
Operating Instructions
Page 3
... To prevent internal heat buildup, do not expose the screen to a warm location, or if the room temperature changes suddenly, the picture may be using the LCD Projection TV for energy efficiency. For details concerning safety precautions, see... "Important Safeguards" on the cord. registered mark. TruSurround, SRS and the ( )® symbol are trademarks of SRS Labs, Inc. and are not of a reflective material. As an ENERGY STAR® Partner, Sony Corporation has determined that face the screen...
... To prevent internal heat buildup, do not expose the screen to a warm location, or if the room temperature changes suddenly, the picture may be using the LCD Projection TV for energy efficiency. For details concerning safety precautions, see... "Important Safeguards" on the cord. registered mark. TruSurround, SRS and the ( )® symbol are trademarks of SRS Labs, Inc. and are not of a reflective material. As an ENERGY STAR® Partner, Sony Corporation has determined that face the screen...
Operating Instructions
Page 5
.... If a snapping or popping sound from overheating, these may scratch the screen's coating. Object and Liquid Entry Never push objects of LCD Projection TV. If the picture becomes dark after using the LCD Projection TV for the specific model of any kind on the screen surface The screen surface has a special coating to overturn. Consult qualified service personnel. The...
.... If a snapping or popping sound from overheating, these may scratch the screen's coating. Object and Liquid Entry Never push objects of LCD Projection TV. If the picture becomes dark after using the LCD Projection TV for the specific model of any kind on the screen surface The screen surface has a special coating to overturn. Consult qualified service personnel. The...
Operating Instructions
Page 7
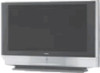
... fingers. About the LCD Projection TV Although the LCD projection TV is a structural property of the LCD Projection TV. For the best picture quality, install your LCD Projection TV against a wall, keep it on the display. Sit at least 10 cm (4 inches) from behind the screen. When the projection lamp wears out after using the LCD projection TV for KF-60WE610 away from your LCD projection TV, and within 60° of the...
... fingers. About the LCD Projection TV Although the LCD projection TV is a structural property of the LCD Projection TV. For the best picture quality, install your LCD Projection TV against a wall, keep it on the display. Sit at least 10 cm (4 inches) from behind the screen. When the projection lamp wears out after using the LCD projection TV for KF-60WE610 away from your LCD projection TV, and within 60° of the...
Operating Instructions
Page 8
... Stick Index 58 Using the Memory Stick Home 60 Viewing Still Images 62 Playing Movies 63 Memory Stick Home Menu Options 65 Using the Menus Overview 68 Using the Video Menu 69 Using the Audio Menu 72 Using the Screen Menu 74 Using the Channel Menu 76 Using the... Parent Menu 78 Using the Setup Menu 82 Other Information Programming the Remote Control 86 Operating Other Components with Your LCD Projection TV Remote Control 88 Notes on Using Memory Stick, Memory Stick PRO Media 90 Notes on Using Memory Stick Duo 91 Contacting Sony...
... Stick Index 58 Using the Memory Stick Home 60 Viewing Still Images 62 Playing Movies 63 Memory Stick Home Menu Options 65 Using the Menus Overview 68 Using the Video Menu 69 Using the Audio Menu 72 Using the Screen Menu 74 Using the Channel Menu 76 Using the... Parent Menu 78 Using the Setup Menu 82 Other Information Programming the Remote Control 86 Operating Other Components with Your LCD Projection TV Remote Control 88 Notes on Using Memory Stick, Memory Stick PRO Media 90 Notes on Using Memory Stick Duo 91 Contacting Sony...
Operating Instructions
Page 9
...different sources (1080i, 720p, 480p or 480i) simultaneously. ❑ Memory Stick® Picture Viewer: Allows you to view on your LCD Projection TV screen digital images that are stored on one picture and listen to the program in on Memory Stick media. ❑ Parental Control: V-...digital connection (HDCP*) to other devices (such as digital set-top boxes) that you for purchasing the Sony LCD Projection TV. This manual is not intended for models KF-42WE610, KF-50WE610 and KF-60WE610. You can connect a DTV (digital television) receiver to zoom in the selected window. The DVI-HDTV...
...different sources (1080i, 720p, 480p or 480i) simultaneously. ❑ Memory Stick® Picture Viewer: Allows you to view on your LCD Projection TV screen digital images that are stored on one picture and listen to the program in on Memory Stick media. ❑ Parental Control: V-...digital connection (HDCP*) to other devices (such as digital set-top boxes) that you for purchasing the Sony LCD Projection TV. This manual is not intended for models KF-42WE610, KF-50WE610 and KF-60WE610. You can connect a DTV (digital television) receiver to zoom in the selected window. The DVI-HDTV...
Operating Instructions
Page 10
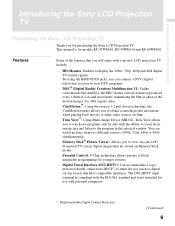
... and to connect the antenna and cable. 2 Using the Features This section shows you to connect your LCD projection TV settings. It shows you how to install your LCD projection TV, to select the wide screen mode automatically. Introducing the Sony LCD Projection TV ❑ Component Video Inputs: Offers the best video quality for DVD (480p, 480i) and Digital Set-top...
... and to connect the antenna and cable. 2 Using the Features This section shows you to connect your LCD projection TV settings. It shows you how to install your LCD projection TV, to select the wide screen mode automatically. Introducing the Sony LCD Projection TV ❑ Component Video Inputs: Offers the best video quality for DVD (480p, 480i) and Digital Set-top...
Operating Instructions
Page 11
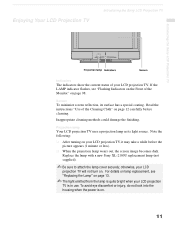
Enjoying Your LCD Projection TV Introducing the Sony LCD Projection TV Introducing the Sony LCD Projection TV Projection lamp Indicators Screen Indicators The indicators show the current status of the Cleaning Cloth" on page 12 carefully before the picture appears (1 minute or less). ❑ When the projection lamp wears out, the screen image becomes dark. Replace the lamp with a new Sony XL-2100U replacement lamp (not supplied...
Enjoying Your LCD Projection TV Introducing the Sony LCD Projection TV Introducing the Sony LCD Projection TV Projection lamp Indicators Screen Indicators The indicators show the current status of the Cleaning Cloth" on page 12 carefully before the picture appears (1 minute or less). ❑ When the projection lamp wears out, the screen image becomes dark. Replace the lamp with a new Sony XL-2100U replacement lamp (not supplied...
Operating Instructions
Page 12
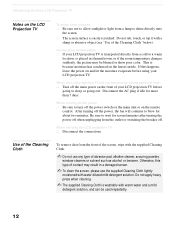
...the front of your LCD projection TV before using your LCD projection TV is easily scratched. Disconnect the AC plug if idle for more than 7 days. When carrying the LCD projection TV ❑ Disconnect the connections. Use of the Cleaning Cloth To remove dust from the front of the screen, wipe with a ... this happens, leave the power on and let the moisture evaporate before going out. After turning off . Introducing the Sony LCD Projection TV Notes on the LCD Projection TV To enjoy clear pictures ❑ Be sure not to allow sunlight or light from a lamp to blow for about two ...
...the front of your LCD projection TV before using your LCD projection TV is easily scratched. Disconnect the AC plug if idle for more than 7 days. When carrying the LCD projection TV ❑ Disconnect the connections. Use of the Cleaning Cloth To remove dust from the front of the screen, wipe with a ... this happens, leave the power on and let the moisture evaporate before going out. After turning off . Introducing the Sony LCD Projection TV Notes on the LCD Projection TV To enjoy clear pictures ❑ Be sure not to allow sunlight or light from a lamp to blow for about two ...
Operating Instructions
Page 13
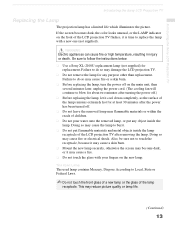
... Also, be sure not to do so may reduce picture quality or lamp life. (Continued) 13 Introducing the Sony LCD Projection TV Introducing the Sony LCD Projection TV Replacing the Lamp The projection lamp has a limited life which illuminates the picture. WARNING Electric appliances can cause fire or high temperature, resulting in...lamp. Failure to touch the receptacle, because it may cause a skin burn. ❑ Mount the new lamp securely, otherwise the screen may become dark, or it cool down completely, as the surface of the lamp receptacle. The Used Lamp The used lamp contains Mercury...
... Also, be sure not to do so may reduce picture quality or lamp life. (Continued) 13 Introducing the Sony LCD Projection TV Introducing the Sony LCD Projection TV Replacing the Lamp The projection lamp has a limited life which illuminates the picture. WARNING Electric appliances can cause fire or high temperature, resulting in...lamp. Failure to touch the receptacle, because it may cause a skin burn. ❑ Mount the new lamp securely, otherwise the screen may become dark, or it cool down completely, as the surface of the lamp receptacle. The Used Lamp The used lamp contains Mercury...
Operating Instructions
Page 37
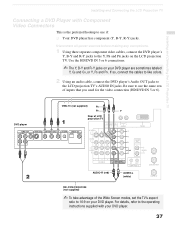
... connections. ✍ The Y, B-Y and R-Y jacks on your DVD player. DVD player VMC-10 (not supplied) PB PR Y Rear of LCD projection TV AUDIO-R (red) AUDIO-L (white) RK-C310/C320/C330 (not supplied) ✍ To take advantage of inputs that you used ...LCD Projection TV Installing and Connecting the LCD Projection TV Connecting a DVD Player with your DVD player. 37 Be sure to 16:9 on the LCD projection TV. For details, refer to the operating instructions supplied with Component Video Connectors This is the preferred hookup to use the same row of the Wide Screen modes, set the TV...
... connections. ✍ The Y, B-Y and R-Y jacks on your DVD player. DVD player VMC-10 (not supplied) PB PR Y Rear of LCD projection TV AUDIO-R (red) AUDIO-L (white) RK-C310/C320/C330 (not supplied) ✍ To take advantage of inputs that you used ...LCD Projection TV Installing and Connecting the LCD Projection TV Connecting a DVD Player with your DVD player. 37 Be sure to 16:9 on the LCD projection TV. For details, refer to the operating instructions supplied with Component Video Connectors This is the preferred hookup to use the same row of the Wide Screen modes, set the TV...
Operating Instructions
Page 38
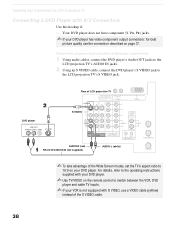
Rear of LCD projection TV DVD player S VIDEO AUDIO-R (red) RK-C310/C320/C330 (not supplied) AUDIO-L (white) ✍ To take advantage of the Wide Screen modes, set the TV's aspect ratio to 16:9 on your DVD player has video component output connectors: for best picture quality use a VIDEO cable (yellow) instead of the S VIDEO ...
Rear of LCD projection TV DVD player S VIDEO AUDIO-R (red) RK-C310/C320/C330 (not supplied) AUDIO-L (white) ✍ To take advantage of the Wide Screen modes, set the TV's aspect ratio to 16:9 on your DVD player has video component output connectors: for best picture quality use a VIDEO cable (yellow) instead of the S VIDEO ...
Operating Instructions
Page 43
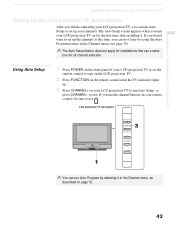
.... Installing and Connecting the LCD Projection TV Installing and Connecting the LCD Projection TV Setting Up the LCD projection TV Automatically After you finish connecting your LCD projection TV, you can run Auto Setup to set up the channels at this time, you can run Auto Setup, or press CHANNEL- The Auto Setup screen appears when you turn on the LCD projection TV. 2 Press FUNCTION on...
.... Installing and Connecting the LCD Projection TV Installing and Connecting the LCD Projection TV Setting Up the LCD projection TV Automatically After you finish connecting your LCD projection TV, you can run Auto Setup to set up the channels at this time, you can run Auto Setup, or press CHANNEL- The Auto Setup screen appears when you turn on the LCD projection TV. 2 Press FUNCTION on...

Operating Instructions
Page 44
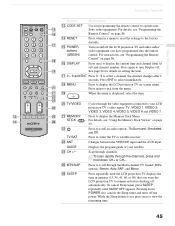
... Zoom. For details, see "Selecting Video Options" on page 54. Press repeatedly to mute the sound. For details, see "Using Wide Screen Mode" on page 69. Button Descriptions VCR/ MUTING DVD SAT/ CABLE POWER MODE PICTURE WIDE DISPLAY JUMP FAVORITES ENT MENU VCR/DVD SAT/ CABLE... Using the Remote Control The following table describes the buttons on the remote control that you want to operate. Freezes the window picture. The LCD projection TV alternates between two channels. For details, see "Using Favorite Channels" on page 50. Also available in the Video menu. qa FREEZE qs...
... Zoom. For details, see "Selecting Video Options" on page 54. Press repeatedly to mute the sound. For details, see "Using Wide Screen Mode" on page 69. Button Descriptions VCR/ MUTING DVD SAT/ CABLE POWER MODE PICTURE WIDE DISPLAY JUMP FAVORITES ENT MENU VCR/DVD SAT/ CABLE... Using the Remote Control The following table describes the buttons on the remote control that you want to operate. Freezes the window picture. The LCD projection TV alternates between two channels. For details, see "Using Favorite Channels" on page 50. Also available in the Video menu. qa FREEZE qs...
Operating Instructions
Page 45
...the remote control to your satellite. qk MENU Press to exit from the menu. Press again to display the LCD projection TV on-screen menu. TV/VIDEO wa MEMORY STICK ws TV/SAT wd ANT GUIDE wf CH +/- Scan through the video equipment connected to operate nonSony video equipment. While ...(15, 30, 45, 60, or 90) that you have programmed into the remote control. qh DISPLAY Press once to display the current time and channel label (if set , press once to turn Display off the power. Displays the program guide of your LCD projection TV's video inputs: TV, VIDEO 1, VIDEO 2, VIDEO...
...the remote control to your satellite. qk MENU Press to exit from the menu. Press again to display the LCD projection TV on-screen menu. TV/VIDEO wa MEMORY STICK ws TV/SAT wd ANT GUIDE wf CH +/- Scan through the video equipment connected to operate nonSony video equipment. While ...(15, 30, 45, 60, or 90) that you have programmed into the remote control. qh DISPLAY Press once to display the current time and channel label (if set , press once to turn Display off the power. Displays the program guide of your LCD projection TV's video inputs: TV, VIDEO 1, VIDEO 2, VIDEO...
Operating Instructions
Page 46
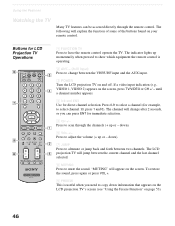
... the VHF/UHF input and the AUX input. 3 POWER Turn the LCD projection TV on the screen. The LCD projection TV will change between two channels. down ). 7 JUMP Press to adjust the volume (+ up or - Using the Features Watching the TV Many TV features can press ENT for LCD Projection TV Operations VCR/ MUTING DVD SAT/ CABLE POWER MODE PICTURE WIDE DISPLAY...
... the VHF/UHF input and the AUX input. 3 POWER Turn the LCD projection TV on the screen. The LCD projection TV will change between two channels. down ). 7 JUMP Press to adjust the volume (+ up or - Using the Features Watching the TV Many TV features can press ENT for LCD Projection TV Operations VCR/ MUTING DVD SAT/ CABLE POWER MODE PICTURE WIDE DISPLAY...
Operating Instructions
Page 50
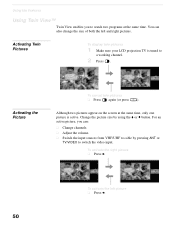
... pressing ANT or TV/VIDEO to a working channel. 2 Press . For an active picture, you to watch two programs at the same time, only one picture is tuned to switch the video input. To activate the left and right pictures. Although two pictures appear on the screen at the same ...time. To activate the right picture ❑ Press b. Activating Twin Pictures To display twin pictures 1 Make sure your LCD projection TV is active. Using the Features Using Twin View™ Twin View enables you ...
... pressing ANT or TV/VIDEO to a working channel. 2 Press . For an active picture, you to watch two programs at the same time, only one picture is tuned to switch the video input. To activate the left and right pictures. Although two pictures appear on the screen at the same ...time. To activate the right picture ❑ Press b. Activating Twin Pictures To display twin pictures 1 Make sure your LCD projection TV is active. Using the Features Using Twin View™ Twin View enables you ...

Operating Instructions
Page 52
To enlarge the left picture (reduce the right) 1 Press B to activate the left and right pictures. The next time you adjust the twin screen sizes, the LCD projection TV memorizes the change the size of the left picture (if not already activated). 2 Press V to enlarge the picture and v to reduce the picture. ✍ When ...
To enlarge the left picture (reduce the right) 1 Press B to activate the left and right pictures. The next time you adjust the twin screen sizes, the LCD projection TV memorizes the change the size of the left picture (if not already activated). 2 Press V to enlarge the picture and v to reduce the picture. ✍ When ...
Operating Instructions
Page 68
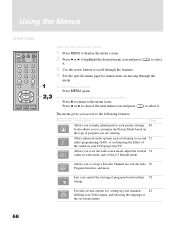
... on their 78 ratings. Offers enhanced audio options such as listening to set the wide screen mode, adjust the vertical 74 center in wide mode, and set up your channels, 82 labeling your LCD projection TV. to select 3 Use the arrow button to highlight the desired menu icon and press ...it . To end one menu session and move to another ❑ Press V to return to select it . Allows you control the viewing of the sound on -screen menus. 68 Using...
... on their 78 ratings. Offers enhanced audio options such as listening to set the wide screen mode, adjust the vertical 74 center in wide mode, and set up your channels, 82 labeling your LCD projection TV. to select 3 Use the arrow button to highlight the desired menu icon and press ...it . To end one menu session and move to another ❑ Press V to return to select it . Allows you control the viewing of the sound on -screen menus. 68 Using...
Operating Instructions
Page 72
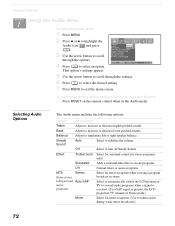
.... (If no SAP signal is present, the LCD projection TV remains in the Audio menu. Select to automatically switch the LCD projection TV to reduce noise during weak stereo broadcasts.) 72 Selecting Audio Options The Audio menu includes the following options: Option Description Treble Adjust to exit the menu screen. Using the Menus Using the Audio Menu...
.... (If no SAP signal is present, the LCD projection TV remains in the Audio menu. Select to automatically switch the LCD projection TV to reduce noise during weak stereo broadcasts.) 72 Selecting Audio Options The Audio menu includes the following options: Option Description Treble Adjust to exit the menu screen. Using the Menus Using the Audio Menu...
Operating Instructions
Page 75
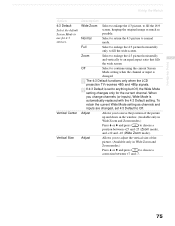
...current Wide Mode setting as possible. Vertical Center Vertical Size Description Wide Zoom Select to enlarge the 4:3 picture, to fill the 16:9 screen, keeping the original image as much as channels and inputs are changed . Normal Select to return the 4:3 picture to an equal aspect ... Zoom and Zoom modes.) Press V or v and press to choose a position between +7 and -7. 75 z The 4:3 Default functions only when the LCD projection TV receives 480i and 480p signals. Adjust Allows you to adjust the vertical size of the picture up and down in the window. (Available only in...
...current Wide Mode setting as possible. Vertical Center Vertical Size Description Wide Zoom Select to enlarge the 4:3 picture, to fill the 16:9 screen, keeping the original image as much as channels and inputs are changed . Normal Select to return the 4:3 picture to an equal aspect ... Zoom and Zoom modes.) Press V or v and press to choose a position between +7 and -7. 75 z The 4:3 Default functions only when the LCD projection TV receives 480i and 480p signals. Adjust Allows you to adjust the vertical size of the picture up and down in the window. (Available only in...


