Operating Instructions
Page 3
... a Stunning HD Experience 5 TV Feature Highlights 5 Getting Started Setting Up Your TV 7 Attaching the Table-Top Stand 8 Adjusting the viewing angle of the TV. . . . . . 10 Locating Inputs and Outputs 11 Connecting the TV 13 Connecting Other Equipment 17 When Installing the TV Against a Wall or Enclosed ... Notices 81 Specifications 82 Index 84 On-line Registration United States http://productregistration.sony.com Canada http://www.sony.ca/registration 3 Widgets 46 Using the Menus Navigating through TV Menus 48 Using the Picture Settings 50 Using the Sound Settings 52 Using ...
... a Stunning HD Experience 5 TV Feature Highlights 5 Getting Started Setting Up Your TV 7 Attaching the Table-Top Stand 8 Adjusting the viewing angle of the TV. . . . . . 10 Locating Inputs and Outputs 11 Connecting the TV 13 Connecting Other Equipment 17 When Installing the TV Against a Wall or Enclosed ... Notices 81 Specifications 82 Index 84 On-line Registration United States http://productregistration.sony.com Canada http://www.sony.ca/registration 3 Widgets 46 Using the Menus Navigating through TV Menus 48 Using the Picture Settings 50 Using the Sound Settings 52 Using ...
Operating Instructions
Page 7
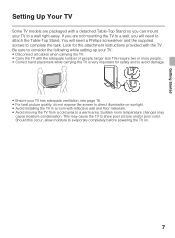
... provided with the adequate number of people; Sudden room temperature changes may cause the TV to attach the Table-Top Stand. Getting Started Getting Started Setting Up Your TV Some TV models are not mounting the TV to a wall, you will need to show poor picture and/or poor color....do not expose the screen to direct illumination or sunlight. • Avoid installing the TV in a room with a detached Table-Top Stand so you are packaged with reflective wall and floor materials. • Avoid moving the TV from a cold area to a wall right away. This may cause moisture condensation....
... provided with the adequate number of people; Sudden room temperature changes may cause the TV to attach the Table-Top Stand. Getting Started Getting Started Setting Up Your TV Some TV models are not mounting the TV to a wall, you will need to show poor picture and/or poor color....do not expose the screen to direct illumination or sunlight. • Avoid installing the TV in a room with a detached Table-Top Stand so you are packaged with reflective wall and floor materials. • Avoid moving the TV from a cold area to a wall right away. This may cause moisture condensation....
Operating Instructions
Page 8
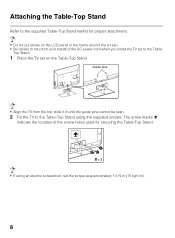
... the top, slide it in until the guide pins cannot be seen. 2 Fix the TV to the Table-Top Stand using an electric screwdriver, set the torque at approximately 1.5 N·m {15 kgf·cm}. 8 The arrow marks indicate the location of the screw holes used ... or the frame around the screen. • Be careful to not pinch your hands or the AC power cord when you install the TV set on the Table-Top Stand. Attaching the Table-Top Stand Refer to the supplied Table-Top Stand leaflet for securing the Table-Top Stand. • If using the supplied screws.
... the top, slide it in until the guide pins cannot be seen. 2 Fix the TV to the Table-Top Stand using an electric screwdriver, set the torque at approximately 1.5 N·m {15 kgf·cm}. 8 The arrow marks indicate the location of the screw holes used ... or the frame around the screen. • Be careful to not pinch your hands or the AC power cord when you install the TV set on the Table-Top Stand. Attaching the Table-Top Stand Refer to the supplied Table-Top Stand leaflet for securing the Table-Top Stand. • If using the supplied screws.
Operating Instructions
Page 9
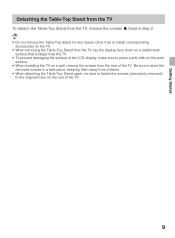
... face down on a stable work surface that is larger than the TV. • To prevent damaging the surface of the LCD display, make sure to install corresponding accessories on the TV. • When removing the Table-Top Stand from the rear of the TV. 9 Be sure to store the removed screws in step 2. &#...8226; Do not remove the Table-Top Stand for any reason other than to place a soft cloth on the...
... face down on a stable work surface that is larger than the TV. • To prevent damaging the surface of the LCD display, make sure to install corresponding accessories on the TV. • When removing the Table-Top Stand from the rear of the TV. 9 Be sure to store the removed screws in step 2. &#...8226; Do not remove the Table-Top Stand for any reason other than to place a soft cloth on the...
Operating Instructions
Page 10
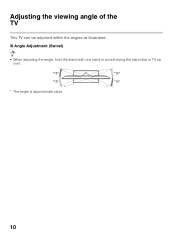
Adjusting the viewing angle of the TV This TV can be adjusted within the angles as illustrated. x Angle Adjustment (Swivel) • When adjusting the angle, hold the stand with one hand to avoid having the stand slip or TV tip over. *15° *15° *15° *15° * The angle is approximate value. 10
Adjusting the viewing angle of the TV This TV can be adjusted within the angles as illustrated. x Angle Adjustment (Swivel) • When adjusting the angle, hold the stand with one hand to avoid having the stand slip or TV tip over. *15° *15° *15° *15° * The angle is approximate value. 10

Operating Instructions
Page 18
... least this much space around the set. Installed with stand 4 inches (10 cm) 11 7/8 inches (30 cm) 4 inches (10 cm) 2 3/8 inches (6 cm) Leave at least this much space around the TV as follows: Air circulation is blocked. Installed on the wall 4 inches (10 cm) 11 7/8 inches (30 cm) ... . Wall Wall • Inadequate ventilation can lead to overheating of the TV and may cause TV damage or cause a fire. 18 When Installing the TV Against a Wall or Enclosed Area Make sure that your TV has adequate ventilation. Air circulation is blocked. Allow enough space around the ...
... least this much space around the set. Installed with stand 4 inches (10 cm) 11 7/8 inches (30 cm) 4 inches (10 cm) 2 3/8 inches (6 cm) Leave at least this much space around the TV as follows: Air circulation is blocked. Installed on the wall 4 inches (10 cm) 11 7/8 inches (30 cm) ... . Wall Wall • Inadequate ventilation can lead to overheating of the TV and may cause TV damage or cause a fire. 18 When Installing the TV Against a Wall or Enclosed Area Make sure that your TV has adequate ventilation. Air circulation is blocked. Allow enough space around the ...
Operating Instructions
Page 19
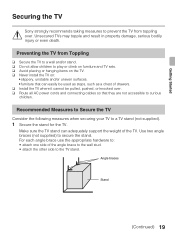
... the following measures when securing your TV to secure the stand. Use two angle braces (not supplied) to a TV stand (not supplied). 1 Secure the stand for the TV. Getting Started Securing the TV Sony strongly recommends taking measures to prevent the TV from Toppling ❑ Secure the TV to a wall and/or stand. ❑ Do not allow children to play or...
... the following measures when securing your TV to secure the stand. Use two angle braces (not supplied) to a TV stand (not supplied). 1 Secure the stand for the TV. Getting Started Securing the TV Sony strongly recommends taking measures to prevent the TV from Toppling ❑ Secure the TV to a wall and/or stand. ❑ Do not allow children to play or...
Operating Instructions
Page 20
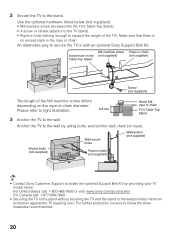
... States call: 1-800-488-7669 or visit: www.sony.com/accessories For Canada call: 1-877-899-7669 • Securing the TV to the stand without securing the TV and the stand to the stand. Make sure that there is with an optional Sony Support Belt Kit. Please refer to right illustration. ...6-8 mm Screw M4 rope or chain TV's Table-Top Stand 3 Anchor the TV to support the weight of ...
... States call: 1-800-488-7669 or visit: www.sony.com/accessories For Canada call: 1-877-899-7669 • Securing the TV to the stand without securing the TV and the stand to the stand. Make sure that there is with an optional Sony Support Belt Kit. Please refer to right illustration. ...6-8 mm Screw M4 rope or chain TV's Table-Top Stand 3 Anchor the TV to support the weight of ...
Operating Instructions
Page 68
...when attaching the mounting hooks to attach the Table-Top Stand. Use of screws other than those supplied may require removing the Table-Top Stand; For product protection and safety reasons, Sony strongly recommends that they are ready to the TV set • Be sure to store the unused ...screws and Table-Top Stand in installing this TV, especially to determine the strength of the box...
...when attaching the mounting hooks to attach the Table-Top Stand. Use of screws other than those supplied may require removing the Table-Top Stand; For product protection and safety reasons, Sony strongly recommends that they are ready to the TV set • Be sure to store the unused ...screws and Table-Top Stand in installing this TV, especially to determine the strength of the box...
Operating Instructions
Page 71
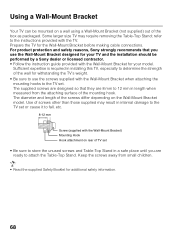
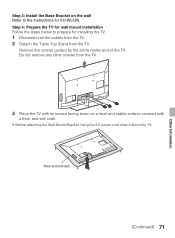
...screws guided by the arrow marks and of the TV. Thick and soft cloth (Continued) 71 Other Information Step 3: Install the Base Bracket on a level and stable surface covered with its screen facing down behind the TV. Step 4: Prepare the TV for wall mount installation Follow the steps below ...to the Instructions for installing the TV. 1 Disconnect all the cables from the TV. 2 Detach the Table-Top Stand from the TV. Do not remove any other screws from the TV. 3 Place the TV with a thick and soft cloth. • Before attaching the Wall-Mount...
...screws guided by the arrow marks and of the TV. Thick and soft cloth (Continued) 71 Other Information Step 3: Install the Base Bracket on a level and stable surface covered with its screen facing down behind the TV. Step 4: Prepare the TV for wall mount installation Follow the steps below ...to the Instructions for installing the TV. 1 Disconnect all the cables from the TV. 2 Detach the Table-Top Stand from the TV. Do not remove any other screws from the TV. 3 Place the TV with a thick and soft cloth. • Before attaching the Wall-Mount...

Operating Instructions
Page 73
Other Information 73 Wall TV 5 Adjust the angle of the front panel too tight. • Remove the screws or install the Mounting Hook on the TV. Step 5: Install the TV on the wall Refer to the Instructions for SU-WL500. ~ • When you put the TV back on the Table-Top Stand, reverse the above steps. • When moving the TV, do not squeeze the bottom of the Mounting Hook. Screw location When installing the Mounting Hooks on a stable and level surface. Refer to the Instructions for SU-WL500. Hook location When installing the TV onto Base Bracket.
Other Information 73 Wall TV 5 Adjust the angle of the front panel too tight. • Remove the screws or install the Mounting Hook on the TV. Step 5: Install the TV on the wall Refer to the Instructions for SU-WL500. ~ • When you put the TV back on the Table-Top Stand, reverse the above steps. • When moving the TV, do not squeeze the bottom of the Mounting Hook. Screw location When installing the Mounting Hooks on a stable and level surface. Refer to the Instructions for SU-WL500. Hook location When installing the TV onto Base Bracket.
Quick Setup Guide
Page 1
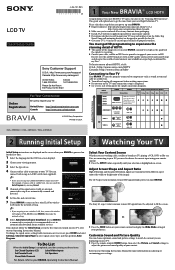
...your BRAVIA is connected to upgrade your content. To learn more information on the Table-Top Stand. Customize Sound and Picture Quality You can cancel the Auto Program by selecting Cancel. 5 Channels of this TV. To Do List When the Initial Setup is receiving. ■ Contact your cable, ... powered on for the first time. 1 Select the language for more about HDTV, visit: U.S.A.: http://www.sony.com/HDTV Canada: http://www.sony.ca/hdtv Connecting to Your TV Your BRAVIA TV must be adjusted to fill the screen. ■ Press the WIDE button on your BRAVIA can connect both ...
...your BRAVIA is connected to upgrade your content. To learn more information on the Table-Top Stand. Customize Sound and Picture Quality You can cancel the Auto Program by selecting Cancel. 5 Channels of this TV. To Do List When the Initial Setup is receiving. ■ Contact your cable, ... powered on for the first time. 1 Select the language for more about HDTV, visit: U.S.A.: http://www.sony.com/HDTV Canada: http://www.sony.ca/hdtv Connecting to Your TV Your BRAVIA TV must be adjusted to fill the screen. ■ Press the WIDE button on your BRAVIA can connect both ...
Marketing Specifications
Page 2
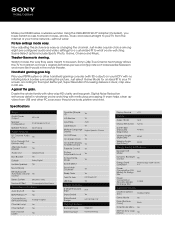
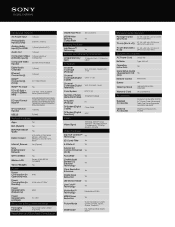
Sony's 24p True Cinema technology allows the TV to the input. Dazzle the whole family with no irritating black...Sleep Timer Yes Twin Picture PAP(Fixed), PIP USB Play Yes Design Features 6 degree Upward Style N/A Stand Swivel Yes Stand Swivel Range Left 15°/Right 15° Display Features Backlight Type Edge LED Dimming Type Frame ...Closed Captions (CC) Analog, Digital Demo Mode Yes Finish (Surface Color) Black Hotel Mode Menu Yes Start Up Sony Logo Display Yes Better yet, Super Resolution Processing delivers a clear, crisp view in the movie theater. Using the ...
Sony's 24p True Cinema technology allows the TV to the input. Dazzle the whole family with no irritating black...Sleep Timer Yes Twin Picture PAP(Fixed), PIP USB Play Yes Design Features 6 degree Upward Style N/A Stand Swivel Yes Stand Swivel Range Left 15°/Right 15° Display Features Backlight Type Edge LED Dimming Type Frame ...Closed Captions (CC) Analog, Digital Demo Mode Yes Finish (Surface Color) Black Hotel Mode Menu Yes Start Up Sony Logo Display Yes Better yet, Super Resolution Processing delivers a clear, crisp view in the movie theater. Using the ...
Marketing Specifications
Page 3
... Full, Normal, Wide Zoom, Zoom Measurements (Approx.) Package Carton (W x H x D) 42 7/8 x 26 5/8 x 6 inch (1088 x 674 x 150 mm) TV only (W x H x D) 37 1/8 x 22 3/4 x 2 3/8 inch (941 x 575 x 60 mm) TV with Stand (W x 37 1/8 x 24 1/8 x 9 1/8 inch H x D) (941 x 612 x 231 mm) Supplied Accessories AC Power Cord attached Batteries Type AAA x2 Operating...; Internet Video Yes DLNA Content JPG, MP3, LPCM, WMA, MPEG1, MPEG2PS, MPEG2TS, AVCHD, MP4, WMV Internet_Browser Yes (Opera) Sony Entertainment Yes Network Wi-Fi Certified Yes Wireless LAN Ready (UWA-BR100 included) Yahoo!
... Full, Normal, Wide Zoom, Zoom Measurements (Approx.) Package Carton (W x H x D) 42 7/8 x 26 5/8 x 6 inch (1088 x 674 x 150 mm) TV only (W x H x D) 37 1/8 x 22 3/4 x 2 3/8 inch (941 x 575 x 60 mm) TV with Stand (W x 37 1/8 x 24 1/8 x 9 1/8 inch H x D) (941 x 612 x 231 mm) Supplied Accessories AC Power Cord attached Batteries Type AAA x2 Operating...; Internet Video Yes DLNA Content JPG, MP3, LPCM, WMA, MPEG1, MPEG2PS, MPEG2TS, AVCHD, MP4, WMV Internet_Browser Yes (Opera) Sony Entertainment Yes Network Wi-Fi Certified Yes Wireless LAN Ready (UWA-BR100 included) Yahoo!


