Operating Instructions
Page 3
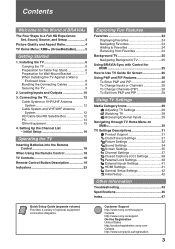
...TV Settings 29 Watching TV 29 Accessing External Inputs 29 Navigating through TV Home Menu on XMB 30 TV Settings Descriptions 31 Product Support 31 Clock/Timers Settings 31 Picture Settings 32 Sound Settings 34 Screen Settings 35 Channel Settings 37...Initial Setup 16 Operating the TV Inserting Batteries into the Remote Control 18 When Using the Remote Control 18 TV Controls 18 Remote Control ...a Full HD Experience: Set, Sound, Source, and Setup 4 Picture Quality and Aspect Ratio 4 TV Home Menu: XMB™ (XrossMediaBar)..........5 Getting Started 1. Contents Welcome ...
...TV Settings 29 Watching TV 29 Accessing External Inputs 29 Navigating through TV Home Menu on XMB 30 TV Settings Descriptions 31 Product Support 31 Clock/Timers Settings 31 Picture Settings 32 Sound Settings 34 Screen Settings 35 Channel Settings 37...Initial Setup 16 Operating the TV Inserting Batteries into the Remote Control 18 When Using the Remote Control 18 TV Controls 18 Remote Control ...a Full HD Experience: Set, Sound, Source, and Setup 4 Picture Quality and Aspect Ratio 4 TV Home Menu: XMB™ (XrossMediaBar)..........5 Getting Started 1. Contents Welcome ...

Operating Instructions
Page 4
... to the World of BRAVIA® Thank you for information on upgrading to HD programming. To experience the stunning detail of your BRAVIA TV is displayed on the sides. To learn more about HDTV, visit: U.S.A. When you compare a high-definition signal to connect other HD... compatible external equipment Contact your cable or satellite provider for purchasing this Sony BRAVIA® high-definition television. The picture quality may not be as sharp as the quality of HD programming and proper setup connections. The 16:9 fills ...
... to the World of BRAVIA® Thank you for information on upgrading to HD programming. To experience the stunning detail of your BRAVIA TV is displayed on the sides. To learn more about HDTV, visit: U.S.A. When you compare a high-definition signal to connect other HD... compatible external equipment Contact your cable or satellite provider for purchasing this Sony BRAVIA® high-definition television. The picture quality may not be as sharp as the quality of HD programming and proper setup connections. The 16:9 fills ...
Operating Instructions
Page 5
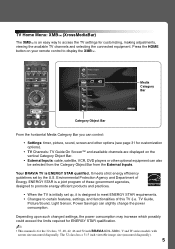
... designed to meet ENERGY STAR requirements. • Changes to display the XMB™. TV Home Menu: XMB™ (XrossMediaBar) The XMB™ is an easy way to access the TV settings for the 32 class, 37, 40, 42, 46 and 52 inch BRAVIA KDL-XBR6, V and W series .... ~ • This manual is for customizing, making adjustments, viewing the available TV channels and selecting the connected equipment. It meets strict energy efficiency guidelines set up, it is ENERGY STAR qualified. TV Guide, Picture/Sound, Light Sensor, Power Savings) can also be selected from the Category Object ...
... designed to meet ENERGY STAR requirements. • Changes to display the XMB™. TV Home Menu: XMB™ (XrossMediaBar) The XMB™ is an easy way to access the TV settings for the 32 class, 37, 40, 42, 46 and 52 inch BRAVIA KDL-XBR6, V and W series .... ~ • This manual is for customizing, making adjustments, viewing the available TV channels and selecting the connected equipment. It meets strict energy efficiency guidelines set up, it is ENERGY STAR qualified. TV Guide, Picture/Sound, Light Sensor, Power Savings) can also be selected from the Category Object ...
Operating Instructions
Page 8
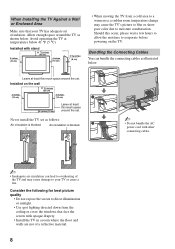
...lead to overheating of a reflective material. 8 Air circulation is blocked. Should this much space around the TV as illustrated below 41 °F (5 °C). Consider the following for best picture quality • Do not expose the screen to direct illumination or sunlight. • Use spot lighting ...hours to allow the moisture to moisture condensation. Installed on the TV. Installed with opaque drapery. • Install the TV in a room where the floor and walls are not of the TV and may cause the TV's picture to blur or show poor color due to evaporate before powering ...
...lead to overheating of a reflective material. 8 Air circulation is blocked. Should this much space around the TV as illustrated below 41 °F (5 °C). Consider the following for best picture quality • Do not expose the screen to direct illumination or sunlight. • Use spot lighting ...hours to allow the moisture to moisture condensation. Installed on the TV. Installed with opaque drapery. • Install the TV in a room where the floor and walls are not of the TV and may cause the TV's picture to blur or show poor color due to evaporate before powering ...
Operating Instructions
Page 11
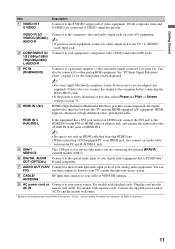
... be connected to a personal computer's video and audio output connector (see page 14). Can also be necessary to use these outputs to listen to your TV's audio through your stereo system. 8 CABLE/ ANTENNA RF input that is PCM/Dolby* OUT (OPTICAL) Digital compatible. 7 AUDIO OUT (VAR/ Connects ...the computer before connecting the HD15-HD15 cable. • If the picture is for the signals that bears the HDMI logo. • When connecting a DVI-equipped PC to an HDMI jack, also connect an Audio cable between this TV and any HDMI-equipped A/V equipment. HDMI supports enhanced, or high-...
... be connected to a personal computer's video and audio output connector (see page 14). Can also be necessary to use these outputs to listen to your TV's audio through your stereo system. 8 CABLE/ ANTENNA RF input that is PCM/Dolby* OUT (OPTICAL) Digital compatible. 7 AUDIO OUT (VAR/ Connects ...the computer before connecting the HD15-HD15 cable. • If the picture is for the signals that bears the HDMI logo. • When connecting a DVI-equipped PC to an HDMI jack, also connect an Audio cable between this TV and any HDMI-equipped A/V equipment. HDMI supports enhanced, or high-...
Operating Instructions
Page 12
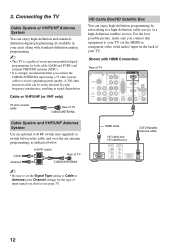
...optional A-B RF switch (not supplied) to a high-definition cable service or a high-definition satellite service. Shown with HDMI Connection Rear of TV CABLE/ANTENNA HD Cable Box/HD Satellite Box You can enjoy high-definition programming by radio frequency interference, resulting in signal degradation. Cable Antenna ... (QAM and 8VSB) and external VHF/UHF antenna (ATSC). • It is strongly recommended that you choose (see page 37). For the best possible picture, make sure you connect this equipment to Cable or Antenna in your area) along with audio) input on the back of ...
...optional A-B RF switch (not supplied) to a high-definition cable service or a high-definition satellite service. Shown with HDMI Connection Rear of TV CABLE/ANTENNA HD Cable Box/HD Satellite Box You can enjoy high-definition programming by radio frequency interference, resulting in signal degradation. Cable Antenna ... (QAM and 8VSB) and external VHF/UHF antenna (ATSC). • It is strongly recommended that you choose (see page 37). For the best possible picture, make sure you connect this equipment to Cable or Antenna in your area) along with audio) input on the back of ...
Operating Instructions
Page 14
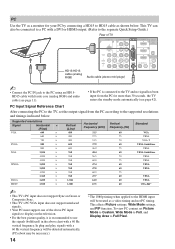
... 1,280 × HDTV 1,920 × Vertical (Line) 480 480 400 600 600 768 768 768 768 768 768 768 1,024 1,080 Horizontal frequency (kHz) 31.5 37.5 31.5 37.9 46.9 48.4 56.5 60.0 47.4 47.8 60.3 47.7 64.0 67.5 Vertical frequency (Hz) 60 75 70 60 75 60 70 75 60 60 75... timings indicated below . In plug and play, signals with a 60 Hz vertical frequency. PC Input Signal Reference Chart After connecting the PC to the TV, set Picture Mode to Custom, Wide Mode to Full, and Display Area to HD15 cable as shown below . To view PC content set the output signal from...
... 1,280 × HDTV 1,920 × Vertical (Line) 480 480 400 600 600 768 768 768 768 768 768 768 1,024 1,080 Horizontal frequency (kHz) 31.5 37.5 31.5 37.9 46.9 48.4 56.5 60.0 47.4 47.8 60.3 47.7 64.0 67.5 Vertical frequency (Hz) 60 75 70 60 75 60 70 75 60 60 75... timings indicated below . In plug and play, signals with a 60 Hz vertical frequency. PC Input Signal Reference Chart After connecting the PC to the TV, set Picture Mode to Custom, Wide Mode to Full, and Display Area to HD15 cable as shown below . To view PC content set the output signal from...
Operating Instructions
Page 19
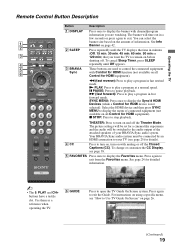
...program in fast forward mode. Press again to display the Sync'd HDMI Devices (while a Control for HDMI device is not selected). Operating the TV Remote Control Button Description Button Description 1 DISPLAY Press once to display the banner with Control for HDMI function (not available on all Control for ...on page 26. (Continued) 19 Select the HDMI device and then press SYNC MENU to exit. The picture settings will be switched to the audio output of the attached speakers of your TV (see page 38. 5 FAVORITES Press once to turn on, turn on the amount of connected equipment ...
...program in fast forward mode. Press again to display the Sync'd HDMI Devices (while a Control for HDMI device is not selected). Operating the TV Remote Control Button Description Button Description 1 DISPLAY Press once to display the banner with Control for HDMI function (not available on all Control for ...on page 26. (Continued) 19 Select the HDMI device and then press SYNC MENU to exit. The picture settings will be switched to the audio output of the attached speakers of your TV (see page 38. 5 FAVORITES Press once to turn on, turn on the amount of connected equipment ...

Operating Instructions
Page 20
See your dealer or www.sony.com/bravia for more information. Press to 0 restore the sound. DMX-NV1...ENT to change channels immediately. 8 qa Use with the current program in a window. Freeze qs Current Frozen program picture Press the V/v/B/b to move focus/highlight. Press 0-9 to mute the sound. qd MUTING Press to select a ... ENT may not be available in the optional BRAVIA external module (e.g. Product Support Clock/Timers Settings Sound Screen qg Channel TV qh 9 DMex Press to toggle through the inputs. ~ • See page 41 on the screen. ~ qh...
See your dealer or www.sony.com/bravia for more information. Press to 0 restore the sound. DMX-NV1...ENT to change channels immediately. 8 qa Use with the current program in a window. Freeze qs Current Frozen program picture Press the V/v/B/b to move focus/highlight. Press 0-9 to mute the sound. qd MUTING Press to select a ... ENT may not be available in the optional BRAVIA external module (e.g. Product Support Clock/Timers Settings Sound Screen qg Channel TV qh 9 DMex Press to toggle through the inputs. ~ • See page 41 on the screen. ~ qh...

Operating Instructions
Page 21
...currently tuned digital program. For details, see Picture settings on current input and content. Press repeatedly to Favorites/ Remove from Favorites See page 24 qk MTS See page 34 Alternate Audio See page 35 ql Digital Rating See page 39 Background TV See page 25 Device Control See page 41... ql PICTURE ~ • The Digital Rating and Alternate Audio options will appear in Options only when digital ratings or alternate ...
...currently tuned digital program. For details, see Picture settings on current input and content. Press repeatedly to Favorites/ Remove from Favorites See page 24 qk MTS See page 34 Alternate Audio See page 35 ql Digital Rating See page 39 Background TV See page 25 Device Control See page 41... ql PICTURE ~ • The Digital Rating and Alternate Audio options will appear in Options only when digital ratings or alternate ...
Operating Instructions
Page 23
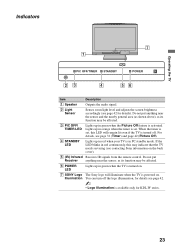
... be affected. 6 POWER LED Lights up in green when the TV is turned on. 7 SONY Logo Illumination The Sony logo will remain lit even if the TV is turned off the logo illumination, for details see page 31 (Timer) and page 42 (Picture Off). 4 STANDBY LED Lights up in red continuously, this LED.... Do not put Receiver anything near the sensor, as its function may indicate that the TV needs servicing (see contacting Sony information on . When the timer is activated. If the LED blinks in green when the Picture Off feature is set . Lights up in orange when the timer is set , this...
... be affected. 6 POWER LED Lights up in green when the TV is turned on. 7 SONY Logo Illumination The Sony logo will remain lit even if the TV is turned off the logo illumination, for details see page 31 (Timer) and page 42 (Picture Off). 4 STANDBY LED Lights up in red continuously, this LED.... Do not put Receiver anything near the sensor, as its function may indicate that the TV needs servicing (see contacting Sony information on . When the timer is activated. If the LED blinks in green when the Picture Off feature is set . Lights up in orange when the timer is set , this...
Operating Instructions
Page 28
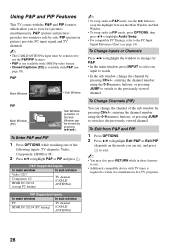
... ANTENNA) PIP Supported Inputs In main window In sub window PC HDMI IN 1/2/3/4 (PC timing) TV channel (CABLE/ ANTENNA) ~ • To swap audio in picture) provides PC input signal and TV channels. ~ • The CABLE/ANTENNA input must be moved by pressing CH+/-; To Change Channels...these features to exit. • Additional compatible device with TV tuner is available with P&P (see page 14). To Change Inputs or Channels Press B/b to highlight the window to change the channel by side. P&P (picture and picture) provides two windows side by : pressing CH+/-; or pressing...
... ANTENNA) PIP Supported Inputs In main window In sub window PC HDMI IN 1/2/3/4 (PC timing) TV channel (CABLE/ ANTENNA) ~ • To swap audio in picture) provides PC input signal and TV channels. ~ • The CABLE/ANTENNA input must be moved by pressing CH+/-; To Change Channels...these features to exit. • Additional compatible device with TV tuner is available with P&P (see page 14). To Change Inputs or Channels Press B/b to highlight the window to change the channel by side. P&P (picture and picture) provides two windows side by : pressing CH+/-; or pressing...
Operating Instructions
Page 30
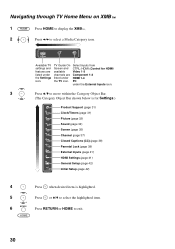
... Menu on XMB™ 1 Press HOME to display the XMB™. 2 Press B/b to exit. 30 TV Guide On Screen and available channels are listed under the TV icon. Settings Available TV settings and features are listed under the Settings icon. Select inputs from CTRL: HDMI (Control for HDMI) Video ...Bar. (The Category Object Bar shown below is for Settings.) Product Support (page 31) Clock/Timers (page 31) Picture (page 32) Sound (page 34) Screen (page 35) Channel (page 37) CC Closed Captions (CC) (page 38) Parental Lock (page 38) External Inputs (page 41) HDMI Settings (...
... Menu on XMB™ 1 Press HOME to display the XMB™. 2 Press B/b to exit. 30 TV Guide On Screen and available channels are listed under the TV icon. Settings Available TV settings and features are listed under the Settings icon. Select inputs from CTRL: HDMI (Control for HDMI) Video ...Bar. (The Category Object Bar shown below is for Settings.) Product Support (page 31) Clock/Timers (page 31) Picture (page 32) Sound (page 34) Screen (page 35) Channel (page 37) CC Closed Captions (CC) (page 38) Parental Lock (page 38) External Inputs (page 41) HDMI Settings (...
Operating Instructions
Page 32
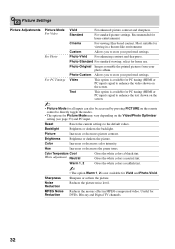
... your preferred settings. Useful for home use. select for Reduction DVDs, Blu-ray and Digital TV channels. 32 Picture Increases or decreases picture contrast. Noise Reduction Reduces the picture noise level. Custom Allows you to directly toggle the modes. • The options for home...Gives the white colors a neutral tint. MPEG Noise Reduces the mosaic effect in a theater-like environment. For standard picture settings. Recommended for Picture Mode may vary depending on the screen. Photo-Custom Allows you to the default values. Cinema For viewing film-...
... your preferred settings. Useful for home use. select for Reduction DVDs, Blu-ray and Digital TV channels. 32 Picture Increases or decreases picture contrast. Noise Reduction Reduces the picture noise level. Custom Allows you to directly toggle the modes. • The options for home...Gives the white colors a neutral tint. MPEG Noise Reduces the mosaic effect in a theater-like environment. For standard picture settings. Recommended for Picture Mode may vary depending on the screen. Photo-Custom Allows you to the default values. Cinema For viewing film-...
Operating Instructions
Page 33
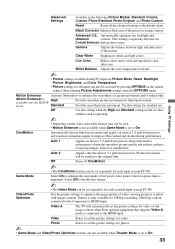
... The CineMotion feature can be seen. • Motion Enhancer is not available when Game Mode is set the picture settings for video or still image content when Sony optional equipment that supports Video-A mode is only available for each input (except PC IN). Select Off to...24p) content connected to improve film content and de-interlacing performance. Using TV Settings Advanced Settings Available in video artifacts such as ghosting. ~ • Depending on the remote control, then selecting Picture Adjustments settings from the OPTIONS menu. Reset Resets all inputs can be...
... The CineMotion feature can be seen. • Motion Enhancer is not available when Game Mode is set the picture settings for video or still image content when Sony optional equipment that supports Video-A mode is only available for each input (except PC IN). Select Off to...24p) content connected to improve film content and de-interlacing performance. Using TV Settings Advanced Settings Available in video artifacts such as ghosting. ~ • Depending on the remote control, then selecting Picture Adjustments settings from the OPTIONS menu. Reset Resets all inputs can be...
Operating Instructions
Page 35
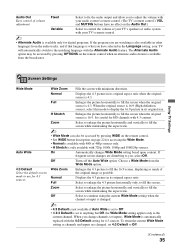
.... On Automatically changes Wide Mode setting based upon content. Wide Zoom Enlarges the 4:3 picture to fill the 16:9 screen, displaying as much of your TV's speakers or audio system with your TV's remote control. ~ • Alternate Audio is available only for digital programs. If...to anything but Off, the Wide Mode setting applies only to the matching language with minimum distortion. Normal Displays the 4:3 picture in the Language setting, your TV will automatically switch to the current channel. If frequent screen changes are changed . ~ • 4:3 Default is not...
.... On Automatically changes Wide Mode setting based upon content. Wide Zoom Enlarges the 4:3 picture to fill the 16:9 screen, displaying as much of your TV's speakers or audio system with your TV's remote control. ~ • Alternate Audio is available only for digital programs. If...to anything but Off, the Wide Mode setting applies only to the matching language with minimum distortion. Normal Displays the 4:3 picture in the Language setting, your TV will automatically switch to the current channel. If frequent screen changes are changed . ~ • 4:3 Default is not...
Operating Instructions
Page 36
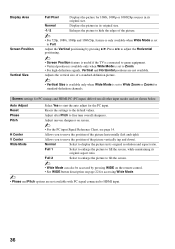
... to Wide Zoom or Zoom for the PC input. Normal Displays the picture in its original resolution and aspect ratio. Press B/b to adjust the Horizontal positioning. ~ • Screen Position feature is useful if the TV is connected to game equipment. • Vertical position is available only... when Wide Mode is set to start the auto adjust for standard-definition channels. Wide Mode Normal Select to move the position of a standard-definition picture. ~ • Vertical Size...
... to Wide Zoom or Zoom for the PC input. Normal Displays the picture in its original resolution and aspect ratio. Press B/b to adjust the Horizontal positioning. ~ • Screen Position feature is useful if the TV is connected to game equipment. • Vertical position is available only... when Wide Mode is set to start the auto adjust for standard-definition channels. Wide Mode Normal Select to move the position of a standard-definition picture. ~ • Vertical Size...
Operating Instructions
Page 42
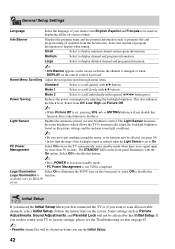
...-compliant. Mode 2 Select to scroll individually with the On option. Light Sensor Enables the automatic picture (screen) brightness control. PC Power Management Select On to have the TV automatically enter standby mode when there is no signal input for KDL-W series. The STANDBY LED .... The Light Sensor measures the room brightness which allows the TV to automatically adjust the backlight brightness based on the front panel illuminates with repeated V/v/B/b button press. Logo Illumination Select On to illuminate the SONY logo on the screen. Follow the instructions on the front ...
...-compliant. Mode 2 Select to scroll individually with the On option. Light Sensor Enables the automatic picture (screen) brightness control. PC Power Management Select On to have the TV automatically enter standby mode when there is no signal input for KDL-W series. The STANDBY LED .... The Light Sensor measures the room brightness which allows the TV to automatically adjust the backlight brightness based on the front panel illuminates with repeated V/v/B/b button press. Logo Illumination Select On to illuminate the SONY logo on the screen. Follow the instructions on the front ...
Operating Instructions
Page 43
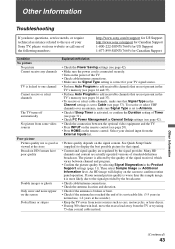
... in normal use of your Sony TV, please visit our website or call one of the following numbers: http://www.sony.com/tvsupport for US Support http://www.sony.ca/support for Canadian Support 1-800-222-SONY(7669) for US Support 1-877-899-SONY(7669) for your normal picture quality is worse than this ...Perform Auto Program to add receivable channels that are not present in the TV's memory (see pages 16 and 37). • Perform Auto Program to add receivable channels that are not present in the TV's memory (see pages 16 and 37). • To receive or select cable channels, make sure Signal Type ...
... in normal use of your Sony TV, please visit our website or call one of the following numbers: http://www.sony.com/tvsupport for US Support http://www.sony.ca/support for Canadian Support 1-800-222-SONY(7669) for US Support 1-877-899-SONY(7669) for your normal picture quality is worse than this ...Perform Auto Program to add receivable channels that are not present in the TV's memory (see pages 16 and 37). • Perform Auto Program to add receivable channels that are not present in the TV's memory (see pages 16 and 37). • To receive or select cable channels, make sure Signal Type ...
Operating Instructions
Page 44
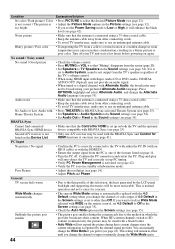
...may be used with the BRAVIA Sync and Control for HDMI is set up PC timing. • Verify PC Power Management is regulated by the LCD panel backlight and supporting electronics will enhance the black level (see page 25). Home Theater System • Set Speakers to Audio System in the... Sync (see page 42). • Verify the PC is set the Power Saving mode to SD content (commercials), the picture may not be more noticeable. If it will be broadcasting your TV and wait a few hours before powering on page 14. • Turn the PC off your preferred Alternate Audio language....
...may be used with the BRAVIA Sync and Control for HDMI is set up PC timing. • Verify PC Power Management is regulated by the LCD panel backlight and supporting electronics will enhance the black level (see page 25). Home Theater System • Set Speakers to Audio System in the... Sync (see page 42). • Verify the PC is set the Power Saving mode to SD content (commercials), the picture may not be more noticeable. If it will be broadcasting your TV and wait a few hours before powering on page 14. • Turn the PC off your preferred Alternate Audio language....


