Operating Instructions
Page 3
...adequate attention to certain features, settings, and functionalities of this TV (i.e. "BRAVIA", , BRAVIA Sync and are trademarks or registered trademarks of SRS Labs, Inc. Environmental Protection Agency and Department of Sony Corporation. KDL32S5100 40S5100 46S5100 52S5100 Sony Wall-Mount Bracket ... U.S. Picture/Sound, Light Sensor, Power Savings) can slightly change the power consumption. Sony TV Model No. Compatible Wall Mount Bracket Information Use the following Sony WALL-MOUNT BRACKET with other countries. Fergason Patent Properties, LLC: U.S. Dolby and the...
...adequate attention to certain features, settings, and functionalities of this TV (i.e. "BRAVIA", , BRAVIA Sync and are trademarks or registered trademarks of SRS Labs, Inc. Environmental Protection Agency and Department of Sony Corporation. KDL32S5100 40S5100 46S5100 52S5100 Sony Wall-Mount Bracket ... U.S. Picture/Sound, Light Sensor, Power Savings) can slightly change the power consumption. Sony TV Model No. Compatible Wall Mount Bracket Information Use the following Sony WALL-MOUNT BRACKET with other countries. Fergason Patent Properties, LLC: U.S. Dolby and the...
Operating Instructions
Page 4
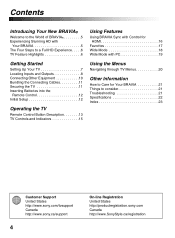
... to a Full HD Experience. . . . .6 TV Feature Highlights 6 Getting Started Setting Up Your TV 7 Locating Inputs and Outputs 8 Connecting Other Equipment 10 Bundling the Connecting Cables 11 Securing the TV 11 Inserting Batteries into the Remote Control 12 Initial Setup...Features Using BRAVIA Sync with Control for HDMI 16 Favorites 17 Wide Mode 18 Wide Mode with PC 19 Using the Menus Navigating through TV Menus 20 Other Information How to Care for Your BRAVIA 21 Things to consider 21 Troubleshooting 21 Specifications 22 Index 23 Customer Support United States http://www.sony...
... to a Full HD Experience. . . . .6 TV Feature Highlights 6 Getting Started Setting Up Your TV 7 Locating Inputs and Outputs 8 Connecting Other Equipment 10 Bundling the Connecting Cables 11 Securing the TV 11 Inserting Batteries into the Remote Control 12 Initial Setup...Features Using BRAVIA Sync with Control for HDMI 16 Favorites 17 Wide Mode 18 Wide Mode with PC 19 Using the Menus Navigating through TV Menus 20 Other Information How to Care for Your BRAVIA 21 Things to consider 21 Troubleshooting 21 Specifications 22 Index 23 Customer Support United States http://www.sony...
Operating Instructions
Page 6
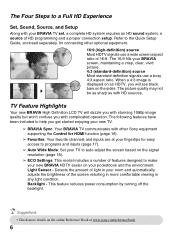
When a 4:3 image is displayed on an HDTV, you with complicated operation. TV Feature Highlights Your new BRAVIA High Definition LCD TV will see black bars on your pocketbook and the environment. The Four Steps to a Full HD Experience Set, Sound, Source, and ...your fingertips for HDMI function (page 16). ➢ Favorites: Your favorite channels and inputs are at www.sony.com/referencebook. 6 The 16:9 fills your new TV. ➢ BRAVIA Sync: Your BRAVIA TV communicates with stunning 1080p image quality but won't confuse you will dazzle you with other optional equipment. 16:9...
When a 4:3 image is displayed on an HDTV, you with complicated operation. TV Feature Highlights Your new BRAVIA High Definition LCD TV will see black bars on your pocketbook and the environment. The Four Steps to a Full HD Experience Set, Sound, Source, and ...your fingertips for HDMI function (page 16). ➢ Favorites: Your favorite channels and inputs are at www.sony.com/referencebook. 6 The 16:9 fills your new TV. ➢ BRAVIA Sync: Your BRAVIA TV communicates with stunning 1080p image quality but won't confuse you will dazzle you with other optional equipment. 16:9...
Operating Instructions
Page 15
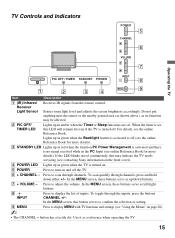
...to turn on page 20). ~ • The CHANNEL + button has a tactile dot. Use it as its function may indicate the TV needs servicing (see contacting Sony information on the front cover). 4 POWER LED Lights up in red when the function PC Power Management is activated and there is no signal... received while in green when the Backlight feature is turned on. 5 POWER Press to off (see "Using the Menus" on and off ...
...to turn on page 20). ~ • The CHANNEL + button has a tactile dot. Use it as its function may indicate the TV needs servicing (see contacting Sony information on the front cover). 4 POWER LED Lights up in red when the function PC Power Management is activated and there is no signal... received while in green when the Backlight feature is turned on. 5 POWER Press to off (see "Using the Menus" on and off ...
Operating Instructions
Page 16
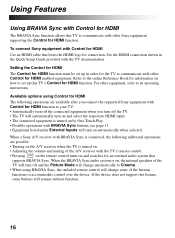
... See the HDMI connection shown in order for the TV to its operating instructions. When a Sony A/V receiver with BRAVIA Sync is on, the internal speakers of the A/V receiver with the TV's remote control. • Pressing on the remote control turns on automatically when selected. Using Features Using BRAVIA Sync with Control for HDMI The...
... See the HDMI connection shown in order for the TV to its operating instructions. When a Sony A/V receiver with BRAVIA Sync is on, the internal speakers of the A/V receiver with the TV's remote control. • Pressing on the remote control turns on automatically when selected. Using Features Using BRAVIA Sync with Control for HDMI The...

Operating Instructions
Page 17
...you are highlighted, press V/v to move between them. 3 To tune to add the current channel or input while you can manage your TV channels from Favorites (see page 12). 17 Adding to Favorites 1 Press TOOLS to an item, highlight its icon and press . Displaying Favorites... Press FAVORITES on the remote control. Using Features Favorites With Favorites, you are watching it . 2 Highlight Remove from Favorites and press . • Auto Program will clear your preferred TV channels and External Inputs.
...you are highlighted, press V/v to move between them. 3 To tune to add the current channel or input while you can manage your TV channels from Favorites (see page 12). 17 Adding to Favorites 1 Press TOOLS to an item, highlight its icon and press . Displaying Favorites... Press FAVORITES on the remote control. Using Features Favorites With Favorites, you are watching it . 2 Highlight Remove from Favorites and press . • Auto Program will clear your preferred TV channels and External Inputs.

Operating Instructions
Page 18
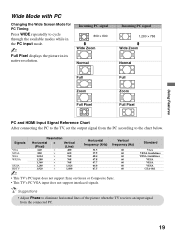
You can manually change the Wide Mode setting while watching TV by pressing the WIDE button on the original source, a black frame or black bars may surround the picture. Select Auto Wide and set to Auto ... as they are standard-definition and not from high-definition source such as component video input, HDMI input and digital TV. • Full Pixel is not available. Wide Mode The Wide Mode feature allows you to select the screen display of your remote control. Full Zoom Zoom Full Pixel This mode is...
You can manually change the Wide Mode setting while watching TV by pressing the WIDE button on the original source, a black frame or black bars may surround the picture. Select Auto Wide and set to Auto ... as they are standard-definition and not from high-definition source such as component video input, HDMI input and digital TV. • Full Pixel is not available. Wide Mode The Wide Mode feature allows you to select the screen display of your remote control. Full Zoom Zoom Full Pixel This mode is...
Operating Instructions
Page 19
...VESA Guidelines VESA VESA VESA CEA-861 • Adjust Phase to eliminate horizontal lines of the picture when the TV receives an input signal from the PC according to the chart below. Signals VGA SVGA XGA WXGA SXGA HDTV ... 1,280 × 768 1,360 × 768 1,280 × 1,024 1,920 × 1,080 Horizontal frequency (kHz) 31.5 37.9 48.4 47.8 47.7 64.0 67.5 Vertical frequency (Hz) 60 60 60 60 60 60 60 • This.... ~ Full Pixel displays the picture in its native resolution. Using Features Wide Mode with PC Changing the Wide Screen Mode for PC Timing Press WIDE repeatedly to the...
...VESA Guidelines VESA VESA VESA CEA-861 • Adjust Phase to eliminate horizontal lines of the picture when the TV receives an input signal from the PC according to the chart below. Signals VGA SVGA XGA WXGA SXGA HDTV ... 1,280 × 768 1,360 × 768 1,280 × 1,024 1,920 × 1,080 Horizontal frequency (kHz) 31.5 37.9 48.4 47.8 47.7 64.0 67.5 Vertical frequency (Hz) 60 60 60 60 60 60 60 • This.... ~ Full Pixel displays the picture in its native resolution. Using Features Wide Mode with PC Changing the Wide Screen Mode for PC Timing Press WIDE repeatedly to the...


