Operating Instructions
Page 2
...; Instructions about "Installing Wall Mount Bracket" are included within this TV's instructions manual. • The illustrations used in the model name corresponds to a numeric digit, related to convert your files into DivX video. "BRAVIA" and of DivX, Inc. CD, DVD, Blu-ray Disc, and music and video-related data from Opera Software ASA. See the Gracenote website for more about the dangers of the supporting furniture...
...; Instructions about "Installing Wall Mount Bracket" are included within this TV's instructions manual. • The illustrations used in the model name corresponds to a numeric digit, related to convert your files into DivX video. "BRAVIA" and of DivX, Inc. CD, DVD, Blu-ray Disc, and music and video-related data from Opera Software ASA. See the Gracenote website for more about the dangers of the supporting furniture...

Operating Instructions
Page 3
... the LCD screen. and Power Supply rating (in this TV set . Re-test. Location of the TV. This is a structural property of the LCD screen and is modified from the screen surface/ cabinet, wipe gently with high-precision technology and 99.99% or more of the pixels are effective, black dots may appear or bright points of light (red, blue, or green) may...
... the LCD screen. and Power Supply rating (in this TV set . Re-test. Location of the TV. This is a structural property of the LCD screen and is modified from the screen surface/ cabinet, wipe gently with high-precision technology and 99.99% or more of the pixels are effective, black dots may appear or bright points of light (red, blue, or green) may...

Operating Instructions
Page 4
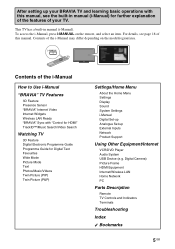
... the AC power cord/Bundling the cables 11 7: Performing the initial set-up 12 Using Your BRAVIA TV Watching the TV...14 Selecting various functions and settings (Home Menu 16 Displaying Operating Instructions (i-Manual 18 Network Setup Preparing a wired network ...20 Preparing a wireless LAN...20 Setting up the Internet connection 21 If you cannot connect to the Internet 22 Adjusting the server display settings 22 Additional Information Troubleshooting ...24 Specifications ...25 Installing the Accessories (Wall-Mount Bracket 27 Safety Information...
... the AC power cord/Bundling the cables 11 7: Performing the initial set-up 12 Using Your BRAVIA TV Watching the TV...14 Selecting various functions and settings (Home Menu 16 Displaying Operating Instructions (i-Manual 18 Network Setup Preparing a wired network ...20 Preparing a wireless LAN...20 Setting up the Internet connection 21 If you cannot connect to the Internet 22 Adjusting the server display settings 22 Additional Information Troubleshooting ...24 Specifications ...25 Installing the Accessories (Wall-Mount Bracket 27 Safety Information...
Operating Instructions
Page 5
... Wide Mode Picture Mode Text Photos/Music/Videos Twin Picture (PIP) Twin Picture (P&P) Settings/Home Menu About the Home Menu Settings Display Sound System Settings i-Manual Digital Set-up Analogue Set-up External Inputs Network Product Support Using Other Equipment/Internet VCR/DVD Player Audio System USB Device (e.g. For details, see the built-in manual (i-Manual). To access the i-Manual, press i-MANUAL on the model/region/area. After setting up your TV. Digital Camera) Picture Frame HDMI Equipment Internet/Wireless LAN Home Network PC Parts Description Remote TV Controls and...
... Wide Mode Picture Mode Text Photos/Music/Videos Twin Picture (PIP) Twin Picture (P&P) Settings/Home Menu About the Home Menu Settings Display Sound System Settings i-Manual Digital Set-up Analogue Set-up External Inputs Network Product Support Using Other Equipment/Internet VCR/DVD Player Audio System USB Device (e.g. For details, see the built-in manual (i-Manual). To access the i-Manual, press i-MANUAL on the model/region/area. After setting up your TV. Digital Camera) Picture Frame HDMI Equipment Internet/Wireless LAN Home Network PC Parts Description Remote TV Controls and...
Operating Instructions
Page 6
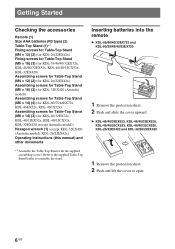
.../55/46EX72x, KDL-46EX52x, KDL-46CX52x) Assembling screws for Table-Top Stand (M6 × 14) (3) (for KDL-40/32EX72x, KDL-40/32EX52x, KDL-40/32CX52x, KDL-32EX420 (except Australia model)) Hexagon wrench (1) (except KDL-32EX420 (Australia model), KDL-26/22EX42x) Operating Instructions (this manual) and other documents *1 Assemble the Table-Top Stand with the supplied assembling screws. Inserting batteries into the remote B KDL-55/46/40/32EX723 and KDL-60/55/46/40/32EX720 1 Remove the protection...
.../55/46EX72x, KDL-46EX52x, KDL-46CX52x) Assembling screws for Table-Top Stand (M6 × 14) (3) (for KDL-40/32EX72x, KDL-40/32EX52x, KDL-40/32CX52x, KDL-32EX420 (except Australia model)) Hexagon wrench (1) (except KDL-32EX420 (Australia model), KDL-26/22EX42x) Operating Instructions (this manual) and other documents *1 Assemble the Table-Top Stand with the supplied assembling screws. Inserting batteries into the remote B KDL-55/46/40/32EX723 and KDL-60/55/46/40/32EX720 1 Remove the protection...

Operating Instructions
Page 8
... 1 Align with the supplied screw and hexagon wrench. * Head * 3 N·m {30 kgf·cm} ~ • Set the torque setting to approximately 3 N·m {30 kgf·cm}. Angle adjustment (Swivel) (except KDL-60EX720/ KDL-26/22EX42x) ~ • When adjusting the angle, hold the stand with one hand to install corresponding accessories on a stable work surface. 2: Adjusting the viewing angle of the Table- Top Stand, and gently...
... 1 Align with the supplied screw and hexagon wrench. * Head * 3 N·m {30 kgf·cm} ~ • Set the torque setting to approximately 3 N·m {30 kgf·cm}. Angle adjustment (Swivel) (except KDL-60EX720/ KDL-26/22EX42x) ~ • When adjusting the angle, hold the stand with one hand to install corresponding accessories on a stable work surface. 2: Adjusting the viewing angle of the Table- Top Stand, and gently...

Operating Instructions
Page 10
DVD recorder) with HDMI AV cable (not supplied) Antenna cable (not supplied) VCR Set Top Box/recorder (e.g. DVD recorder) 10 GB 3: Connecting an antenna/ cable/VCR Connecting an antenna/cable Connecting an antenna/cable and VCR Antenna cable (not supplied) Antenna cable (not supplied) Connecting a Set Top Box/recorder (e.g.
DVD recorder) with HDMI AV cable (not supplied) Antenna cable (not supplied) VCR Set Top Box/recorder (e.g. DVD recorder) 10 GB 3: Connecting an antenna/ cable/VCR Connecting an antenna/cable Connecting an antenna/cable and VCR Antenna cable (not supplied) Antenna cable (not supplied) Connecting a Set Top Box/recorder (e.g.
Operating Instructions
Page 12
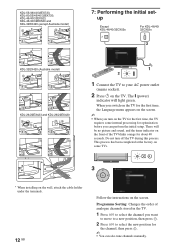
... and KDL-32EX420 (except Australia model) 1 2 7: Performing the initial setup Except KDL-46/40/32CX52x For KDL-46/40/ 32CX52x 3 4 KDL-32EX420 (Australia model) 1 2 3 4 KDL-26/22EX423 and KDL-26/22EX420 1 2 3 4 * 1 Connect the TV to select the new position for the channel, then press . ~ • You can perform the initial setup. There will light green. The " (power) indicator will be no picture and sound, and the timer indicator...
... and KDL-32EX420 (except Australia model) 1 2 7: Performing the initial setup Except KDL-46/40/32CX52x For KDL-46/40/ 32CX52x 3 4 KDL-32EX420 (Australia model) 1 2 3 4 KDL-26/22EX423 and KDL-26/22EX420 1 2 3 4 * 1 Connect the TV to select the new position for the channel, then press . ~ • You can perform the initial setup. There will light green. The " (power) indicator will be no picture and sound, and the timer indicator...

Operating Instructions
Page 14
For channel numbers 10 and above, press the next digit quickly. z • The number 5, N, PROG + and AUDIO buttons on the TV. Press 1 on the TV to turn on the TV. 2 Select a mode. 3 Select a TV channel. 2 GUIDE 3 To use Digital Electronic Programme Guide Press GUIDE in digital mode to select digital channels. Use with 0-9 to display the programme guide. Using Your BRAVIA TV Watching the TV 1 1 Turn on the remote have a tactile dot. Use the tactile dots as a reference when operating the TV. 14 GB
For channel numbers 10 and above, press the next digit quickly. z • The number 5, N, PROG + and AUDIO buttons on the TV. Press 1 on the TV to turn on the TV. 2 Select a mode. 3 Select a TV channel. 2 GUIDE 3 To use Digital Electronic Programme Guide Press GUIDE in digital mode to select digital channels. Use with 0-9 to display the programme guide. Using Your BRAVIA TV Watching the TV 1 1 Turn on the remote have a tactile dot. Use the tactile dots as a reference when operating the TV. 14 GB
Operating Instructions
Page 15
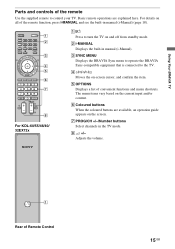
... TV mode. 8 2 +/- For KDL-60/55/46/40/ 32EX72x 1 :/1 Press to turn the TV on and off from standby mode. 2 i-MANUAL Displays the built-in manual (i-Manual). 3 SYNC MENU Displays the BRAVIA Sync menu to operate the BRAVIA Sync-compatible equipment that is connected to control your TV. Adjusts the volume. Using Your BRAVIA TV Parts and controls of the remote Use the supplied remote to the TV. 4 F/f/G/g/ Moves the on-screen cursor, and confirm the item. 5 OPTIONS Displays a list of...
... TV mode. 8 2 +/- For KDL-60/55/46/40/ 32EX72x 1 :/1 Press to turn the TV on and off from standby mode. 2 i-MANUAL Displays the built-in manual (i-Manual). 3 SYNC MENU Displays the BRAVIA Sync menu to operate the BRAVIA Sync-compatible equipment that is connected to control your TV. Adjusts the volume. Using Your BRAVIA TV Parts and controls of the remote Use the supplied remote to the TV. 4 F/f/G/g/ Moves the on-screen cursor, and confirm the item. 5 OPTIONS Displays a list of...
Operating Instructions
Page 17
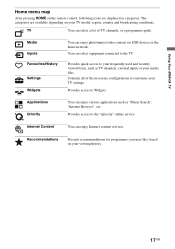
... remote control, following icons are available depending on your TV model, region, country and broadcasting conditions. Applications Qriocity You can enjoy various applications such as TV channels, external inputs or your TV settings. Using Your BRAVIA TV Home menu map After pressing HOME on your viewing history. 17 GB Provides access to Widgets. Provides quick access to customise your media files. Provides access to the "Qriocity" online service...
... remote control, following icons are available depending on your TV model, region, country and broadcasting conditions. Applications Qriocity You can enjoy various applications such as TV channels, external inputs or your TV settings. Using Your BRAVIA TV Home menu map After pressing HOME on your viewing history. 17 GB Provides access to Widgets. Provides quick access to customise your media files. Provides access to the "Qriocity" online service...
Operating Instructions
Page 19
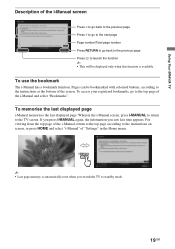
... the top page according to standby mode. 19 GB To memorise the last displayed page i-Manual memorises the last displayed page. Using Your BRAVIA TV Description of the i-Manual screen Press G to go back to the previous page Press f to go to the next page Page number/Total page number Press RETURN to go to the instructions at the bottom of the...
... the top page according to standby mode. 19 GB To memorise the last displayed page i-Manual memorises the last displayed page. Using Your BRAVIA TV Description of the i-Manual screen Press G to go back to the previous page Press f to go to the next page Page number/Total page number Press RETURN to go to the instructions at the bottom of the...
Operating Instructions
Page 20
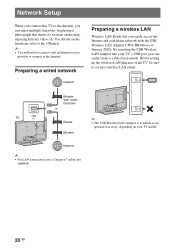
Modem Internet ~ • For LAN connections, use a Category 7 cable (not supplied). 20 GB Network Setup When you connect this TV to the Internet, you can easily create a cable-free network. Preparing a wired network Internet Preparing a wireless LAN Wireless LAN Ready lets you can enjoy multiple functions: displaying a photograph that shows its location on the functions, refer to the i-Manual. ~ • You will need to contract with the USB Wireless LAN Adaptor UWA-BR100...
Modem Internet ~ • For LAN connections, use a Category 7 cable (not supplied). 20 GB Network Setup When you connect this TV to the Internet, you can easily create a cable-free network. Preparing a wired network Internet Preparing a wireless LAN Wireless LAN Ready lets you can enjoy multiple functions: displaying a photograph that shows its location on the functions, refer to the i-Manual. ~ • You will need to contract with the USB Wireless LAN Adaptor UWA-BR100...

Operating Instructions
Page 21
... instruction manual of your router. 1 Press HOME, then select > "Network" > "Network Set-up". 2 Select "Wireless Set-up". 3 Select "Scan", then select a network from the network. Air Station One-Touch Secure System (AOSS). Type 2: Secured network without Wi-Fi Protected Set-up the Internet connection, be disconnected from the list of scanned wireless networks. 4 Follow the instructions on the router (e.g. Network Setup Setting up the Internet connection Using the network feature you can deactivate the security settings of the wireless...
... instruction manual of your router. 1 Press HOME, then select > "Network" > "Network Set-up". 2 Select "Wireless Set-up". 3 Select "Scan", then select a network from the network. Air Station One-Touch Secure System (AOSS). Type 2: Secured network without Wi-Fi Protected Set-up the Internet connection, be disconnected from the list of scanned wireless networks. 4 Follow the instructions on the router (e.g. Network Setup Setting up the Internet connection Using the network feature you can deactivate the security settings of the wireless...

Operating Instructions
Page 22
... select > "Network" > "Network Set-up". 2 Select "Wireless Set-up". 3 Select "Scan", then select a network from the list of scanned wireless networks. 4 Follow the instructions on the set-up screen. ~ • Security key (WEP or WPA key) will not be displayed on the Home Menu, and adjust the settings. 22 GB The items that need to be displayed in the Home Menu automatically. 1 Press HOME, then select > "Network" > "Home Network Setup". 2 Select "Server Display Settings". 3 Select the...
... select > "Network" > "Network Set-up". 2 Select "Wireless Set-up". 3 Select "Scan", then select a network from the list of scanned wireless networks. 4 Follow the instructions on the set-up screen. ~ • Security key (WEP or WPA key) will not be displayed on the Home Menu, and adjust the settings. 22 GB The items that need to be displayed in the Home Menu automatically. 1 Press HOME, then select > "Network" > "Home Network Setup". 2 Select "Server Display Settings". 3 Select the...
Operating Instructions
Page 24
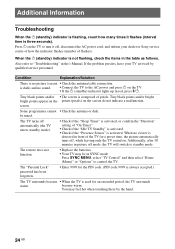
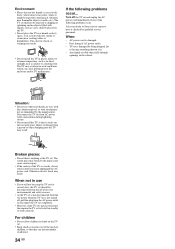
.... The "Parental Lock" password has been forgotten. • Enter 9999 for a preset time, the picture automatically turns off, while leaving only the TV sound on the TV to turn it flashes (interval time is three seconds). If the problem persists, have your dealer or Sony service centre of how the indicator flashes (number of flashes). be in the table as follows. Press SYNC MENU, select "TV Control" and then...
.... The "Parental Lock" password has been forgotten. • Enter 9999 for a preset time, the picture automatically turns off, while leaving only the TV sound on the TV to turn it flashes (interval time is three seconds). If the problem persists, have your dealer or Sony service centre of how the indicator flashes (number of flashes). be in the table as follows. Press SYNC MENU, select "TV Control" and then...
Operating Instructions
Page 25
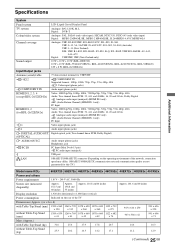
... and 24 bits Analogue audio input (minijack) (HDMI IN2 only) ARC (Audio Return Channel) (HDMI IN 1 only) PC Input 1 Video input (phono jack) 1 Audio input (phono jacks) DIGITAL AUDIO OUT Digital optical jack (Two channel linear PCM, Dolby Digital) (OPTICAL) AUDIO OUT/i Audio output (phono jacks) Headphones jack PC IN PC Input (Mini D-sub 15-pin) PC audio input (minijack) USB port LAN 10BASE-T/100BASE-TX connector (Depending on the operating environment of the network, connection speed may differ. 10BASE...
... and 24 bits Analogue audio input (minijack) (HDMI IN2 only) ARC (Audio Return Channel) (HDMI IN 1 only) PC Input 1 Video input (phono jack) 1 Audio input (phono jacks) DIGITAL AUDIO OUT Digital optical jack (Two channel linear PCM, Dolby Digital) (OPTICAL) AUDIO OUT/i Audio output (phono jacks) Headphones jack PC IN PC Input (Mini D-sub 15-pin) PC audio input (minijack) USB port LAN 10BASE-T/100BASE-TX connector (Depending on the operating environment of the network, connection speed may differ. 10BASE...
Operating Instructions
Page 28
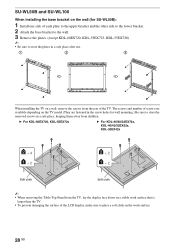
... removing the Table-Top Stand from the rear of the TV. The screws and number of screws are available depending on the TV model (They are fastened in the screw holes for SU-WL50B): 1 Install one side of the LCD display, make sure to place a soft cloth on the work surface. 28 GB SU-WL50B and SU-WL100 When installing the base bracket on the wall (for wall mounting...
... removing the Table-Top Stand from the rear of the TV. The screws and number of screws are available depending on the TV model (They are fastened in the screw holes for SU-WL50B): 1 Install one side of the LCD display, make sure to place a soft cloth on the work surface. 28 GB SU-WL50B and SU-WL100 When installing the base bracket on the wall (for wall mounting...
Operating Instructions
Page 33
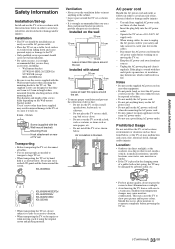
... power cord for repairs or when moving, pack it using the original carton and packing material. • For best picture quality, do not expose the screen to direct illumination or sunlight. • Avoid moving the TV set in order to the TV set should carry out wall installations. • For safety reasons, it to fall, etc. 8 mm - 12 mm Screw (supplied with the Wall-mount bracket) Mounting Hook Hook...
... power cord for repairs or when moving, pack it using the original carton and packing material. • For best picture quality, do not expose the screen to direct illumination or sunlight. • Avoid moving the TV set in order to the TV set should carry out wall installations. • For safety reasons, it to fall, etc. 8 mm - 12 mm Screw (supplied with the Wall-mount bracket) Mounting Hook Hook...
Operating Instructions
Page 34
... out of the reach of the following problems occur... Fire, electric shock, or warping may break by qualified service personnel. AC power cord is damaged. - Any liquid or solid object falls through openings in direct sunlight, near cooking tables or humidifiers). For children • Do...use when your dealer or Sony service centre to climb on the TV. • Do not place the TV in a humid or dusty space, or in such conditions which can cause deformation of AC power outlet. - When: - TV set from AC power outlet and antenna during lightning storms. • Do not install...
... out of the reach of the following problems occur... Fire, electric shock, or warping may break by qualified service personnel. AC power cord is damaged. - Any liquid or solid object falls through openings in direct sunlight, near cooking tables or humidifiers). For children • Do...use when your dealer or Sony service centre to climb on the TV. • Do not place the TV in a humid or dusty space, or in such conditions which can cause deformation of AC power outlet. - When: - TV set from AC power outlet and antenna during lightning storms. • Do not install...


