Operating Instructions
Page 3
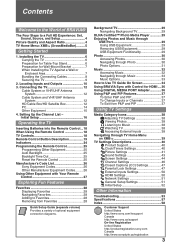
...General Setup Settings 51 Initial Setup 52 Other Information Troubleshooting 53 Specifications 57 Index 58 Customer Support United States http://www.sony.com/tvsupport Canada http://www.sony.ca/support On-line Registration United States http://productregistration.sony.com Canada http://www.sonystyle....ca/registration 3 Initial Setup 16 Operating the TV Inserting Batteries into the Remote Control......
...General Setup Settings 51 Initial Setup 52 Other Information Troubleshooting 53 Specifications 57 Index 58 Customer Support United States http://www.sony.com/tvsupport Canada http://www.sony.ca/support On-line Registration United States http://productregistration.sony.com Canada http://www.sonystyle....ca/registration 3 Initial Setup 16 Operating the TV Inserting Batteries into the Remote Control......
Operating Instructions
Page 5
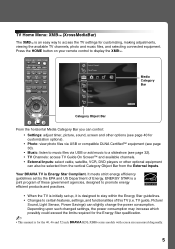
... control: • Settings: adjust timer, picture, sound, screen and other options (see page 40 for the 40, 46 and 52 inch BRAVIA KDL-XBR6 series models with screen size measured diagonally. 5 Your BRAVIA TV is designed to stay within the Energy Star guidelines. • Changes to a slideshow (see page 30). • Music: listen...
... control: • Settings: adjust timer, picture, sound, screen and other options (see page 40 for the 40, 46 and 52 inch BRAVIA KDL-XBR6 series models with screen size measured diagonally. 5 Your BRAVIA TV is designed to stay within the Energy Star guidelines. • Changes to a slideshow (see page 30). • Music: listen...

Operating Instructions
Page 14
...IN jack to the PC using an HD15HD15 cable with ferrite core (analog RGB) and audio cable (see page 52). In plug and play, signals with a 60 Hz vertical frequency will be detected automatically. (PC reboot may... display on the television. • For the best picture quality, it is connected to the TV and no signal has been input from the PC according to the supported resolutions and timings indicated below...signal from the PC for your PC by connecting a HD15-HD15 cable as shown below . This TV can also be treated as a video timing and not PC timing. This affects Picture settings, Wide ...
...IN jack to the PC using an HD15HD15 cable with ferrite core (analog RGB) and audio cable (see page 52). In plug and play, signals with a 60 Hz vertical frequency will be detected automatically. (PC reboot may... display on the television. • For the best picture quality, it is connected to the TV and no signal has been input from the PC according to the supported resolutions and timings indicated below...signal from the PC for your PC by connecting a HD15-HD15 cable as shown below . This TV can also be treated as a video timing and not PC timing. This affects Picture settings, Wide ...

Operating Instructions
Page 17
...17 Getting Started s To Run Initial Setup Again or Auto Program at a Later Time Select the Initial Setup feature from the beginning when the TV is turned back on. • Auto Program may be canceled while the channels are being scanned. HDMI Settings General Setup Settings Initial Setup... Channels Use the Add Digital Channels feature as described on page 46. (Useful for antenna installations.) ~ • If you accidentally turn off the TV during the Initial Setup process, the Initial Setup will restart from the XMB™ or perform the steps described in the Initial Setup section on...
...17 Getting Started s To Run Initial Setup Again or Auto Program at a Later Time Select the Initial Setup feature from the beginning when the TV is turned back on. • Auto Program may be canceled while the channels are being scanned. HDMI Settings General Setup Settings Initial Setup... Channels Use the Add Digital Channels feature as described on page 46. (Useful for antenna installations.) ~ • If you accidentally turn off the TV during the Initial Setup process, the Initial Setup will restart from the XMB™ or perform the steps described in the Initial Setup section on...
Operating Instructions
Page 24
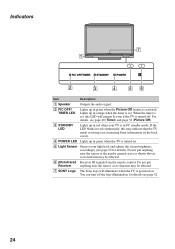
...PC standby mode. For details, see page 52. 24 If the LED blinks in green when the Picture Off feature is activated. Do not put Receiver anything near the sensor, as its function may indicate that the TV needs servicing (see contacting Sony information on the back cover). 4 POWER ...LED Lights up in green when the TV is powered on . 5 Light Sensor Senses room light level and adjusts the screen brightness accordingly (see page 52 for details see page 40 (Timer) and page 52 (Picture Off). 3 STANDBY LED ...
...PC standby mode. For details, see page 52. 24 If the LED blinks in green when the Picture Off feature is activated. Do not put Receiver anything near the sensor, as its function may indicate that the TV needs servicing (see contacting Sony information on the back cover). 4 POWER ...LED Lights up in green when the TV is powered on . 5 Light Sensor Senses room light level and adjusts the screen brightness accordingly (see page 52 for details see page 40 (Timer) and page 52 (Picture Off). 3 STANDBY LED ...

Operating Instructions
Page 28
... Favorites, the recently viewed channels and inputs are highlighted. • Background TV themes, built-in photos and music, and some inputs are automatically saved into Favorites as a factory default. To remove from Favorites (see page 52). 28 Locate the item you wish to add and press OPTIONS. 2 ...Press V/v to highlight Add to Favorites 1 From the XMBTM, select a Photo, Music, TV, or External Inputs icon. Removing from Favorites 1 Press FAVORITES, then ...
... Favorites, the recently viewed channels and inputs are highlighted. • Background TV themes, built-in photos and music, and some inputs are automatically saved into Favorites as a factory default. To remove from Favorites (see page 52). 28 Locate the item you wish to add and press OPTIONS. 2 ...Press V/v to highlight Add to Favorites 1 From the XMBTM, select a Photo, Music, TV, or External Inputs icon. Removing from Favorites 1 Press FAVORITES, then ...
Operating Instructions
Page 39
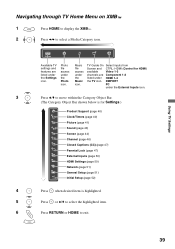
... 1-3 channels are listed under the Music icon. Music file access under the Settings icon. Settings Available TV settings and features are Component 1-2 listed under the Photo icon. TV Guide On Select inputs from Screen and CTRL: HDMI (Control for Settings.) Product Support (page 40)... Parental Lock (page 47) External Inputs (page 50) HDMI Settings (page 50) Network (page 51) General Setup (page 51) Initial Setup (page 52) 4 Press when desired item is highlighted. 5 Press or V/v to select the highlighted item. 6 Press RETURN or HOME to select a Media Category icon...
... 1-3 channels are listed under the Music icon. Music file access under the Settings icon. Settings Available TV settings and features are Component 1-2 listed under the Photo icon. TV Guide On Select inputs from Screen and CTRL: HDMI (Control for Settings.) Product Support (page 40)... Parental Lock (page 47) External Inputs (page 50) HDMI Settings (page 50) Network (page 51) General Setup (page 51) Initial Setup (page 52) 4 Press when desired item is highlighted. 5 Press or V/v to select the highlighted item. 6 Press RETURN or HOME to select a Media Category icon...
Operating Instructions
Page 52
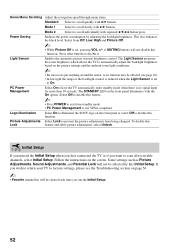
... the automatic picture (screen) brightness control. Logo Illumination Select On to illuminate the SONY logo on the front panel or select Off to scan all receivable channels, select Initial... STANDBY LED on the screen. The Light Sensor measures the room brightness which allows the TV to automatically adjust the backlight brightness based on page 56. ~ • Favorite channel ...adjusting the backlight brightness. Mode 1 Select to On. If you run the Initial Setup. 52 Power Saving Reduces the power consumption by this Lock feature and allow picture adjustments, select ...
... the automatic picture (screen) brightness control. Logo Illumination Select On to illuminate the SONY logo on the front panel or select Off to scan all receivable channels, select Initial... STANDBY LED on the screen. The Light Sensor measures the room brightness which allows the TV to automatically adjust the backlight brightness based on page 56. ~ • Favorite channel ...adjusting the backlight brightness. Mode 1 Select to On. If you run the Initial Setup. 52 Power Saving Reduces the power consumption by this Lock feature and allow picture adjustments, select ...
Operating Instructions
Page 53
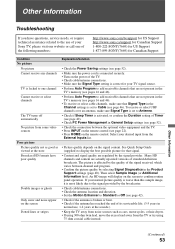
...Timer is activated, or confirm the Duration setting of Timer (see page 40). • Check PC Power Management in General Setup settings (see page 52). • Check the connection between channel and program. • Confirm the picture quality by the broadcaster. • Check cable/antenna connections. ...(3-5 years in normal use of your Sony TV, please visit our website or call one of the following numbers: http://www.sony.com/tvsupport for US Support http://www.sony.ca/support for Canadian Support 1-800-222-SONY(7669) for US Support 1-877-899-SONY(7669) for Canadian Support Condition No ...
...Timer is activated, or confirm the Duration setting of Timer (see page 40). • Check PC Power Management in General Setup settings (see page 52). • Check the connection between channel and program. • Confirm the picture quality by the broadcaster. • Check cable/antenna connections. ...(3-5 years in normal use of your Sony TV, please visit our website or call one of the following numbers: http://www.sony.com/tvsupport for US Support http://www.sony.ca/support for Canadian Support 1-800-222-SONY(7669) for US Support 1-877-899-SONY(7669) for Canadian Support Condition No ...

Operating Instructions
Page 54
...44). Noisy picture • Make sure that the antenna is properly configured on page 51. Turn off your TV and wait a few hours before powering on your DLNA Certified media server's connections and configurations. ~ • ...the LAN cable/connection to a digital channel with the BRAVIA Sync and Control for connection information. • Reconfigure your TV. Condition Explanation/Solution No color / Dark picture / Color • Press PICTURE to select the desired Picture Mode ... instruction manual for HDMI functions at one time (see page 52). Check your server connections.
...44). Noisy picture • Make sure that the antenna is properly configured on page 51. Turn off your TV and wait a few hours before powering on your DLNA Certified media server's connections and configurations. ~ • ...the LAN cable/connection to a digital channel with the BRAVIA Sync and Control for connection information. • Reconfigure your TV. Condition Explanation/Solution No color / Dark picture / Color • Press PICTURE to select the desired Picture Mode ... instruction manual for HDMI functions at one time (see page 52). Check your server connections.

Operating Instructions
Page 55
... (Continued) Other Information 55 To turn off this is regulated by the broadcaster (see page 44). Black bands appear at the front of the TV. • Keep the remote control sensor area clear from the PC is due to the digital compression of Text1-4. Poor Picture • Adjust the... Remote control does not operate • To determine if the problem is set up PC timing. • Verify PC Power Management is activated (see page 52). • Verify the PC is available (see page 14). • Adjust Pitch and Phase. Suddenly the picture gets smaller • The picture gets ...
... (Continued) Other Information 55 To turn off this is regulated by the broadcaster (see page 44). Black bands appear at the front of the TV. • Keep the remote control sensor area clear from the PC is due to the digital compression of Text1-4. Poor Picture • Adjust the... Remote control does not operate • To determine if the problem is set up PC timing. • Verify PC Power Management is activated (see page 52). • Verify the PC is available (see page 14). • Adjust Pitch and Phase. Suddenly the picture gets smaller • The picture gets ...
Operating Instructions
Page 57
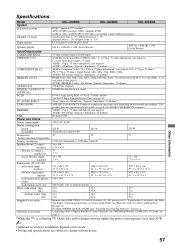
... KDL-46XBR6 KDL-52XBR6 NTSC: American TV standard ATSC (8VSB terrestrial): ATSC compliant 8VSB QAM on cable: ANSI/SCTE 07 2000 (Does not include CableCARD functionality) Analog terrestrial: 2 - 69 / Digital terrestrial: 2 - 69 Analog Cable: 1 - 135 / Digital Cable: 1 - 135 LCD (Liquid Crystal Display)... 13 5/8 1257 x 831 x 127 49 1/2 x 32 3/4 x 5 M6 (length: refer to diagram on page 7) 20.0 23.5 35.5 45.0 52.0 79.0 23.5 28.0 42.5 52.0 62.0 94.0 Remote control RM-YD024 (1) / Size AA batteries (2) / AC power cord (1) / Cable holder (1 attached to the TableTop Stand) / Operating...
... KDL-46XBR6 KDL-52XBR6 NTSC: American TV standard ATSC (8VSB terrestrial): ATSC compliant 8VSB QAM on cable: ANSI/SCTE 07 2000 (Does not include CableCARD functionality) Analog terrestrial: 2 - 69 / Digital terrestrial: 2 - 69 Analog Cable: 1 - 135 / Digital Cable: 1 - 135 LCD (Liquid Crystal Display)... 13 5/8 1257 x 831 x 127 49 1/2 x 32 3/4 x 5 M6 (length: refer to diagram on page 7) 20.0 23.5 35.5 45.0 52.0 79.0 23.5 28.0 42.5 52.0 62.0 94.0 Remote control RM-YD024 (1) / Size AA batteries (2) / AC power cord (1) / Cable holder (1 attached to the TableTop Stand) / Operating...
Operating Instructions
Page 58
... Color 41 Color Temperature 41 COMPONENT IN jack (1080p/1080i/ 720p/480p/480i) 11 Contact Sony 40 Control for Slideshow 33 Add to Favorites 31, 33 Advanced Settings 42 Analog CC 47 Audio ... Receiver (IR) 24 INPUT button 22 Installing the TV on a wall 7 J JUMP button 23 L Language 51 LIGHT button 19 Light Sensor Described 24 Setting 52 Logo Illumination 52 M Manage Inputs 50 Motion Enhancer 42 Movie Rating 49...40 Closed Captions (CC) 47 External Inputs 50 General Setup 51 HDMI Settings 50 Initial Setup 52 Network 51 Parental Lock 47 Picture 41 Product Support 40 Screen 44 Sound 43 Sharpness 41 ...
... Color 41 Color Temperature 41 COMPONENT IN jack (1080p/1080i/ 720p/480p/480i) 11 Contact Sony 40 Control for Slideshow 33 Add to Favorites 31, 33 Advanced Settings 42 Analog CC 47 Audio ... Receiver (IR) 24 INPUT button 22 Installing the TV on a wall 7 J JUMP button 23 L Language 51 LIGHT button 19 Light Sensor Described 24 Setting 52 Logo Illumination 52 M Manage Inputs 50 Motion Enhancer 42 Movie Rating 49...40 Closed Captions (CC) 47 External Inputs 50 General Setup 51 HDMI Settings 50 Initial Setup 52 Network 51 Parental Lock 47 Picture 41 Product Support 40 Screen 44 Sound 43 Sharpness 41 ...


