
Operating Instructions
Page 1
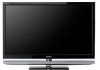
4-113-760-11(1) LCD Digital Color TV Operating Instructions KDL-40XBR6 KDL-46XBR6 KDL-52XBR6 © 2008 Sony Corporation
4-113-760-11(1) LCD Digital Color TV Operating Instructions KDL-40XBR6 KDL-46XBR6 KDL-52XBR6 © 2008 Sony Corporation
Operating Instructions
Page 2
...-2230 This device complies with other countries. Sony TV Model No. Use with part 15 of Conformity Trade Name: SONY Model: KDL-40XBR6/KDL-46XBR6/ KDL-52XBR6 Responsible Party: Sony Electronics Inc. To Customers Sufficient expertise is subject to the following WALL-MOUNT BRACKET or TV-stand. Fergason Patent Properties, LLC: U.S. SU-WL500 Sony TV Stand Model No. Owner's Record The...
...-2230 This device complies with other countries. Sony TV Model No. Use with part 15 of Conformity Trade Name: SONY Model: KDL-40XBR6/KDL-46XBR6/ KDL-52XBR6 Responsible Party: Sony Electronics Inc. To Customers Sufficient expertise is subject to the following WALL-MOUNT BRACKET or TV-stand. Fergason Patent Properties, LLC: U.S. SU-WL500 Sony TV Stand Model No. Owner's Record The...
Operating Instructions
Page 3
...Setup Settings 51 Initial Setup 52 Other Information Troubleshooting 53 Specifications 57 Index 58 Customer Support United States http://www.sony.com/tvsupport Canada http://www.sony.ca/support On-line Registration United States http://productregistration.sony.com Canada http://www.sonystyle....ca/registration 3 Setting Up the Channel List - Installing the TV 6 Carrying the TV 6 Preparation for Table-Top...
...Setup Settings 51 Initial Setup 52 Other Information Troubleshooting 53 Specifications 57 Index 58 Customer Support United States http://www.sony.com/tvsupport Canada http://www.sony.ca/support On-line Registration United States http://productregistration.sony.com Canada http://www.sonystyle....ca/registration 3 Setting Up the Channel List - Installing the TV 6 Carrying the TV 6 Preparation for Table-Top...

Operating Instructions
Page 4
...a wide screen aspect ratio of 16:9. The picture quality may not be as sharp as the quality of the signal it receives. Your BRAVIA TV can enjoy crisp, clear images, smooth movement and high-impact visuals from : • Over-the-air broadcasting via HD-quality antenna •... the image). HDTV uses a wider screen than conventional standarddefinition TV. 16:9 (high-definition) source Most HDTV signals use a boxy 4:3 aspect ratio. Welcome to the World of BRAVIA® Thank you need access to HD programming. http://www.sony.com/HDTV Canada http://www.sonystyle.ca/hd The Four Steps...
...a wide screen aspect ratio of 16:9. The picture quality may not be as sharp as the quality of the signal it receives. Your BRAVIA TV can enjoy crisp, clear images, smooth movement and high-impact visuals from : • Over-the-air broadcasting via HD-quality antenna •... the image). HDTV uses a wider screen than conventional standarddefinition TV. 16:9 (high-definition) source Most HDTV signals use a boxy 4:3 aspect ratio. Welcome to the World of BRAVIA® Thank you need access to HD programming. http://www.sony.com/HDTV Canada http://www.sonystyle.ca/hd The Four Steps...
Operating Instructions
Page 5
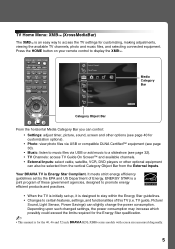
... set up, it is designed to stay within the Energy Star guidelines. • Changes to access the TV settings for the 40, 46 and 52 inch BRAVIA KDL-XBR6 series models with screen size measured diagonally. 5 TV Home Menu: XMB™ (XrossMediaBar) The XMB™ is an easy way to certain features, settings, and...
... set up, it is designed to stay within the Energy Star guidelines. • Changes to access the TV settings for the 40, 46 and 52 inch BRAVIA KDL-XBR6 series models with screen size measured diagonally. 5 TV Home Menu: XMB™ (XrossMediaBar) The XMB™ is an easy way to certain features, settings, and...

Operating Instructions
Page 6
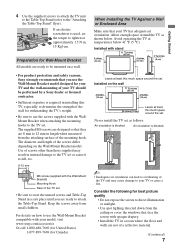
... accessory bag. Table-Top Stand Screws TV Unit 2 Place the Table-Top Stand on the LCD panel or the frame around the screen. • Be careful to the Table-Top Stand. 6 Do not subject the TV to place on a TV stand (except model, KDL-52XBR6). 1 Remove the Table-Top Stand ...and screws from the bottom center. ~ • Do not put stress on a TV stand (each sold separately). For product protection and safety reasons, Sony strongly recommends that you install the TV unit to not pinch...
... accessory bag. Table-Top Stand Screws TV Unit 2 Place the Table-Top Stand on the LCD panel or the frame around the screen. • Be careful to the Table-Top Stand. 6 Do not subject the TV to place on a TV stand (except model, KDL-52XBR6). 1 Remove the Table-Top Stand ...and screws from the bottom center. ~ • Do not put stress on a TV stand (each sold separately). For product protection and safety reasons, Sony strongly recommends that you install the TV unit to not pinch...
Operating Instructions
Page 7
... used, set . For details on a wall. • For product protection and safety reasons, Sony strongly recommends that your TV should be mounted on how to attach the Table-Top Stand. Avoid operating the TV at approximately 1.5 N·m, 15 Kgf·cm. Use of screws other than those supplied may ... If an electric screwdriver is blocked. The diameter and length of the wall for withstanding the TV's weight. • Be sure to use the Wall-Mount Bracket compatible with your model, visit www.sony.com/accessories Or call 1-800-488-7669 (for United States) 1-877-899-7669 (for ...
... used, set . For details on a wall. • For product protection and safety reasons, Sony strongly recommends that your TV should be mounted on how to attach the Table-Top Stand. Avoid operating the TV at approximately 1.5 N·m, 15 Kgf·cm. Use of screws other than those supplied may ... If an electric screwdriver is blocked. The diameter and length of the wall for withstanding the TV's weight. • Be sure to use the Wall-Mount Bracket compatible with your model, visit www.sony.com/accessories Or call 1-800-488-7669 (for United States) 1-877-899-7669 (for ...

Operating Instructions
Page 8
Should this occur, please wait a few hours to allow the moisture to moisture condensation. AC IN ~ • Do not bundle the AC power cord with other connecting cables. 8 Bundling the Connecting Cables You can bundle the connecting cables as illustrated below. • When moving the TV from a cold area to a warm area, a sudden room temperature change may cause the TV's picture to blur or show poor color due to evaporate before powering on the TV.
Should this occur, please wait a few hours to allow the moisture to moisture condensation. AC IN ~ • Do not bundle the AC power cord with other connecting cables. 8 Bundling the Connecting Cables You can bundle the connecting cables as illustrated below. • When moving the TV from a cold area to a warm area, a sudden room temperature change may cause the TV's picture to blur or show poor color due to evaporate before powering on the TV.
Operating Instructions
Page 9
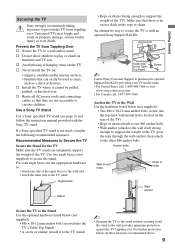
... Stand • Rope or chain (strong enough to support the weight of the TV. Getting Started Securing the TV Sony strongly recommends taking measures to prevent the TV from Toppling Over s Secure the TV to a wall and/or stand. Use a Sony TV Stand Use a Sony specified TV stand (see page 2) and follow all AC power cords and connecting cables...
... Stand • Rope or chain (strong enough to support the weight of the TV. Getting Started Securing the TV Sony strongly recommends taking measures to prevent the TV from Toppling Over s Secure the TV to a wall and/or stand. Use a Sony TV Stand Use a Sony specified TV stand (see page 2) and follow all AC power cords and connecting cables...

Operating Instructions
Page 10
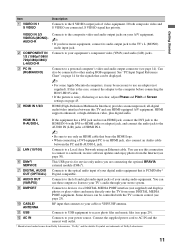
Locating Inputs and Outputs 5 Rear of TV VIDEO IN 1 3 1 S VIDEO VIDEO L (MONO) AUDIO R COMPONENT IN PC IN 1 2 Y RGB P B IN DIGITAL 1 AUDIO OUT (OPTICAL) 3 P R L AUDIO R AUDIO (1080p/1080i/720p/480p/480i ) 4 AUDIO OUT R ... R (VAR/FIX) 23 4 LAN DMe x / (10/100) SERVICE 6 7 8 9 DMPORT CABLE/ANTENNA 0 Side Panel qa IN 4 2 qs AC IN VIDEO IN 2 VIDEO L (MONO) 1 AUDIO R ~ • This TV displays all video input signals in a resolution of 1,920 dots × 1,080 lines. • An HDMI or Component video (YPBPR) connection is required to view...
Locating Inputs and Outputs 5 Rear of TV VIDEO IN 1 3 1 S VIDEO VIDEO L (MONO) AUDIO R COMPONENT IN PC IN 1 2 Y RGB P B IN DIGITAL 1 AUDIO OUT (OPTICAL) 3 P R L AUDIO R AUDIO (1080p/1080i/720p/480p/480i ) 4 AUDIO OUT R ... R (VAR/FIX) 23 4 LAN DMe x / (10/100) SERVICE 6 7 8 9 DMPORT CABLE/ANTENNA 0 Side Panel qa IN 4 2 qs AC IN VIDEO IN 2 VIDEO L (MONO) 1 AUDIO R ~ • This TV displays all video input signals in a resolution of 1,920 dots × 1,080 lines. • An HDMI or Component video (YPBPR) connection is required to view...
Operating Instructions
Page 11
... equipment's component video (YPBPR) and audio (L/R) jacks. HDMI supports enhanced, or high-definition video, plus digital audio. qs AC IN Connects to the TV's L (MONO) audio input jack. You can be displayed. ~ • For some DIGITAL MEDIA PORT equipment. This USB port is for the signals...page 29). qa USB Connects to USB equipment to an HDMI jack, also connect an Audio cable between this connection to connect to your TV's audio through your analog audio equipment. Connect the supplied power cord to the S VIDEO output jack of your stereo system. 9 DMPORT Connects...
... equipment's component video (YPBPR) and audio (L/R) jacks. HDMI supports enhanced, or high-definition video, plus digital audio. qs AC IN Connects to the TV's L (MONO) audio input jack. You can be displayed. ~ • For some DIGITAL MEDIA PORT equipment. This USB port is for the signals...page 29). qa USB Connects to USB equipment to an HDMI jack, also connect an Audio cable between this connection to connect to your TV's audio through your analog audio equipment. Connect the supplied power cord to the S VIDEO output jack of your stereo system. 9 DMPORT Connects...

Operating Instructions
Page 12
.../UHF (or VHF only) 75-ohm coaxial cable Rear of input signal you choose (see page 46). Shown with audio) input on the back of TV VIDEO IN 1 3 S VIDEO VIDEO L (MONO) AUDIO R COMPONENT IN PC IN 1 2 Y RGB PB PR L AUDIO R AUDIO (1080p/1080i/720p/480p/480i) IN DIGITAL...You can enjoy high-definition programming by radio frequency interference, resulting in your area) along with standard-definition analog programming. ~ • This TV is strongly recommended that you connect this equipment to Cable or Antenna in the Channel settings for both cable (QAM and 8VSB) and external...
.../UHF (or VHF only) 75-ohm coaxial cable Rear of input signal you choose (see page 46). Shown with audio) input on the back of TV VIDEO IN 1 3 S VIDEO VIDEO L (MONO) AUDIO R COMPONENT IN PC IN 1 2 Y RGB PB PR L AUDIO R AUDIO (1080p/1080i/720p/480p/480i) IN DIGITAL...You can enjoy high-definition programming by radio frequency interference, resulting in your area) along with standard-definition analog programming. ~ • This TV is strongly recommended that you connect this equipment to Cable or Antenna in the Channel settings for both cable (QAM and 8VSB) and external...

Operating Instructions
Page 13
...) jack and connect the audio jack to the HDMI IN 4 (with Component Connection Rear of HDMI IN 4. Getting Started Shown with DVI Connection Rear of TV VIDEO IN 1 3 S VIDEO VIDEO L (MONO) AUDIO R DVI-to-HDMI cable COMPONENT IN PC IN 1 2 Y RGB PB IN DIGITAL 1 AUDIO OUT (OPTICAL) 3 PR L ... cable Audio cable ~ • If the equipment has a DVI jack and not an HDMI jack, connect the DVI jack to the AUDIO IN (L/R) jacks of TV VIDEO IN 1 3 S VIDEO VIDEO L (MONO) AUDIO R COMPONENT IN PC IN 1 2 Y RGB PB IN DIGITAL 1 AUDIO OUT (OPTICAL) 3 PR L AUDIO R AUDIO (...
...) jack and connect the audio jack to the HDMI IN 4 (with Component Connection Rear of HDMI IN 4. Getting Started Shown with DVI Connection Rear of TV VIDEO IN 1 3 S VIDEO VIDEO L (MONO) AUDIO R DVI-to-HDMI cable COMPONENT IN PC IN 1 2 Y RGB PB IN DIGITAL 1 AUDIO OUT (OPTICAL) 3 PR L ... cable Audio cable ~ • If the equipment has a DVI jack and not an HDMI jack, connect the DVI jack to the AUDIO IN (L/R) jacks of TV VIDEO IN 1 3 S VIDEO VIDEO L (MONO) AUDIO R COMPONENT IN PC IN 1 2 Y RGB PB IN DIGITAL 1 AUDIO OUT (OPTICAL) 3 PR L AUDIO R AUDIO (...

Operating Instructions
Page 14
...the PC for your PC by connecting a HD15-HD15 cable as a video timing and not PC timing. PC Use the TV as a monitor for more than 30 seconds, the TV enters the standby mode automatically (see page 11). • If the PC is recommended to the PC using an HD15HD15 cable...) ~ • Connect the PC IN jack to use the signals (boldfaced) in the above chart with ferrite core (analog RGB) and audio cable (see page 52). Supported resolutions Signal VGA Horizontal × (Pixel) 640 × 640 × 720 × SVGA 800 × 800 × XGA 1,024 × 1,024 × 1,024...
...the PC for your PC by connecting a HD15-HD15 cable as a video timing and not PC timing. PC Use the TV as a monitor for more than 30 seconds, the TV enters the standby mode automatically (see page 11). • If the PC is recommended to the PC using an HD15HD15 cable...) ~ • Connect the PC IN jack to use the signals (boldfaced) in the above chart with ferrite core (analog RGB) and audio cable (see page 52). Supported resolutions Signal VGA Horizontal × (Pixel) 640 × 640 × 720 × SVGA 800 × 800 × XGA 1,024 × 1,024 × 1,024...
Operating Instructions
Page 15
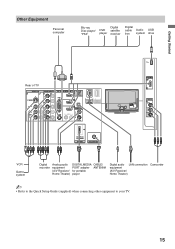
Getting Started Other Equipment Personal computer Blu-ray Disc player/ "PS3" DVD player Digital satellite receiver Digital cable Audio USB box system drive Rear of TV VIDEO IN 1 3 S VIDEO VIDEO L (MONO) AUDIO R COMPONENT IN PC IN 1 2 Y RGB PB IN DIGITAL 1 AUDIO OUT (OPTICAL) 3 PR L AUDIO R AUDIO (1080p/1080i/720p/480p/480i) 4 ... portable player Digital audio LAN connection equipment (A/V Receiver/ Home Theater) Camcorder ~ • Refer to the Quick Setup Guide (supplied) when connecting other equipment to your TV. 15
Getting Started Other Equipment Personal computer Blu-ray Disc player/ "PS3" DVD player Digital satellite receiver Digital cable Audio USB box system drive Rear of TV VIDEO IN 1 3 S VIDEO VIDEO L (MONO) AUDIO R COMPONENT IN PC IN 1 2 Y RGB PB IN DIGITAL 1 AUDIO OUT (OPTICAL) 3 PR L AUDIO R AUDIO (1080p/1080i/720p/480p/480i) 4 ... portable player Digital audio LAN connection equipment (A/V Receiver/ Home Theater) Camcorder ~ • Refer to the Quick Setup Guide (supplied) when connecting other equipment to your TV. 15

Operating Instructions
Page 16
...the CABLE/ ANTENNA input (e.g. 4. Language settings will scan for available channels from the broadcaster. If you to set up to the TV's CABLE/ANTENNA input. Begin your TV Guide On Screen Setup When the Initial Setup is obtained by pressing OPTIONS on how to the previous screen. Next, you have ... see page 44). 4 Set the date and time. Initial Setup The Initial Setup screen appears when you to move back to acquire the TV Guide On Screen service. • The service is free of 6 Initial Setup is available from the signal source directly connected to two days of...
...the CABLE/ ANTENNA input (e.g. 4. Language settings will scan for available channels from the broadcaster. If you to set up to the TV's CABLE/ANTENNA input. Begin your TV Guide On Screen Setup When the Initial Setup is obtained by pressing OPTIONS on how to the previous screen. Next, you have ... see page 44). 4 Set the date and time. Initial Setup The Initial Setup screen appears when you to move back to acquire the TV Guide On Screen service. • The service is free of 6 Initial Setup is available from the signal source directly connected to two days of...

Operating Instructions
Page 17
Press RETURN first, then press either B/b on page 52. Getting Started s To Run Initial Setup Again or Auto Program at a Later Time Select the Initial Setup feature from the beginning when the TV is turned back on. • Auto Program may be canceled while the channels are being scanned. HDMI ... Use the Add Digital Channels feature as described on page 46. (Useful for antenna installations.) ~ • If you accidentally turn off the TV during the Initial Setup process, the Initial Setup will restart from the XMB™ or perform the steps described in the Initial Setup section on...
Press RETURN first, then press either B/b on page 52. Getting Started s To Run Initial Setup Again or Auto Program at a Later Time Select the Initial Setup feature from the beginning when the TV is turned back on. • Auto Program may be canceled while the channels are being scanned. HDMI ... Use the Add Digital Channels feature as described on page 46. (Useful for antenna installations.) ~ • If you accidentally turn off the TV during the Initial Setup process, the Initial Setup will restart from the XMB™ or perform the steps described in the Initial Setup section on...
Operating Instructions
Page 18
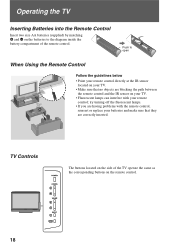
... make sure that no objects are correctly inserted. Push to the diagram inside the battery compartment of the TV operate the same as the corresponding buttons on the remote control. 18 Operating the TV Inserting Batteries into the Remote Control Insert two size AA batteries (supplied) by matching e and E on the batteries... to open When Using the Remote Control Follow the guidelines below • Point your remote control directly at the IR sensor located on your TV. • Make sure that they are blocking the path between the remote control and the IR sensor on your...
... make sure that no objects are correctly inserted. Push to the diagram inside the battery compartment of the TV operate the same as the corresponding buttons on the remote control. 18 Operating the TV Inserting Batteries into the Remote Control Insert two size AA batteries (supplied) by matching e and E on the batteries... to open When Using the Remote Control Follow the guidelines below • Point your remote control directly at the IR sensor located on your TV. • Make sure that they are blocking the path between the remote control and the IR sensor on your...

Operating Instructions
Page 19
...regions. (Continued) 19 DMX-NV1). m (fast reverse): Press to the DVD, AMP, or STB FUNCTION buttons of your dealer or www.sony.com/bravia for details). See Info Banner on all Control for "Programming the Remote Control". See page 25 for HDMI equipment). . Remote ...Control Button Description Operating the TV 1 2 3 4 DISPLAY LIGHT POWER TV POWER DVD AMP STB TV FUNCTION PREV REPLAY ADVANCE NEXT PLAY SYNC MENU PAUSE STOP 5 6 THEATER SOUND PICTURE WIDE CC FREEZE VOL MUTING ...
...regions. (Continued) 19 DMX-NV1). m (fast reverse): Press to the DVD, AMP, or STB FUNCTION buttons of your dealer or www.sony.com/bravia for details). See Info Banner on all Control for "Programming the Remote Control". See page 25 for HDMI equipment). . Remote ...Control Button Description Operating the TV 1 2 3 4 DISPLAY LIGHT POWER TV POWER DVD AMP STB TV FUNCTION PREV REPLAY ADVANCE NEXT PLAY SYNC MENU PAUSE STOP 5 6 THEATER SOUND PICTURE WIDE CC FREEZE VOL MUTING ...

Operating Instructions
Page 20
.../Timers Settings Sound Screen Channel TV qa 0-9 ENT qs qd MUTING qf VOL +/- Press 0-9 to enter 2.1, press 2 , , 1 and ENT. For example, to select a channel; Press to adjust the volume. Press to mute the sound. Blue, Yellow 20 Press ENT to select digital channels. Use with Sony Blu-ray player (BD)... see "How to Use TV Guide On Screen" on page 26. X REC PAUSE: Press to stop recording. x REC STOP: Press to pause recording. TOP...
.../Timers Settings Sound Screen Channel TV qa 0-9 ENT qs qd MUTING qf VOL +/- Press 0-9 to enter 2.1, press 2 , , 1 and ENT. For example, to select a channel; Press to adjust the volume. Press to mute the sound. Blue, Yellow 20 Press ENT to select digital channels. Use with Sony Blu-ray player (BD)... see "How to Use TV Guide On Screen" on page 26. X REC PAUSE: Press to stop recording. x REC STOP: Press to pause recording. TOP...


