Operating Instructions
Page 3
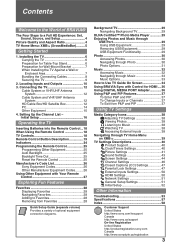
... TV Settings Descriptions 40 Product Support 40 Clock/Timers Settings 40 Picture Settings 41 Sound Settings 43 Screen Settings 44 Channel Settings 46 CC Closed Captions (CC) Settings 47 Parental Lock Settings 47 External Inputs Settings 50 HDMI Settings 50 Network Settings 51 General Setup Settings 51 Initial Setup 52 Other Information Troubleshooting 53 Specifications 57 Index 58 Customer Support United States http://www.sony...
... TV Settings Descriptions 40 Product Support 40 Clock/Timers Settings 40 Picture Settings 41 Sound Settings 43 Screen Settings 44 Channel Settings 46 CC Closed Captions (CC) Settings 47 Parental Lock Settings 47 External Inputs Settings 50 HDMI Settings 50 Network Settings 51 General Setup Settings 51 Initial Setup 52 Other Information Troubleshooting 53 Specifications 57 Index 58 Customer Support United States http://www.sony...

Operating Instructions
Page 4
...use a boxy 4:3 aspect ratio. When a 4:3 image is displayed on your BRAVIA TV is only as good as with your BRAVIA TV set, a complete HD system requires an HD sound system, a source of your new BRAVIA TV, you for information on the sides. To experience the stunning detail of HD programming...). 4 This manual explains basic setup connections (see black bars on upgrading to HD programming. http://www.sony.com/HDTV Canada http://www.sonystyle.ca/hd The Four Steps to a Full HD Experience: Set, Sound, Source, and Setup Along with HD sources. ~ • You can use the Wide Mode...
...use a boxy 4:3 aspect ratio. When a 4:3 image is displayed on your BRAVIA TV is only as good as with your BRAVIA TV set, a complete HD system requires an HD sound system, a source of your new BRAVIA TV, you for information on the sides. To experience the stunning detail of HD programming...). 4 This manual explains basic setup connections (see black bars on upgrading to HD programming. http://www.sony.com/HDTV Canada http://www.sonystyle.ca/hd The Four Steps to a Full HD Experience: Set, Sound, Source, and Setup Along with HD sources. ~ • You can use the Wide Mode...
Operating Instructions
Page 5
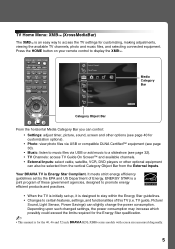
...set by the EPA and US Department of this TV (i.e. Your BRAVIA TV is for customization options). • Photo: view photo files via USB or compatible DLNA Certified™ equipment (see page 40 for the 40, 46 and 52 inch BRAVIA KDL-XBR6 series models with screen size measured diagonally. 5 DISPLAY LIGHT POWER TV... POWER DVD AMP STB TV FUNCTION PREV REPLAY ADVANCE NEXT PLAY SYNC MENU PAUSE STOP THEATER SOUND ...
...set by the EPA and US Department of this TV (i.e. Your BRAVIA TV is for customization options). • Photo: view photo files via USB or compatible DLNA Certified™ equipment (see page 40 for the 40, 46 and 52 inch BRAVIA KDL-XBR6 series models with screen size measured diagonally. 5 DISPLAY LIGHT POWER TV... POWER DVD AMP STB TV FUNCTION PREV REPLAY ADVANCE NEXT PLAY SYNC MENU PAUSE STOP THEATER SOUND ...
Operating Instructions
Page 7
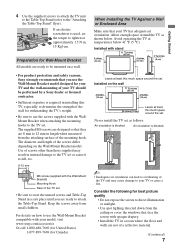
... screws other than those supplied may cause damage to the TV set . Use of the screws differ depending on a wall. • For product protection and safety reasons, Sony strongly recommends that your TV or cause a fire. Consider the following for Canada) When Installing the TV Against a Wall or Enclosed Area Make sure that you use...
... screws other than those supplied may cause damage to the TV set . Use of the screws differ depending on a wall. • For product protection and safety reasons, Sony strongly recommends that your TV or cause a fire. Consider the following for Canada) When Installing the TV Against a Wall or Enclosed Area Make sure that you use...
Operating Instructions
Page 9
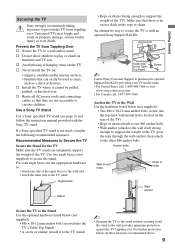
...brace Stand • Rope or chain (strong enough to the TV stand. If a Sony specified TV stand is with the Sony TV stand. s Install the TV where it and the stand to the wall provides minimum protection against the TV toppling over. For each angle brace use the appropriate hardware ...holes located on furniture and TV sets. Use two angle braces (not supplied) to a wall and/or stand. Getting Started Securing the TV Sony strongly recommends taking measures to prevent the TV from Toppling Over s Secure the TV to secure the stand. Prevent the TV from toppling over . ...
...brace Stand • Rope or chain (strong enough to the TV stand. If a Sony specified TV stand is with the Sony TV stand. s Install the TV where it and the stand to the wall provides minimum protection against the TV toppling over. For each angle brace use the appropriate hardware ...holes located on furniture and TV sets. Use two angle braces (not supplied) to a wall and/or stand. Getting Started Securing the TV Sony strongly recommends taking measures to prevent the TV from Toppling Over s Secure the TV to secure the stand. Prevent the TV from toppling over . ...
Operating Instructions
Page 11
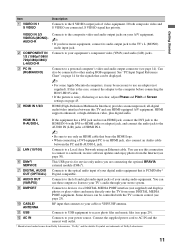
...* OUT (OPTICAL) Digital compatible. 8 AUDIO OUT (VAR/FIX) Connects to the left and right audio input jacks of Screen settings on page 45. If this TV and any HDMI-equipped A/V equipment. Connect the supplied power cord to other analog RGB equipment. Getting Started Item 1 VIDEO IN ...1 S VIDEO Description Connects to a Local Area Network using an Ethernet cable. qa USB Connects to USB equipment to the TV's L (MONO) audio input jack. VIDEO IN 2/3 VIDEO/L(MONO)AUDIO-R 2 COMPONENT IN 1/2 (1080p/1080i/ 720p/480p/480i)/ L-AUDIO-R 3 PC IN (RGB...
...* OUT (OPTICAL) Digital compatible. 8 AUDIO OUT (VAR/FIX) Connects to the left and right audio input jacks of Screen settings on page 45. If this TV and any HDMI-equipped A/V equipment. Connect the supplied power cord to other analog RGB equipment. Getting Started Item 1 VIDEO IN ...1 S VIDEO Description Connects to a Local Area Network using an Ethernet cable. qa USB Connects to USB equipment to the TV's L (MONO) audio input jack. VIDEO IN 2/3 VIDEO/L(MONO)AUDIO-R 2 COMPONENT IN 1/2 (1080p/1080i/ 720p/480p/480i)/ L-AUDIO-R 3 PC IN (RGB...

Operating Instructions
Page 12
...to a high-definition cable service or a high-definition satellite service. Cable Antenna A-B RF switch A Rear of TV B CABLE/ANTENNA ~ • Be sure to set the Signal Type setting to your TV via the HDMI or component video (with audio) input on the back of your area) along with HDMI ...air antenna programming, as indicated below. For the best possible picture, make sure you connect this equipment to Cable or Antenna in the Channel settings for both cable (QAM and 8VSB) and external VHF/UHF antenna (ATSC). • It is strongly recommended that you choose (see page...
...to a high-definition cable service or a high-definition satellite service. Cable Antenna A-B RF switch A Rear of TV B CABLE/ANTENNA ~ • Be sure to set the Signal Type setting to your TV via the HDMI or component video (with audio) input on the back of your area) along with HDMI ...air antenna programming, as indicated below. For the best possible picture, make sure you connect this equipment to Cable or Antenna in the Channel settings for both cable (QAM and 8VSB) and external VHF/UHF antenna (ATSC). • It is strongly recommended that you choose (see page...

Operating Instructions
Page 14
... ~ • This TV's PC input does not support Sync on the television....Signal Reference Chart After connecting the PC to the TV, set Picture Mode to Custom, Wide Mode to Full,...Pixel. 14 To view PC content set the output signal from the PC for your PC ... video timing and not PC timing. This TV can also be connected to a PC with ...Composite Sync. • This TV's PC VGA input does not support interlaced signals. • Your PC must support one of TV HD15-HD15 cable (analog RGB...settings, Wide Mode settings, and PIP function. PC Use the TV as a monitor for more than 30 seconds, the TV enters the...
... ~ • This TV's PC input does not support Sync on the television....Signal Reference Chart After connecting the PC to the TV, set Picture Mode to Custom, Wide Mode to Full,...Pixel. 14 To view PC content set the output signal from the PC for your PC ... video timing and not PC timing. This TV can also be connected to a PC with ...Composite Sync. • This TV's PC VGA input does not support interlaced signals. • Your PC must support one of TV HD15-HD15 cable (analog RGB...settings, Wide Mode settings, and PIP function. PC Use the TV as a monitor for more than 30 seconds, the TV enters the...

Operating Instructions
Page 16
... avoid accidental input change while using an external input; If you to select the highlighted option and advance to set up to two days of charge. • Your TV acquires program listing information while your cable connections (refer to the preceding pages and the Quick Setup Guide provided ... • Once the program information is complete. Initial Setup Step 1 of 6 Initial Setup is obtained by pressing OPTIONS on the TV for digital programs (see page 44). 4 Set the date and time. B button: Allows you will see page 50 for details. • If the language that you have ...
... avoid accidental input change while using an external input; If you to select the highlighted option and advance to set up to two days of charge. • Your TV acquires program listing information while your cable connections (refer to the preceding pages and the Quick Setup Guide provided ... • Once the program information is complete. Initial Setup Step 1 of 6 Initial Setup is obtained by pressing OPTIONS on the TV for digital programs (see page 44). 4 Set the date and time. B button: Allows you will see page 50 for details. • If the language that you have ...

Operating Instructions
Page 17
... first, then press either B/b on page 52. Select Yes to cancel or No to resume Auto Program. 17 Getting Started s To Run Initial Setup Again or Auto Program at a Later Time Select the Initial Setup feature from the beginning when the TV is turned back on. • Auto Program... may be canceled while the channels are being scanned. To run Auto Program, see page 46. HDMI Settings General Setup Settings Initial Setup TV s To Add Digital Channels Use the Add Digital Channels feature as described on page 46. (Useful for antenna installations.) ~ • If...
... first, then press either B/b on page 52. Select Yes to cancel or No to resume Auto Program. 17 Getting Started s To Run Initial Setup Again or Auto Program at a Later Time Select the Initial Setup feature from the beginning when the TV is turned back on. • Auto Program... may be canceled while the channels are being scanned. To run Auto Program, see page 46. HDMI Settings General Setup Settings Initial Setup TV s To Add Digital Channels Use the Add Digital Channels feature as described on page 46. (Useful for antenna installations.) ~ • If...

Operating Instructions
Page 19
...these FUNCTION buttons to play a program at a normal speed. Select the HDMI device and then press SYNC MENU to live TV cache. See your TV (see Sound settings on the amount of connected equipment (not available on all Control for the device mode the remote control is selected, the ...TV POWER DVD AMP STB TV FUNCTION PREV REPLAY ADVANCE NEXT PLAY SYNC MENU PAUSE STOP 5 6 THEATER SOUND PICTURE WIDE CC FREEZE VOL MUTING CH JUMP REC RECPAUSE RECSTOP BD/DVD TOP MENU MENU F1 F2 ~ • The 5, PLAY and CH+ buttons have a tactile dot. X PAUSE: Press to your dealer or www.sony...
...these FUNCTION buttons to play a program at a normal speed. Select the HDMI device and then press SYNC MENU to live TV cache. See your TV (see Sound settings on the amount of connected equipment (not available on all Control for the device mode the remote control is selected, the ...TV POWER DVD AMP STB TV FUNCTION PREV REPLAY ADVANCE NEXT PLAY SYNC MENU PAUSE STOP 5 6 THEATER SOUND PICTURE WIDE CC FREEZE VOL MUTING CH JUMP REC RECPAUSE RECSTOP BD/DVD TOP MENU MENU F1 F2 ~ • The 5, PLAY and CH+ buttons have a tactile dot. X PAUSE: Press to your dealer or www.sony...

Operating Instructions
Page 20
... Menu/XMB™ to mute the sound. Product Support Clock/Timers Settings Sound Screen Channel TV qa 0-9 ENT qs qd MUTING qf VOL +/- Press to access the TV Home Menu items such as the TV Settings, Photo, Music, TV channels and External Inputs list (see pages 5 and 38). X REC PAUSE: Press to the operating ...Description 7 FAVORITES Press once to record. For example, to restore the sound. Press again or press VOL + to enter 2.1, press 2 , , 1 and ENT. Use with Sony Blu-ray player (BD) see "How to Use TV Guide On Screen" on page 26. Press again to select digital channels.
... Menu/XMB™ to mute the sound. Product Support Clock/Timers Settings Sound Screen Channel TV qa 0-9 ENT qs qd MUTING qf VOL +/- Press to access the TV Home Menu items such as the TV Settings, Photo, Music, TV channels and External Inputs list (see pages 5 and 38). X REC PAUSE: Press to the operating ...Description 7 FAVORITES Press once to record. For example, to restore the sound. Press again or press VOL + to enter 2.1, press 2 , , 1 and ENT. Use with Sony Blu-ray player (BD) see "How to Use TV Guide On Screen" on page 26. Press again to select digital channels.
Operating Instructions
Page 21
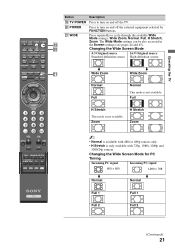
...Stretch is not available. Full H Stretch This mode is not available. The Wide Mode settings can be also accessed in the Screen settings (see pages 44 and 45). Operating the TV Button Description ql TV POWER Press to turn on and off the external equipment selected by FUNCTION buttons. DISPLAY LIGHT... POWER TV POWER DVD AMP STB TV FUNCTION PREV REPLAY ADVANCE NEXT PLAY ql ...
...Stretch is not available. Full H Stretch This mode is not available. The Wide Mode settings can be also accessed in the Screen settings (see pages 44 and 45). Operating the TV Button Description ql TV POWER Press to turn on and off the external equipment selected by FUNCTION buttons. DISPLAY LIGHT... POWER TV POWER DVD AMP STB TV FUNCTION PREV REPLAY ADVANCE NEXT PLAY ql ...
Operating Instructions
Page 22
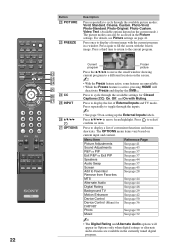
... Freeze feature is active, pressing HOME will appear in Options only when digital ratings or alternate audio streams are available in the Picture settings. Freeze Current program Frozen picture Press the V/v/B/b to move focus/highlight. Menu Item Picture Adjustments Sound Adjustments P&P or PIP Exit P&P... or Exit PIP Speakers Audio Swap Screen Add to Favorites/ Remove from Favorites MTS Alternate Audio Digital Rating Background TV Motion Enhancer Device Control Device Control (Menu) for Closed Captions (CC): On, Off, and On with Muting. Press a third time ...
... Freeze feature is active, pressing HOME will appear in Options only when digital ratings or alternate audio streams are available in the Picture settings. Freeze Current program Frozen picture Press the V/v/B/b to move focus/highlight. Menu Item Picture Adjustments Sound Adjustments P&P or PIP Exit P&P... or Exit PIP Speakers Audio Swap Screen Add to Favorites/ Remove from Favorites MTS Alternate Audio Digital Rating Background TV Motion Enhancer Device Control Device Control (Menu) for Closed Captions (CC): On, Off, and On with Muting. Press a third time ...
Operating Instructions
Page 24
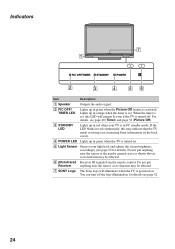
When the timer is set, this may be affected. 7 SONY Logo The Sony logo will remain lit even if the TV is set. Do not put Receiver anything near the sensor, as its function may be affected. 6 (IR) Infrared Receives IR signals from the remote control. Lights up ... level and adjusts the screen brightness accordingly (see page 52 for details see page 40 (Timer) and page 52 (Picture Off). 3 STANDBY LED Lights up in red when your TV is activated. If the LED blinks in red continuously, this LED will illuminate when the TV is turned on . You can turn off . Indicators...
When the timer is set, this may be affected. 7 SONY Logo The Sony logo will remain lit even if the TV is set. Do not put Receiver anything near the sensor, as its function may be affected. 6 (IR) Infrared Receives IR signals from the remote control. Lights up ... level and adjusts the screen brightness accordingly (see page 52 for details see page 40 (Timer) and page 52 (Picture Off). 3 STANDBY LED Lights up in red when your TV is activated. If the LED blinks in red continuously, this LED will illuminate when the TV is turned on . You can turn off . Indicators...

Operating Instructions
Page 25
...to operate the following Sony equipment. DVD 5 seconds (default) STB 15 seconds AMP 10 seconds TV 20 seconds Reset the Remote Control To reset the remote control to your remote control. For example, DVD can be programmed to program your preferred time out setting and press . If ... pressed. Backlight Time Out The remote control can be set backlight: Press LIGHT and MUTING simultaneously until the TV button blinks red. 3 VOL CH Follow the steps below to program your equipment from page 26. Function Button Sony Equipment Code Number DVD DVD Player 31033 AMP Receiver 52172...
...to operate the following Sony equipment. DVD 5 seconds (default) STB 15 seconds AMP 10 seconds TV 20 seconds Reset the Remote Control To reset the remote control to your remote control. For example, DVD can be programmed to program your preferred time out setting and press . If ... pressed. Backlight Time Out The remote control can be set backlight: Press LIGHT and MUTING simultaneously until the TV button blinks red. 3 VOL CH Follow the steps below to program your equipment from page 26. Function Button Sony Equipment Code Number DVD DVD Player 31033 AMP Receiver 52172...

Operating Instructions
Page 28
... ~ • To clear your Favorites to highlight Remove from Favorites and press . ~ • Auto Program will clear your TV channels from Favorites (see page 52). 28 Removing from Favorites, follow the instructions below. Locate the item you wish to add and press OPTIONS. 2 Press V/v to...Favorites 1 From the XMBTM, select a Photo, Music, TV, or External Inputs icon. Displaying Favorites Press FAVORITES. To remove from Favorites 1 Press FAVORITES, then select an item to be removed, and press OPTIONS. 2 Press V/v to factory default settings (see pages 16 and 46). • Initial Setup ...
... ~ • To clear your Favorites to highlight Remove from Favorites and press . ~ • Auto Program will clear your TV channels from Favorites (see page 52). 28 Removing from Favorites, follow the instructions below. Locate the item you wish to add and press OPTIONS. 2 Press V/v to...Favorites 1 From the XMBTM, select a Photo, Music, TV, or External Inputs icon. Displaying Favorites Press FAVORITES. To remove from Favorites 1 Press FAVORITES, then select an item to be removed, and press OPTIONS. 2 Press V/v to factory default settings (see pages 16 and 46). • Initial Setup ...

Operating Instructions
Page 31
...photo folder, equipment, or server information. Exploring Fun Features Display Preference Select to view the photo file highlighted. File Order Sets the order in Standard or Expanded size. Photo Options Pressing OPTIONS while displaying the List View will be available for photos from... Favorites. (Continued) 31 Thumbnail View Select to set the slideshow transition or image effect (shown below is Butterfly effect). ~ • Maze and Butterfly slideshow effects can only display...
...photo folder, equipment, or server information. Exploring Fun Features Display Preference Select to view the photo file highlighted. File Order Sets the order in Standard or Expanded size. Photo Options Pressing OPTIONS while displaying the List View will be available for photos from... Favorites. (Continued) 31 Thumbnail View Select to set the slideshow transition or image effect (shown below is Butterfly effect). ~ • Maze and Butterfly slideshow effects can only display...

Operating Instructions
Page 32
Speakers Select to set sound to TV Speakers or Audio System. ~ • For Display Size, Playback Method, Photo Settings, Start Slideshow, Rotate and Save, Delete, Information, Add to Favorites, and Remove from a Sony connected USB equipment (not supplied) or add music to a slideshow. USB Samples Music USB ...menu Picture Adjustments Select to music MP3 files directly from Favorites see page 31. • Photos cannot be displayed in the TV. Highlight and select any available file or folder. 32 Sound Adjustments Select to make adjustments to highlight and select the music ...
Speakers Select to set sound to TV Speakers or Audio System. ~ • For Display Size, Playback Method, Photo Settings, Start Slideshow, Rotate and Save, Delete, Information, Add to Favorites, and Remove from a Sony connected USB equipment (not supplied) or add music to a slideshow. USB Samples Music USB ...menu Picture Adjustments Select to music MP3 files directly from Favorites see page 31. • Photos cannot be displayed in the TV. Highlight and select any available file or folder. 32 Sound Adjustments Select to make adjustments to highlight and select the music ...

Operating Instructions
Page 33
...To play of a music track. Music Options menu Omit from Slideshow Playback Method Select to continue play order and visual effect settings while playing music files. Sets the play . Thumbnail View Select to view track, folder, or equipment information. After adding a music file, see Slideshow ...Remove from Favorites Select to continuously play during a slideshow. To stop playing a music track and return to Favorites. File Order Sets the order in the TV. 33 Select from the slideshow music. Add to Favorites Select to add a track, folder, or equipment to List View/...
...To play of a music track. Music Options menu Omit from Slideshow Playback Method Select to continue play order and visual effect settings while playing music files. Sets the play . Thumbnail View Select to view track, folder, or equipment information. After adding a music file, see Slideshow ...Remove from Favorites Select to continuously play during a slideshow. To stop playing a music track and return to Favorites. File Order Sets the order in the TV. 33 Select from the slideshow music. Add to Favorites Select to add a track, folder, or equipment to List View/...


