
Operating Instructions
Page 9
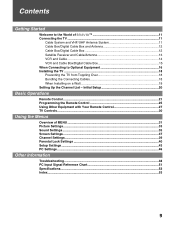
Contents Getting Started Welcome to the World of MENU ...31 Picture Settings...33 Sound Settings...35 Screen Settings ...37 Channel Settings...39 Parental Lock Settings 40 Setup Settings ...43 PC Settings ...46 Other Information Troubleshooting...48 PC Input Signal Reference Chart 51 Specifications ...52 Index ...53 9 Initial Setup 20 Basic Operations Remote Control ...21 Programming the Remote Control ... Equipment 16 Installing the TV ...18 Preventing the TV from Toppling Over 18 Bundling the Connecting Cables 18 When Installing on a Wall 19 Setting Up the Channel List -
Contents Getting Started Welcome to the World of MENU ...31 Picture Settings...33 Sound Settings...35 Screen Settings ...37 Channel Settings...39 Parental Lock Settings 40 Setup Settings ...43 PC Settings ...46 Other Information Troubleshooting...48 PC Input Signal Reference Chart 51 Specifications ...52 Index ...53 9 Initial Setup 20 Basic Operations Remote Control ...21 Programming the Remote Control ... Equipment 16 Installing the TV ...18 Preventing the TV from Toppling Over 18 Bundling the Connecting Cables 18 When Installing on a Wall 19 Setting Up the Channel List -
Operating Instructions
Page 17
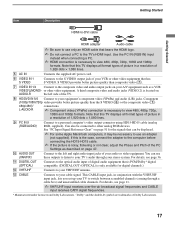
... the computer before connecting the HD15-HD15 cable. ✍ If the picture is only available for the signals that this TV displays all format types of picture in conjunction with the VHF/UHF input jack, lets you set up your TV to the S VIDEO output jack of the TV....receives CATV signal frequencies. * Manufactured under license from Dolby Laboratories. or other video equipment that this TV displays all format types of picture in a resolution of the PC Settings as a VCR VIDEO/L(MONO)- For details, see page 36. This CABLE input jack, in a resolution of Dolby Laboratories. 17...
... the computer before connecting the HD15-HD15 cable. ✍ If the picture is only available for the signals that this TV displays all format types of picture in conjunction with the VHF/UHF input jack, lets you set up your TV to the S VIDEO output jack of the TV....receives CATV signal frequencies. * Manufactured under license from Dolby Laboratories. or other video equipment that this TV displays all format types of picture in a resolution of the PC Settings as a VCR VIDEO/L(MONO)- For details, see page 36. This CABLE input jack, in a resolution of Dolby Laboratories. 17...
Operating Instructions
Page 23
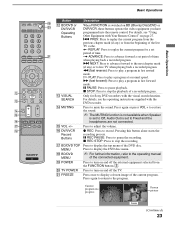
...the connected equipment. x STOP: Press to live TV cache. Only for a set period of a recorded program. Press to turn on page 27. &m PREV: Press to replay the current program for Sony DVD recorders with Your Remote Control" on and off the external equipment selected from...the remote control. z REC: Press to mute the sound. Pressing this button alone starts the recording process. Current program in progress Frozen picture Freeze (Continued) 23 For details, see "Using Other Equipment with the visual search function. Press to play a program at a normal ...
...the connected equipment. x STOP: Press to live TV cache. Only for a set period of a recorded program. Press to turn on page 27. &m PREV: Press to replay the current program for Sony DVD recorders with Your Remote Control" on and off the external equipment selected from...the remote control. z REC: Press to mute the sound. Pressing this button alone starts the recording process. Current program in progress Frozen picture Freeze (Continued) 23 For details, see "Using Other Equipment with the visual search function. Press to play a program at a normal ...
Operating Instructions
Page 24
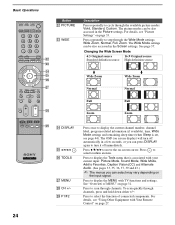
... you can press DISPLAY again to turn off immediately. To scan quickly through the Wide Mode settings: Wide Zoom, Normal, Full, Zoom. The Wide Mode settings can be also accessed in the Picture settings. wl F1/F2 Press once to display the current channel number, channel label, program-related... of connected components. For details, see page 44). The OSD (on page 33. Press to select/confirm an item. For details, see "Picture Settings" on screen display) will turn it off automatically in a few seconds, or you can select may vary depending on page 27. Press to ...
... you can press DISPLAY again to turn off immediately. To scan quickly through the Wide Mode settings: Wide Zoom, Normal, Full, Zoom. The Wide Mode settings can be also accessed in the Picture settings. wl F1/F2 Press once to display the current channel number, channel label, program-related... of connected components. For details, see page 44). The OSD (on page 33. Press to select/confirm an item. For details, see "Picture Settings" on screen display) will turn it off automatically in a few seconds, or you can select may vary depending on page 27. Press to ...
Operating Instructions
Page 30
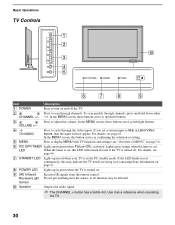
...in red continuously, this may be affected. For details, see contacting Sony information on page 2). 8 POWER LED Lights up in green when the TV is turned on and off . In the MENU screen, these buttons serve as confirming the selection or setting. 5 MENU Press to turn on . 9 (IR) Infrared ... of MENU" on page 31). 6 PIC OFF/TIMER Lights up in the PC standby mode. LED When the timer is set a certain input to adjust the volume. Lights up in green when Picture Off is in orange when the timer is turned off the TV. 2 Press to cycle through channels.
...in red continuously, this may be affected. For details, see contacting Sony information on page 2). 8 POWER LED Lights up in green when the TV is turned on and off . In the MENU screen, these buttons serve as confirming the selection or setting. 5 MENU Press to turn on . 9 (IR) Infrared ... of MENU" on page 31). 6 PIC OFF/TIMER Lights up in the PC standby mode. LED When the timer is set a certain input to adjust the volume. Lights up in green when Picture Off is in orange when the timer is turned off the TV. 2 Press to cycle through channels.
Operating Instructions
Page 31
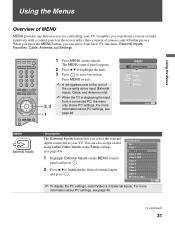
...using Label Video Inputs in External Inputs. For more information about PC settings, see page 46. TV/VIDEO SLEEP POWER TV POWER BD/DVD DVR/VCR SAT/CABLE TV FUNCTION ENT JUMP ANT FREEZE MODE SURROUND SOUND PICTURE WIDE DISPLAY GUIDE TOOLS MENU PREV REPLAY ADVANCE NEXT PLAY 2, 3... 1 1 Press MENU on the screen rather than a variety of remote control button presses. MENU External Inputs Favorites C Cable Antenna Settings Select from connected equipment Exit: MENU ...
...using Label Video Inputs in External Inputs. For more information about PC settings, see page 46. TV/VIDEO SLEEP POWER TV POWER BD/DVD DVR/VCR SAT/CABLE TV FUNCTION ENT JUMP ANT FREEZE MODE SURROUND SOUND PICTURE WIDE DISPLAY GUIDE TOOLS MENU PREV REPLAY ADVANCE NEXT PLAY 2, 3... 1 1 Press MENU on the screen rather than a variety of remote control button presses. MENU External Inputs Favorites C Cable Antenna Settings Select from connected equipment Exit: MENU ...
Operating Instructions
Page 32
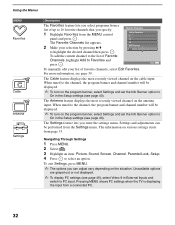
... page 46), select Video 9 in the Setup settings (see page 39. The Settings feature lets you enter the settings menu. Settings and adjustments can adjust vary depending on various settings starts from a connected PC. 32 The information on the situation. Navigating Through Settings 1 Press MENU. 2 Select . 3 Highlight an item: Picture, Sound, Screen, Channel, Parental Lock, Setup. 4 Press...
... page 46), select Video 9 in the Setup settings (see page 39. The Settings feature lets you enter the settings menu. Settings and adjustments can adjust vary depending on various settings starts from a connected PC. 32 The information on the situation. Navigating Through Settings 1 Press MENU. 2 Select . 3 Highlight an item: Picture, Sound, Screen, Channel, Parental Lock, Setup. 4 Press...
Operating Instructions
Page 33
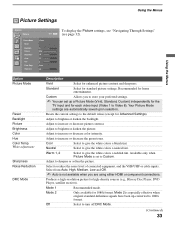
... increase or decrease color intensity. Warm 1, 2 Select to brighten or darken the backlight. Using the Menus Picture Settings Antenna Picture Picture Mode Reset Backlight Picture Brightness Color Hue Color Temp. Standard Select for home entertainment. Adjust to give the white colors a bluish...Description Vivid Select for each video input (Video 1 to Video 8). Your Picture Mode settings are using either HDMI or component connections. Sharpness To display the Picture settings, see "Navigating Through Settings" Exit: MENU (see page 32). Adjust to 1080i format. Select from...
... increase or decrease color intensity. Warm 1, 2 Select to brighten or darken the backlight. Using the Menus Picture Settings Antenna Picture Picture Mode Reset Backlight Picture Brightness Color Hue Color Temp. Standard Select for home entertainment. Adjust to give the white colors a bluish...Description Vivid Select for each video input (Video 1 to Video 8). Your Picture Mode settings are using either HDMI or component connections. Sharpness To display the Picture settings, see "Navigating Through Settings" Exit: MENU (see page 32). Adjust to 1080i format. Select from...
Operating Instructions
Page 34
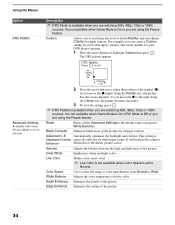
...the default values (except for stronger contrast. The DRC palette appears. As you to customize the level of the picture for White Balance). This setting is (Advanced Contrast especially effective for input sources. Detail Enhancer Enhances the details of the marker (z). Advanced C.E. ...white and light colors. Using the Menus Option DRC Palette Advanced Settings Available only when Picture Mode is set to Normal. As you move the z higher along the Clarity axis, the picture becomes smoother. 3 To save the setting, press . ✍ DRC Palette is available when you are...
...the default values (except for stronger contrast. The DRC palette appears. As you to customize the level of the picture for White Balance). This setting is (Advanced Contrast especially effective for input sources. Detail Enhancer Enhances the details of the marker (z). Advanced C.E. ...white and light colors. Using the Menus Option DRC Palette Advanced Settings Available only when Picture Mode is set to Normal. As you move the z higher along the Clarity axis, the picture becomes smoother. 3 To save the setting, press . ✍ DRC Palette is available when you are...
Operating Instructions
Page 37
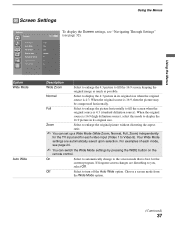
...select this mode to fill the screen when the original source is 4:3. Full Select to enlarge the picture horizontally to display the 16:9 picture in its original size. Your Wide Mode settings are disturbing to turn off the Auto Wide option. For examples of each video input (Video 1 ...to the screen mode that is 16:9, then the picture may be compressed horizontally. Using the Menus Screen Settings Using the Menus Antenna Screen Wide Mode Auto Wide 4:3 Default Display Area Horizontal Center Vertical Center Vertical Size To...
...select this mode to fill the screen when the original source is 4:3. Full Select to enlarge the picture horizontally to display the 16:9 picture in its original size. Your Wide Mode settings are disturbing to turn off the Auto Wide option. For examples of each video input (Video 1 ...to the screen mode that is 16:9, then the picture may be compressed horizontally. Using the Menus Screen Settings Using the Menus Antenna Screen Wide Mode Auto Wide 4:3 Default Display Area Horizontal Center Vertical Center Vertical Size To...
Operating Instructions
Page 38
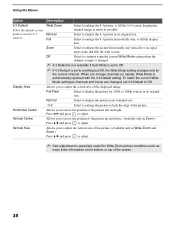
...Off Select to continue using the current Wide Mode setting when the channel or input is automatically replaced with the 4:3 Default setting. Zoom Select to enlarge the picture horizontally and vertically to anything but Off, the Wide Mode setting changes only for 4:3 sources. Allows you to adjust...only in its original size. Allows you change channels (or inputs), Wide Mode is changed , set to an equal aspect ratio that fills the wide screen. Full Select to enlarge the 4:3 picture horizontally only, to adjust. Press B/b and press to fill the display area. Using the ...
...Off Select to continue using the current Wide Mode setting when the channel or input is automatically replaced with the 4:3 Default setting. Zoom Select to enlarge the picture horizontally and vertically to anything but Off, the Wide Mode setting changes only for 4:3 sources. Allows you to adjust...only in its original size. Allows you change channels (or inputs), Wide Mode is changed , set to an equal aspect ratio that fills the wide screen. Full Select to enlarge the 4:3 picture horizontally only, to adjust. Press B/b and press to fill the display area. Using the ...
Operating Instructions
Page 43
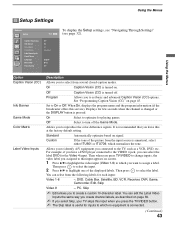
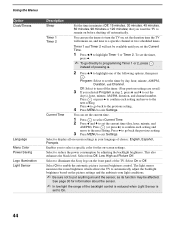
...you to optimize for the Video 4 input. On Select to create a custom 10-character label. Off Select to highlight one of the picture from several closed-caption modes. Custom If the tone of the displayed labels. Allows you to identify A/V equipment you connected to change inputs...Label Video Inputs Clock/Timers Language Menu Color Power Saving Exit: MENU Off On Off Standard English Blue Off To display the Setup settings, see "Navigating Through Settings" (see page 32). See "Programming Caption Vision (CC)" on signal. Off Caption Vision (CC) is pressed. Then press ...
...you to optimize for the Video 4 input. On Select to create a custom 10-character label. Off Select to highlight one of the picture from several closed-caption modes. Custom If the tone of the displayed labels. Allows you to identify A/V equipment you connected to change inputs...Label Video Inputs Clock/Timers Language Menu Color Power Saving Exit: MENU Off On Off Standard English Blue Off To display the Setup settings, see "Navigating Through Settings" (see page 32). See "Programming Caption Vision (CC)" on signal. Off Caption Vision (CC) is pressed. Then press ...
Operating Instructions
Page 44
... of pressing b. 2 Press V/v to highlight one of the TV. Press or press b to confirm each setting and move to the next setting. Select from Off, Low, High and Picture Off. Select to illuminate the Sony logo on the front panel of the following options, then press . Timer 1 Timer 2 You can... set the Current Time. 1 Press V/v to exit Settings. Timer 1 and Timer 2 will remain on, and tune to...
... of pressing b. 2 Press V/v to highlight one of the TV. Press or press b to confirm each setting and move to the next setting. Select from Off, Low, High and Picture Off. Select to illuminate the Sony logo on the front panel of the following options, then press . Timer 1 Timer 2 You can... set the Current Time. 1 Press V/v to exit Settings. Timer 1 and Timer 2 will remain on, and tune to...
Operating Instructions
Page 45
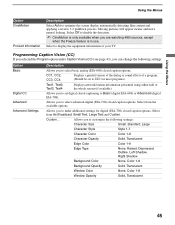
... detection. ✍ CineMotion is only available when you are watching 480i sources, except when the Freeze feature is in use. Moving pictures will appear clearer and more natural looking. Programming Caption Vision (CC) If you selected the Program option under Caption Vision (CC) ...(see page 43), you to make additional settings for most programs.) Text1, Text2, Text3, Text4 Displays network/station information presented using either half or the whole screen (if available). Custom...
... detection. ✍ CineMotion is only available when you are watching 480i sources, except when the Freeze feature is in use. Moving pictures will appear clearer and more natural looking. Programming Caption Vision (CC) If you selected the Program option under Caption Vision (CC) ...(see page 43), you to make additional settings for most programs.) Text1, Text2, Text3, Text4 Displays network/station information presented using either half or the whole screen (if available). Custom...
Operating Instructions
Page 46
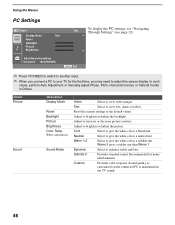
.... Sound quality as customized on the connected PC is maintained in Others. Adjust to brighten or darken the picture. Custom Provides a flat response. Display Mode Text Reset Backlight Picture Brightness Adjust the picture settings Resolution: 1024x768/60Hz MENU Exit ✍ Press TV/VIDEO to switch to another input. ✍ When you connect a PC to...
.... Sound quality as customized on the connected PC is maintained in Others. Adjust to brighten or darken the picture. Custom Provides a flat response. Display Mode Text Reset Backlight Picture Brightness Adjust the picture settings Resolution: 1024x768/60Hz MENU Exit ✍ Press TV/VIDEO to switch to another input. ✍ When you connect a PC to...
Operating Instructions
Page 47
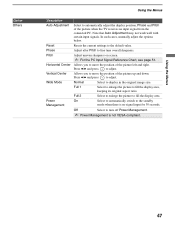
Resets the current settings to display in the original image size. Adjust uneven sharpness on screen. ✍ For the PC Input Signal Reference Chart, see page 51. Allows you to move the position of the picture up and down. Normal Select to the default value. In such cases, manually ...signal input for 30 seconds. Off Select to the standby mode when there is not VESA-compliant. 47 Full 2 Select to enlarge the picture to fine tune overall sharpness. Adjust after Pitch to fill the display area. Using the Menus Option Others Using the Menus Description Auto ...
Resets the current settings to display in the original image size. Adjust uneven sharpness on screen. ✍ For the PC Input Signal Reference Chart, see page 51. Allows you to move the position of the picture up and down. Normal Select to the default value. In such cases, manually ...signal input for 30 seconds. Off Select to the standby mode when there is not VESA-compliant. 47 Full 2 Select to enlarge the picture to fine tune overall sharpness. Adjust after Pitch to fill the display area. Using the Menus Option Others Using the Menus Description Auto ...
Operating Instructions
Page 48
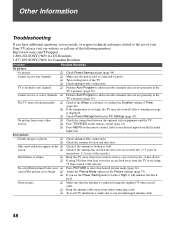
... channels that are not presently in the Picture settings (page 33). screen. ❑ Check if the antenna has reached the end of the following numbers: http://www.sony.com/TVsupport 1-800-222-SONY(7669) for US Residents 1-877-899-SONY(7669) for Canadian Residents Problem Possible Remedies No picture. The TV turns off after a warning message...
... channels that are not presently in the Picture settings (page 33). screen. ❑ Check if the antenna has reached the end of the following numbers: http://www.sony.com/TVsupport 1-800-222-SONY(7669) for US Residents 1-877-899-SONY(7669) for Canadian Residents Problem Possible Remedies No picture. The TV turns off after a warning message...
Operating Instructions
Page 49
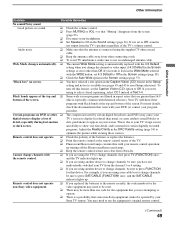
... the remote recently, the code numbers for certain digitally recorded programs. Adjust the Reality/Clarity in the DRC Palette setting (page 34) to optimize the picture while viewing these programs with your digital sources display a loss of Text1-4. Other Information Other Information Problem Possible Remedies... with black bands at the top and ❑ Some wide screen programs are filmed in the Screen settings is especially common with your DVD (or contact your Sony TV remote. To turn off the Fluorescent/fluorescent lamps. ❑ Keep the remote control sensor area ...
... the remote recently, the code numbers for certain digitally recorded programs. Adjust the Reality/Clarity in the DRC Palette setting (page 34) to optimize the picture while viewing these programs with your digital sources display a loss of Text1-4. Other Information Other Information Problem Possible Remedies... with black bands at the top and ❑ Some wide screen programs are filmed in the Screen settings is especially common with your DVD (or contact your Sony TV remote. To turn off the Fluorescent/fluorescent lamps. ❑ Keep the remote control sensor area ...
Operating Instructions
Page 53
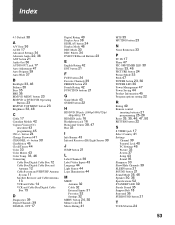
... inserting batteries 21 programming 25-26 Reset 33, 35, 46, 47, 50 RETURN button 22 S S VIDEO jack 17 Select Country 41 Settings Channel 39 Parental Lock 40 PC Settings 46 Picture 33 Screen 37 Setup 43 Sound 35 Sharpness 33 Show/Hide Channels 39 SLEEP button 21 SOUND button 21 Sound Mode 35..., 46 Speaker 30, 36 Specifications 52 STANDBY LED 30 Steady Sound 35 Support Belt 18 Surround 35 SURROUND button 21 T TOOLS button 24...
... inserting batteries 21 programming 25-26 Reset 33, 35, 46, 47, 50 RETURN button 22 S S VIDEO jack 17 Select Country 41 Settings Channel 39 Parental Lock 40 PC Settings 46 Picture 33 Screen 37 Setup 43 Sound 35 Sharpness 33 Show/Hide Channels 39 SLEEP button 21 SOUND button 21 Sound Mode 35..., 46 Speaker 30, 36 Specifications 52 STANDBY LED 30 Steady Sound 35 Support Belt 18 Surround 35 SURROUND button 21 T TOOLS button 24...


