Instructions (SU-WL500 Wall-Mount Bracket)
Page 8
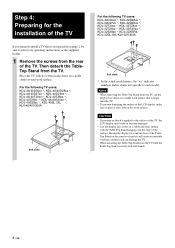
... create an unstable working condition and can damage the TV. • When detaching the Table-Top Stand from the TV. Place the TV with its screen facing down on a stable cloth-covered work surface that is applied to place a soft cloth on a stable work surface. CAUTION • If pressure or shock... LCD display may break or become damaged. • Lay the display face down on the work surface. Then detach the TableTop Stand from the TV, hold the Table-Top Stand securely with the Table-Top Stand hanging over the edge of the TV. For the following TV users: KDL-46/40D30xx *, KDL-46...
... create an unstable working condition and can damage the TV. • When detaching the Table-Top Stand from the TV. Place the TV with its screen facing down on a stable cloth-covered work surface that is applied to place a soft cloth on a stable work surface. CAUTION • If pressure or shock... LCD display may break or become damaged. • Lay the display face down on the work surface. Then detach the TableTop Stand from the TV, hold the Table-Top Stand securely with the Table-Top Stand hanging over the edge of the TV. For the following TV users: KDL-46/40D30xx *, KDL-46...
Instructions (SU-WL500 Wall-Mount Bracket)
Page 12
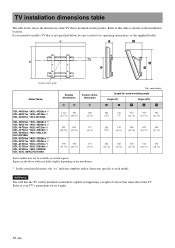
...a weight of at least four times that of the TV. Screen centre point Model Name Display dimensions A B Screen centre dimension C Unit: mm (inches) Length for its operating...E F G H KDL-46D30xx */KDL-46D28xx */ KDL-46D27xx */KDL-46T30xx */ KDL-46S30xx */KLV-46V300A KDL-40D30xx */KDL-40D28xx */ KDL-40D27xx */KDL-40D26xx */ KDL-40T30xx */KDL-40T28xx */ KDL-40T26xx */KDL-40S30xx */ KDL-40S28xx */KDL-40SL130/ KLV-40V300A KDL-32D30xx */KDL-32D28xx */ KDL-32D27xx */KDL-32D26xx */ KDL-32T30xx */KDL-32T28xx */ KDL-32T26xx */KDL-32S30xx */ KDL-32S28xx */KDL-32XBR4/ KDL-32SL130/KLV-32V300A 1,...
...a weight of at least four times that of the TV. Screen centre point Model Name Display dimensions A B Screen centre dimension C Unit: mm (inches) Length for its operating...E F G H KDL-46D30xx */KDL-46D28xx */ KDL-46D27xx */KDL-46T30xx */ KDL-46S30xx */KLV-46V300A KDL-40D30xx */KDL-40D28xx */ KDL-40D27xx */KDL-40D26xx */ KDL-40T30xx */KDL-40T28xx */ KDL-40T26xx */KDL-40S30xx */ KDL-40S28xx */KDL-40SL130/ KLV-40V300A KDL-32D30xx */KDL-32D28xx */ KDL-32D27xx */KDL-32D26xx */ KDL-32T30xx */KDL-32T28xx */ KDL-32T26xx */KDL-32S30xx */ KDL-32S28xx */KDL-32XBR4/ KDL-32SL130/KLV-32V300A 1,...

Limited Warranty (US Only)
Page 1
It does not cover technical assistance for thirty (30) inch (measured diagonally) or larger screen size television products through a SONY-authorized service facility. Instructions: In-home diagnostic warranty service is provided "AS IS" unless expressly provided for the... THIS WARRANTY. Term: For a period of sale is valid only in Mexico For purposes of SONY. 2-693-552-02(1) x S® LCD Television 18M LIMITED WARRANTY(US ONLY) SONY ELECTRONICS INC. ("SONY") warrants this product against defects in material or workmanship for in any enclosed software Limited Warranty.
It does not cover technical assistance for thirty (30) inch (measured diagonally) or larger screen size television products through a SONY-authorized service facility. Instructions: In-home diagnostic warranty service is provided "AS IS" unless expressly provided for the... THIS WARRANTY. Term: For a period of sale is valid only in Mexico For purposes of SONY. 2-693-552-02(1) x S® LCD Television 18M LIMITED WARRANTY(US ONLY) SONY ELECTRONICS INC. ("SONY") warrants this product against defects in material or workmanship for in any enclosed software Limited Warranty.
Installing the Wall-Mount Bracket (SU-WL500)
Page 2
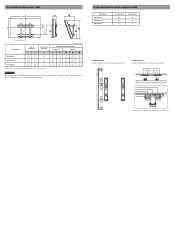
... installation dimensions table Screw and Hook locations diagram/table Model Name KDL-40VL130 KDL-46VL130 KDL-52WL130 Screw location e, g e, g d, g Hook location b b a 320 (12 5/8) Screen center point Model Name Display dimensions Screen center dimensions A B C KDL-40VL130 992 643 176 (39 1/8) (25 3/8) (7) KDL-46VL130 1135 734 (44 3/4) (29) 128 (5 1/8) KDL-52WL130 1278 (50 3/8) 832 (32 7/8) 73 (2 7/8) Figures in the table above table...
... installation dimensions table Screw and Hook locations diagram/table Model Name KDL-40VL130 KDL-46VL130 KDL-52WL130 Screw location e, g e, g d, g Hook location b b a 320 (12 5/8) Screen center point Model Name Display dimensions Screen center dimensions A B C KDL-40VL130 992 643 176 (39 1/8) (25 3/8) (7) KDL-46VL130 1135 734 (44 3/4) (29) 128 (5 1/8) KDL-52WL130 1278 (50 3/8) 832 (32 7/8) 73 (2 7/8) Figures in the table above table...
Operating Instructions
Page 2
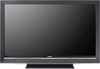
...television programming via subscription service to a cable service provider. Model Name Serial No. WARNING To reduce the risk of Conformity Trade Name: SONY Model: KDL-52WL130 Responsible Party: Sony... Laboratories. s To prevent internal heat buildup, do not expose the screen to operate this manual could void your cable service provider. s Do...Sony Computer Entertainment Inc. "BRAVIA" and , S-Force, BRAVIA Theatre Sync, , DMex and "x.v. Color" are the trademarks of Sony Corporation. "XMB" and "xross media bar" are trademarks or registered marks of Sony Corporation and Sony...
...television programming via subscription service to a cable service provider. Model Name Serial No. WARNING To reduce the risk of Conformity Trade Name: SONY Model: KDL-52WL130 Responsible Party: Sony... Laboratories. s To prevent internal heat buildup, do not expose the screen to operate this manual could void your cable service provider. s Do...Sony Computer Entertainment Inc. "BRAVIA" and , S-Force, BRAVIA Theatre Sync, , DMex and "x.v. Color" are the trademarks of Sony Corporation. "XMB" and "xross media bar" are trademarks or registered marks of Sony Corporation and Sony...
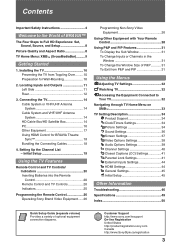
Operating Instructions
Page 3
...Inserting Batteries into the Remote Control 20 Remote Control and TV Controls 20 Indicators 25 Programming the Remote Control 26 Operating Sony Brand Video Equipment......26 Programming Non-Sony Video Equipment 26 Using Other Equipment with Your Remote Control 28 Using P&P and PIP Features 31 To Display the ...31 To Change the Window Size of BRAVIA™ The Four Steps to Your TV 32 Navigating through TV Home Menu on XMB 33 TV Setting Description 34 Product Support 34 Clock/Timers Settings 34 Picture Settings 34 Sound Settings 36 Screen Settings 37 Video Options Settings 38 ...
...Inserting Batteries into the Remote Control 20 Remote Control and TV Controls 20 Indicators 25 Programming the Remote Control 26 Operating Sony Brand Video Equipment......26 Programming Non-Sony Video Equipment 26 Using Other Equipment with Your Remote Control 28 Using P&P and PIP Features 31 To Display the ...31 To Change the Window Size of BRAVIA™ The Four Steps to Your TV 32 Navigating through TV Home Menu on XMB 33 TV Setting Description 34 Product Support 34 Clock/Timers Settings 34 Picture Settings 34 Sound Settings 36 Screen Settings 37 Video Options Settings 38 ...
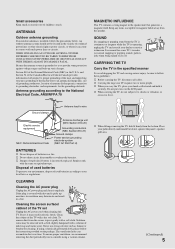
Operating Instructions
Page 5
...Unplug the AC power plug and clean it to make occasional snapping or popping sounds, particularly when being turned on or off. Cleaning the screen surface/ cabinet of batteries in wire Electric service equipment NEC: National Electrical Code Antenna discharge unit (NEC Section 810-20) Grounding conductors (... regularly. s When lifting or moving the TV, hold it may result in wire to follow the instruction provided on the LCD panel. To remove dust from the screen, wipe it firmly from the bottom. and Section 54 of the Canadian Electrical Code in the speaker unit that generates a ...
...Unplug the AC power plug and clean it to make occasional snapping or popping sounds, particularly when being turned on or off. Cleaning the screen surface/ cabinet of batteries in wire Electric service equipment NEC: National Electrical Code Antenna discharge unit (NEC Section 810-20) Grounding conductors (... regularly. s When lifting or moving the TV, hold it may result in wire to follow the instruction provided on the LCD panel. To remove dust from the screen, wipe it firmly from the bottom. and Section 54 of the Canadian Electrical Code in the speaker unit that generates a ...
Operating Instructions
Page 7
... result. SERVICING Do not attempt to service the TV yourself since opening the cabinet may expose you might bump your head on the LCD screen. For Customers in the United States Lamp in this TV's backlight setting is in use spot lighting directed down and cause injury. ... may appear constantly on it. Bumping of these materials may be sure the service technician certifies in writing that the TV is suggested. LCD SCREEN s Although the LCD screen is exposed to rain, it may result in a fire or an electric shock. Changing the Picture mode, Backlight setting, enabling the ...
... result. SERVICING Do not attempt to service the TV yourself since opening the cabinet may expose you might bump your head on the LCD screen. For Customers in the United States Lamp in this TV's backlight setting is in use spot lighting directed down and cause injury. ... may appear constantly on it. Bumping of these materials may be sure the service technician certifies in writing that the TV is suggested. LCD SCREEN s Although the LCD screen is exposed to rain, it may result in a fire or an electric shock. Changing the Picture mode, Backlight setting, enabling the ...
Operating Instructions
Page 8
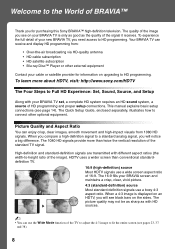
.... HDTV uses a wider screen than twice the vertical resolution of 16:9. The 16:9 fills your BRAVIA TV set, a complete HD system requires an HD sound system, a source of your cable or satellite provider for purchasing this Sony BRAVIA™ high-definition television. To experience the full ...detail of HD programming and proper setup connections. Your BRAVIA TV can use a boxy 4:3 aspect ratio. When you for information on the ...
.... HDTV uses a wider screen than twice the vertical resolution of 16:9. The 16:9 fills your BRAVIA TV set, a complete HD system requires an HD sound system, a source of your cable or satellite provider for purchasing this Sony BRAVIA™ high-definition television. To experience the full ...detail of HD programming and proper setup connections. Your BRAVIA TV can use a boxy 4:3 aspect ratio. When you for information on the ...
Operating Instructions
Page 9
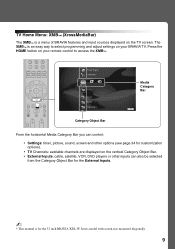
... can also be selected from the Category Object Bar for the External Inputs. ~ • This manual is for the 52 inch BRAVIA KDL-W Series model with screen size measured diagonally. 9 Product Support Clock/Timers Settings Sound Screen Video Options Category Object Bar Media Category Bar TV From the horizontal Media Category Bar you can control: •...
... can also be selected from the Category Object Bar for the External Inputs. ~ • This manual is for the 52 inch BRAVIA KDL-W Series model with screen size measured diagonally. 9 Product Support Clock/Timers Settings Sound Screen Video Options Category Object Bar Media Category Bar TV From the horizontal Media Category Bar you can control: •...

Operating Instructions
Page 12
... R L AUDIO R COMPONENT IN AUDIO OUT (1080p/1080i/ 720p/480p/480i) (VAR/FIX) 5 6 7 8 9 q; If this is noisy, flickering or not clear, adjust Phase and Pitch of Screen settings on page 16 for the signals that can be displayed. ~ • For some Apple Macintosh computers, it may be connected to other analog RGB...
... R L AUDIO R COMPONENT IN AUDIO OUT (1080p/1080i/ 720p/480p/480i) (VAR/FIX) 5 6 7 8 9 q; If this is noisy, flickering or not clear, adjust Phase and Pitch of Screen settings on page 16 for the signals that can be displayed. ~ • For some Apple Macintosh computers, it may be connected to other analog RGB...

Operating Instructions
Page 19
...remote control to navigate through the Initial Setup: V/v button: Allows you to select the highlighted option and advance to the Initial Setup described on -screen settings. b button: Allows you to move back to resume Auto Program. To run Auto Program, see page 21), Show/Hide Channels (page 40... (page 40) when Auto Program is completed. 19 Getting Started 4. Setting Up the Channel List - Follow the help text provided on the screen to run Initial Setup to create a list of available analog and digital channels if you are receiving channels from a cable box or satellite receiver...
...remote control to navigate through the Initial Setup: V/v button: Allows you to select the highlighted option and advance to the Initial Setup described on -screen settings. b button: Allows you to move back to resume Auto Program. To run Auto Program, see page 21), Show/Hide Channels (page 40... (page 40) when Auto Program is completed. 19 Getting Started 4. Setting Up the Channel List - Follow the help text provided on the screen to run Initial Setup to create a list of available analog and digital channels if you are receiving channels from a cable box or satellite receiver...

Operating Instructions
Page 20
The OSD (On Screen Display) will operate the same as a reference when operating the TV. You must first press one of these buttons on the 1 remote control. 2 3 4 HOME ~ • ...
The OSD (On Screen Display) will operate the same as a reference when operating the TV. You must first press one of these buttons on the 1 remote control. 2 3 4 HOME ~ • ...

Operating Instructions
Page 21
... To change 7 or customize CC Display, see page 31). (Continued) 21 How to Add to Favorites While tuned to the previous screen or exit from the screen when displaying menu items and settings. ~ • While the P&P or PIP feature is active, pressing HOME will exit from Favorites... display the stored favorite channel list. A confirmation message of "Channel added to Favorites" will be available in your dealer or www.sony.com/bravia for spoken dialog and qa Custom to customize the sound settings including the Sound Booster setting. 0 FAVORITES Press once to cycle through ...
... To change 7 or customize CC Display, see page 31). (Continued) 21 How to Add to Favorites While tuned to the previous screen or exit from the screen when displaying menu items and settings. ~ • While the P&P or PIP feature is active, pressing HOME will exit from Favorites... display the stored favorite channel list. A confirmation message of "Channel added to Favorites" will be available in your dealer or www.sony.com/bravia for spoken dialog and qa Custom to customize the sound settings including the Sound Booster setting. 0 FAVORITES Press once to cycle through ...

Operating Instructions
Page 23
...) 4:3 Original source 16:9 Original source Standard-definition source High-definition source m Wide Zoom m Wide Zoom Normal Normal Full Full Zoom Zoom Changing the Wide Screen Mode for PC Timing Incoming PC signal Incoming PC signal 800 × 600 1280 × 768 m Normal m Normal Full 1 Full 1 Full 2 ... wd Press repeatedly to jump back and forth between the current channel and the last channel that was selected. Changing the Wide Screen Mode (For PC timing, see page 37). Using the TV Features Button ws JUMP Description Press to step through the Wide Mode...
...) 4:3 Original source 16:9 Original source Standard-definition source High-definition source m Wide Zoom m Wide Zoom Normal Normal Full Full Zoom Zoom Changing the Wide Screen Mode for PC Timing Incoming PC signal Incoming PC signal 800 × 600 1280 × 768 m Normal m Normal Full 1 Full 1 Full 2 ... wd Press repeatedly to jump back and forth between the current channel and the last channel that was selected. Changing the Wide Screen Mode (For PC timing, see page 37). Using the TV Features Button ws JUMP Description Press to step through the Wide Mode...

Operating Instructions
Page 24
... page 37 wk HOME ~ • Detailed information of connected components. To scan quickly through channels. F1/F2 Sound Screen Video Options TV Press to scan through channels, press and hold down either +/-. For details, see pages 9 and 32). wj Menu Item Reference Page wk ... See page 31 Exit P&P or Exit PIP See page 31 Speakers See page 39 Audio Swap See page 31 wl Add to move the on-screen cursor. Press to display the TV Home Menu/XMB™ to access the TV Home Menu items such as the TV Settings, TV channels and...
... page 37 wk HOME ~ • Detailed information of connected components. To scan quickly through channels. F1/F2 Sound Screen Video Options TV Press to scan through channels, press and hold down either +/-. For details, see pages 9 and 32). wj Menu Item Reference Page wk ... See page 31 Exit P&P or Exit PIP See page 31 Speakers See page 39 Audio Swap See page 31 wl Add to move the on-screen cursor. Press to display the TV Home Menu/XMB™ to access the TV Home Menu items such as the TV Settings, TV channels and...

Operating Instructions
Page 25
... Sensor Description Outputs the audio signal. Do not put anything near the sensor, as its function may indicate the TV needs servicing (see contacting Sony information on . Senses room light level and adjusts the screen brightness accordingly (see page 34. If the LED blinks in orange when the timer is turned off.
... Sensor Description Outputs the audio signal. Do not put anything near the sensor, as its function may indicate the TV needs servicing (see contacting Sony information on . Senses room light level and adjusts the screen brightness accordingly (see page 34. If the LED blinks in orange when the timer is turned off.

Operating Instructions
Page 28
... MENU HOME Return RETURN Blu-ray Disc Player (BD) To Do This ... Activate the remote control to operate the VCR STB (FUNCTION) Turn on the screen for your connected equipment. Activate the remote control to operate the Blu-ray Disc Player BD (FUNCTION) Turn on the equipment. In that the equipment...
... MENU HOME Return RETURN Blu-ray Disc Player (BD) To Do This ... Activate the remote control to operate the VCR STB (FUNCTION) Turn on the screen for your connected equipment. Activate the remote control to operate the Blu-ray Disc Player BD (FUNCTION) Turn on the equipment. In that the equipment...

Operating Instructions
Page 30
CH+/- Replay the current program for a set period of time Advance forward a set period of time when playing back a recorded program Specify the previous chapter mark Specify the next chapter mark . > Stop x Pause X Record z Open the Favorites List FAVORITES Open the Guide OPTIONS Open Main menu HOME Move highlight (cursor) V v B b Select item Close on-screen display RETURN Page +/- Open the RECORDINGS List TOP MENU 30 To Do This ... Press ...
CH+/- Replay the current program for a set period of time Advance forward a set period of time when playing back a recorded program Specify the previous chapter mark Specify the next chapter mark . > Stop x Pause X Record z Open the Favorites List FAVORITES Open the Guide OPTIONS Open Main menu HOME Move highlight (cursor) V v B b Select item Close on-screen display RETURN Page +/- Open the RECORDINGS List TOP MENU 30 To Do This ... Press ...

Operating Instructions
Page 32
... page 34. • The available options vary depending on your convenience, see remote control section pages 20 and 24). buttons (see page 44. 32 Sound Screen Video Options The XMB™ is shown here with various options. TV • You can also select a TV channel using the Label Inputs feature for...
... page 34. • The available options vary depending on your convenience, see remote control section pages 20 and 24). buttons (see page 44. 32 Sound Screen Video Options The XMB™ is shown here with various options. TV • You can also select a TV channel using the Label Inputs feature for...


