Operating Instructions
Page 3
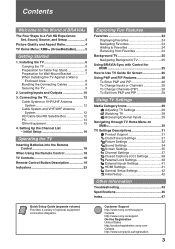
... the World of optional equipment connection diagrams. Customer Support http://www.sony.com/tvsupport Canada http://www.sony.ca/support On-line Registration United States http://productregistration.sony.com Canada http://www.sonystyle.ca/registration 3 Setting Up the Channel List - Connecting the TV 12 Cable System or VHF/UHF Antenna System 12 Cable System and...
... the World of optional equipment connection diagrams. Customer Support http://www.sony.com/tvsupport Canada http://www.sony.ca/support On-line Registration United States http://productregistration.sony.com Canada http://www.sonystyle.ca/registration 3 Setting Up the Channel List - Connecting the TV 12 Cable System or VHF/UHF Antenna System 12 Cable System and...
Operating Instructions
Page 4
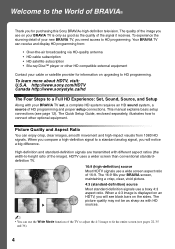
...screen aspect ratio of 16:9. Welcome to a Full HD Experience: Set, Sound, Source, and Setup Along with your BRAVIA TV set, a complete HD system requires an HD sound system, a source of HD programming and proper setup connections. http://www.sony.com/HDTV Canada http://www.sonystyle.ca/hd The Four Steps to... the World of BRAVIA® Thank you see black bars on your BRAVIA TV is ...
...screen aspect ratio of 16:9. Welcome to a Full HD Experience: Set, Sound, Source, and Setup Along with your BRAVIA TV set, a complete HD system requires an HD sound system, a source of HD programming and proper setup connections. http://www.sony.com/HDTV Canada http://www.sonystyle.ca/hd The Four Steps to... the World of BRAVIA® Thank you see black bars on your BRAVIA TV is ...
Operating Instructions
Page 5
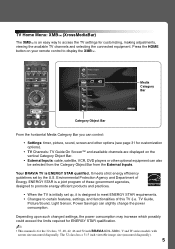
... options (see page 31 for customization options). • TV Channels: TV Guide On Screen™ and available channels are displayed on your remote control to access the TV settings for the 32 class, 37, 40, 42, 46 and 52 inch BRAVIA KDL-XBR6, V and W series models with screen size measured... diagonally. Your BRAVIA TV is for customizing, making adjustments, viewing the available TV channels and selecting the connected equipment.
... options (see page 31 for customization options). • TV Channels: TV Guide On Screen™ and available channels are displayed on your remote control to access the TV settings for the 32 class, 37, 40, 42, 46 and 52 inch BRAVIA KDL-XBR6, V and W series models with screen size measured... diagonally. Your BRAVIA TV is for customizing, making adjustments, viewing the available TV channels and selecting the connected equipment.
Operating Instructions
Page 7
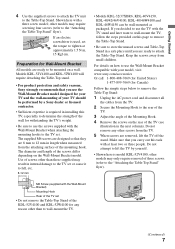
...TV set . The supplied M6 screws are designed so that they are ready to use the TV with the TV stand and later want to wall-mount the TV, follow the steps provided on the rear of the TV (see illustration in installing this TV, especially to determine the strength of the KDL-52V4100 and KDL-52W4100 for withstanding the TV...people. Preparation for Wall-Mount Bracket All models are 8 mm to 12 mm in internal damage to the TV set the torque to lift the TV by a Sony dealer or licensed contractor. • Sufficient expertise is required in the next column). If you decided to...
...TV set . The supplied M6 screws are designed so that they are ready to use the TV with the TV stand and later want to wall-mount the TV, follow the steps provided on the rear of the TV (see illustration in installing this TV, especially to determine the strength of the KDL-52V4100 and KDL-52W4100 for withstanding the TV...people. Preparation for Wall-Mount Bracket All models are 8 mm to 12 mm in internal damage to the TV set the torque to lift the TV by a Sony dealer or licensed contractor. • Sufficient expertise is required in the next column). If you decided to...
Operating Instructions
Page 8
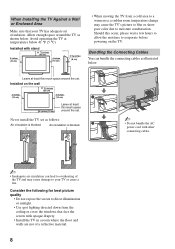
...a reflective material. 8 Allow enough space around the set. Installed with stand 11 7/8 inches (30 cm) 4 inches (10 cm) 4 inches (10 cm) 2 3/8 inches (6 cm) • When moving the TV from the ceiling or cover the windows that your TV or cause a fire. Air circulation is blocked. ... cm) 11 7/8 inches (30 cm) 4 inches (10 cm) 4 inches (10 cm) Leave at temperatures below . Never install the TV set . When Installing the TV Against a Wall or Enclosed Area Make sure that face the screen with other connecting cables. ~ • Inadequate air circulation can bundle the ...
...a reflective material. 8 Allow enough space around the set. Installed with stand 11 7/8 inches (30 cm) 4 inches (10 cm) 4 inches (10 cm) 2 3/8 inches (6 cm) • When moving the TV from the ceiling or cover the windows that your TV or cause a fire. Air circulation is blocked. ... cm) 11 7/8 inches (30 cm) 4 inches (10 cm) 4 inches (10 cm) Leave at temperatures below . Never install the TV set . When Installing the TV Against a Wall or Enclosed Area Make sure that face the screen with other connecting cables. ~ • Inadequate air circulation can bundle the ...
Operating Instructions
Page 9
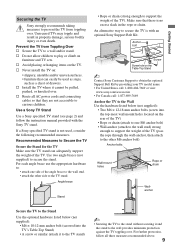
... can easily be pulled, pushed, or knocked over . Getting Started Securing the TV Sony strongly recommends taking measures to prevent the TV from Toppling Over s Secure the TV to a wall and/or stand. s Never install the TV on furniture and TV sets. Angle brace Stand • Rope or chain (strong enough to curious children. Make sure that...
... can easily be pulled, pushed, or knocked over . Getting Started Securing the TV Sony strongly recommends taking measures to prevent the TV from Toppling Over s Secure the TV to a wall and/or stand. s Never install the TV on furniture and TV sets. Angle brace Stand • Rope or chain (strong enough to curious children. Make sure that...
Operating Instructions
Page 11
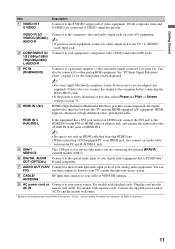
...to the HDMI IN 4 (with DVI-to-HDMI cable or adapter) jack, and connect the audio jack to the AUDIO IN (L/R) jacks of Screen settings on page 36. HDMI (High-Definition Multimedia Interface) provides an uncompressed, all-digital audio/video interface between the PC and R-AUDIO-L jack. You ...VIDEO IN 1 S VIDEO Description Connects to the S VIDEO output jack of your digital audio equipment that can FIX) use these outputs to listen to your TV's audio through your stereo system. 8 CABLE/ ANTENNA RF input that bears the HDMI logo. • When connecting a DVI-equipped PC to an HDMI ...
...to the HDMI IN 4 (with DVI-to-HDMI cable or adapter) jack, and connect the audio jack to the AUDIO IN (L/R) jacks of Screen settings on page 36. HDMI (High-Definition Multimedia Interface) provides an uncompressed, all-digital audio/video interface between the PC and R-AUDIO-L jack. You ...VIDEO IN 1 S VIDEO Description Connects to the S VIDEO output jack of your digital audio equipment that can FIX) use these outputs to listen to your TV's audio through your stereo system. 8 CABLE/ ANTENNA RF input that bears the HDMI logo. • When connecting a DVI-equipped PC to an HDMI ...
Operating Instructions
Page 12
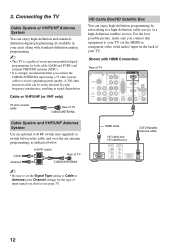
...a 75-ohm coaxial cable to Cable or Antenna in signal degradation. Cable Antenna A-B RF switch A Rear of TV B CABLE/ANTENNA ~ • Be sure to set the Signal Type setting to receive optimum picture quality. 3. A 300-ohm twin lead cable can enjoy high-definition programming by radio frequency ...interference, resulting in the Channel settings for both cable (QAM and 8VSB) and external VHF/UHF antenna (ATSC). • It is capable of receiving unscrambled digital programming for the type of your TV via the HDMI or component video (with audio) ...
...a 75-ohm coaxial cable to Cable or Antenna in signal degradation. Cable Antenna A-B RF switch A Rear of TV B CABLE/ANTENNA ~ • Be sure to set the Signal Type setting to receive optimum picture quality. 3. A 300-ohm twin lead cable can enjoy high-definition programming by radio frequency ...interference, resulting in the Channel settings for both cable (QAM and 8VSB) and external VHF/UHF antenna (ATSC). • It is capable of receiving unscrambled digital programming for the type of your TV via the HDMI or component video (with audio) ...
Operating Instructions
Page 14
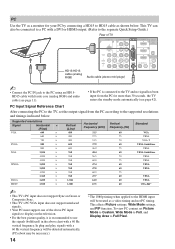
... shown below . In plug and play, signals with a 60 Hz vertical frequency. This TV can also be treated as a video timing and not PC timing. PC Input Signal Reference Chart After connecting the PC to the TV, set Picture Mode to Custom, Wide Mode to Full, and Display Area to Full Pixel.... This affects Picture settings, Wide Mode settings, and PIP function. PC Use the TV as a monitor for more than 30 seconds, the TV enters the standby mode automatically (see page 11). • If the PC is recommended to use the ...
... shown below . In plug and play, signals with a 60 Hz vertical frequency. This TV can also be treated as a video timing and not PC timing. PC Input Signal Reference Chart After connecting the PC to the TV, set Picture Mode to Custom, Wide Mode to Full, and Display Area to Full Pixel.... This affects Picture settings, Wide Mode settings, and PIP function. PC Use the TV as a monitor for more than 30 seconds, the TV enters the standby mode automatically (see page 11). • If the PC is recommended to use the ...
Operating Instructions
Page 16
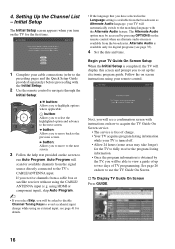
... a cable box or satellite receiver without using an external input; s To Display TV Guide On Screen Press GUIDE. 16 Language settings will apply to the previous screen. Begin your cable connections (refer to the TV's CABLE/ANTENNA input. Initial Setup Step 6 of 6 Please select a language. ... 2 Use the remote control to navigate through the Initial Setup: V/v button: Allows you to set up to highlight options where applicable. Highlight a choice and press to begin the TV Guide setup. 4. Initial Setup The Initial Setup screen appears when you will scan for the first ...
... a cable box or satellite receiver without using an external input; s To Display TV Guide On Screen Press GUIDE. 16 Language settings will apply to the previous screen. Begin your cable connections (refer to the TV's CABLE/ANTENNA input. Initial Setup Step 6 of 6 Please select a language. ... 2 Use the remote control to navigate through the Initial Setup: V/v button: Allows you to set up to highlight options where applicable. Highlight a choice and press to begin the TV Guide setup. 4. Initial Setup The Initial Setup screen appears when you will scan for the first ...
Operating Instructions
Page 17
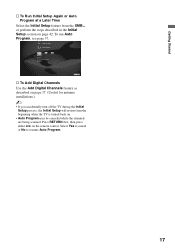
HDMI Settings General Setup Settings Initial Setup TV s To Add Digital Channels Use the Add Digital Channels feature as described on page 37. (Useful for antenna installations.) ~ • If you accidentally turn off the TV during the Initial Setup process, the Initial Setup will restart from the XMB™ or perform the steps described in... being scanned. Getting Started s To Run Initial Setup Again or Auto Program at a Later Time Select the Initial Setup feature from the beginning when the TV is turned back on the remote control.
HDMI Settings General Setup Settings Initial Setup TV s To Add Digital Channels Use the Add Digital Channels feature as described on page 37. (Useful for antenna installations.) ~ • If you accidentally turn off the TV during the Initial Setup process, the Initial Setup will restart from the XMB™ or perform the steps described in... being scanned. Getting Started s To Run Initial Setup Again or Auto Program at a Later Time Select the Initial Setup feature from the beginning when the TV is turned back on the remote control.
Operating Instructions
Page 19
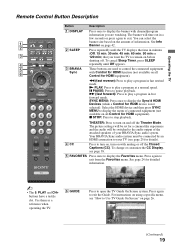
... function (not available on all Control for HDMI device is not selected). The picture settings will be set for details). 4 CC Press to turn on, turn on page 26. (Continued) 19 Press again to open the TV Guide On Screen system. Your BRAVIA Sync audio system must be connected by an HDMI... connection to your TV (see page 25 for a cinema-like experience and the audio will ...
... function (not available on all Control for HDMI device is not selected). The picture settings will be set for details). 4 CC Press to turn on, turn on page 26. (Continued) 19 Press again to open the TV Guide On Screen system. Your BRAVIA Sync audio system must be connected by an HDMI... connection to your TV (see page 25 for a cinema-like experience and the audio will ...

Operating Instructions
Page 20
See your dealer or www.sony.com/bravia for more information. For example, to select/ confirm an item. 20 qf POWER Press to move focus/highlight. DMX-NV1). Freeze qs Current ... active, pressing HOME will deactivate Freeze and display the XMB™. Press to enter 2.1, press 2 , , 1 and ENT. 9 qs VOL +/- Product Support Clock/Timers Settings Sound Screen qg Channel TV qh 9 DMex Press to select a channel; The module qj 0 0-9 ENT may not be available in the optional BRAVIA external module (e.g. the channel changes...
See your dealer or www.sony.com/bravia for more information. For example, to select/ confirm an item. 20 qf POWER Press to move focus/highlight. DMX-NV1). Freeze qs Current ... active, pressing HOME will deactivate Freeze and display the XMB™. Press to enter 2.1, press 2 , , 1 and ENT. 9 qs VOL +/- Product Support Clock/Timers Settings Sound Screen qg Channel TV qh 9 DMex Press to select a channel; The module qj 0 0-9 ENT may not be available in the optional BRAVIA external module (e.g. the channel changes...

Operating Instructions
Page 21
.../ Remove from Favorites See page 24 qk MTS See page 34 Alternate Audio See page 35 ql Digital Rating See page 39 Background TV See page 25 Device Control See page 41 ql PICTURE ~ • The Digital Rating and Alternate Audio options will appear in Options... only when digital ratings or alternate audio streams are available in the Picture settings. For details, see Picture settings on current input and content. Press repeatedly to display a list of convenient functions and menu shortcuts. The OPTIONS menu items...
.../ Remove from Favorites See page 24 qk MTS See page 34 Alternate Audio See page 35 ql Digital Rating See page 39 Background TV See page 25 Device Control See page 41 ql PICTURE ~ • The Digital Rating and Alternate Audio options will appear in Options... only when digital ratings or alternate audio streams are available in the Picture settings. For details, see Picture settings on current input and content. Press repeatedly to display a list of convenient functions and menu shortcuts. The OPTIONS menu items...
Operating Instructions
Page 22
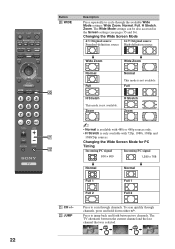
... m Normal m Normal Full 1 Full 1 Full 2 Full 2 wz CH +/- The TV alternates between two channels. Full Full w; To scan quickly through channels. The Wide Mode settings can be also accessed in the Screen settings (see pages 35 and 36). Zoom Zoom ~ • Normal is available with 720p,... 1080i, 1080p and wz 1080/24p sources. Press to cycle through the available Wide Mode settings: Wide Zoom, Normal, Full, H Stretch, Zoom. H Stretch H Stretch This mode is not available. WIDE Description Press repeatedly to jump...
... m Normal m Normal Full 1 Full 1 Full 2 Full 2 wz CH +/- The TV alternates between two channels. Full Full w; To scan quickly through channels. The Wide Mode settings can be also accessed in the Screen settings (see pages 35 and 36). Zoom Zoom ~ • Normal is available with 720p,... 1080i, 1080p and wz 1080/24p sources. Press to cycle through the available Wide Mode settings: Wide Zoom, Normal, Full, H Stretch, Zoom. H Stretch H Stretch This mode is not available. WIDE Description Press repeatedly to jump...
Operating Instructions
Page 23
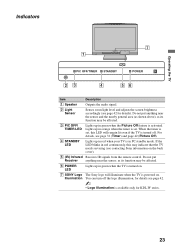
... the timer is set , this may be affected. 6 POWER LED Lights up in PC standby mode. Do not put anything near the sensor and the nearby general area (as shown above), as its function may indicate that the TV needs servicing (see contacting Sony information on . Operating the TV Indicators 7 1 ...brightness accordingly (see page 42 for KDL-W series. 23 When the timer is powered on the back cover). 5 (IR) Infrared Receives IR signals from the remote control. If the LED blinks in green when the TV is turned on. 7 SONY Logo Illumination The Sony logo will remain lit even if ...
... the timer is set , this may be affected. 6 POWER LED Lights up in PC standby mode. Do not put anything near the sensor and the nearby general area (as shown above), as its function may indicate that the TV needs servicing (see contacting Sony information on . Operating the TV Indicators 7 1 ...brightness accordingly (see page 42 for KDL-W series. 23 When the timer is powered on the back cover). 5 (IR) Infrared Receives IR signals from the remote control. If the LED blinks in green when the TV is turned on. 7 SONY Logo Illumination The Sony logo will remain lit even if ...
Operating Instructions
Page 24
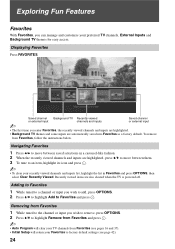
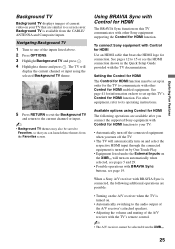
... will return your Favorites to factory default settings (see page 42). 24 Adding to Favorites 1 While tuned to a channel or input you enter Favorites, the recently viewed channels and inputs are highlighted. • Background TV themes and some inputs are automatically saved into... to remove, press OPTIONS. 2 Press V/v to highlight Remove from Favorites and press . ~ • Auto Program will clear your TV channels from Favorites, follow the instructions below. Displaying Favorites Press FAVORITES. Navigating Favorites 1 Press B/b to move between saved selections in Favorites...
... will return your Favorites to factory default settings (see page 42). 24 Adding to Favorites 1 While tuned to a channel or input you enter Favorites, the recently viewed channels and inputs are highlighted. • Background TV themes and some inputs are automatically saved into... to remove, press OPTIONS. 2 Press V/v to highlight Remove from Favorites and press . ~ • Auto Program will clear your TV channels from Favorites, follow the instructions below. Displaying Favorites Press FAVORITES. Navigating Favorites 1 Press B/b to move between saved selections in Favorites...
Operating Instructions
Page 25
... screen. For other equipment, refer to communicate with other Sony equipment supporting the Control for HDMI function. Setting the Control for HDMI The Control for HDMI function must be set up in the Quick Setup Guide provided with the TV documentation. See pages 12 to your TV that are possible: • Turning on the A/V receiver...
... screen. For other equipment, refer to communicate with other Sony equipment supporting the Control for HDMI function. Setting the Control for HDMI The Control for HDMI function must be set up in the Quick Setup Guide provided with the TV documentation. See pages 12 to your TV that are possible: • Turning on the A/V receiver...
Operating Instructions
Page 27
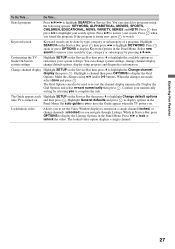
...type, category or subcategory of a program. Press V/v to customize your search. Customizing the TV Guide On Screen system settings Highlight SETUP on Service Bar. Lock/unlock video Allows you to set the Video Window display to display options in Service Bar, press OPTIONS to highlight SEARCH on ...on the Service Bar then press v to have the Guide appear when the TV powers on a single channel (locked) or change default options, display setup progress and diagnostics information. To Do This ... Set auto guide to on the Service Bar then press v to display Keyword ...
...type, category or subcategory of a program. Press V/v to customize your search. Customizing the TV Guide On Screen system settings Highlight SETUP on Service Bar. Lock/unlock video Allows you to set the Video Window display to display options in Service Bar, press OPTIONS to highlight SEARCH on ...on the Service Bar then press v to have the Guide appear when the TV powers on a single channel (locked) or change default options, display setup progress and diagnostics information. To Do This ... Set auto guide to on the Service Bar then press v to display Keyword ...
Operating Instructions
Page 29
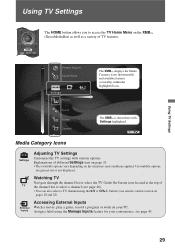
.... Watching TV Navigate through the channel list or select the TV Guide On Screen icon located at the top of TV the channel list to access the TV Home Menu on pages 20 and 22). TV Media Category Icons Settings Adjusting TV Settings Customize the TV settings with Settings highlighted. ... or not displayed. buttons (see page 26). • You can also select a TV channel using the Manage Inputs feature for your PC. Using TV Settings Product Support Clock/Timers Settings The XMB™ displays the Media Category icons (horizontally) and available features (vertically) ...
.... Watching TV Navigate through the channel list or select the TV Guide On Screen icon located at the top of TV the channel list to access the TV Home Menu on pages 20 and 22). TV Media Category Icons Settings Adjusting TV Settings Customize the TV settings with Settings highlighted. ... or not displayed. buttons (see page 26). • You can also select a TV channel using the Manage Inputs feature for your PC. Using TV Settings Product Support Clock/Timers Settings The XMB™ displays the Media Category icons (horizontally) and available features (vertically) ...


