Operating Instructions
Page 3
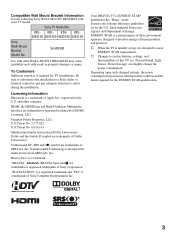
... or registered trademarks of Energy. It meets strict energy efficiency guidelines set up, it is initially set by the U.S. s When the TV is designed to promote energy efficient products and practices. KDL- TruSurround XT technology is a trademark. Sony TV Model No. Fergason Patent Properties, LLC: U.S. KDL- Picture/Sound, Light Sensor, Power Savings) can slightly change the power...
... or registered trademarks of Energy. It meets strict energy efficiency guidelines set up, it is initially set by the U.S. s When the TV is designed to promote energy efficient products and practices. KDL- TruSurround XT technology is a trademark. Sony TV Model No. Fergason Patent Properties, LLC: U.S. KDL- Picture/Sound, Light Sensor, Power Savings) can slightly change the power...
Operating Instructions
Page 4
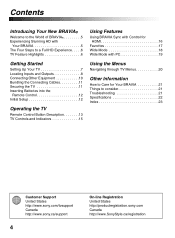
... . . . .6 TV Feature Highlights 6 Getting Started Setting Up Your TV 7 Locating Inputs and Outputs 8 Connecting Other Equipment 10 Bundling the Connecting Cables 11 Securing the TV 11 Inserting Batteries into ...the Remote Control 12 Initial Setup 12 Operating the TV Remote Control Button Description 13 TV...18 Wide Mode with PC 19 Using the Menus Navigating through TV Menus 20 Other Information How to Care for Your BRAVIA 21...
... . . . .6 TV Feature Highlights 6 Getting Started Setting Up Your TV 7 Locating Inputs and Outputs 8 Connecting Other Equipment 10 Bundling the Connecting Cables 11 Securing the TV 11 Inserting Batteries into ...the Remote Control 12 Initial Setup 12 Operating the TV Remote Control Button Description 13 TV...18 Wide Mode with PC 19 Using the Menus Navigating through TV Menus 20 Other Information How to Care for Your BRAVIA 21...
Operating Instructions
Page 5
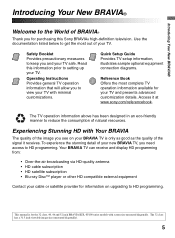
.... This manual is only as good as the quality of the signal it at www.sony.com/referencebook. Operating Instructions Provides general TV operation information that will allow you to view your TV with Your BRAVIA The quality of the image you see on upgrading to HD programming. ... information available for the 32 class, 40, 46 and 52 inch BRAVIA KDL-S5100 series models with screen size measured diagonally. The TV operation information above has been designed in an eco-friendly manner to setting up your TV. Your BRAVIA TV can receive and display HD programming from: • Over-the...
.... This manual is only as good as the quality of the signal it at www.sony.com/referencebook. Operating Instructions Provides general TV operation information that will allow you to view your TV with Your BRAVIA The quality of the image you see on upgrading to HD programming. ... information available for the 32 class, 40, 46 and 52 inch BRAVIA KDL-S5100 series models with screen size measured diagonally. The TV operation information above has been designed in an eco-friendly manner to setting up your TV. Your BRAVIA TV can receive and display HD programming from: • Over-the...
Operating Instructions
Page 6
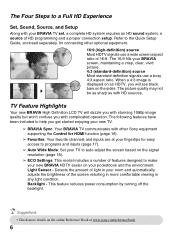
... Quick Setup Guide, enclosed separately, for easy access to programs and inputs (page 17). ➢ Auto Wide Mode: Set your BRAVIA screen, maintaining a crisp, clear, vivid picture. 4:3 (standard-definition) source Most standard-definition signals use a...LCD TV will see black bars on the online Reference Book at your new TV. ➢ BRAVIA Sync: Your BRAVIA TV communicates with complicated operation. When a 4:3 image is displayed on an HDTV, you will dazzle you with stunning 1080p image quality but won't confuse you get started enjoying your fingertips for connecting other Sony...
... Quick Setup Guide, enclosed separately, for easy access to programs and inputs (page 17). ➢ Auto Wide Mode: Set your BRAVIA screen, maintaining a crisp, clear, vivid picture. 4:3 (standard-definition) source Most standard-definition signals use a...LCD TV will see black bars on the online Reference Book at your new TV. ➢ BRAVIA Sync: Your BRAVIA TV communicates with complicated operation. When a 4:3 image is displayed on an HDTV, you will dazzle you with stunning 1080p image quality but won't confuse you get started enjoying your fingertips for connecting other Sony...
Operating Instructions
Page 7
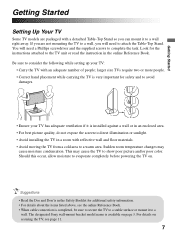
... best picture quality, do not expose the screen to direct illumination or sunlight. • Avoid installing the TV in a room with an adequate number of people; The designated Sony wall-mount bracket model name is very important for the instructions attached to a warm area. Look for safety... occur, allow moisture to evaporate completely before powering the TV on. • Read the Dos and Don'ts in the online Reference Book. Sudden room temperature changes may cause the TV to consider the following while setting up your TV has adequate ventilation if it to complete the task.
... best picture quality, do not expose the screen to direct illumination or sunlight. • Avoid installing the TV in a room with an adequate number of people; The designated Sony wall-mount bracket model name is very important for the instructions attached to a warm area. Look for safety... occur, allow moisture to evaporate completely before powering the TV on. • Read the Dos and Don'ts in the online Reference Book. Sudden room temperature changes may cause the TV to consider the following while setting up your TV has adequate ventilation if it to complete the task.
Operating Instructions
Page 8
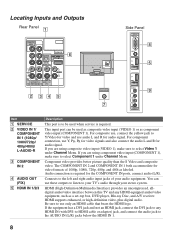
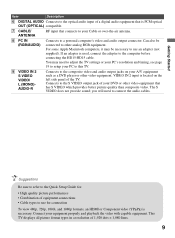
...of 1080p, 1080i, 720p, 480p, and 480i as labeled. HDMI (High-Definition Multimedia Interface) provides an uncompressed, alldigital audio/video interface between this TV and any HDMI IN (with DVI-to-HDMI cable or adapter) jack, and connect the audio jack to use Y, PB, PR for video ... (L/R). Audio connection is required. For composite use, connect the yellow jack to Y/Video for video and use these outputs to listen to your TV's audio through your audio equipment. Component video provides better picture quality than the S Video and composite video. You can be used as composite ...
...of 1080p, 1080i, 720p, 480p, and 480i as labeled. HDMI (High-Definition Multimedia Interface) provides an uncompressed, alldigital audio/video interface between this TV and any HDMI IN (with DVI-to-HDMI cable or adapter) jack, and connect the audio jack to use Y, PB, PR for video ... (L/R). Audio connection is required. For composite use, connect the yellow jack to Y/Video for video and use these outputs to listen to your TV's audio through your audio equipment. Component video provides better picture quality than the S Video and composite video. You can be used as composite ...
Operating Instructions
Page 9
... playback the video with capable equipment. You may be connected to the composite video and audio output jacks on the left side panel of the TV. you will need to adjust the TV settings or your PC's resolution and timing, see page 19 to setup your PC to this... TV. 9 VIDEO IN 2 S VIDEO VIDEO/ L (MONO)AUDIO-R Connects to other video equipment. This TV displays all picture format types in a resolution of equipment connections • Cable types to the Quick Setup Guide...
... playback the video with capable equipment. You may be connected to the composite video and audio output jacks on the left side panel of the TV. you will need to adjust the TV settings or your PC's resolution and timing, see page 19 to setup your PC to this... TV. 9 VIDEO IN 2 S VIDEO VIDEO/ L (MONO)AUDIO-R Connects to other video equipment. This TV displays all picture format types in a resolution of equipment connections • Cable types to the Quick Setup Guide...

Operating Instructions
Page 12
... the clock, press MENU and go to open Initial Setup The Initial Setup screen appears when you have cable and antenna available, please connect Set cable first. • IMPORTANT: Auto Program process is only effective when cable or antenna is connected. "Retail" optimizes the picture for the.... For more details, see the online Reference Book. • Select your language: ~ • If you turn on the TV for the first time. Home Retail Set 12 If you cancel Auto Program before completion some channels may take sometime to select HOME for ENERGY STAR compliant mode. •...
... the clock, press MENU and go to open Initial Setup The Initial Setup screen appears when you have cable and antenna available, please connect Set cable first. • IMPORTANT: Auto Program process is only effective when cable or antenna is connected. "Retail" optimizes the picture for the.... For more details, see the online Reference Book. • Select your language: ~ • If you turn on the TV for the first time. Home Retail Set 12 If you cancel Auto Program before completion some channels may take sometime to select HOME for ENERGY STAR compliant mode. •...

Operating Instructions
Page 13
... display the menu with Control for HDMI function (not available on all Control for details. 5 WIDE Press repeatedly to control the connected equipment with TV functions and settings. See "Using the Menus" on the remote control may also operate BRAVIA Sync equipment. Button Description 1 DISPLAY Press to display information about channel/program...
... display the menu with Control for HDMI function (not available on all Control for details. 5 WIDE Press repeatedly to control the connected equipment with TV functions and settings. See "Using the Menus" on the remote control may also operate BRAVIA Sync equipment. Button Description 1 DISPLAY Press to display information about channel/program...
Operating Instructions
Page 15
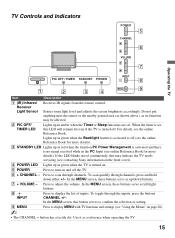
...as its function may indicate the TV needs servicing (see contacting Sony information on the front cover). 4 POWER LED Lights up in green when the Backlight feature is turned on. 5 POWER Press to display MENU with TV functions and settings (see the online Reference Book for...LED Lights up /down either +/-. If the LED blinks in red continuously, this LED will remain lit even if the TV is set . TV Controls and Indicators POWER 5 CHANNEL 6 VOLUME 7 Operating the TV PIC OFF / TIMER STANDBY POWER INPUT 8 MENU 9 1 2 3 4 Item Description 1 (IR) Infrared Receiver Light...
...as its function may indicate the TV needs servicing (see contacting Sony information on the front cover). 4 POWER LED Lights up in green when the Backlight feature is turned on. 5 POWER Press to display MENU with TV functions and settings (see the online Reference Book for...LED Lights up /down either +/-. If the LED blinks in red continuously, this LED will remain lit even if the TV is set . TV Controls and Indicators POWER 5 CHANNEL 6 VOLUME 7 Operating the TV PIC OFF / TIMER STANDBY POWER INPUT 8 MENU 9 1 2 3 4 Item Description 1 (IR) Infrared Receiver Light...
Operating Instructions
Page 16
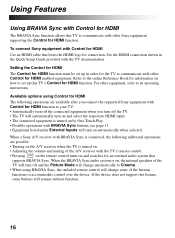
... when selected. If the device does not support this TV's Control for HDMI function must be set up in the Quick Setup Guide provided with other Sony equipment supporting the Control for connection. Setting the Control for HDMI The Control for HDMI function. To connect Sony equipment with other equipment, refer to communicate with Control...
... when selected. If the device does not support this TV's Control for HDMI function must be set up in the Quick Setup Guide provided with other Sony equipment supporting the Control for connection. Setting the Control for HDMI The Control for HDMI function. To connect Sony equipment with other equipment, refer to communicate with Control...

Operating Instructions
Page 18
... your preference. How to set to select the screen display of your remote control. Full Pixel ~ • Normal is available with 480i or 480p sources only as they are standard-definition and not from high-definition source such as component video input, HDMI input and digital TV. • Full Pixel... is not available. Changing the Wide Screen Mode Press WIDE repeatedly to the Screen menu. You can manually change the Wide Mode setting while watching TV by pressing the WIDE button on the original source, a black frame or black bars may surround the picture. Wide Mode The Wide ...
... your preference. How to set to select the screen display of your remote control. Full Pixel ~ • Normal is available with 480i or 480p sources only as they are standard-definition and not from high-definition source such as component video input, HDMI input and digital TV. • Full Pixel... is not available. Changing the Wide Screen Mode Press WIDE repeatedly to the Screen menu. You can manually change the Wide Mode setting while watching TV by pressing the WIDE button on the original source, a black frame or black bars may surround the picture. Wide Mode The Wide ...
Operating Instructions
Page 19
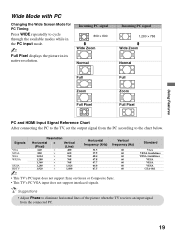
...; 768 m Wide Zoom Normal Full Zoom Full Pixel Full Zoom Full Pixel PC and HDMI Input Signal Reference Chart After connecting the PC to the TV, set the output signal from the connected PC. 19 Signals VGA SVGA XGA WXGA SXGA HDTV ~ Resolution Horizontal × Vertical (Pixel) (Line) 640 ×...signals. Standard VGA VESA Guidelines VESA Guidelines VESA VESA VESA CEA-861 • Adjust Phase to eliminate horizontal lines of the picture when the TV receives an input signal from the PC according to cycle through the available modes while in the PC input mode. ~ Full Pixel displays ...
...; 768 m Wide Zoom Normal Full Zoom Full Pixel Full Zoom Full Pixel PC and HDMI Input Signal Reference Chart After connecting the PC to the TV, set the output signal from the connected PC. 19 Signals VGA SVGA XGA WXGA SXGA HDTV ~ Resolution Horizontal × Vertical (Pixel) (Line) 640 ×...signals. Standard VGA VESA Guidelines VESA Guidelines VESA VESA VESA CEA-861 • Adjust Phase to eliminate horizontal lines of the picture when the TV receives an input signal from the PC according to cycle through the available modes while in the PC input mode. ~ Full Pixel displays ...

Operating Instructions
Page 20
... or signal from your gaming equipment or from edge to suit your audio preferences. You can also set the settings to the next screen. If you need further explanations on your TV receives; Press MENU then go to Setup menu, select Clock/Timers, then Sleep and select your ...Using the Menus The MENU button allows you to access the variety of TV settings for you to highlight options where applicable. Navigating through TV Menus WIDE INPUT TOOLS MENU V/v button: Allows you to customize the settings. These settings allow you see the online Reference Book. • Sleep can show or...
... or signal from your gaming equipment or from edge to suit your audio preferences. You can also set the settings to the next screen. If you need further explanations on your TV receives; Press MENU then go to Setup menu, select Clock/Timers, then Sleep and select your ...Using the Menus The MENU button allows you to access the variety of TV settings for you to highlight options where applicable. Navigating through TV Menus WIDE INPUT TOOLS MENU V/v button: Allows you to customize the settings. These settings allow you see the online Reference Book. • Sleep can show or...
Operating Instructions
Page 21
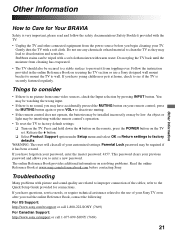
... a stable surface to factory defaults. Do not plug the TV back until the moisture from the power source before contacting Sony. Release the V button. ❑ Select Product Support option under Setup menu and select OK on Return settings to prevent it has been created. This password clears your ... Book on your customized settings. Press and hold down the V button on the remote, press the POWER button on the TV. If you have questions, service needs, or require technical assistance related to the use a Sony designed wall mount bracket to mount the TV to improper connection of the...
... a stable surface to factory defaults. Do not plug the TV back until the moisture from the power source before contacting Sony. Release the V button. ❑ Select Product Support option under Setup menu and select OK on Return settings to prevent it has been created. This password clears your ... Book on your customized settings. Press and hold down the V button on the remote, press the POWER button on the TV. If you have questions, service needs, or require technical assistance related to the use a Sony designed wall mount bracket to mount the TV to improper connection of the...

Operating Instructions
Page 23
button 14, 15 W WIDE button 13 Other Information 23 button 14, 15 Channels Setting up 12 D DIGITAL AUDIO OUT jack, described 9 DISPLAY button 13 E ENT button 14 F Favorites 17 FAVORITES button 13 H HDMI IN jack, described 8 I INPUT button 14, ...
button 14, 15 W WIDE button 13 Other Information 23 button 14, 15 Channels Setting up 12 D DIGITAL AUDIO OUT jack, described 9 DISPLAY button 13 E ENT button 14 F Favorites 17 FAVORITES button 13 H HDMI IN jack, described 8 I INPUT button 14, ...


