Operating Instructions
Page 3
... on XMB 33 TV Setting Description 34 Product Support 34 Clock/Timers Settings 34 Picture Settings 34 Sound Settings 36 Screen Settings 37 Video Options Settings 39 Audio Options Settings 40 Channel Settings 40 CC Closed Captions (CC) Settings 41 Parental Lock Settings 42 External Inputs Settings 44 HDMI Settings 44 General Settings 44 Initial Setup 45 Other Information Cleaning 46 Troubleshooting 46 Specifications 49 Index...
... on XMB 33 TV Setting Description 34 Product Support 34 Clock/Timers Settings 34 Picture Settings 34 Sound Settings 36 Screen Settings 37 Video Options Settings 39 Audio Options Settings 40 Channel Settings 40 CC Closed Captions (CC) Settings 41 Parental Lock Settings 42 External Inputs Settings 44 HDMI Settings 44 General Settings 44 Initial Setup 45 Other Information Cleaning 46 Troubleshooting 46 Specifications 49 Index...
Operating Instructions
Page 4
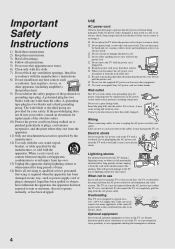
... this apparatus near any ventilation openings. s Use only an original Sony AC power cord, not other equipment. Do not use If you plug/unplug the AC power cord from the AC power source when the TV set . Overloading This TV set . A polarized plug has two blades with dry cloth. 7) ... allow anything to rain or moisture, does not operate normally, or has been dropped. Contact your safety. If it may damage the TV set is damaged, liquid has been spilled or objects have the outlet changed. Optional equipment Do not install optional equipment too close proximity to ...
... this apparatus near any ventilation openings. s Use only an original Sony AC power cord, not other equipment. Do not use If you plug/unplug the AC power cord from the AC power source when the TV set . Overloading This TV set . A polarized plug has two blades with dry cloth. 7) ... allow anything to rain or moisture, does not operate normally, or has been dropped. Contact your safety. If it may damage the TV set is damaged, liquid has been spilled or objects have the outlet changed. Optional equipment Do not install optional equipment too close proximity to ...

Operating Instructions
Page 5
... the U.S.A. Cleaning the screen surface/ cabinet of used batteries To preserve our environment, dispose of the TV set Unplug the AC power cord when cleaning this TV. To remove dust from the speaker. The ventilation holes can come in electric shock. s Carrying the...fire. It is installed, follow the instruction provided on the LCD panel and the frame around the screen. s When you carry the TV, place your local laws or regulations. KDL-40XBR4/ KDL-46XBR4/ KDL-40XBR5/ KDL-46XBR5 KDL-52XBR4/ KDL-52XBR5 Electric service equipment NEC: National Electrical Code Antenna discharge ...
... the U.S.A. Cleaning the screen surface/ cabinet of used batteries To preserve our environment, dispose of the TV set Unplug the AC power cord when cleaning this TV. To remove dust from the speaker. The ventilation holes can come in electric shock. s Carrying the...fire. It is installed, follow the instruction provided on the LCD panel and the frame around the screen. s When you carry the TV, place your local laws or regulations. KDL-40XBR4/ KDL-46XBR4/ KDL-40XBR5/ KDL-46XBR5 KDL-52XBR4/ KDL-52XBR5 Electric service equipment NEC: National Electrical Code Antenna discharge ...

Operating Instructions
Page 6
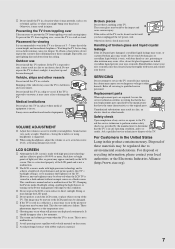
...11 7/8 inches (30 cm) 4 inches (10 cm) 4 inches (10 cm) 4 inches (10 cm) Leave at least this space around the set . Placement The TV should be sure to direct air conditioning. Do not allow children to follow the operating instructions supplied with a cloth or other similar surface. If...11 7/8 inches (30 cm) 4 inches (10 cm) 4 inches (10 cm) 2 3/8 inches (6 cm) Leave at least this space around the TV set . If any kind on the TV. Unless proper ventilation is blocked. It may be exposed to mechanical vibration. s Be sure to protect it checked immediately by placing the...
...11 7/8 inches (30 cm) 4 inches (10 cm) 4 inches (10 cm) 4 inches (10 cm) Leave at least this space around the set . Placement The TV should be sure to direct air conditioning. Do not allow children to follow the operating instructions supplied with a cloth or other similar surface. If...11 7/8 inches (30 cm) 4 inches (10 cm) 4 inches (10 cm) 2 3/8 inches (6 cm) Leave at least this space around the TV set . If any kind on the TV. Unless proper ventilation is blocked. It may be exposed to mechanical vibration. s Be sure to protect it checked immediately by placing the...
Operating Instructions
Page 7
... the Picture mode, Backlight setting, enabling the Light Sensor, or turning on top of medical equipment. s Do not expose the LCD screen surface to qualified service personnel. Doing so may occur when still pictures are required, be observed when the LCD TV is made with bare hands...When using headphones is exposed to achieve a high level of performance and picture quality, this TV's backlight setting is normal and not a malfunction of broken glass and liquid crystal leakage If the LCD panel gets damaged, crystalline liquid leakage may occur, or scattered broken glass may cause eye...
... the Picture mode, Backlight setting, enabling the Light Sensor, or turning on top of medical equipment. s Do not expose the LCD screen surface to qualified service personnel. Doing so may occur when still pictures are required, be observed when the LCD TV is made with bare hands...When using headphones is exposed to achieve a high level of performance and picture quality, this TV's backlight setting is normal and not a malfunction of broken glass and liquid crystal leakage If the LCD panel gets damaged, crystalline liquid leakage may occur, or scattered broken glass may cause eye...
Operating Instructions
Page 8
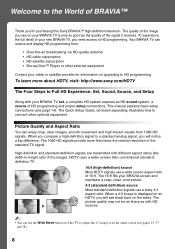
...screen than twice the vertical resolution of the image you see on the sides. The quality of the standard TV signal. This manual explains basic setup connections (see black bars on your BRAVIA TV set, a complete HD system requires an HD sound system, a source of the signal it receives. When ...The 1080 HD signals provide more about HDTV, visit: http://www.sony.com/HDTV The Four Steps to Full HD Experience: Set, Sound, Source, and Setup Along with your BRAVIA TV is displayed on upgrading to -height ratio of the TV to adjust the 4:3 image to HD programming. To experience the ...
...screen than twice the vertical resolution of the image you see on the sides. The quality of the standard TV signal. This manual explains basic setup connections (see black bars on your BRAVIA TV set, a complete HD system requires an HD sound system, a source of the signal it receives. When ...The 1080 HD signals provide more about HDTV, visit: http://www.sony.com/HDTV The Four Steps to Full HD Experience: Set, Sound, Source, and Setup Along with your BRAVIA TV is displayed on upgrading to -height ratio of the TV to adjust the 4:3 image to HD programming. To experience the ...
Operating Instructions
Page 9
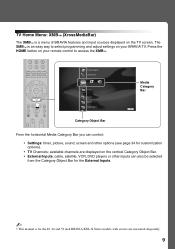
... on your remote control to select programming and adjust settings on the TV screen. Product Support Clock/Timers Settings Sound Screen Video Options Category Object Bar Media Category Bar TV From the horizontal Media Category Bar you can control: • Settings: timer, picture, sound, screen and other options ...players or other inputs can also be selected from the Category Object Bar for the 40, 46 and 52 inch BRAVIA KDL-X Series models with screen size measured diagonally. 9 Press the HOME button on your BRAVIA TV. The XMB™ is an easy way to access the XMB™.
... on your remote control to select programming and adjust settings on the TV screen. Product Support Clock/Timers Settings Sound Screen Video Options Category Object Bar Media Category Bar TV From the horizontal Media Category Bar you can control: • Settings: timer, picture, sound, screen and other options ...players or other inputs can also be selected from the Category Object Bar for the 40, 46 and 52 inch BRAVIA KDL-X Series models with screen size measured diagonally. 9 Press the HOME button on your BRAVIA TV. The XMB™ is an easy way to access the XMB™.
Operating Instructions
Page 10
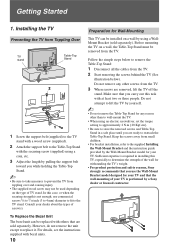
... by yourself. ~ • Do not remove the Table-Top Stand for any other than to wall-mount the TV. • When using an electric screwdriver, set the torque setting to approximately 2 N·m {20 Kgf·cm}. • Be sure to store the removed screws and Table...-Top Stand in installing this task with the securing screw (supplied) using a WallMount Bracket (sold separately. Before mounting the TV on a wall by using a coin, etc. 3 Adjust the length by a Sony...
... by yourself. ~ • Do not remove the Table-Top Stand for any other than to wall-mount the TV. • When using an electric screwdriver, set the torque setting to approximately 2 N·m {20 Kgf·cm}. • Be sure to store the removed screws and Table...-Top Stand in installing this task with the securing screw (supplied) using a WallMount Bracket (sold separately. Before mounting the TV on a wall by using a coin, etc. 3 Adjust the length by a Sony...
Operating Instructions
Page 11
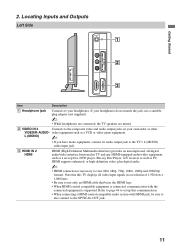
... jack, use a suitable plug adapter (not supplied). ~ • While headphones are connected, the TV speakers are muted. 2 VIDEO IN 2 Connects to use only an HDMI cable that this TV and any HDMI-equipped audio/video equipment, such as a set up this communication. • When connecting a HDMI control compatible audio system with the connected...
... jack, use a suitable plug adapter (not supplied). ~ • While headphones are connected, the TV speakers are muted. 2 VIDEO IN 2 Connects to use only an HDMI cable that this TV and any HDMI-equipped audio/video equipment, such as a set up this communication. • When connecting a HDMI control compatible audio system with the connected...
Operating Instructions
Page 12
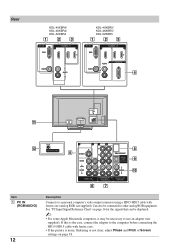
See "PC Input Signal Reference Chart" on page 38. Rear KDL-40XBR4/ KDL-46XBR4/ KDL-52XBR4 1 23 PC IN 1 RGB IN 3 KDL-40XBR5/ KDL-46XBR5/ KDL-52XBR5 1 23 PC IN 1 RGB IN 3 AUDIO L AUDIO R AUDIO AUDIO L R REMOTE 4 qa qs VHF/UHF/CABLE 5 1 31 2 Y S VIDEO VIDEO L (MONO) AUDIO R VIDEO IN ...not supplied). Can also be necessary to other analog RGB equipment. If this is noisy, flickering or not clear, adjust Phase and Pitch of Screen settings on page 16 for the signals that can be displayed. ~ • For some Apple Macintosh computers, it may be connected to use an adapter...
See "PC Input Signal Reference Chart" on page 38. Rear KDL-40XBR4/ KDL-46XBR4/ KDL-52XBR4 1 23 PC IN 1 RGB IN 3 KDL-40XBR5/ KDL-46XBR5/ KDL-52XBR5 1 23 PC IN 1 RGB IN 3 AUDIO L AUDIO R AUDIO AUDIO L R REMOTE 4 qa qs VHF/UHF/CABLE 5 1 31 2 Y S VIDEO VIDEO L (MONO) AUDIO R VIDEO IN ...not supplied). Can also be necessary to other analog RGB equipment. If this is noisy, flickering or not clear, adjust Phase and Pitch of Screen settings on page 16 for the signals that can be displayed. ~ • For some Apple Macintosh computers, it may be connected to use an adapter...
Operating Instructions
Page 13
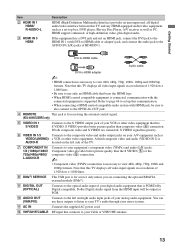
... module (DMex). 9 DIGITAL OUT (OPTICAL) Connects to the optical audio input of your digital audio equipment that this TV and any HDMI-equipped audio/video equipment, such as a set up this communication. • When connecting a HDMI control compatible audio system with HDMI jack, be output as PCM.... composite video and audio (VIDEO IN 2) is AUDIO-R located on your analog audio equipment. Note that is for receiving the external control signal. (KDL-40/46/52XBR5 only) 5 VIDEO IN 1 S VIDEO Connects to the OPTICAL OUT jack. 4 REMOTE This jack is supported. This USB port is PCM/...
... module (DMex). 9 DIGITAL OUT (OPTICAL) Connects to the optical audio input of your digital audio equipment that this TV and any HDMI-equipped audio/video equipment, such as a set up this communication. • When connecting a HDMI control compatible audio system with HDMI jack, be output as PCM.... composite video and audio (VIDEO IN 2) is AUDIO-R located on your analog audio equipment. Note that is for receiving the external control signal. (KDL-40/46/52XBR5 only) 5 VIDEO IN 1 S VIDEO Connects to the OPTICAL OUT jack. 4 REMOTE This jack is supported. This USB port is PCM/...
Operating Instructions
Page 14
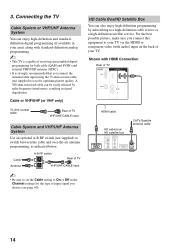
... of input signal you connect this equipment to your TV via the HDMI or component video (with audio) input on the back of your area) along with HDMI Connection Rear of TV B VHF/UHF/CABLE input ~ • Be sure to set the Cable setting to switch between the cable and over-the-air... antenna programming, as indicated below. 3. Connecting the TV Cable System or VHF/UHF Antenna System You can enjoy high-definition...
... of input signal you connect this equipment to your TV via the HDMI or component video (with audio) input on the back of your area) along with HDMI Connection Rear of TV B VHF/UHF/CABLE input ~ • Be sure to set the Cable setting to switch between the cable and over-the-air... antenna programming, as indicated below. 3. Connecting the TV Cable System or VHF/UHF Antenna System You can enjoy high-definition...
Operating Instructions
Page 16
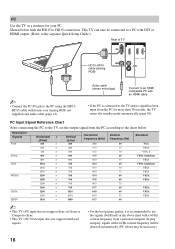
PC Input Signal Reference Chart After connecting the PC to the TV, set the output signal from the PC according to the chart below with an HDMI ... and audio cable (page 12). Audio cable (stereo mini plugs) Connect to an HDMI compatible PC with the HD15 to the TV and no signal has been input from a personal computer. Shown below . Resolution Signals VGA SVGA XGA WXGA SXGA HDTV Horizontal ... 480 400 600 600 768 768 768 768 768 768 768 1024 1024 1080 Horizontal frequency (kHz) 31.5 37.5 31.5 37.9 46.9 48.4 56.5 60.0 47.4 47.8 60.3 47.7 64.0 80.0 67.5 Vertical frequency (Hz) 60 75 70 60 75...
PC Input Signal Reference Chart After connecting the PC to the TV, set the output signal from the PC according to the chart below with an HDMI ... and audio cable (page 12). Audio cable (stereo mini plugs) Connect to an HDMI compatible PC with the HD15 to the TV and no signal has been input from a personal computer. Shown below . Resolution Signals VGA SVGA XGA WXGA SXGA HDTV Horizontal ... 480 400 600 600 768 768 768 768 768 768 768 1024 1024 1080 Horizontal frequency (kHz) 31.5 37.5 31.5 37.9 46.9 48.4 56.5 60.0 47.4 47.8 60.3 47.7 64.0 80.0 67.5 Vertical frequency (Hz) 60 75 70 60 75...
Operating Instructions
Page 18
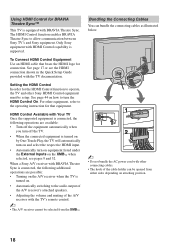
... HDMI Control for the HDMI Control function to operate, the TV and other Sony HDMI Control equipment must be opened from the XMB™. Setting the HDMI Control In order for BRAVIA Theatre Sync™ This TV is equipped with BRAVIA Theatre Sync is connected, the following ...operations are possible: • Turning on the A/V receiver when the TV is supported. When a Sony A/V receiver with BRAVIA Theatre...
... HDMI Control for the HDMI Control function to operate, the TV and other Sony HDMI Control equipment must be opened from the XMB™. Setting the HDMI Control In order for BRAVIA Theatre Sync™ This TV is equipped with BRAVIA Theatre Sync is connected, the following ...operations are possible: • Turning on the A/V receiver when the TV is supported. When a Sony A/V receiver with BRAVIA Theatre...
Operating Instructions
Page 19
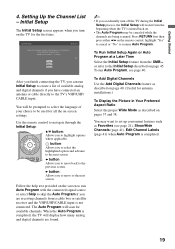
...to on . • The Auto Program may want to the TV's VHF/UHF/ CABLE input. Use the remote control to navigate through the Initial Setup: V/v button: Allows you have connected an antenna or cable directly to set up convenient features such as default audio for all the on ...5 Please select a language. When the Auto Program is completed, the TV will restart from the XMB™ or refer to the next screen. Getting Started 4. Setting Up the Channel List - button: Allows you turn off the TV during the Initial Setup process, the Initial Setup will display how many ...
...to on . • The Auto Program may want to the TV's VHF/UHF/ CABLE input. Use the remote control to navigate through the Initial Setup: V/v button: Allows you have connected an antenna or cable directly to set up convenient features such as default audio for all the on ...5 Please select a language. When the Auto Program is completed, the TV will restart from the XMB™ or refer to the next screen. Getting Started 4. Setting Up the Channel List - button: Allows you turn off the TV during the Initial Setup process, the Initial Setup will display how many ...
Operating Instructions
Page 20
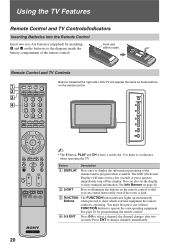
... Remote Control and TV Controls/Indicators Inserting Batteries into the Remote Control Insert two size AA batteries (supplied) by matching e and E on the batteries to the diagram inside the battery compartment of these buttons 1 on the remote control so that you can also set the display to show... programming the remote control. 4 0-9 ENT Press 0-9 to the channel and/or program when available. Remote Control and TV Controls Buttons located at the right side of the TV will time out in a few seconds or press again to change channels immediately. 20 Push and slide to operate the...
... Remote Control and TV Controls/Indicators Inserting Batteries into the Remote Control Insert two size AA batteries (supplied) by matching e and E on the batteries to the diagram inside the battery compartment of these buttons 1 on the remote control so that you can also set the display to show... programming the remote control. 4 0-9 ENT Press 0-9 to the channel and/or program when available. Remote Control and TV Controls Buttons located at the right side of the TV will time out in a few seconds or press again to change channels immediately. 20 Push and slide to operate the...
Operating Instructions
Page 21
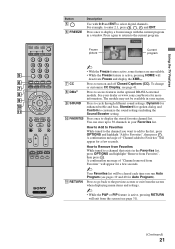
...information. How to Remove from Favorites While tuned to 30 channels in your dealer or www.sony.com/bravia for a few seconds. To change 7 or customize CC Display, see pages... Favorites list. A confirmation message of "Channel removed from Favorites", then press . Using the TV Features Button 5 6 FREEZE Description Use with the current program in a window. How to ... you want to add to the list, press OPTIONS and highlight "Add to cycle through different sound settings: Dynamic for 0 enhanced treble and bass, Standard for Auto Program). Press again to return to enter...
...information. How to Remove from Favorites While tuned to 30 channels in your dealer or www.sony.com/bravia for a few seconds. To change 7 or customize CC Display, see pages... Favorites list. A confirmation message of "Channel removed from Favorites", then press . Using the TV Features Button 5 6 FREEZE Description Use with the current program in a window. How to ... you want to add to the list, press OPTIONS and highlight "Add to cycle through different sound settings: Dynamic for 0 enhanced treble and bass, Standard for Auto Program). Press again to return to enter...

Operating Instructions
Page 22
... the audio output of the attached speakers of the connected equipment. For details, see page 17 for a cinema like experience and the audio will be set for details). M& NEXT: Press to advance forward to your BRAVIA Theatre Sync audio system. qf qh DVR/VCR z REC: Press to play a... When FUNCTION is switched on BD (Blu-ray Disc), DVD or STB or STB, these buttons operate the video equipment you want the TV to live TV cache. Your BRAVIA Theatre Sync audio system must be switched to pause the recording. Pressing this button alone starts the Record recording process. ...
... the audio output of the attached speakers of the connected equipment. For details, see page 17 for a cinema like experience and the audio will be set for details). M& NEXT: Press to advance forward to your BRAVIA Theatre Sync audio system. qf qh DVR/VCR z REC: Press to play a... When FUNCTION is switched on BD (Blu-ray Disc), DVD or STB or STB, these buttons operate the video equipment you want the TV to live TV cache. Your BRAVIA Theatre Sync audio system must be switched to pause the recording. Pressing this button alone starts the Record recording process. ...
Operating Instructions
Page 23
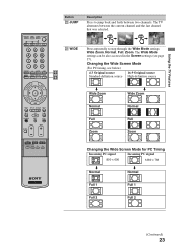
... be also accessed in the Screen settings (see below) 4:3 Original source 16:9 Original source Standard-definition source High-definition source m Wide Zoom m Wide Zoom Normal Normal Full Full Zoom Zoom Changing the ...). JUMP JUMP wd WIDE ws wd Press repeatedly to jump back and forth between the current channel and the last channel that was selected. The TV alternates between two channels. Using the TV Features Button ws JUMP Description Press to step through the Wide Mode settings: Wide Zoom, Normal, Full, Zoom.
... be also accessed in the Screen settings (see below) 4:3 Original source 16:9 Original source Standard-definition source High-definition source m Wide Zoom m Wide Zoom Normal Normal Full Full Zoom Zoom Changing the ...). JUMP JUMP wd WIDE ws wd Press repeatedly to jump back and forth between the current channel and the last channel that was selected. The TV alternates between two channels. Using the TV Features Button ws JUMP Description Press to step through the Wide Mode settings: Wide Zoom, Normal, Full, Zoom.
Operating Instructions
Page 24
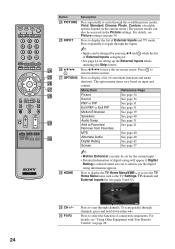
...External Inputs is selected when an icon to display the list of External Inputs and TV mode. Press to display the TV Home Menu/XMB™ to access the TV Home Menu items such as the TV Settings, TV channels and External Inputs list (see "Using Other Equipment with Your Remote Control" ...on page 28. 24 Press to cycle through channels. For details, see Picture settings on input and content. Press repeatedly to move the on setting up the ...
...External Inputs is selected when an icon to display the list of External Inputs and TV mode. Press to display the TV Home Menu/XMB™ to access the TV Home Menu items such as the TV Settings, TV channels and External Inputs list (see "Using Other Equipment with Your Remote Control" ...on page 28. 24 Press to cycle through channels. For details, see Picture settings on input and content. Press repeatedly to move the on setting up the ...


