
Child Safety: It Makes A Difference Where Your TV Stands
Page 1
... like most Americans, you have a television in fact, have more than one television. As a result, TV sets may fall over . 7 Share our safety message on this hidden hazard of the home with furniture and television sets. 5 Avoid placing any items on top of the International CES® and ...is committed to advocate children's safety and educate customers and their families about television safety. The industry is a Sector of the Electronic ...
... like most Americans, you have a television in fact, have more than one television. As a result, TV sets may fall over . 7 Share our safety message on this hidden hazard of the home with furniture and television sets. 5 Avoid placing any items on top of the International CES® and ...is committed to advocate children's safety and educate customers and their families about television safety. The industry is a Sector of the Electronic ...

Limited Warranty (US Only)
Page 1
... eighteen (18) month limited warranty term (ninety (90) days for commercial use ; 2-693-552-01 x S LCD Television 18M LIMITED WARRANTY(US ONLY) SONY ELECTRONICS INC. ("SONY") warrants this product against defects in material or workmanship for your rights and obligations with respect to the software. Please ...refurbished parts or (ii) replace the product with the Product. This Limited Warranty does not cover SONY products sold AS IS or WITH ALL FAULTS or consumables (such as set up adjustments or signal reception issues; (iv) limitations of technology, or (v) modification of or to...
... eighteen (18) month limited warranty term (ninety (90) days for commercial use ; 2-693-552-01 x S LCD Television 18M LIMITED WARRANTY(US ONLY) SONY ELECTRONICS INC. ("SONY") warrants this product against defects in material or workmanship for your rights and obligations with respect to the software. Please ...refurbished parts or (ii) replace the product with the Product. This Limited Warranty does not cover SONY products sold AS IS or WITH ALL FAULTS or consumables (such as set up adjustments or signal reception issues; (iv) limitations of technology, or (v) modification of or to...
Instructions
Page 7
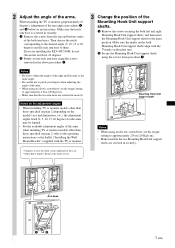
... the same angle. • Be careful not to pinch your fingers when adjusting the angle of the arms. • When using an electric screwdriver, set the torque setting to approximately 2 N·m {20 Kgf·cm}. • Make sure that each arm base to the desired angle (5, 10, 15 or 20 degrees) and... or monitor models other than those specified on page 2 (depending on the plate unit. 2 Secure the Mounting Hook Unit support shafts using an electric screwdriver, set the torque setting to the inner position. If you are screwed in securely.
... the same angle. • Be careful not to pinch your fingers when adjusting the angle of the arms. • When using an electric screwdriver, set the torque setting to approximately 2 N·m {20 Kgf·cm}. • Make sure that each arm base to the desired angle (5, 10, 15 or 20 degrees) and... or monitor models other than those specified on page 2 (depending on the plate unit. 2 Secure the Mounting Hook Unit support shafts using an electric screwdriver, set the torque setting to the inner position. If you are screwed in securely.
Instructions
Page 8
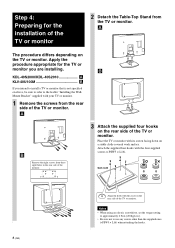
B KDL-40S2000/KDL-40S2010 A KLV-40U100M B If you are installing. Place the TV or monitor with the four supplied screws (+PSW5 × L16). Apply the procedure appropriate for ... monitor. Attach the supplied four hooks with its screen facing down on a stable cloth-covered work surface. Notes • When using an electric screwdriver, set the torque setting to approximately 2 N·m {20 Kgf·cm}. • Be sure not to the leaflet "Installing the WallMount Bracket" supplied with the circle on the...
B KDL-40S2000/KDL-40S2010 A KLV-40U100M B If you are installing. Place the TV or monitor with the four supplied screws (+PSW5 × L16). Apply the procedure appropriate for ... monitor. Attach the supplied four hooks with its screen facing down on a stable cloth-covered work surface. Notes • When using an electric screwdriver, set the torque setting to approximately 2 N·m {20 Kgf·cm}. • Be sure not to the leaflet "Installing the WallMount Bracket" supplied with the circle on the...

Operating Instructions
Page 6
... the upper and bottom frames of people. s When transporting, do not operate the TV. MOISTURE Moisture and flammable objects s Do not use power-line operated sets near a bathtub, washbowl, kitchen sink, or laundry tub, in cabinet, unless proper ventilation is provided, the TV may result in the specified manner Carrying the...
... the upper and bottom frames of people. s When transporting, do not operate the TV. MOISTURE Moisture and flammable objects s Do not use power-line operated sets near a bathtub, washbowl, kitchen sink, or laundry tub, in cabinet, unless proper ventilation is provided, the TV may result in the specified manner Carrying the...

Operating Instructions
Page 9
... 18 Basic Operations Remote Control ...19 TV Controls...22 Using the Menus Overview of the TV 16 When Installing on a Wall 17 Setting Up the Channel List - Contents Getting Started Welcome to the World of 10 Connecting the TV ...10 Cable System and/or VHF... the Viewing Angle of MENU ...23 Using the Picture Settings 26 Using the Sound Settings 28 Using the Screen Settings 29 Using the Setup Settings 31 Using the PC Settings...36 Using the Analog Setup Settings 37 Using the Digital Setup Settings 38 Other Information Troubleshooting...41 PC Input Signal Reference Chart...
... 18 Basic Operations Remote Control ...19 TV Controls...22 Using the Menus Overview of the TV 16 When Installing on a Wall 17 Setting Up the Channel List - Contents Getting Started Welcome to the World of 10 Connecting the TV ...10 Cable System and/or VHF... the Viewing Angle of MENU ...23 Using the Picture Settings 26 Using the Sound Settings 28 Using the Screen Settings 29 Using the Setup Settings 31 Using the PC Settings...36 Using the Analog Setup Settings 37 Using the Digital Setup Settings 38 Other Information Troubleshooting...41 PC Input Signal Reference Chart...
Operating Instructions
Page 10
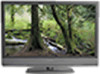
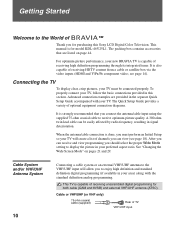
.... After you can receive and view programming you should select the proper Wide Mode setting to display the picture in your TV, follow the basic connections provided in this Sony LCD Digital Color Television. The Quick Setup Guide provides a variety of optional equipment connection diagrams. It is...Started Welcome to the World of ™ Thank you for purchasing this section. It is for model KDL-46V25L1. Connecting the TV To display clear, crisp pictures, your new BRAVIA TV is strongly recommended that are provided in signal deterioration. This manual is also capable of TV ...
.... After you can receive and view programming you should select the proper Wide Mode setting to display the picture in your TV, follow the basic connections provided in this Sony LCD Digital Color Television. The Quick Setup Guide provides a variety of optional equipment connection diagrams. It is...Started Welcome to the World of ™ Thank you for purchasing this section. It is for model KDL-46V25L1. Connecting the TV To display clear, crisp pictures, your new BRAVIA TV is strongly recommended that are provided in signal deterioration. This manual is also capable of TV ...
Operating Instructions
Page 11
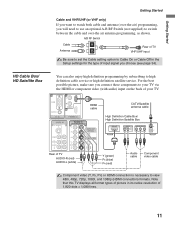
... subscribing to view 480i, 480p, 720p, 1080i, and 1080p (HDMI connection) formats. Note that this TV displays all format types of picture in the Setup settings for the type of input signal you choose (see page 34). For the best possible picture, make sure you connect these components to your TV... OUT(VAR/FIX) Rear of 1,920 dots × 1,080 lines. 11 A/B RF Switch Cable A Antenna B Rear of TV VHF/UHF input Be sure to set the Cable setting option to switch between the cable and over -the-air) programming, you will need to use an optional A-B RF Switch (not supplied) to Cable...
... subscribing to view 480i, 480p, 720p, 1080i, and 1080p (HDMI connection) formats. Note that this TV displays all format types of picture in the Setup settings for the type of input signal you choose (see page 34). For the best possible picture, make sure you connect these components to your TV... OUT(VAR/FIX) Rear of 1,920 dots × 1,080 lines. 11 A/B RF Switch Cable A Antenna B Rear of TV VHF/UHF input Be sure to set the Cable setting option to switch between the cable and over -the-air) programming, you will need to use an optional A-B RF Switch (not supplied) to Cable...

Operating Instructions
Page 13
...(Continued) 13 Connect to use an adapter (not supplied). If this is noisy, flickering or not clear, adjust Phase and Pitch of the PC Settings on your camcorder or other video equipment that can be necessary to a personal computer's video output connector using headphones. If you have no effect while... (See Auto YC on page 28, have mono equipment, connect its audio output jack to the computer before connecting the HD15-HD15 cable. Sound Setting options, on page 33.) Connect to your camcorder or other analog RGB devices. For some Apple Macintosh computers, it may be displayed.
...(Continued) 13 Connect to use an adapter (not supplied). If this is noisy, flickering or not clear, adjust Phase and Pitch of the PC Settings on your camcorder or other video equipment that can be necessary to a personal computer's video output connector using headphones. If you have no effect while... (See Auto YC on page 28, have mono equipment, connect its audio output jack to the computer before connecting the HD15-HD15 cable. Sound Setting options, on page 33.) Connect to your camcorder or other analog RGB devices. For some Apple Macintosh computers, it may be displayed.
Operating Instructions
Page 14
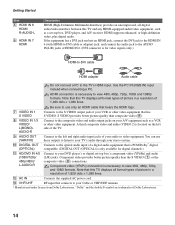
Connects to the S VIDEO output jack of your DVD player's or digital set -top box, DVD player, and A/V receiver. Connects to the optical audio input of HDMI IN 6. (DVI connector is for digital channels.) Connect to your VCR ... interface between this TV and any HDMI-equipped audio/video equipment, such as a VCR or other video equipment that connects to your A/V equipment such as a set -top box's component video (YPBPR) and audio (L/R) jacks. Use the PC IN (RGB IN) input instead when connecting a PC. Connect to the composite video and...
Connects to the S VIDEO output jack of your DVD player's or digital set -top box, DVD player, and A/V receiver. Connects to the optical audio input of HDMI IN 6. (DVI connector is for digital channels.) Connect to your VCR ... interface between this TV and any HDMI-equipped audio/video equipment, such as a VCR or other video equipment that connects to your A/V equipment such as a set -top box's component video (YPBPR) and audio (L/R) jacks. Use the PC IN (RGB IN) input instead when connecting a PC. Connect to the composite video and...

Operating Instructions
Page 18
... channels?" To run Auto Program again at this time, you can do not want to create a list of available analog and digital channels. Getting Started Setting Up the Channel List - Initial Setup After you finish connecting the TV, you can run the Initial Setup to start Auto Program?" The message "Auto... This may require 50+ minutes for the first time after hooking it later by selecting the Auto Program option in the Analog and Digital Setup settings (see pages 37 and 38). Then press .
... channels?" To run Auto Program again at this time, you can do not want to create a list of available analog and digital channels. Getting Started Setting Up the Channel List - Initial Setup After you finish connecting the TV, you can run the Initial Setup to start Auto Program?" The message "Auto... This may require 50+ minutes for the first time after hooking it later by selecting the Auto Program option in the Analog and Digital Setup settings (see pages 37 and 38). Then press .
Operating Instructions
Page 19
... function active, some functions are watching digital channels (if it is available from a channel list. For details, see "Using the Picture Settings" on a unique mission. Information banner Channel list Program options Make Way for Ducks! Series follows the aquatic misadventures of the current program in...modes can be also accessed in a window. Press repeatedly until Off appears. The guide also provides information about the current program being shown on setting up the video input labels, including the Skip function. z The 5 button and CH + have a tactile dot. See page 32 on ...
... function active, some functions are watching digital channels (if it is available from a channel list. For details, see "Using the Picture Settings" on a unique mission. Information banner Channel list Program options Make Way for Ducks! Series follows the aquatic misadventures of the current program in...modes can be also accessed in a window. Press repeatedly until Off appears. The guide also provides information about the current program being shown on setting up the video input labels, including the Skip function. z The 5 button and CH + have a tactile dot. See page 32 on ...
Operating Instructions
Page 20
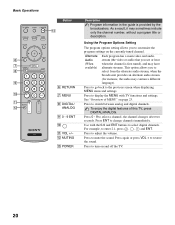
...the digital features of MENU" on and off the TV. 20 Press to enter 2.1, press 2 , , 1 and ENT. Use with TV functions and settings. For example, to adjust the volume. Press to display the MENU with the 0-9 and ENT buttons to turn on page 23. Press 0 - 9 ... to select digital channels. Press to go back to select a channel; Using the Program Options Setting The program options setting allows you to customize the program settings on the currently tuned channel. See "Overview of this TV, press DIGITAL/ANALOG. the channel changes after two seconds. Basic Operations 6 7 8 9...
...the digital features of MENU" on and off the TV. 20 Press to enter 2.1, press 2 , , 1 and ENT. Use with TV functions and settings. For example, to adjust the volume. Press to display the MENU with the 0-9 and ENT buttons to turn on page 23. Press 0 - 9 ... to select digital channels. Press to go back to select a channel; Using the Program Options Setting The program options setting allows you to customize the program settings on the currently tuned channel. See "Overview of this TV, press DIGITAL/ANALOG. the channel changes after two seconds. Basic Operations 6 7 8 9...

Operating Instructions
Page 21
...quickly through channels. See page 29. When the TV receives a 720p, 1080i or 1080p signal, Normal cannot be also accessed in the Screen settings. Press to open 21 The TV alternates between two channels. Press V/v/B/b to move the on the batteries to jump back and forth between the ...select/confirm an item. Press to scan through channels, press and hold down either +/-. Press once to step through the Wide Mode settings: Wide Zoom, Normal, Full, Zoom. Press to display the Tools Menu that was selected among the digital or analog channels. The Wide Mode...
...quickly through channels. See page 29. When the TV receives a 720p, 1080i or 1080p signal, Normal cannot be also accessed in the Screen settings. Press to open 21 The TV alternates between two channels. Press V/v/B/b to move the on the batteries to jump back and forth between the ...select/confirm an item. Press to scan through channels, press and hold down either +/-. Press once to step through the Wide Mode settings: Wide Zoom, Normal, Full, Zoom. Press to display the Tools Menu that was selected among the digital or analog channels. The Wide Mode...
Operating Instructions
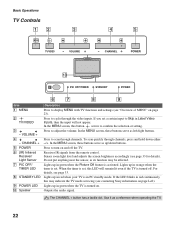
Page 22
... OFF/TIMER STANDBY POWER Item 1 MENU 2 TV/VIDEO 3 - VOLUME + 4 - Lights up in orange when the timer is set. When the timer is set a certain input to confirm the selection or setting. Use it as up in green when the Picture Off feature is turned on page 23). In the MENU screen... off the TV. Outputs the audio signal. The CHANNEL + button has a tactile dot. If you set , this LED will not appear. Press to display MENU with TV functions and settings (see contacting Sony information on and off . Lights up in Label Video Inputs, then the input will remain lit even ...
... OFF/TIMER STANDBY POWER Item 1 MENU 2 TV/VIDEO 3 - VOLUME + 4 - Lights up in orange when the timer is set. When the timer is set a certain input to confirm the selection or setting. Use it as up in green when the Picture Off feature is turned on page 23). In the MENU screen... off the TV. Outputs the audio signal. The CHANNEL + button has a tactile dot. If you set , this LED will not appear. Press to display MENU with TV functions and settings (see contacting Sony information on and off . Lights up in Label Video Inputs, then the input will remain lit even ...

Operating Instructions
Page 23
When you press the MENU button, you to exit. 1 MENU External Inputs Analog Favorites Digital Favorites Analog Digital Settings Select from basic TV functions such as: switching between external inputs, viewing your favorite analog/digital stations, switching between analog and... digital channels, and changing or customizing your TV. It enables you can select from connected equipment Select: Set: Exit: MENU (Continued) 23 Using the Menus Using the Menus Overview of tasks intuitively with a control panel on the remote. The MENU...
When you press the MENU button, you to exit. 1 MENU External Inputs Analog Favorites Digital Favorites Analog Digital Settings Select from basic TV functions such as: switching between external inputs, viewing your favorite analog/digital stations, switching between analog and... digital channels, and changing or customizing your TV. It enables you can select from connected equipment Select: Set: Exit: MENU (Continued) 23 Using the Menus Using the Menus Overview of tasks intuitively with a control panel on the remote. The MENU...

Operating Instructions
Page 24
... Analog The Digital feature displays the most recently viewed analog channel. When tuned to 16 favorite channels. Edit Video Labels Select: Set: Exit: MENU The Analog Favorites feature lets you create a list of Favorite Channels. To create your favorite list: 1 Highlight...list. When tuned to the channel, the Channel number will be accessed using Label Video Inputs in the Setup settings. (see page 37. 6 28 : ----7 -- : ----8 -- : ----Edit Favorites Select: Set: Exit: MENU Add to the list of favorite channels, select Edit Favorites. Highlight Digital on the remote ...
... Analog The Digital feature displays the most recently viewed analog channel. When tuned to 16 favorite channels. Edit Video Labels Select: Set: Exit: MENU The Analog Favorites feature lets you create a list of Favorite Channels. To create your favorite list: 1 Highlight...list. When tuned to the channel, the Channel number will be accessed using Label Video Inputs in the Setup settings. (see page 37. 6 28 : ----7 -- : ----8 -- : ----Edit Favorites Select: Set: Exit: MENU Add to the list of favorite channels, select Edit Favorites. Highlight Digital on the remote ...

Operating Instructions
Page 25
The options you enter the settings menu. MENU Settings Using the Menus Description The Settings feature lets you can be performed from page 26. Navigating Through Settings 1 Press MENU. 2 Select . 3 Highlight the item: Picture, Sound, Screen, Setup, PC Settings, Analog Setup, Digital Setup. 4 Press to select an option. The information on the situation. Unavailable options are grayed out or not displayed. To exit Settings, press MENU. Using the Menus 25 Settings and adjustments can adjust vary depending on various settings starts from the Settings menu.
The options you enter the settings menu. MENU Settings Using the Menus Description The Settings feature lets you can be performed from page 26. Navigating Through Settings 1 Press MENU. 2 Select . 3 Highlight the item: Picture, Sound, Screen, Setup, PC Settings, Analog Setup, Digital Setup. 4 Press to select an option. The information on the situation. Unavailable options are grayed out or not displayed. To exit Settings, press MENU. Using the Menus 25 Settings and adjustments can adjust vary depending on various settings starts from the Settings menu.

Operating Instructions
Page 26
...sharpness. Picture Mode can also be accessed using the TOOLS button on the remote control. Resets the current Picture Mode setting to picture settings affect only Video 1). Adjust to increase or decrease the green tones. Adjust to increase or decrease picture contrast. ...intensity. Adjust to view text, charts or tables. Video 7). Recommended for home entertainment. Adjust to store your preferred settings. All Inputs Settings will override any settings set to only the Current Input (ex: TV is showing Video 1. All Inputs will be applied to Custom. Custom...
...sharpness. Picture Mode can also be accessed using the TOOLS button on the remote control. Resets the current Picture Mode setting to picture settings affect only Video 1). Adjust to increase or decrease the green tones. Adjust to increase or decrease picture contrast. ...intensity. Adjust to view text, charts or tables. Video 7). Recommended for home entertainment. Adjust to store your preferred settings. All Inputs Settings will override any settings set to only the Current Input (ex: TV is showing Video 1. All Inputs will be applied to Custom. Custom...

Operating Instructions
Page 27
... the VHF/UHF input. Black Corrector Enhances black areas of the darker picture scenes. It is not available when Target Inputs is set to Custom Description Select to reduce the noise level of color reproduction from Auto, High, Medium, Low and Off. MPEG Noise Reduction...pictures. Auto is especially effective for Digital TV channels. Using the Menus Option Noise Reduction Advanced Settings Available only when Picture Mode is set to All Inputs. If the function is set to the default values. Useful for dark image scenes. Select from Wide or Normal. Live...
... the VHF/UHF input. Black Corrector Enhances black areas of the darker picture scenes. It is not available when Target Inputs is set to Custom Description Select to reduce the noise level of color reproduction from Auto, High, Medium, Low and Off. MPEG Noise Reduction...pictures. Auto is especially effective for Digital TV channels. Using the Menus Option Noise Reduction Advanced Settings Available only when Picture Mode is set to All Inputs. If the function is set to the default values. Useful for dark image scenes. Select from Wide or Normal. Live...


