Operating Instructions
Page 1
3-196-472-17(1) LCD Digital Color TV Operating Instructions KDL-26S3000 KDL-32SL130 KDL-32S3000 KDL-40SL130 KDL-40S3000 KDL-46S3000 © 2007 Sony Corporation
3-196-472-17(1) LCD Digital Color TV Operating Instructions KDL-26S3000 KDL-32SL130 KDL-32S3000 KDL-40SL130 KDL-40S3000 KDL-46S3000 © 2007 Sony Corporation
Operating Instructions
Page 2
...: KDL-26S3000/KDL-32S3000/ KDL-40S3000/KDL-46S3000/ KDL-32SL130/KDL-40SL130 Responsible Party: Sony Electronics Inc. If this case, please wait a few hours to direct illumination or direct sunlight. s Consult the dealer or an experienced radio/ TV technician for the voltage where you will not occur in injury. s Use the AC power cord specified by your area depends...
...: KDL-26S3000/KDL-32S3000/ KDL-40S3000/KDL-46S3000/ KDL-32SL130/KDL-40SL130 Responsible Party: Sony Electronics Inc. If this case, please wait a few hours to direct illumination or direct sunlight. s Consult the dealer or an experienced radio/ TV technician for the voltage where you will not occur in injury. s Use the AC power cord specified by your area depends...
Operating Instructions
Page 3
.../tvsupport On-line Registration United States http://productregistration.sony.com Canada http://www.SonyStyle.ca/registration 3 Locating Inputs and Outputs 13 Left side 13 Rear 14 3. Initial Setup 21 Remote Control and TV Controls/Indicators 22 Inserting Batteries into the Remote control 22 Remote Control...19 Using HDMI Control for Wall-Mounting 12 2. Setting Up the Channel List - Installing the TV 11 Preventing the TV from P&P and PIP 27 Using TV Features Adjust TV Settings 28 Watching TV 28 Access the equipment connected to Stunning HD Experience: Set, Sound, Source, and Setup 8...
.../tvsupport On-line Registration United States http://productregistration.sony.com Canada http://www.SonyStyle.ca/registration 3 Locating Inputs and Outputs 13 Left side 13 Rear 14 3. Initial Setup 21 Remote Control and TV Controls/Indicators 22 Inserting Batteries into the Remote control 22 Remote Control...19 Using HDMI Control for Wall-Mounting 12 2. Setting Up the Channel List - Installing the TV 11 Preventing the TV from P&P and PIP 27 Using TV Features Adjust TV Settings 28 Watching TV 28 Access the equipment connected to Stunning HD Experience: Set, Sound, Source, and Setup 8...
Operating Instructions
Page 4
... of the obsolete outlet. 10) Protect the power cord from the TV set. Contact your dealer or Sony service center to an AC power socket outlet with dry cloth. 7) Do not block any equipment emitting electromagnetic radiation. It may damage the TV set should be disconnected from the wall outlet and disconnect the...
... of the obsolete outlet. 10) Protect the power cord from the TV set. Contact your dealer or Sony service center to an AC power socket outlet with dry cloth. 7) Do not block any equipment emitting electromagnetic radiation. It may damage the TV set should be disconnected from the wall outlet and disconnect the...
Operating Instructions
Page 5
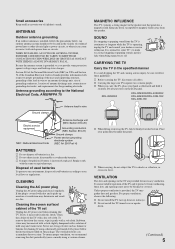
...causing serious injury, be located in wire to make occasional snapping or popping sounds, particularly when being turned on the LCD panel. s Carrying the large size TV requires two or more people. s Do not short circuit, disassemble or overheat the batteries. Place your hand as...the vicinity of mild soap and warm water. s Do not install the TV turned over time. Keep any items susceptible to shocks or vibration, or excessive force. KDL-26S3000 KDL-32S3000/KDL-40S3000/ KDL-46S3000/KDL-32SL130/ KDL-40SL130 Ground clamps Antenna lead-in electric shock. If the plug is normal...
...causing serious injury, be located in wire to make occasional snapping or popping sounds, particularly when being turned on the LCD panel. s Carrying the large size TV requires two or more people. s Do not short circuit, disassemble or overheat the batteries. Place your hand as...the vicinity of mild soap and warm water. s Do not install the TV turned over time. Keep any items susceptible to shocks or vibration, or excessive force. KDL-26S3000 KDL-32S3000/KDL-40S3000/ KDL-46S3000/KDL-32SL130/ KDL-40SL130 Ground clamps Antenna lead-in electric shock. If the plug is normal...

Operating Instructions
Page 6
... objects filled with stand 11 7/8 inches (30 cm) 4 inches (10 cm) 4 inches (10 cm) 2 3/8 inches (6 cm) Leave at least this TV get wet. for example, near a bathtub, washbowl, kitchen sink, or laundry tub, in a fire or an electric shock. It may fall and cause serious injury...s Never block the slots and openings by qualified personnel. s To prevent fire, keep flammable objects or open flame (e.g. s Be sure to the TV set as shown below. Otherwise, air-circulation may be inadequate and cause overheating, which may result in a place exposed to follow the operating instructions...
... objects filled with stand 11 7/8 inches (30 cm) 4 inches (10 cm) 4 inches (10 cm) 2 3/8 inches (6 cm) Leave at least this TV get wet. for example, near a bathtub, washbowl, kitchen sink, or laundry tub, in a fire or an electric shock. It may fall and cause serious injury...s Never block the slots and openings by qualified personnel. s To prevent fire, keep flammable objects or open flame (e.g. s Be sure to the TV set as shown below. Otherwise, air-circulation may be inadequate and cause overheating, which may result in a place exposed to follow the operating instructions...

Operating Instructions
Page 7
... a malfunction of these materials may be observed when the LCD TV is not a malfunction. Sound carries very easily at the TV. s Do not expose the LCD screen surface to qualified service personnel. The image may be uneven or the LCD panel may be sure the service technician certifies in moderate ...until you to dangerous voltage or other hazards. Medical institutions Do not place this TV in safe operating condition, and to so certify. LCD SCREEN s Although the LCD screen is in a vehicle. s The LCD screen is made with water and consult your eyes or mouth. Should either contact...
... a malfunction of these materials may be observed when the LCD TV is not a malfunction. Sound carries very easily at the TV. s Do not expose the LCD screen surface to qualified service personnel. The image may be uneven or the LCD panel may be sure the service technician certifies in moderate ...until you to dangerous voltage or other hazards. Medical institutions Do not place this TV in safe operating condition, and to so certify. LCD SCREEN s Although the LCD screen is in a vehicle. s The LCD screen is made with water and consult your eyes or mouth. Should either contact...
Operating Instructions
Page 8
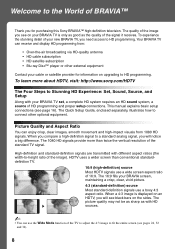
...an HDTV, you compare a high-definition signal to connect other external equipment Contact your new BRAVIA TV, you see page 16). The 1080 HD signals provide more about HDTV, visit: http://www.sony.com/HDTV The Four Steps to Stunning HD Experience: Set, Sound, Source, and Setup Along ..., a complete HD system requires an HD sound system, a source of your cable or satellite provider for purchasing this Sony BRAVIA™ high-definition television. The 16:9 fills your BRAVIA TV is displayed on upgrading to -height ratio of the signal it receives. When a 4:3 image is only as good ...
...an HDTV, you compare a high-definition signal to connect other external equipment Contact your new BRAVIA TV, you see page 16). The 1080 HD signals provide more about HDTV, visit: http://www.sony.com/HDTV The Four Steps to Stunning HD Experience: Set, Sound, Source, and Setup Along ..., a complete HD system requires an HD sound system, a source of your cable or satellite provider for purchasing this Sony BRAVIA™ high-definition television. The 16:9 fills your BRAVIA TV is displayed on upgrading to -height ratio of the signal it receives. When a 4:3 image is only as good ...
Operating Instructions
Page 9
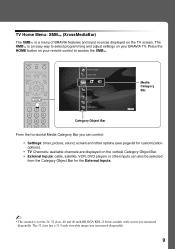
... is an easy way to access the XMB™. HOME Product Support Clock/Timers Settings Sound Screen Video Options Category Object Bar Media Category Bar TV From the horizontal Media Category Bar you can control: • Settings: timer, picture, sound, screen and other options (see page 30 for...• This manual is for the 26, 32 class, 40 and 46 inch BRAVIA KDL-S Series models with screen size measured diagonally. Press the HOME button on the TV screen. The 32 class has a 31.5 inch viewable image size (measured diagonally). 9 TV Home Menu: XMB™ (XrossMediaBar) The XMB™ is a ...
... is an easy way to access the XMB™. HOME Product Support Clock/Timers Settings Sound Screen Video Options Category Object Bar Media Category Bar TV From the horizontal Media Category Bar you can control: • Settings: timer, picture, sound, screen and other options (see page 30 for...• This manual is for the 26, 32 class, 40 and 46 inch BRAVIA KDL-S Series models with screen size measured diagonally. Press the HOME button on the TV screen. The 32 class has a 31.5 inch viewable image size (measured diagonally). 9 TV Home Menu: XMB™ (XrossMediaBar) The XMB™ is a ...
Operating Instructions
Page 11
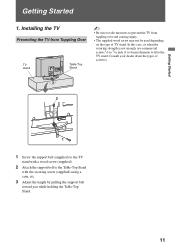
... holding the Table-Top Stand. 11 Consult your dealer about the types of TV stand. Installing the TV Preventing the TV from Toppling Over TV stand Table-Top Stand ~ • Be sure to take measures to prevent the TV from toppling over and causing injury. • The supplied wood screw may ...not be used depending on the type of screw(s). 2 3 1 1 Screw the support belt (supplied) to the TV stand with a wood screw (supplied). 2 Attach the support belt...
... holding the Table-Top Stand. 11 Consult your dealer about the types of TV stand. Installing the TV Preventing the TV from Toppling Over TV stand Table-Top Stand ~ • Be sure to take measures to prevent the TV from toppling over and causing injury. • The supplied wood screw may ...not be used depending on the type of screw(s). 2 3 1 1 Screw the support belt (supplied) to the TV stand with a wood screw (supplied). 2 Attach the support belt...
Operating Instructions
Page 12
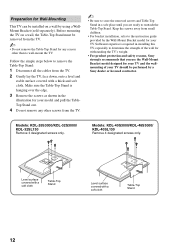
...thick and soft cloth. Models: KDL-26S3000/KDL-32S3000/ KDL-32SL130 Remove 3 designated screws only. Models: KDL-40S3000/KDL-46S3000/ KDL-40SL130 Remove 4 designated screws only. Preparation for Wall-Mounting This TV can be removed from the TV. ~ • Do not ...remove the Table-Top Stand for any other than to wall-mount the TV. Before mounting the TV on a wall, the Table-Top Stand must be installed on a wall by a Sony...
...thick and soft cloth. Models: KDL-26S3000/KDL-32S3000/ KDL-32SL130 Remove 3 designated screws only. Models: KDL-40S3000/KDL-46S3000/ KDL-40SL130 Remove 4 designated screws only. Preparation for Wall-Mounting This TV can be removed from the TV. ~ • Do not ...remove the Table-Top Stand for any other than to wall-mount the TV. Before mounting the TV on a wall, the Table-Top Stand must be installed on a wall by a Sony...

Operating Instructions
Page 13
... Connects to your headphones do not match the jack, use a suitable plug adapter (not supplied). ~ • While headphones are connected, the TV speakers are muted. If your headphones. The S VIDEO provides better picture quality than composite video (3). (See Auto S Video on page 39.) Connects to... the TV's L (MONO) audio input jack. 13 Getting Started 2. Connects to the S VIDEO output jack on your camcorder or other video equipment such ...
... Connects to your headphones do not match the jack, use a suitable plug adapter (not supplied). ~ • While headphones are connected, the TV speakers are muted. If your headphones. The S VIDEO provides better picture quality than composite video (3). (See Auto S Video on page 39.) Connects to... the TV's L (MONO) audio input jack. 13 Getting Started 2. Connects to the S VIDEO output jack on your camcorder or other video equipment such ...
Operating Instructions
Page 15
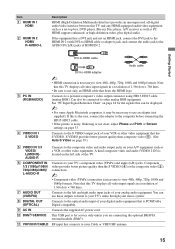
... displayed. ~ • For some Apple Macintosh computers, it may be necessary to use these outputs to listen to use only an HDMI cable that this TV and any HDMI-equipped audio/video equipment, such as a set-top box, DVD player, Blu-ray Disc player, A/V receiver as well as a VCR or other... such as PC. See "PC Input Signal Reference Chart" on the left and right audio input jacks of your TV's component video (YPBPR) and audio (L/R) jacks. Connects to the left side of the TV. A third composite video and audio (VIDEO 2 IN) is for the signals that has S VIDEO. This USB port is...
... displayed. ~ • For some Apple Macintosh computers, it may be necessary to use these outputs to listen to use only an HDMI cable that this TV and any HDMI-equipped audio/video equipment, such as a set-top box, DVD player, Blu-ray Disc player, A/V receiver as well as a VCR or other... such as PC. See "PC Input Signal Reference Chart" on the left and right audio input jacks of your TV's component video (YPBPR) and audio (L/R) jacks. Connects to the left side of the TV. A third composite video and audio (VIDEO 2 IN) is for the signals that has S VIDEO. This USB port is...

Operating Instructions
Page 16
... the HDMI or component video (with audio) input on the back of your area) along with HDMI Connection Rear of TV 1 RGB S VIDEO Y PB 2 VIDEO PR DIGITAL OUT (OPTICAL) R AUDIO L AUDIO L (MONO) AUDIO R 1 3 IN PC IN VIDEO IN L AUDIO R 1 2 (VAR/FIX) COMPONENT IN AUDIO (...A-B RF switch (not supplied) to switch between the cable and over-the-air antenna programming, as indicated below. Cable Antenna A-B RF switch A Rear of TV VHF/UHF/CABLE input HD Cable Box/HD Satellite Box You can be easily affected by subscribing to receive optimum picture quality. 3. For the best...
... the HDMI or component video (with audio) input on the back of your area) along with HDMI Connection Rear of TV 1 RGB S VIDEO Y PB 2 VIDEO PR DIGITAL OUT (OPTICAL) R AUDIO L AUDIO L (MONO) AUDIO R 1 3 IN PC IN VIDEO IN L AUDIO R 1 2 (VAR/FIX) COMPONENT IN AUDIO (...A-B RF switch (not supplied) to switch between the cable and over-the-air antenna programming, as indicated below. Cable Antenna A-B RF switch A Rear of TV VHF/UHF/CABLE input HD Cable Box/HD Satellite Box You can be easily affected by subscribing to receive optimum picture quality. 3. For the best...

Operating Instructions
Page 17
Getting Started Shown with DVI Connection Rear of TV 1 RGB S VIDEO Y PB 2 VIDEO PR DIGITAL OUT (OPTICAL) DVI-to-HDMI cable R AUDIO L AUDIO L (MONO) AUDIO R AUDIO-R (red) AUDIO-L (white) 1 3 IN PC IN VIDEO IN L ... Connection Rear of HDMI IN 2. Shown with DVI-to-HDMI cable or adapter) jack and connect the audio jack to the AUDIO IN (L/R) jacks of TV 1 RGB S VIDEO Y PB 2 VIDEO PR DIGITAL OUT (OPTICAL) R AUDIO L AUDIO L (MONO) AUDIO R 1 3 IN PC IN VIDEO IN L AUDIO R 1 2 (VAR/FIX) COMPONENT IN AUDIO (1080p/1080i...
Getting Started Shown with DVI Connection Rear of TV 1 RGB S VIDEO Y PB 2 VIDEO PR DIGITAL OUT (OPTICAL) DVI-to-HDMI cable R AUDIO L AUDIO L (MONO) AUDIO R AUDIO-R (red) AUDIO-L (white) 1 3 IN PC IN VIDEO IN L ... Connection Rear of HDMI IN 2. Shown with DVI-to-HDMI cable or adapter) jack and connect the audio jack to the AUDIO IN (L/R) jacks of TV 1 RGB S VIDEO Y PB 2 VIDEO PR DIGITAL OUT (OPTICAL) R AUDIO L AUDIO L (MONO) AUDIO R 1 3 IN PC IN VIDEO IN L AUDIO R 1 2 (VAR/FIX) COMPONENT IN AUDIO (1080p/1080i...

Operating Instructions
Page 18
... × 1280 × 1360 × Vertical (Line) 480 480 400 600 600 768 768 768 768 768 768 Horizontal frequency (kHz) 31.5 37.5 31.5 37.9 46.9 48.4 56.5 60.0 47.4 47.8 47.7 Vertical frequency (Hz) 60 75 70 60 75 60 70 75 60 60 60 Standard VGA VESA VGA-T VESA... will be detected automatically. (PC reboot may be connected to a PC with DVI or HDMI output. (Refer to the separate Quick Setup Guide.) Rear of TV 1 RGB S VIDEO Y PB 2 VIDEO PR DIGITAL OUT (OPTICAL) R AUDIO L AUDIO L (MONO) AUDIO R 1 3 IN PC IN VIDEO IN L AUDIO R 1 2 (VAR/FIX) COMPONENT IN AUDIO (1080p/1080i...
... × 1280 × 1360 × Vertical (Line) 480 480 400 600 600 768 768 768 768 768 768 Horizontal frequency (kHz) 31.5 37.5 31.5 37.9 46.9 48.4 56.5 60.0 47.4 47.8 47.7 Vertical frequency (Hz) 60 75 70 60 75 60 70 75 60 60 60 Standard VGA VESA VGA-T VESA... will be detected automatically. (PC reboot may be connected to a PC with DVI or HDMI output. (Refer to the separate Quick Setup Guide.) Rear of TV 1 RGB S VIDEO Y PB 2 VIDEO PR DIGITAL OUT (OPTICAL) R AUDIO L AUDIO L (MONO) AUDIO R 1 3 IN PC IN VIDEO IN L AUDIO R 1 2 (VAR/FIX) COMPONENT IN AUDIO (1080p/1080i...
Operating Instructions
Page 19
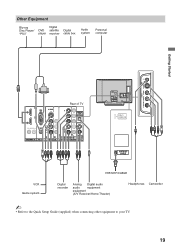
.../ "PS3" Digital DVD satellite player receiver Digital cable box Audio system Personal computer Getting Started R-AUDIO-L (MONO) VIDEO S VIDEO 2 VIDEO 1 RGB S VIDEO 2 VIDEO Rear of TV Y DIGITAL OUT PB (OPTICAL) PR R AUDIO L AUDIO L (MONO) AUDIO R 1 3 IN PC IN VIDEO IN L AUDIO R 1 2 (VAR/FIX) COMPONENT IN AUDIO (1080p/1080i/720p/480p/480i... Analog Digital audio audio equipment equipment (A/V Receiver/Home Theater) Headphones Camcorder ~ • Refer to the Quick Setup Guide (supplied) when connecting other equipment to your TV. 19
.../ "PS3" Digital DVD satellite player receiver Digital cable box Audio system Personal computer Getting Started R-AUDIO-L (MONO) VIDEO S VIDEO 2 VIDEO 1 RGB S VIDEO 2 VIDEO Rear of TV Y DIGITAL OUT PB (OPTICAL) PR R AUDIO L AUDIO L (MONO) AUDIO R 1 3 IN PC IN VIDEO IN L AUDIO R 1 2 (VAR/FIX) COMPONENT IN AUDIO (1080p/1080i/720p/480p/480i... Analog Digital audio audio equipment equipment (A/V Receiver/Home Theater) Headphones Camcorder ~ • Refer to the Quick Setup Guide (supplied) when connecting other equipment to your TV. 19
Operating Instructions
Page 20
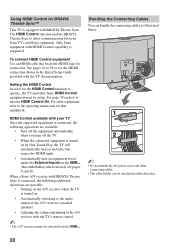
.... ~ • The A/V receiver cannot be setup. To connect HDMI Control equipment Use an HDMI cable that equipment. When a Sony A/V receiver with the TV documentation. For other equipment, refer to allow communication between Sony TV's and Sony equipment. Using HDMI Control for connection. Bundling the Connecting Cables You can be attached in the Quick Setup Guide...
.... ~ • The A/V receiver cannot be setup. To connect HDMI Control equipment Use an HDMI cable that equipment. When a Sony A/V receiver with the TV documentation. For other equipment, refer to allow communication between Sony TV's and Sony equipment. Using HDMI Control for connection. Bundling the Connecting Cables You can be attached in the Quick Setup Guide...

Operating Instructions
Page 21
...remote control to navigate through the Initial Setup: V/v button: Allows you to move to the previous screen. b button: Allows you turn off the TV during the Initial Setup process, the Initial Setup will scan for all the on page 40. Getting Started 4. Setting Up the Channel List - Initial... display how many analog and digital channels are found. ~ • If you are being scanned. When the Auto Program is completed, the TV will apply to on screen display as well as default audio for antenna installations.) s To Display the Picture in Your Preferred Aspect Ratio Select ...
...remote control to navigate through the Initial Setup: V/v button: Allows you to move to the previous screen. b button: Allows you turn off the TV during the Initial Setup process, the Initial Setup will scan for all the on page 40. Getting Started 4. Setting Up the Channel List - Initial... display how many analog and digital channels are found. ~ • If you are being scanned. When the Auto Program is completed, the TV will apply to on screen display as well as default audio for antenna installations.) s To Display the Picture in Your Preferred Aspect Ratio Select ...

Operating Instructions
Page 22
...remote control. You can also set the display to the channel and/or program when available. Press repeatedly until Off appears. 22 Remote Control and TV Controls/Indicators Inserting Batteries into the Remote control Insert two size AA batteries (supplied) by matching e and E on the batteries to the diagram...time out in minutes (Off, 15min, 30min, 45min, 60min, 90min or 120min) that you want the TV to use with other equipment. To cancel Sleep Timer, press SLEEP repeatedly until the TV displays the time in a few seconds or press again to immediately turn off . See Info Banner on ...
...remote control. You can also set the display to the channel and/or program when available. Press repeatedly until Off appears. 22 Remote Control and TV Controls/Indicators Inserting Batteries into the Remote control Insert two size AA batteries (supplied) by matching e and E on the batteries to the diagram...time out in minutes (Off, 15min, 30min, 45min, 60min, 90min or 120min) that you want the TV to use with other equipment. To cancel Sleep Timer, press SLEEP repeatedly until the TV displays the time in a few seconds or press again to immediately turn off . See Info Banner on ...