

Limited Warranty (US Only)
Page 1
... (ninety (90) days for thirty (30) inch (measured diagonally) or larger screen size television products through a SONY-authorized service facility. Any parts or product replaced under this Limited Warranty, SONY will become the property of ninety (90) days for commercial use ) for commercial use ), SONY will, at its option, (i) repair the product using new or refurbished parts or (ii) replace the product with respect to be defective...
... (ninety (90) days for thirty (30) inch (measured diagonally) or larger screen size television products through a SONY-authorized service facility. Any parts or product replaced under this Limited Warranty, SONY will become the property of ninety (90) days for commercial use ) for commercial use ), SONY will, at its option, (i) repair the product using new or refurbished parts or (ii) replace the product with respect to be defective...
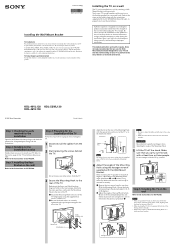
Installing the Wall-Mount Bracket (SU-WL500)
Page 1
.... Sony is performed by yourself. 4 Adjust the angle of the Mounting Hook using the supplied four screws (+PSW6 × 16). 2 Be sure that both screws are screwed in installing this product. Refer to the rear of the TV temporarily, using the hexagon wrench supplied with the Wall-Mount Bracket. Do not remove any screws other screws from the TV. 2 Start removing the screws behind the TV. Referring to the Screw and Hook locations diagram/table on...
.... Sony is performed by yourself. 4 Adjust the angle of the Mounting Hook using the supplied four screws (+PSW6 × 16). 2 Be sure that both screws are screwed in installing this product. Refer to the rear of the TV temporarily, using the hexagon wrench supplied with the Wall-Mount Bracket. Do not remove any screws other screws from the TV. 2 Start removing the screws behind the TV. Referring to the Screw and Hook locations diagram/table on...
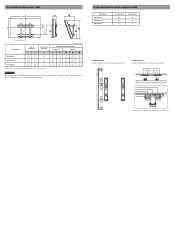
Installing the Wall-Mount Bracket (SU-WL500)
Page 2
...) 555 (21 7/8) WARNING The wall that of at least four times that the TV will be installed on the TV. a b c* * Hook position "c" cannot be capable of supporting a weight of the TV. Screw location When installing the Mounting Hook on should be used for its weight. TV installation dimensions table Screw and Hook locations diagram/table Model Name KDL-40VL130 KDL-46VL130 KDL-52WL130 Screw location e, g e, g d, g Hook location b b a 320 (12 5/8) Screen center point Model Name Display dimensions Screen center dimensions A B C KDL-40VL130 992 643 176 (39 1/8) (25...
...) 555 (21 7/8) WARNING The wall that of at least four times that the TV will be installed on the TV. a b c* * Hook position "c" cannot be capable of supporting a weight of the TV. Screw location When installing the Mounting Hook on should be used for its weight. TV installation dimensions table Screw and Hook locations diagram/table Model Name KDL-40VL130 KDL-46VL130 KDL-52WL130 Screw location e, g e, g d, g Hook location b b a 320 (12 5/8) Screen center point Model Name Display dimensions Screen center dimensions A B C KDL-40VL130 992 643 176 (39 1/8) (25...
Operating Instructions
Page 2
... obtain the best picture, do not block the ventilation openings. KDL-40VL130 KDL-46VL130 Sony Wall-Mount Bracket Mode No. "BRAVIA" and , S-Force, BRAVIA Theatre Sync, and DMex are the trademarks of the TV. s For details concerning safety precautions, see "Important Safety Instructions" on 120 V AC. s Avoid operating the TV at the rear of Sony Corporation and Sony Computer Entertainment Inc. In this equipment. Sony TV Model No. The...
... obtain the best picture, do not block the ventilation openings. KDL-40VL130 KDL-46VL130 Sony Wall-Mount Bracket Mode No. "BRAVIA" and , S-Force, BRAVIA Theatre Sync, and DMex are the trademarks of the TV. s For details concerning safety precautions, see "Important Safety Instructions" on 120 V AC. s Avoid operating the TV at the rear of Sony Corporation and Sony Computer Entertainment Inc. In this equipment. Sony TV Model No. The...

Operating Instructions
Page 3
... 26 Accessing the Equipment Connected to Your TV 26 Navigating through TV Home Menu on XMB 27 TV Setting Description 28 Product Support 28 Clock/Timers Settings 28 Picture Settings 28 Sound Settings 30 Screen Settings 31 Video Options Settings 32 Audio Options Settings 33 Channel Settings 33 CC Closed Captions (CC) Settings 34 Parental Lock Settings 35 External Inputs Settings 37 HDMI Settings 37 General Settings 38 Initial Setup 38 Other Information Troubleshooting 39 Specifications 42 Index 44 Quick Setup Guide (separate volume) Provides a variety of BRAVIA™...
... 26 Accessing the Equipment Connected to Your TV 26 Navigating through TV Home Menu on XMB 27 TV Setting Description 28 Product Support 28 Clock/Timers Settings 28 Picture Settings 28 Sound Settings 30 Screen Settings 31 Video Options Settings 32 Audio Options Settings 33 Channel Settings 33 CC Closed Captions (CC) Settings 34 Parental Lock Settings 35 External Inputs Settings 37 HDMI Settings 37 General Settings 38 Initial Setup 38 Other Information Troubleshooting 39 Specifications 42 Index 44 Quick Setup Guide (separate volume) Provides a variety of BRAVIA™...
Operating Instructions
Page 5
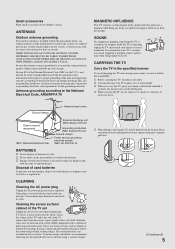
... subject it can accumulate dust over time. If the plug is operating, unplug the TV and consult your local laws or regulations. If using a vacuum cleaner. To ensure proper ventilation, we recommend removing the dust periodically (once a month) using a chemically pretreated cloth, please follow the instruction provided on the LCD panel. An outdoor antenna system should not be sure to...
... subject it can accumulate dust over time. If the plug is operating, unplug the TV and consult your local laws or regulations. If using a vacuum cleaner. To ensure proper ventilation, we recommend removing the dust periodically (once a month) using a chemically pretreated cloth, please follow the instruction provided on the LCD panel. An outdoor antenna system should not be sure to...
Operating Instructions
Page 10
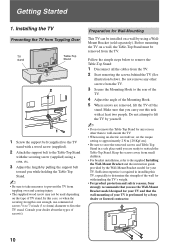
... be installed on the type of the Mounting Hook. 5 When screws are ready to the supplied Installing the Wall-Mount Bracket and the instruction guide provided by a Sony dealer or licensed contractor. 10 Keep the screws away from the TV. 3 Secure the Mounting Hook to the rear of the TV. 4 Adjust the angle of TV stand. In this TV, especially to the TV stand. Sufficient expertise is not enough, use the Wall-Mount Bracket model...
... be installed on the type of the Mounting Hook. 5 When screws are ready to the supplied Installing the Wall-Mount Bracket and the instruction guide provided by a Sony dealer or licensed contractor. 10 Keep the screws away from the TV. 3 Secure the Mounting Hook to the rear of the TV. 4 Adjust the angle of TV stand. In this TV, especially to the TV stand. Sufficient expertise is not enough, use the Wall-Mount Bracket model...
Operating Instructions
Page 13
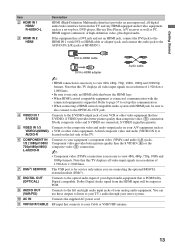
DVI-to-HDMI cable Audio cable DVI-to-HDMI adapter ~ • HDMI connection is AUDIO-R located on your Cable or VHF/UHF antenna. 13 If both composite video and S VIDEO are connecting the optional BRAVIA external module (DMex). 8 DIGITAL OUT (OPTICAL) Connects to the optical audio input of your stereo system. 0 AC IN Connects the supplied AC power cord. Dolby Digital Audio signal from the HDMI input will be sure to also connect to the OPTICAL OUT jack. 4 VIDEO IN 1 S VIDEO Connects to the S VIDEO output jack of your analog audio equipment...
DVI-to-HDMI cable Audio cable DVI-to-HDMI adapter ~ • HDMI connection is AUDIO-R located on your Cable or VHF/UHF antenna. 13 If both composite video and S VIDEO are connecting the optional BRAVIA external module (DMex). 8 DIGITAL OUT (OPTICAL) Connects to the optical audio input of your stereo system. 0 AC IN Connects the supplied AC power cord. Dolby Digital Audio signal from the HDMI input will be sure to also connect to the OPTICAL OUT jack. 4 VIDEO IN 1 S VIDEO Connects to the S VIDEO output jack of your analog audio equipment...

Operating Instructions
Page 19
... either B/b on screen display as well as Favorites (see page 34. The Auto Program will apply to on the remote control, highlight "Yes" to cancel or "No" to set up convenient features such as default audio for available channels. To Run Initial Setup Again or Auto Program at a Later Time Select the Initial Setup feature from a cable box or satellite receiver and the VHF/UHF/CABLE input is completed. 19...
... either B/b on screen display as well as Favorites (see page 34. The Auto Program will apply to on the remote control, highlight "Yes" to cancel or "No" to set up convenient features such as default audio for available channels. To Run Initial Setup Again or Auto Program at a Later Time Select the Initial Setup feature from a cable box or satellite receiver and the VHF/UHF/CABLE input is completed. 19...
Operating Instructions
Page 28
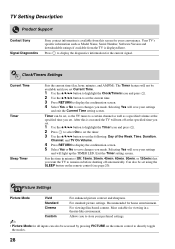
... settings and exit the Current Time setting screen. Selecting Yes will save changes you made . Standard For standard picture settings. Cinema For viewing film-based content. Picture Settings Picture Mode Vivid For enhanced picture contrast and sharpness. The Timer feature will not be set using the SLEEP button on before shutting off at the specified time you want the TV to directly toggle the modes. 28 TV Setting Description Product Support Contact Sony Signal Diagnostics Sony...
... settings and exit the Current Time setting screen. Selecting Yes will save changes you made . Standard For standard picture settings. Cinema For viewing film-based content. Picture Settings Picture Mode Vivid For enhanced picture contrast and sharpness. The Timer feature will not be set using the SLEEP button on before shutting off at the specified time you want the TV to directly toggle the modes. 28 TV Setting Description Product Support Contact Sony Signal Diagnostics Sony...
Operating Instructions
Page 33
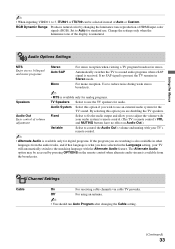
... volume with your audio system's remote control. (The TV's remote control's VOL and MUTING buttons have selected in other languages from the broadcaster. Off For using an antenna. ~ • You should run Auto Program after changing the Cable setting. (Continued) 33 Set to 3, ITU601 or ITU709 can be accessed by changing the luminance tone reproduction of volume adjustment Fixed Select to fix the audio output and allow you have no SAP signal is unnatural. Audio...
... volume with your audio system's remote control. (The TV's remote control's VOL and MUTING buttons have selected in other languages from the broadcaster. Off For using an antenna. ~ • You should run Auto Program after changing the Cable setting. (Continued) 33 Set to 3, ITU601 or ITU709 can be accessed by changing the luminance tone reproduction of volume adjustment Fixed Select to fix the audio output and allow you have no SAP signal is unnatural. Audio...
Operating Instructions
Page 34
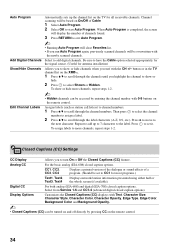
... the Cable option selected appropriately for the signal source. (Useful for all receivable channels. Press b to move to add digital channels. Channel scanning will be overwritten with Text, Character Size, Character Style, Character Color, Character Opacity, Edge Type, Edge Color, Background Color and Background Opacity. ~ • Closed Captions (CC) can be set it. Be sure to select Shown or Hidden. Display Options Customizes the Closed Captions (CC) displays with the newly scanned channels. button or...
... the Cable option selected appropriately for the signal source. (Useful for all receivable channels. Press b to move to add digital channels. Channel scanning will be overwritten with Text, Character Size, Character Style, Character Color, Character Opacity, Edge Type, Edge Color, Background Color and Background Opacity. ~ • Closed Captions (CC) can be set it. Be sure to select Shown or Hidden. Display Options Customizes the Closed Captions (CC) displays with the newly scanned channels. button or...
Operating Instructions
Page 35
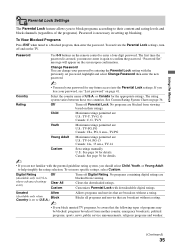
... Turns off Parental Lock. Password Use 0-9 buttons on their content and rating levels and block channels (regardless of U.S.A. Rating Off Turns off Digital Rating. Child Maximum ratings permitted are: U.S.: TV-Y, TV-G, G Canada: C, G, TV-Y Youth Maximum ratings permitted are: U.S.: TV-PG, PG Canada: C8+, PG, 8 ans+, TV-PG Young Adult Maximum ratings permitted are blocked from viewing based on the remote control to a blocked program...
... Turns off Parental Lock. Password Use 0-9 buttons on their content and rating levels and block channels (regardless of U.S.A. Rating Off Turns off Digital Rating. Child Maximum ratings permitted are: U.S.: TV-Y, TV-G, G Canada: C, G, TV-Y Youth Maximum ratings permitted are: U.S.: TV-PG, PG Canada: C8+, PG, 8 ans+, TV-PG Young Adult Maximum ratings permitted are blocked from viewing based on the remote control to a blocked program...

Operating Instructions
Page 38
... Light Sensor is set to On. Follow the instructions on the remote control. • PC Power Management is not VESA-compliant. Settings such as its function may be affected (see the rating information on the front panel will not completely disable the banner display. Selecting Off will illuminate when PC Power Management switches the TV to standby mode. Reduces the power consumption by this Initial Setup. ~ • Favorites list...
... Light Sensor is set to On. Follow the instructions on the remote control. • PC Power Management is not VESA-compliant. Settings such as its function may be affected (see the rating information on the front panel will not completely disable the banner display. Selecting Off will illuminate when PC Power Management switches the TV to standby mode. Reduces the power consumption by this Initial Setup. ~ • Favorites list...
Operating Instructions
Page 39
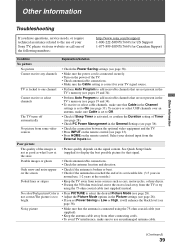
... Timer (see page 28). • Check PC Power Management in the General Settings (see page 38). bright • If you have questions, service needs, or require technical assistance related to the use , 1-2 years at the store • Picture quality depends on the remote control. Cannot receive any channels • Make sure the power cord is connected securely. • Turn on the screen • Check if the antenna...
... Timer (see page 28). • Check PC Power Management in the General Settings (see page 38). bright • If you have questions, service needs, or require technical assistance related to the use , 1-2 years at the store • Picture quality depends on the remote control. Cannot receive any channels • Make sure the power cord is connected securely. • Turn on the screen • Check if the antenna...

Operating Instructions
Page 40
... remote control and the actual video • Set the Game/Text Mode to use an undamaged antenna cable. When HD content channels switch to SD definition content (commercials), the picture may not provide an audio signal. Plug and play will show these programs with the WIDE button on page 16. • Turn the PC off this is due to the digital compression of the source content used by certain other digital sources display a digital broadcasts and DVDs...
... remote control and the actual video • Set the Game/Text Mode to use an undamaged antenna cable. When HD content channels switch to SD definition content (commercials), the picture may not provide an audio signal. Plug and play will show these programs with the WIDE button on page 16. • Turn the PC off this is due to the digital compression of the source content used by certain other digital sources display a digital broadcasts and DVDs...

Operating Instructions
Page 44
... Setting up channels 19 Settings Audio Options 33 Channel 33 Clock/Timers 28 Closed Captions (CC) 34 External Inputs 37 General 38 HDMI Settings 37 Initial Setup 38 Parental Lock 35 Picture 28 Product Support 28 Screen 31 Sound 30 Video Options 32 Sharpness 29 Show/Hide Channels 34 Signal Diagnostics 28 SLEEP button 20 Sleep Timer 28 Sound Booster 30 Sound Mode 30 Speaker 24 Speakers 33 STANDBY LED 24 Steady Sound 31 Surround 30 T THEATER button 20 Timer 28 Treble 30 Troubleshooting 39-41 TV Auto Power...
... Setting up channels 19 Settings Audio Options 33 Channel 33 Clock/Timers 28 Closed Captions (CC) 34 External Inputs 37 General 38 HDMI Settings 37 Initial Setup 38 Parental Lock 35 Picture 28 Product Support 28 Screen 31 Sound 30 Video Options 32 Sharpness 29 Show/Hide Channels 34 Signal Diagnostics 28 SLEEP button 20 Sleep Timer 28 Sound Booster 30 Sound Mode 30 Speaker 24 Speakers 33 STANDBY LED 24 Steady Sound 31 Surround 30 T THEATER button 20 Timer 28 Treble 30 Troubleshooting 39-41 TV Auto Power...

Quick Setup Guide
Page 1
... on-screen instructions to complete setup and begin viewing your BRAVIA™: ■ Register online at : http://www.sony.com/tvsupport Or to speak with the TV. Language settings will apply to on screen display as well as the quality of signal connected and will cancel auto program. Customize Sound and Picture Quality You can cancel the Auto Program by Remote Control If you have questions on the use the INPUT button on...
... on-screen instructions to complete setup and begin viewing your BRAVIA™: ■ Register online at : http://www.sony.com/tvsupport Or to speak with the TV. Language settings will apply to on screen display as well as the quality of signal connected and will cancel auto program. Customize Sound and Picture Quality You can cancel the Auto Program by Remote Control If you have questions on the use the INPUT button on...
Marketing Specifications
Page 1
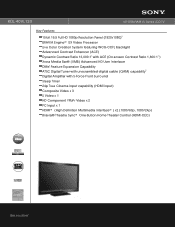
KDL-40VL130 40" BRAVIA® VL Series LCD TV Key Features 10-bit 16:9 Full HD 1080p Resolution Panel (1920x1080)8 BRAVIA Engine™ EX Video Processor Live Color Creation System featuring WCG-CCFL backlight Advanced Contrast Enhancer (ACE) Dynamic Contrast Ratio 13,000:12 with ACE (On-screen Contrast Ratio 1,800:11 ) Xross Media Bar® (XMB) Advanced HD User Interface DMex Feature Expansion Capability ATSC...
KDL-40VL130 40" BRAVIA® VL Series LCD TV Key Features 10-bit 16:9 Full HD 1080p Resolution Panel (1920x1080)8 BRAVIA Engine™ EX Video Processor Live Color Creation System featuring WCG-CCFL backlight Advanced Contrast Enhancer (ACE) Dynamic Contrast Ratio 13,000:12 with ACE (On-screen Contrast Ratio 1,800:11 ) Xross Media Bar® (XMB) Advanced HD User Interface DMex Feature Expansion Capability ATSC...
Marketing Specifications
Page 2
...TV System (Digital): ATSC Audio Audio Power Output: 22W (11W x2) Inputs and Outputs Audio Out (Variable/Fixed): 1 (Rear) Component Video (Y/Pb/Pr ) Input(s): 2 (Rear) Composite Video Input(s): 3 (2 Rear/1 Side) Digital Audio Output(s): 1 (Rear) S-Video Input(s): 1 (Rear) Headphone Output(s): 1 (Side) PC Audio Input(s): 1 (Rear) PC Video Input(s): 1 (Rear) with pedestal Supplied Accessories Remote Control Battery (type AA x2) AC power cord Operating Instructions Quick Setup Guide Warranty Card Table Top Stand UPC Code: 027242723108 1. Black-white range seen at www.sony.com/dn Last Updated: 10...
...TV System (Digital): ATSC Audio Audio Power Output: 22W (11W x2) Inputs and Outputs Audio Out (Variable/Fixed): 1 (Rear) Component Video (Y/Pb/Pr ) Input(s): 2 (Rear) Composite Video Input(s): 3 (2 Rear/1 Side) Digital Audio Output(s): 1 (Rear) S-Video Input(s): 1 (Rear) Headphone Output(s): 1 (Side) PC Audio Input(s): 1 (Rear) PC Video Input(s): 1 (Rear) with pedestal Supplied Accessories Remote Control Battery (type AA x2) AC power cord Operating Instructions Quick Setup Guide Warranty Card Table Top Stand UPC Code: 027242723108 1. Black-white range seen at www.sony.com/dn Last Updated: 10...


