
Operating Instructions
Page 5
... standard analog signal, you are watching (page 20). 5 When you compare a high-definition signal to the most suitable picture and sound settings based on the signal resolution (page 25). ➢ Input Selection: Allows you to easily switch between the connected equipment (page 26). ➢ ... contents genre you will notice a big difference in Picture): You can enjoy crisp, clear images, smooth movement, and high-impact visuals from Sony USB equipment (page 27). ➢ PIP (Picture in picture quality. TV Feature Highlights Your BRAVIA comes with many convenient features, such as...
... standard analog signal, you are watching (page 20). 5 When you compare a high-definition signal to the most suitable picture and sound settings based on the signal resolution (page 25). ➢ Input Selection: Allows you to easily switch between the connected equipment (page 26). ➢ ... contents genre you will notice a big difference in Picture): You can enjoy crisp, clear images, smooth movement, and high-impact visuals from Sony USB equipment (page 27). ➢ PIP (Picture in picture quality. TV Feature Highlights Your BRAVIA comes with many convenient features, such as...
Operating Instructions
Page 21
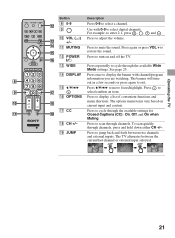
qd WIDE Press repeatedly to select a channel. The options menu items vary based on and off the TV. To scan quickly through channels. qf qa MUTING qg qs POWER qh "/1 Press 0-9 to cycle through the available settings for ...
qd WIDE Press repeatedly to select a channel. The options menu items vary based on and off the TV. To scan quickly through channels. qf qa MUTING qg qs POWER qh "/1 Press 0-9 to cycle through the available settings for ...

Operating Instructions
Page 25
... press . To set to Auto Wide. Using Features Favorites Your favorite channels and external inputs can be cleared each time you run the Auto Program. Based on your TV to On. Adding to Favorites While tuned to select the screen display of the screen. To change the Wide Screen Mode Press...
... press . To set to Auto Wide. Using Features Favorites Your favorite channels and external inputs can be cleared each time you run the Auto Program. Based on your TV to On. Adding to Favorites While tuned to select the screen display of the screen. To change the Wide Screen Mode Press...
Operating Instructions
Page 28
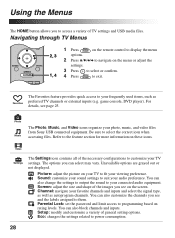
...access to them. Setup: modify and customize a variety of TV settings and USB media files. For details, see and the labels assigned to programming based on these icons. You can also customize the channels you see on your TV to the feature section for more information on rating levels. Eco...settings. Photo The Photo, Music, and Video icons organize your audio preference. The options you to suit your photo, music, and video files from Sony USB connected equipment. Channel: navigate your viewing preference. You can also change the settings to output the sound to exit.
...access to them. Setup: modify and customize a variety of TV settings and USB media files. For details, see and the labels assigned to programming based on these icons. You can also customize the channels you see on your TV to the feature section for more information on rating levels. Eco...settings. Photo The Photo, Music, and Video icons organize your audio preference. The options you to suit your photo, music, and video files from Sony USB connected equipment. Channel: navigate your viewing preference. You can also change the settings to output the sound to exit.
Operating Instructions
Page 29
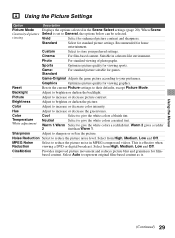
...Scene Select settings (page 20). Picture Adjust to brighten or darken the picture. Sharpness Adjust to represent original film-based content as is. Select Auto to sharpen or soften the picture. GameStandard For standard picture suitable for standard picture ... Warm 1. CineMotion Provides improved picture movement and reduces picture blur and graininess for enhanced picture contrast and sharpness. Cinema For film-based content. Suitable in a theater-like environment. Color Temperature White adjustment Cool Neutral Warm 1/Warm 2 Select to store your preference....
...Scene Select settings (page 20). Picture Adjust to brighten or darken the picture. Sharpness Adjust to represent original film-based content as is. Select Auto to sharpen or soften the picture. GameStandard For standard picture suitable for standard picture ... Warm 1. CineMotion Provides improved picture movement and reduces picture blur and graininess for enhanced picture contrast and sharpness. Cinema For film-based content. Suitable in a theater-like environment. Color Temperature White adjustment Cool Neutral Warm 1/Warm 2 Select to store your preference....
Operating Instructions
Page 33
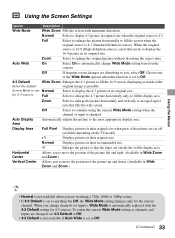
... mode to you change channels (or inputs), Wide Mode is set to Off. 4:3 Default Wide Zoom Enlarges the 4:3 picture to automatically change Wide Mode setting based on the TV model). +1 Displays pictures in its original size. Zoom Select to enlarge the picture horizontally and vertically to enlarge the original picture without...
... mode to you change channels (or inputs), Wide Mode is set to Off. 4:3 Default Wide Zoom Enlarges the 4:3 picture to automatically change Wide Mode setting based on the TV model). +1 Displays pictures in its original size. Zoom Select to enlarge the picture horizontally and vertically to enlarge the original picture without...
Operating Instructions
Page 36
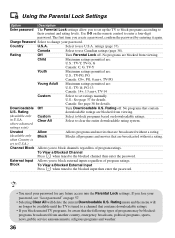
... the password. • You need your password, see "Lost password" on downloadable ratings. Clear All where advanced Select to use U.S.A. Canada Select to block programs based on page 57. • Selecting Clear All will no longer be available until the TV is Blocks all programs and movies that the following types...
... the password. • You need your password, see "Lost password" on downloadable ratings. Clear All where advanced Select to use U.S.A. Canada Select to block programs based on page 57. • Selecting Clear All will no longer be available until the TV is Blocks all programs and movies that the following types...

Operating Instructions
Page 37
...Using the Menus • To ensure maximum blocking capability, set the Age-Based Ratings. (Continued) 37 NC-17 and X No one 17 or under 13. TV-PG Parental guidance suggested . Content-Based Ratings FV Fantasy violence. V Violence. PG-13 Parental guidance for children ...children age 7 and older. Option Description Movie Rating G All children and general audience. S Sexual situations. TV Rating Age-Based Ratings Block programs by TV-Y All children. TV-MA Mature audience only. PG Parental guidance suggested . General audience. in the ...
...Using the Menus • To ensure maximum blocking capability, set the Age-Based Ratings. (Continued) 37 NC-17 and X No one 17 or under 13. TV-PG Parental guidance suggested . Content-Based Ratings FV Fantasy violence. V Violence. PG-13 Parental guidance for children ...children age 7 and older. Option Description Movie Rating G All children and general audience. S Sexual situations. TV Rating Age-Based Ratings Block programs by TV-Y All children. TV-MA Mature audience only. PG Parental guidance suggested . General audience. in the ...
Operating Instructions
Page 48
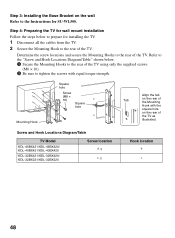
... illustrated. Step 3: Installing the Base Bracket on the rear of the TV. Step 4: Preparing the TV for SU-WL500. Determine the screw locations and secure the Mounting Hooks to the rear of the TV. Screw and Hook Locations Diagram/Table TV Model KDL-46BX421/KDL-46BX420/ KDL-40BX421/KDL-40BX420 KDL-32BX421/KDL-32BX420/ KDL-32BX321/KDL-32BX320 Screw location...
... illustrated. Step 3: Installing the Base Bracket on the rear of the TV. Step 4: Preparing the TV for SU-WL500. Determine the screw locations and secure the Mounting Hooks to the rear of the TV. Screw and Hook Locations Diagram/Table TV Model KDL-46BX421/KDL-46BX420/ KDL-40BX421/KDL-40BX420 KDL-32BX421/KDL-32BX420/ KDL-32BX321/KDL-32BX320 Screw location...
Operating Instructions
Page 49
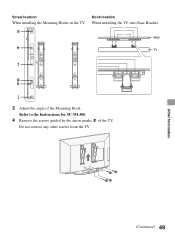
Wall TV 3 Adjust the angle of the TV. Other Information (Continued) 49 Screw location Hook location When installing the Mounting Hooks on the TV. Refer to the Instructions for SU-WL500. 4 Remove the screws guided by the arrow marks Do not remove any other screws from the TV. of the Mounting Hook. When installing the TV onto Base Bracket.
Wall TV 3 Adjust the angle of the TV. Other Information (Continued) 49 Screw location Hook location When installing the Mounting Hooks on the TV. Refer to the Instructions for SU-WL500. 4 Remove the screws guided by the arrow marks Do not remove any other screws from the TV. of the Mounting Hook. When installing the TV onto Base Bracket.
Operating Instructions
Page 51
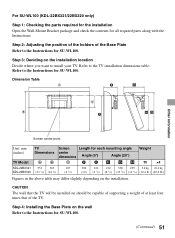
...Figures in the above table may differ slightly depending on the installation location Decide where you want to install your TV. Step 4: Installing the Base Plate on should be capable of supporting a weight of at least four times that the TV will be installed on the wall Refer to ...Adjusting the position of the holders of the TV. CAUTION The wall that of the Base Plate Refer to the Instructions for SU-WL100. Refer to the Instructions for SU-WL100. (Continued) 51 For SU-WL100 (KDL-22BX321/22BX320 only) Step 1: Checking the parts required for the installation Open the Wall...
...Figures in the above table may differ slightly depending on the installation location Decide where you want to install your TV. Step 4: Installing the Base Plate on should be capable of supporting a weight of at least four times that the TV will be installed on the wall Refer to ...Adjusting the position of the holders of the TV. CAUTION The wall that of the Base Plate Refer to the Instructions for SU-WL100. Refer to the Instructions for SU-WL100. (Continued) 51 For SU-WL100 (KDL-22BX321/22BX320 only) Step 1: Checking the parts required for the installation Open the Wall...
Operating Instructions
Page 52
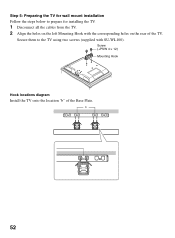
b 52 Screw (+PSW 4 × 12) Mounting Hook Hook locations diagram Install the TV onto the location "b" of the TV. Step 5: Preparing the TV for wall mount installation Follow the steps below to the TV using two screws (supplied with the corresponding holes on the rear of the Base Plate. Secure them to prepare for installing the TV. 1 Disconnect all the cables from the TV. 2 Align the holes on the left Mounting Hook with SU-WL100).
b 52 Screw (+PSW 4 × 12) Mounting Hook Hook locations diagram Install the TV onto the location "b" of the TV. Step 5: Preparing the TV for wall mount installation Follow the steps below to the TV using two screws (supplied with the corresponding holes on the rear of the Base Plate. Secure them to prepare for installing the TV. 1 Disconnect all the cables from the TV. 2 Align the holes on the left Mounting Hook with SU-WL100).
Operating Instructions
Page 53
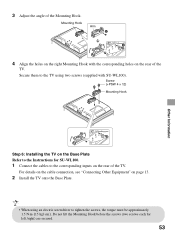
... to the TV using an electric screwdriver to the corresponding inputs on page 13. 2 Install the TV onto the Base Plate. • When using two screws (supplied with the corresponding holes on the Base Plate Refer to the Instructions for left /right) are secured. 53 Screw (+PSW 4 × 12) Mounting Hook Step...
... to the TV using an electric screwdriver to the corresponding inputs on page 13. 2 Install the TV onto the Base Plate. • When using two screws (supplied with the corresponding holes on the Base Plate Refer to the Instructions for left /right) are secured. 53 Screw (+PSW 4 × 12) Mounting Hook Step...
Operating Instructions
Page 57
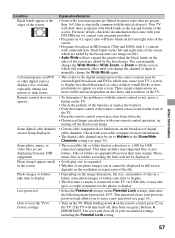
... cable, it may cause your TV's screen to display less detail than 16:9 (this is 1,000 for more details, check the documentation that are populated based on their time stamps. While holding down V on the remote control, press 1 on the TV. (The TV will turn itself off the fluorescent lamps. •...
... cable, it may cause your TV's screen to display less detail than 16:9 (this is 1,000 for more details, check the documentation that are populated based on their time stamps. While holding down V on the remote control, press 1 on the TV. (The TV will turn itself off the fluorescent lamps. •...


