Operating Instructions
Page 2
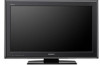
...with your Sony dealer regarding this TV (i.e. This manual is a trademark. "BRAVIA", , BRAVIA Sync, and are located at the rear of the TV. It meets strict energy efficiency guidelines set by the U.S. Picture/Sound, ...settings, and functionalities of this TV. Model Name Serial No. Blu-ray Disc is for additional information. CAUTION To prevent electric shock and blade exposure, do not use strong solvents such as a thinner, alcohol or benzine for cleaning. • See the supplied Safety Booklet for the 32 class BRAVIA KDL-32L504 model. Your BRAVIA TV is a trademark of Sony...
...with your Sony dealer regarding this TV (i.e. This manual is a trademark. "BRAVIA", , BRAVIA Sync, and are located at the rear of the TV. It meets strict energy efficiency guidelines set by the U.S. Picture/Sound, ...settings, and functionalities of this TV. Model Name Serial No. Blu-ray Disc is for additional information. CAUTION To prevent electric shock and blade exposure, do not use strong solvents such as a thinner, alcohol or benzine for cleaning. • See the supplied Safety Booklet for the 32 class BRAVIA KDL-32L504 model. Your BRAVIA TV is a trademark of Sony...
Operating Instructions
Page 3
... Using BRAVIA Sync with Control for HDMI 21 Using PIP Feature 22 Favorites 22 Wide Mode 23 Wide Mode with PC 23 Inputs 24 Using the Menus Navigating through TV Menus 25 Using the Picture Settings 26 Using the Sound Settings 27 Using the Screen Settings 28 Using the Channel Settings 30 Using the Parental Lock Settings 31...
... Using BRAVIA Sync with Control for HDMI 21 Using PIP Feature 22 Favorites 22 Wide Mode 23 Wide Mode with PC 23 Inputs 24 Using the Menus Navigating through TV Menus 25 Using the Picture Settings 26 Using the Sound Settings 27 Using the Screen Settings 28 Using the Channel Settings 30 Using the Parental Lock Settings 31...
Operating Instructions
Page 5
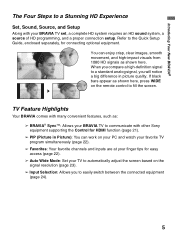
... separately, for easy access (page 22). ➢ Auto Wide Mode: Set your BRAVIA TV to communicate with other Sony equipment supporting the Control for HDMI function (page 21). ➢ PIP (Picture in picture quality. Introducing Your New BRAVIA® The Four Steps to a Stunning HD Experience Set, Sound, Source, and Setup Along with your finger tips for connecting...
... separately, for easy access (page 22). ➢ Auto Wide Mode: Set your BRAVIA TV to communicate with other Sony equipment supporting the Control for HDMI function (page 21). ➢ PIP (Picture in picture quality. Introducing Your New BRAVIA® The Four Steps to a Stunning HD Experience Set, Sound, Source, and Setup Along with your finger tips for connecting...
Operating Instructions
Page 6
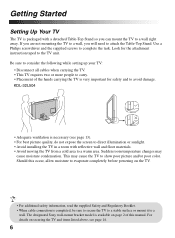
...damage. KDL-32L504 • Adequate ventilation is necessary (see page 14. 6 If you are not mounting the TV to a wall, you can mount the TV to a wall right away. Use a Philips screwdriver and the supplied screws to complete the task. Should this manual. The designated Sony wall-mount...setting up your TV: • Disconnect all cables when carrying the TV. • This TV requires two or more people to carry. • Placement of this occur, allow moisture to evaporate completely before powering on securing the TV and items listed above, see page 13). • For best picture...
...damage. KDL-32L504 • Adequate ventilation is necessary (see page 14. 6 If you are not mounting the TV to a wall, you can mount the TV to a wall right away. Use a Philips screwdriver and the supplied screws to complete the task. Should this manual. The designated Sony wall-mount...setting up your TV: • Disconnect all cables when carrying the TV. • This TV requires two or more people to carry. • Placement of this occur, allow moisture to evaporate completely before powering on securing the TV and items listed above, see page 13). • For best picture...

Operating Instructions
Page 8
.... 0 CABLE/ ANTENNA RF input that connects to your analog audio equipment. To set to Auto. 7 COMPONENT Component video provides better picture quality than the S Video and composite IN 2 video. (1080p/1080i/ Audio connection is required for audio signal. L (MONO)AUDIO-R This TV can auto detect and switch between the VIDEO 1 and COMPONENT 1 when...
.... 0 CABLE/ ANTENNA RF input that connects to your analog audio equipment. To set to Auto. 7 COMPONENT Component video provides better picture quality than the S Video and composite IN 2 video. (1080p/1080i/ Audio connection is required for audio signal. L (MONO)AUDIO-R This TV can auto detect and switch between the VIDEO 1 and COMPONENT 1 when...

Operating Instructions
Page 9
Cable or VHF/UHF (or VHF only) 75-ohm coaxial cable Rear of TV CABLE/ANTENNA • Be sure to set the Signal Type setting to Cable or Antenna found under the Channel settings for both cable (QAM and 8VSB) and external VHF/UHF antenna (ATSC). Cable System and VHF/UHF... Antenna System Use an optional A-B RF switch (not supplied) to receive optimum picture quality. This TV is strongly ...
Cable or VHF/UHF (or VHF only) 75-ohm coaxial cable Rear of TV CABLE/ANTENNA • Be sure to set the Signal Type setting to Cable or Antenna found under the Channel settings for both cable (QAM and 8VSB) and external VHF/UHF antenna (ATSC). Cable System and VHF/UHF... Antenna System Use an optional A-B RF switch (not supplied) to receive optimum picture quality. This TV is strongly ...

Operating Instructions
Page 16
..., be done at later time, press MENU and select the Auto Program under the Screen settings; for this TV. Press WIDE to select the Wide Mode or press MENU and set the Auto Wide to navigate and highlight options where applicable. Select WIDE INPUT V/v/B/b buttons: ... signal source directly connected to the Quick Setup Guide (supplied) for ENERGY STAR compliant mode. Refer to the TV's CABLE/ANTENNA input. "Home" optimizes the picture for digital and analog channels Complete your cable connections before beginning the Initial Setup. Running Initial Setup During initial ...
..., be done at later time, press MENU and select the Auto Program under the Screen settings; for this TV. Press WIDE to select the Wide Mode or press MENU and set the Auto Wide to navigate and highlight options where applicable. Select WIDE INPUT V/v/B/b buttons: ... signal source directly connected to the Quick Setup Guide (supplied) for ENERGY STAR compliant mode. Refer to the TV's CABLE/ANTENNA input. "Home" optimizes the picture for digital and analog channels Complete your cable connections before beginning the Initial Setup. Running Initial Setup During initial ...

Operating Instructions
Page 18
... BRAVIA® SyncTM equipment. Select the HDMI device and then press SYNC MENU to display the menu of your Favorites list. 5 WIDE Press repeatedly to cycle through the available Wide Mode settings. THEATER: Press to turn On when Muting or Off the Closed Captions (CC). The picture settings will be set ...screen or exit from the screen when displaying menu items and settings. 7 MENU Press to display the menu with channel/program information you are used to control the equipment connected to the TV by an HDMI connection to your TV (see page 21 for HDMI device is not selected). Remote...
... BRAVIA® SyncTM equipment. Select the HDMI device and then press SYNC MENU to display the menu of your Favorites list. 5 WIDE Press repeatedly to cycle through the available Wide Mode settings. THEATER: Press to turn On when Muting or Off the Closed Captions (CC). The picture settings will be set ...screen or exit from the screen when displaying menu items and settings. 7 MENU Press to display the menu with channel/program information you are used to control the equipment connected to the TV by an HDMI connection to your TV (see page 21 for HDMI device is not selected). Remote...
Operating Instructions
Page 20
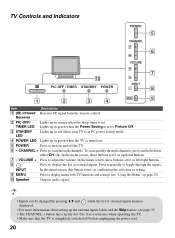
...POWER Press to toggle through channels. Receiver 2 PIC OFF/ Lights up in orange when the sleep timer is set to display the list of external inputs menu is completely switched off the TV. 6 - In the menu screen, these buttons serve as up the external inputs labels and the Skip ...buttons serve as left/right buttons. 8 Press to Picture Off. 3 STANDBY LED Lights up in red when your TV is in PC power saving mode. 4 POWER LED Lights up in green when the TV is set . VOLUME + Press to display menu with TV functions and settings (see page 35. • The CHANNEL + button...
...POWER Press to toggle through channels. Receiver 2 PIC OFF/ Lights up in orange when the sleep timer is set to display the list of external inputs menu is completely switched off the TV. 6 - In the menu screen, these buttons serve as up the external inputs labels and the Skip ...buttons serve as left/right buttons. 8 Press to Picture Off. 3 STANDBY LED Lights up in red when your TV is in PC power saving mode. 4 POWER LED Lights up in green when the TV is set . VOLUME + Press to display menu with TV functions and settings (see page 35. • The CHANNEL + button...
Operating Instructions
Page 23
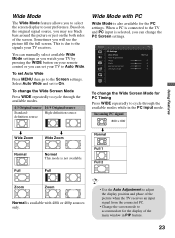
...the original signal source, you may see the picture fill the full screen. This is due to the signals your preference. When a PC is connected to the TV and PC input is available with PC Wide Mode is not available. Screen PC Settings Wide Mode Auto Adjustment Phase Pitch Horizontal Center Vertical... Center PC Normal 0 0 0 0 To change the Wide Screen Mode for the PC settings. Sometimes you will see black bars around the picture or just on your TV by pressing the WIDE button on the both sides of the main window in the PC input mode. High...
...the original signal source, you may see the picture fill the full screen. This is due to the signals your preference. When a PC is connected to the TV and PC input is available with PC Wide Mode is not available. Screen PC Settings Wide Mode Auto Adjustment Phase Pitch Horizontal Center Vertical... Center PC Normal 0 0 0 0 To change the Wide Screen Mode for the PC settings. Sometimes you will see black bars around the picture or just on your TV by pressing the WIDE button on the both sides of the main window in the PC input mode. High...
Operating Instructions
Page 25
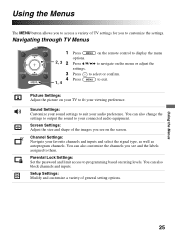
Picture Settings: Adjust the picture on your TV to suit your viewing preference. Using the Menus 25 Sound Settings: Customize your sound settings to fit your audio preference. You can also customize the channels you see on the screen. TOOLS 3 Press to select or confirm. 4 Press 1, 4 to them. Screen Settings...autoprogram channels. Channel Settings: Navigate your connected audio equipment. Parental Lock Settings: Set the password and limit access to customize the settings. Using the Menus The MENU button allows you to access a variety of TV settings for you to ...
Picture Settings: Adjust the picture on your TV to suit your viewing preference. Using the Menus 25 Sound Settings: Customize your sound settings to fit your audio preference. You can also customize the channels you see on the screen. TOOLS 3 Press to select or confirm. 4 Press 1, 4 to them. Screen Settings...autoprogram channels. Channel Settings: Navigate your connected audio equipment. Parental Lock Settings: Set the password and limit access to customize the settings. Using the Menus The MENU button allows you to access a variety of TV settings for you to ...

Operating Instructions
Page 26
... white colors a reddish tint. Recommended for viewing in detail. Sharpness Adjust to improve film content. Using the Picture Settings Option Description Picture Mode Vivid Select for stronger contrast. Enhances black areas of the picture for enhanced picture contrast and sharpness. CineMotion Select Auto to activate CineMotion to automatically detect film-based content and apply an...
... white colors a reddish tint. Recommended for viewing in detail. Sharpness Adjust to improve film content. Using the Picture Settings Option Description Picture Mode Vivid Select for stronger contrast. Enhances black areas of the picture for enhanced picture contrast and sharpness. CineMotion Select Auto to activate CineMotion to automatically detect film-based content and apply an...
Operating Instructions
Page 28
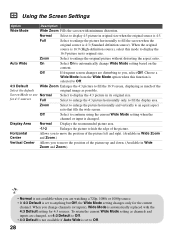
... its original size. Off Select to hide the edge of the picture. Display Area Normal Displays the recommended picture area. -1/-2 Enlarges the picture to continue using the current Wide Mode setting when the channel or input is changed , set 4:3 Default to Off. • 4:3 Default is not available if ... to Off. 4:3 Default Wide Zoom Enlarges the 4:3 picture to fill the 16:9 screen, displaying as much of the picture up and down. (Available in original size when the original source is set to anything but Off, the Wide Mode setting changes only for 4:3 sources. When you , select ...
... its original size. Off Select to hide the edge of the picture. Display Area Normal Displays the recommended picture area. -1/-2 Enlarges the picture to continue using the current Wide Mode setting when the channel or input is changed , set 4:3 Default to Off. • 4:3 Default is not available if ... to Off. 4:3 Default Wide Zoom Enlarges the 4:3 picture to fill the 16:9 screen, displaying as much of the picture up and down. (Available in original size when the original source is set to anything but Off, the Wide Mode setting changes only for 4:3 sources. When you , select ...
Operating Instructions
Page 29
...Adjust after Pitch to fill the display area. Center Vertical Center Allows you to move the position of the Screen settings. Full 1 Select to enlarge the picture to display in the original image size. Wide Mode Normal Select to fill the display area, keeping its original aspect... ratio. Option PC Settings Description When a PC is connected to the TV and the PC input is selected, the PC settings screen appears instead of the picture up ...
...Adjust after Pitch to fill the display area. Center Vertical Center Allows you to move the position of the Screen settings. Full 1 Select to enlarge the picture to display in the original image size. Wide Mode Normal Select to fill the display area, keeping its original aspect... ratio. Option PC Settings Description When a PC is connected to the TV and the PC input is selected, the PC settings screen appears instead of the picture up ...

Operating Instructions
Page 34
...on when the TV is turned off the TV after 1h, 2h, or 3h when no signal input for 30 seconds. CC1, CC2, Displays a printed version of the dialogue or sound effects CC3, CC4 of a program. (Should be set , pressing VOL +/- Custom Allows you to disable it. While Picture Off is ... you to select from High, Low, Off, Picture Off to automatically power off . Using the Setup Settings Option Eco Closed Captions (CC) Description Power Saving Select from several closed caption modes (for programs that are pressed on the remote control or the TV. The Custom option is not VESA-compliant. &#...
...on when the TV is turned off the TV after 1h, 2h, or 3h when no signal input for 30 seconds. CC1, CC2, Displays a printed version of the dialogue or sound effects CC3, CC4 of a program. (Should be set , pressing VOL +/- Custom Allows you to disable it. While Picture Off is ... you to select from High, Low, Off, Picture Off to automatically power off . Using the Setup Settings Option Eco Closed Captions (CC) Description Power Saving Select from several closed caption modes (for programs that are pressed on the remote control or the TV. The Custom option is not VESA-compliant. &#...
Operating Instructions
Page 36
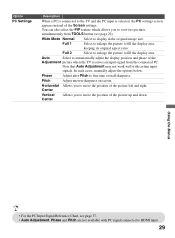
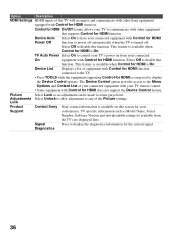
... Some equipment with Control for HDMI Power Off function to power off automatically when the TV is turned off. Select Off to any of the Picture settings. Adjustments Select Unlock to allow adjustment to disable this function. The Device Control option ...provides access to the Menu, Options and Content List of your connected equipment with your connected On equipment with other Sony equipment equipped with Control for HDMI function connected to the TV...
... Some equipment with Control for HDMI Power Off function to power off automatically when the TV is turned off. Select Off to any of the Picture settings. Adjustments Select Unlock to allow adjustment to disable this function. The Device Control option ...provides access to the Menu, Options and Content List of your connected equipment with your connected On equipment with other Sony equipment equipped with Control for HDMI function connected to the TV...
Operating Instructions
Page 37
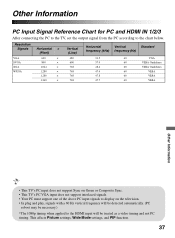
Other Information PC Input Signal Reference Chart for PC and HDMI IN 1/2/3 After connecting the PC to the TV, set the output signal from the PC according to the HDMI input will be detected automatically. (PC reboot may be necessary.) *The 1080p timing when applied ... TV's PC VGA input does not support interlaced signals. • Your PC must support one of the above PC input signals to display on the television. • In plug and play, signals with a 60 Hz vertical frequency will be treated as a video timing and not PC timing. This affects Picture settings, Wide Mode settings...
Other Information PC Input Signal Reference Chart for PC and HDMI IN 1/2/3 After connecting the PC to the TV, set the output signal from the PC according to the HDMI input will be detected automatically. (PC reboot may be necessary.) *The 1080p timing when applied ... TV's PC VGA input does not support interlaced signals. • Your PC must support one of the above PC input signals to display on the television. • In plug and play, signals with a 60 Hz vertical frequency will be treated as a video timing and not PC timing. This affects Picture settings, Wide Mode settings...

Operating Instructions
Page 39
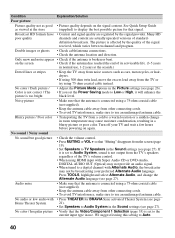
...activated (see page 35). • Check PC Power Management in the TV's memory (see pages 16 and 30). TV is turn on the remote control (see page 34). Condition Explanation/Solution No picture No picture • Check the Power Saving settings (see page 24). sources • Press INPUT on . You ... channels over an antenna, make sure that are not present in the Eco settings (see page 30). No picture from the TV, you have accidentally pressed the MUTING button on the power of your Sony TV even after you to the Quick Setup Guide provided for your previous password and...
...activated (see page 35). • Check PC Power Management in the TV's memory (see pages 16 and 30). TV is turn on the remote control (see page 34). Condition Explanation/Solution No picture No picture • Check the Power Saving settings (see page 24). sources • Press INPUT on . You ... channels over an antenna, make sure that are not present in the Eco settings (see page 30). No picture from the TV, you have accidentally pressed the MUTING button on the power of your Sony TV even after you to the Quick Setup Guide provided for your previous password and...
Operating Instructions
Page 40
See Quick Setup Guide (supplied) to display the best possible picture for BRAVIA Sync activated Theater System (see page 21). • Set Speakers to Audio System in the Sound settings (see page 27). • Verify that the antenna is connected using a 75-ohm coaxial cable (not supplied). • Keep the antenna...excess lead away from the TV or try using 75 ohm coaxial cable instead. • Adjust the Picture Mode options in the Picture settings (see page 26). • If you set the Power Saving mode to Low or High, it is set to the current input type in a blurry picture or poor color. If...
See Quick Setup Guide (supplied) to display the best possible picture for BRAVIA Sync activated Theater System (see page 21). • Set Speakers to Audio System in the Sound settings (see page 27). • Verify that the antenna is connected using a 75-ohm coaxial cable (not supplied). • Keep the antenna...excess lead away from the TV or try using 75 ohm coaxial cable instead. • Adjust the Picture Mode options in the Picture settings (see page 26). • If you set the Power Saving mode to Low or High, it is set to the current input type in a blurry picture or poor color. If...
Quick Setup Guide
Page 1
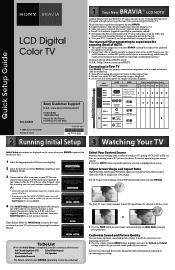
...picture for completion. Start auto program now? The boxy 4:3 aspect ratio (common to most from packaging. ■ Install 2 AA batteries (supplied separately) in China 4-159-784-11(1) 1 Your New BRAVIA® LCD HDTV Congratulations! Quick Setup Guide Audio/Video Performance LCD Digital Color TV Sony Customer Support U.S.A.: www.sony.com/tvsupport KDL-32L504 United States 1.800.222.SONY... on the screen when your BRAVIA is receiving. ■ Contact your cable or satellite provider to upgrade your BRAVIA can choose optimum sound and picture settings to -height ratio of use...
...picture for completion. Start auto program now? The boxy 4:3 aspect ratio (common to most from packaging. ■ Install 2 AA batteries (supplied separately) in China 4-159-784-11(1) 1 Your New BRAVIA® LCD HDTV Congratulations! Quick Setup Guide Audio/Video Performance LCD Digital Color TV Sony Customer Support U.S.A.: www.sony.com/tvsupport KDL-32L504 United States 1.800.222.SONY... on the screen when your BRAVIA is receiving. ■ Contact your cable or satellite provider to upgrade your BRAVIA can choose optimum sound and picture settings to -height ratio of use...


