Operating Instructions
Page 2
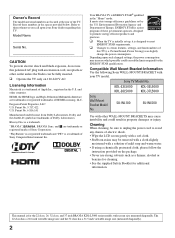
...TV. Depending upon your TV model. KDL-22L5000 KDL-26L5000 KDL-32L5000 KDL-37L5000 Sony Wall-Mount Bracket Model No. The 22 class has a 21.6 inch viewable image size and the 32 class has a 31.5 inch viewable image size (measured diagonally). 2 Patent No. 5,717,422 U.S. Your BRAVIA TV is initially set... Information Macintosh is a trademark of electric shock. • Wipe the LCD screen gently with a soft cloth. • Stubborn stains may cause instability...the 22 class, 26, 32 class, and 37 inch BRAVIA KDL-L5000 series models with your Sony dealer regarding this TV. HDMI, the ...
...TV. Depending upon your TV model. KDL-22L5000 KDL-26L5000 KDL-32L5000 KDL-37L5000 Sony Wall-Mount Bracket Model No. The 22 class has a 21.6 inch viewable image size and the 32 class has a 31.5 inch viewable image size (measured diagonally). 2 Patent No. 5,717,422 U.S. Your BRAVIA TV is initially set... Information Macintosh is a trademark of electric shock. • Wipe the LCD screen gently with a soft cloth. • Stubborn stains may cause instability...the 22 class, 26, 32 class, and 37 inch BRAVIA KDL-L5000 series models with your Sony dealer regarding this TV. HDMI, the ...
Operating Instructions
Page 3
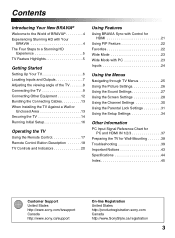
... the Menus Navigating through TV Menus 25 Using the Picture Settings 26 Using the Sound Settings 27 Using the Screen Settings 28 Using the Channel Settings 30 Using the Parental Lock Settings 31 Using the Setup Settings 34 Other Information PC ...Input Signal Reference Chart for PC and HDMI IN 1/2/3 37 Preparing the TV for Wall-Mounting 38 Troubleshooting 39 Important Notices 43 Specifications 44 Index 45 Customer Support United States http://www.sony...
... the Menus Navigating through TV Menus 25 Using the Picture Settings 26 Using the Sound Settings 27 Using the Screen Settings 28 Using the Channel Settings 30 Using the Parental Lock Settings 31 Using the Setup Settings 34 Other Information PC ...Input Signal Reference Chart for PC and HDMI IN 1/2/3 37 Preparing the TV for Wall-Mounting 38 Troubleshooting 39 Important Notices 43 Specifications 44 Index 45 Customer Support United States http://www.sony...
Operating Instructions
Page 4
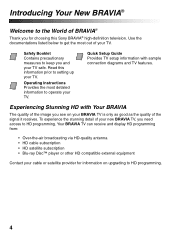
...quality of the image you see on your cable or satellite provider for choosing this information prior to setting up your new BRAVIA TV, you need access to HD programming. Your BRAVIA TV can receive and display HD programming from: • Over-the-air broadcasting via HD-quality antenna...as good as the quality of the signal it receives. Experiencing Stunning HD with sample connection diagrams and TV features. To experience the stunning detail of your TV. Read this Sony BRAVIA® high-definition television. Introducing Your New BRAVIA® Welcome to the World of BRAVIA®...
...quality of the image you see on your cable or satellite provider for choosing this information prior to setting up your new BRAVIA TV, you need access to HD programming. Your BRAVIA TV can receive and display HD programming from: • Over-the-air broadcasting via HD-quality antenna...as good as the quality of the signal it receives. Experiencing Stunning HD with sample connection diagrams and TV features. To experience the stunning detail of your TV. Read this Sony BRAVIA® high-definition television. Introducing Your New BRAVIA® Welcome to the World of BRAVIA®...
Operating Instructions
Page 5
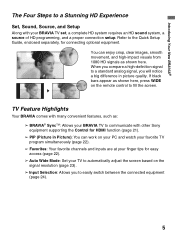
...finger tips for easy access (page 22). ➢ Auto Wide Mode: Set your BRAVIA TV set, a complete HD system requires an HD sound system, a source of HD programming, and a proper connection setup. TV Feature Highlights Your BRAVIA comes with many convenient features, such as shown here.... Introducing Your New BRAVIA® The Four Steps to a Stunning HD Experience Set, Sound, Source, and Setup Along with other Sony equipment supporting the Control for HDMI ...
...finger tips for easy access (page 22). ➢ Auto Wide Mode: Set your BRAVIA TV set, a complete HD system requires an HD sound system, a source of HD programming, and a proper connection setup. TV Feature Highlights Your BRAVIA comes with many convenient features, such as shown here.... Introducing Your New BRAVIA® The Four Steps to a Stunning HD Experience Set, Sound, Source, and Setup Along with other Sony equipment supporting the Control for HDMI ...
Operating Instructions
Page 6
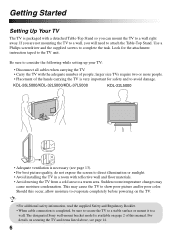
Look for safety and to avoid damage. KDL-26L5000/KDL-32L5000/KDL-37L5000 KDL-22L5000 • Adequate ventilation is necessary (see page 14. 6 For details on the TV. • For additional safety information, read the supplied Safety and Regulatory Booklet. • When cable connection is very ... following while setting up your TV: • Disconnect all cables when carrying the TV. • Carry the TV with the adequate number of the hands carrying the TV is completed, be sure to secure the TV to a stable surface or mount it to a wall. The designated Sony wall-mount...
Look for safety and to avoid damage. KDL-26L5000/KDL-32L5000/KDL-37L5000 KDL-22L5000 • Adequate ventilation is necessary (see page 14. 6 For details on the TV. • For additional safety information, read the supplied Safety and Regulatory Booklet. • When cable connection is very ... following while setting up your TV: • Disconnect all cables when carrying the TV. • Carry the TV with the adequate number of the hands carrying the TV is completed, be sure to secure the TV to a stable surface or mount it to a wall. The designated Sony wall-mount...
Operating Instructions
Page 7
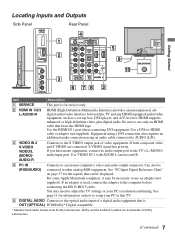
... cable connected to AUDIO (L/R). 3 VIDEO IN 2 S VIDEO VIDEO/L (MONO)AUDIO-R Connects to adjust the TV settings or your PC to this TV and any HDMI-equipped audio/video equipment, such as a set-top box, DVD player, and A/V receiver. If an adapter is used, connect the adapter to a personal... 37 for service only. 2 HDMI IN 1/2/3 L-AUDIO-R HDMI (High-Definition Multimedia Interface) provides an uncompressed, alldigital audio/video interface between this TV. 5 DIGITAL AUDIO Connects to use only an HDMI cable that bears the HDMI logo. Dolby and the double-D symbol are connected, S VIDEO...
... cable connected to AUDIO (L/R). 3 VIDEO IN 2 S VIDEO VIDEO/L (MONO)AUDIO-R Connects to adjust the TV settings or your PC to this TV and any HDMI-equipped audio/video equipment, such as a set-top box, DVD player, and A/V receiver. If an adapter is used, connect the adapter to a personal... 37 for service only. 2 HDMI IN 1/2/3 L-AUDIO-R HDMI (High-Definition Multimedia Interface) provides an uncompressed, alldigital audio/video interface between this TV. 5 DIGITAL AUDIO Connects to use only an HDMI cable that bears the HDMI logo. Dolby and the double-D symbol are connected, S VIDEO...
Operating Instructions
Page 8
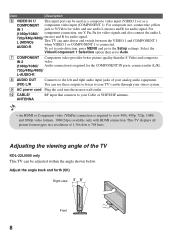
... 480i, 480p, 720p, 1080i and 1080p video formats. 1080/24p is available only with HDMI connection. Adjusting the viewing angle of the TV KDL-22L5000 only This TV can auto detect and switch between the VIDEO 1 and COMPONENT 1 when VIDEO 1 or COMPONENT 1 is connected. Adjust the angle back and...and R for audio signal. Select the Video/Component 1 Selection option then set to auto detection, press MENU and go to the Setup settings. Item Description 6 VIDEO IN 1/ This input port can use these outputs to listen to your TV's audio through your stereo system. 9 AC power cord Plug the cord ...
... 480i, 480p, 720p, 1080i and 1080p video formats. 1080/24p is available only with HDMI connection. Adjusting the viewing angle of the TV KDL-22L5000 only This TV can auto detect and switch between the VIDEO 1 and COMPONENT 1 when VIDEO 1 or COMPONENT 1 is connected. Adjust the angle back and...and R for audio signal. Select the Video/Component 1 Selection option then set to auto detection, press MENU and go to the Setup settings. Item Description 6 VIDEO IN 1/ This input port can use these outputs to listen to your TV's audio through your stereo system. 9 AC power cord Plug the cord ...
Operating Instructions
Page 9
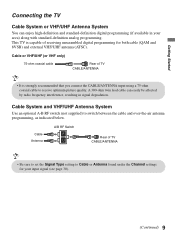
... digital programming (if available in signal degradation. Cable Antenna A/B RF Switch A B Rear of TV CABLE/ANTENNA • Be sure to set the Signal Type setting to Cable or Antenna found under the Channel settings for both cable (QAM and 8VSB) and external VHF/UHF antenna (ATSC). Cable System and ...VHF/UHF Antenna System Use an optional A-B RF switch (not supplied) to receive optimum picture quality. Getting Started Connecting the TV Cable System or VHF/UHF ...
... digital programming (if available in signal degradation. Cable Antenna A/B RF Switch A B Rear of TV CABLE/ANTENNA • Be sure to set the Signal Type setting to Cable or Antenna found under the Channel settings for both cable (QAM and 8VSB) and external VHF/UHF antenna (ATSC). Cable System and ...VHF/UHF Antenna System Use an optional A-B RF switch (not supplied) to receive optimum picture quality. Getting Started Connecting the TV Cable System or VHF/UHF ...
Operating Instructions
Page 13
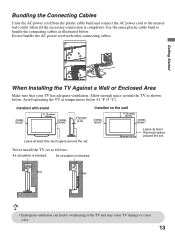
Installed with other connecting cables. Never install the TV set . Air circulation is blocked. Allow enough space around the set as follows: Air circulation is blocked. Installed on the wall 4 inches (10 cm) 11 7/8 inches (30 cm) 4 inches (10 cm)... (6 cm) Leave at least this much space around the set. Getting Started When Installing the TV Against a Wall or Enclosed Area Make sure that your TV has adequate ventilation. Avoid operating the TV at least this much space around the TV as illustrated below . Wall Wall • Inadequate ventilation can...
Installed with other connecting cables. Never install the TV set . Air circulation is blocked. Allow enough space around the set as follows: Air circulation is blocked. Installed on the wall 4 inches (10 cm) 11 7/8 inches (30 cm) 4 inches (10 cm)... (6 cm) Leave at least this much space around the set. Getting Started When Installing the TV Against a Wall or Enclosed Area Make sure that your TV has adequate ventilation. Avoid operating the TV at least this much space around the TV as illustrated below . Wall Wall • Inadequate ventilation can...
Operating Instructions
Page 14
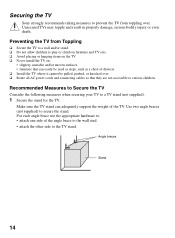
...• attach the other side to the TV stand. Securing the TV Sony strongly recommends taking measures to prevent the TV from Toppling ❑ Secure the TV to a wall and/or stand. ❑ Do not allow children to play or climb on furniture and TV sets. ❑ Avoid placing or hanging items... on the TV. ❑ Never install the TV on: •...
...• attach the other side to the TV stand. Securing the TV Sony strongly recommends taking measures to prevent the TV from Toppling ❑ Secure the TV to a wall and/or stand. ❑ Do not allow children to play or climb on furniture and TV sets. ❑ Avoid placing or hanging items... on the TV. ❑ Never install the TV on: •...
Operating Instructions
Page 15
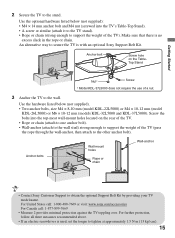
... chain (strong enough to the wall. Anchor bolts Wall-mount holes Rope or chain Wall-anchor • Contact Sony Customer Support to secure the TV is with an optional Sony Support Belt Kit. For further protection, follow all three measures recommended above. • If an electric screwdriver is... of the TV). Use the optional hardware listed below (not supplied). • Two anchor bolts, size M4 × 8-10 mm (model KDL-22L5000) or M4 × 10-12 mm (model KDL-26L5000) or M6 × 10-12 mm (models KDL-32L5000 and KDL-37L5000). Getting Started 2 Secure the TV to the ...
... chain (strong enough to the wall. Anchor bolts Wall-mount holes Rope or chain Wall-anchor • Contact Sony Customer Support to secure the TV is with an optional Sony Support Belt Kit. For further protection, follow all three measures recommended above. • If an electric screwdriver is... of the TV). Use the optional hardware listed below (not supplied). • Two anchor bolts, size M4 × 8-10 mm (model KDL-22L5000) or M4 × 10-12 mm (model KDL-26L5000) or M6 × 10-12 mm (models KDL-32L5000 and KDL-37L5000). Getting Started 2 Secure the TV to the ...

Operating Instructions
Page 16
...Please select the type of use and is Energy Star compliant. for this TV. Press WIDE to select the Wide Mode or press MENU and set the Auto Wide to On under Channel settings. Follow the help text provided on the TV. To run the Auto Program. • When prompted to select Retail ...later time, press MENU and select the Auto Program under the Screen settings; "Home" optimizes the picture for normal home use for more details see page 23. 16 for the screen display. Initial Setup • Select Cancel to the TV's CABLE/ANTENNA input. Refer to the Quick Setup Guide (supplied) ...
...Please select the type of use and is Energy Star compliant. for this TV. Press WIDE to select the Wide Mode or press MENU and set the Auto Wide to On under Channel settings. Follow the help text provided on the TV. To run the Auto Program. • When prompted to select Retail ...later time, press MENU and select the Auto Program under the Screen settings; "Home" optimizes the picture for normal home use for more details see page 23. 16 for the screen display. Initial Setup • Select Cancel to the TV's CABLE/ANTENNA input. Refer to the Quick Setup Guide (supplied) ...
Operating Instructions
Page 18
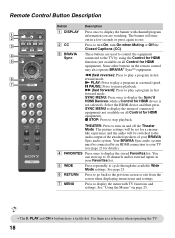
...SYNC MENU to pause playback. Use them as a reference when operating the TV. 18 X PAUSE: Press to display the menu of your Favorites list. 5 WIDE Press repeatedly to cycle through the available Wide Mode settings. SYNC MENU: Press once to turn On when Muting or Off the ... 1 2 3 DISPLAY CC POWER 4 5 WIDE INPUT 6 7 TOOLS Button Description 1 DISPLAY 2 CC 3 BRAVIA Sync Press once to display the banner with TV functions and settings. You can store up to 10 channels and/or external inputs in fast forward mode. See "Using the Menus" on the remote control may...
...SYNC MENU to pause playback. Use them as a reference when operating the TV. 18 X PAUSE: Press to display the menu of your Favorites list. 5 WIDE Press repeatedly to cycle through the available Wide Mode settings. SYNC MENU: Press once to turn On when Muting or Off the ... 1 2 3 DISPLAY CC POWER 4 5 WIDE INPUT 6 7 TOOLS Button Description 1 DISPLAY 2 CC 3 BRAVIA Sync Press once to display the banner with TV functions and settings. You can store up to 10 channels and/or external inputs in fast forward mode. See "Using the Menus" on the remote control may...
Operating Instructions
Page 20
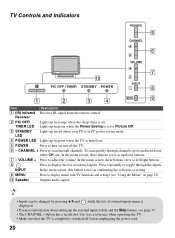
...in PC power saving mode. 4 POWER LED Lights up in green when the TV is set . In the menu screen, these buttons serve as a reference when operating the TV. • Make sure that the TV is displayed. • For more information about setting up /down either CH -/+. Receiver 2 PIC OFF/ Lights up in orange ...when the sleep timer is set to display menu with TV functions and settings (see page 35. • The CHANNEL + button has a tactile dot. TIMER LED Lights up in green when the Power Saving is turned on and ...
...in PC power saving mode. 4 POWER LED Lights up in green when the TV is set . In the menu screen, these buttons serve as a reference when operating the TV. • Make sure that the TV is displayed. • For more information about setting up /down either CH -/+. Receiver 2 PIC OFF/ Lights up in orange ...when the sleep timer is set to display menu with TV functions and settings (see page 35. • The CHANNEL + button has a tactile dot. TIMER LED Lights up in green when the Power Saving is turned on and ...
Operating Instructions
Page 21
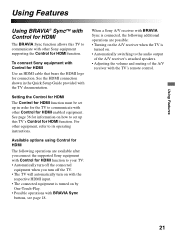
... for information on . • Automatically switching to set up this TV to communicate with Control for HDMI enabled equipment. For other equipment, refer to your TV: • Automatically turn off the TV. • The TV will automatically turn off the connected equipment when you connect the supported Sony equipment with other Control for HDMI function to...
... for information on . • Automatically switching to set up this TV to communicate with Control for HDMI enabled equipment. For other equipment, refer to your TV: • Automatically turn off the TV. • The TV will automatically turn off the connected equipment when you connect the supported Sony equipment with other Control for HDMI function to...
Operating Instructions
Page 23
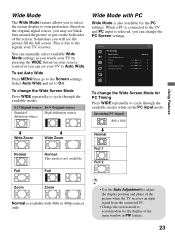
... screen. When a PC is available with PC Wide Mode is selected, you can set Auto Wide Press MENU then go to the signals your TV by pressing the WIDE button on the both sides of the picture when the TV receives an input signal from the connected PC. • Change the screen mode... to cycle through the available modes while in PIP feature. 23 To set your preference. Incoming PC signal 800 × 600 m Wide Zoom m Wide Zoom...
... screen. When a PC is available with PC Wide Mode is selected, you can set Auto Wide Press MENU then go to the signals your TV by pressing the WIDE button on the both sides of the picture when the TV receives an input signal from the connected PC. • Change the screen mode... to cycle through the available modes while in PIP feature. 23 To set your preference. Incoming PC signal 800 × 600 m Wide Zoom m Wide Zoom...

Operating Instructions
Page 24
... label it as Skip. When you assign Skip, your TV will skip over this input when you want to which you press the INPUT button. Inputs Press INPUT to display the Input menu and toggle through the External Inputs to Setup settings. To Label an Input 1 Press MENU then go to... select your External Inputs to the TV. Press V/v to highlight the video input (Video 1-2, Component 1-2, HDMI 1-3, PC) to assign a label; The Skip labeled...
... label it as Skip. When you assign Skip, your TV will skip over this input when you want to which you press the INPUT button. Inputs Press INPUT to display the Input menu and toggle through the External Inputs to Setup settings. To Label an Input 1 Press MENU then go to... select your External Inputs to the TV. Press V/v to highlight the video input (Video 1-2, Component 1-2, HDMI 1-3, PC) to assign a label; The Skip labeled...
Operating Instructions
Page 25
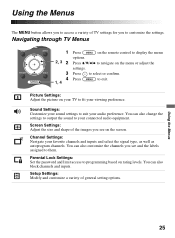
...programming based on rating levels. Screen Settings: Adjust the size and shape of the images you to customize the settings. Using the Menus 25 Picture Settings: Adjust the picture on your TV to fit your audio preference. Sound Settings: Customize your sound settings to suit your viewing preference. Using... a variety of TV settings for you see and the labels assigned to them. Setup Settings: Modify and customize a variety of general setting options. Navigating through TV Menus WIDE INPUT 1 Press on the menu or adjust the settings. You can also change the settings to output the...
...programming based on rating levels. Screen Settings: Adjust the size and shape of the images you to customize the settings. Using the Menus 25 Picture Settings: Adjust the picture on your TV to fit your audio preference. Sound Settings: Customize your sound settings to suit your viewing preference. Using... a variety of TV settings for you see and the labels assigned to them. Setup Settings: Modify and customize a variety of general setting options. Navigating through TV Menus WIDE INPUT 1 Press on the menu or adjust the settings. You can also change the settings to output the...
Operating Instructions
Page 26
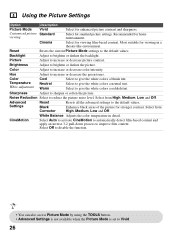
...the current Picture Mode settings to sharpen or soften the picture. Sharpness Adjust to the default values. Picture Adjust to Vivid. 26 Select Off to disable the function. • You can also access Picture Mode by using the TOOLS button. • Advanced Settings is not available when ...the Picture Mode is set to increase or decrease picture contrast. CineMotion Select Auto...
...the current Picture Mode settings to sharpen or soften the picture. Sharpness Adjust to the default values. Picture Adjust to Vivid. 26 Select Off to disable the function. • You can also access Picture Mode by using the TOOLS button. • Advanced Settings is not available when ...the Picture Mode is set to increase or decrease picture contrast. CineMotion Select Auto...

Operating Instructions
Page 27
...Using the Menus • MTS Audio is present, the TV remains in the alternate audio streams. Speakers TV Speakers Select to may be broadcasted in a different language in Stereo mode. By selecting this function. Reset Resets the current Sound Mode settings to increase or decrease lower-pitched sounds. Bass Adjust to ...analog programs. • Alternate Audio is not available if the program is received. Select Off to disable this option you are disabling the TV speakers. Using the Sound Settings Option Description Sound Mode Dynamic Enhances treble and bass.
...Using the Menus • MTS Audio is present, the TV remains in the alternate audio streams. Speakers TV Speakers Select to may be broadcasted in a different language in Stereo mode. By selecting this function. Reset Resets the current Sound Mode settings to increase or decrease lower-pitched sounds. Bass Adjust to ...analog programs. • Alternate Audio is not available if the program is received. Select Off to disable this option you are disabling the TV speakers. Using the Sound Settings Option Description Sound Mode Dynamic Enhances treble and bass.


