Operating Instructions
Page 3
... TV : for digital channels only Watching TV 14 Checking the Digital Electronic Programme Guide (EPG) 16 Using the Favourite list 18 Viewing pictures from connected equipment 19 Using the Menu Navigating through menus 19 Overview of the menus 20 Picture Adjustment menu 21 Picture Mode 21 Contrast/Brightness/Colour/Hue/Sharpness/ Colour Tone 22 Reset 22 Noise Reduction 22 Iris 22 Sound Adjustment menu 23 Sound Effect 23 Treble/Bass/Balance 23 Reset 23 Dual Sound 24 Auto Volume 24 Screen menu...
... TV : for digital channels only Watching TV 14 Checking the Digital Electronic Programme Guide (EPG) 16 Using the Favourite list 18 Viewing pictures from connected equipment 19 Using the Menu Navigating through menus 19 Overview of the menus 20 Picture Adjustment menu 21 Picture Mode 21 Contrast/Brightness/Colour/Hue/Sharpness/ Colour Tone 22 Reset 22 Noise Reduction 22 Iris 22 Sound Adjustment menu 23 Sound Effect 23 Treble/Bass/Balance 23 Reset 23 Dual Sound 24 Auto Volume 24 Screen menu...
Operating Instructions
Page 4
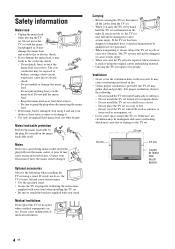
... damaged, have the mains socket changed. If the TV set , disconnect all the cables from heat sources. - For proper ventilation, observe the following the instructions supplied with the mains lead plugged in a closet. - Do not install the TV set . Do not install the TV set may fall and cause serious injury. • Use the specified stand. • Secure the TV set to jolts or excessive vibration.
... damaged, have the mains socket changed. If the TV set , disconnect all the cables from heat sources. - For proper ventilation, observe the following the instructions supplied with the mains lead plugged in a closet. - Do not install the TV set . Do not install the TV set may fall and cause serious injury. • Use the specified stand. • Secure the TV set to jolts or excessive vibration.

Operating Instructions
Page 5
... Do not install this TV set . Ships and other vessel. Outdoor use oil. Wiring • Unplug the mains lead when wiring cables. Placement • Never place the TV set in a vehicle. for your safety. • Take care not to seawater, it checked immediately by qualified service personnel. • To prevent fire, keep flammable objects (candles, etc.) and electric bulbs away from...
... Do not install this TV set . Ships and other vessel. Outdoor use oil. Wiring • Unplug the mains lead when wiring cables. Placement • Never place the TV set in a vehicle. for your safety. • Take care not to seawater, it checked immediately by qualified service personnel. • To prevent fire, keep flammable objects (candles, etc.) and electric bulbs away from...
Operating Instructions
Page 6
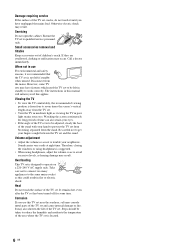
... seven times the screen's vertical length away from the TV set. • View the TV in poor light strains your eyes. Volume adjustment • Adjust the volume so as viewing the TV in moderate light, as not to trouble your neighbours. Take care not to connect too many appliances to the same mains socket as hearing damage may also shorten the life of the TV set to qualified service personnel...
... seven times the screen's vertical length away from the TV set. • View the TV in poor light strains your eyes. Volume adjustment • Adjust the volume so as viewing the TV in moderate light, as not to trouble your neighbours. Take care not to connect too many appliances to the same mains socket as hearing damage may also shorten the life of the TV set to qualified service personnel...

Operating Instructions
Page 7
... use. It may disappear after operating the TV set is in close to the TV set The screen surface is finished with a special coating to any type of abrasive pad, alkaline/acid cleaner, scouring powder, or volatile solvent, such as the temperature rises. • Ghosting may occur when still pictures are effective, black dots may appear or bright points of light (red, blue, or green...
... use. It may disappear after operating the TV set is in close to the TV set The screen surface is finished with a special coating to any type of abrasive pad, alkaline/acid cleaner, scouring powder, or volatile solvent, such as the temperature rises. • Ghosting may occur when still pictures are effective, black dots may appear or bright points of light (red, blue, or green...

Operating Instructions
Page 8
.... • In analogue mode: Displays information such as current channel number and screen mode. • In Text mode (page 15): Reveals hidden information (e.g., answers to a quiz). Input select / Text hold 8 4 • In TV mode (page 19): Selects the input source from the standby mode. 2 1 2 % - qj • In Text mode: Enters the three digit page number to digital mode. qf / - EPG (Digital Electronic Programme Guide) (page 16) qh M/m/ Sound effect (page 23...
.... • In analogue mode: Displays information such as current channel number and screen mode. • In Text mode (page 15): Reveals hidden information (e.g., answers to a quiz). Input select / Text hold 8 4 • In TV mode (page 19): Selects the input source from the standby mode. 2 1 2 % - qj • In Text mode: Enters the three digit page number to digital mode. qf / - EPG (Digital Electronic Programme Guide) (page 16) qh M/m/ Sound effect (page 23...

Operating Instructions
Page 9
Overview of the TV buttons and indicators W E G A TGE A PUSH O PEN T V /V ID E O VO L U M E CANNEL T IM E R L A M PP OW E R A/S NT D B Y P OW E R MENU OK 12 3 4 5 6 78 9 1 (page 19) 2 / - Input select (page 15) • In TV mode: Selects the input source from equipment connected to the TV sockets. • In TV menu: OK 3 2 +/-/
Overview of the TV buttons and indicators W E G A TGE A PUSH O PEN T V /V ID E O VO L U M E CANNEL T IM E R L A M PP OW E R A/S NT D B Y P OW E R MENU OK 12 3 4 5 6 78 9 1 (page 19) 2 / - Input select (page 15) • In TV mode: Selects the input source from equipment connected to the TV sockets. • In TV menu: OK 3 2 +/-/
Operating Instructions
Page 12
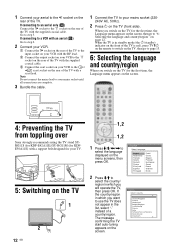
... cable. 1 Connect the TV to the / 2 scart socket on the rear of the TV. When the TV is in standby mode (the 1 (standby) indicator on the front of the TV is red), press TV +/1 on the remote to switch on the TV, then go to page 13. 6: Selecting the language and country/region When you switch on the TV for the first time, the Language menu appears on the screen...
... cable. 1 Connect the TV to the / 2 scart socket on the rear of the TV. When the TV is in standby mode (the 1 (standby) indicator on the front of the TV is red), press TV +/1 on the remote to switch on the TV, then go to page 13. 6: Selecting the language and country/region When you switch on the TV for the first time, the Language menu appears on the screen...
Operating Instructions
Page 15
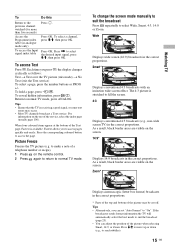
... information the TV will automatically select the best mode to suit the broadcast (page 25). • You can set "Auto Format" to "On". Press , to access the page. To hold a page, press / . Press the corresponding coloured button to select the desired input signal, press m/M, then press OK. As a result, black border areas are visible on the screen. To change the screen mode manually to suit...
... information the TV will automatically select the best mode to suit the broadcast (page 25). • You can set "Auto Format" to "On". Press , to access the page. To hold a page, press / . Press the corresponding coloured button to select the desired input signal, press m/M, then press OK. As a result, black border areas are visible on the screen. To change the screen mode manually to suit...

Operating Instructions
Page 19
... buttons, to access the Input signal index table. Audio input signal is input through the audio socket L/G/S/I , R/D/D/D sockets / 3. 4/ 4: Video input signal through the video socket 4, and audio input signal through the HDMI IN 6 socket. TV operation Access the Input signal index table Press OK. The picture from connected equipment Switch on the connected equipment, then perform one of the video socket 4, and S video input signal is input through the S video socket 4. 5: RGB input signal through the PC connectors audio input signal through the socket 5. 5, and 6: Digital...
... buttons, to access the Input signal index table. Audio input signal is input through the audio socket L/G/S/I , R/D/D/D sockets / 3. 4/ 4: Video input signal through the video socket 4, and audio input signal through the HDMI IN 6 socket. TV operation Access the Input signal index table Press OK. The picture from connected equipment Switch on the connected equipment, then perform one of the video socket 4, and S video input signal is input through the S video socket 4. 5: RGB input signal through the PC connectors audio input signal through the socket 5. 5, and 6: Digital...

Operating Instructions
Page 20
...) Reset (23) Dual Sound (24) Auto Volume (24) 3 Screen Auto Format (25) Screen Format (25) RGB Center (25) 4 Features AV2 Output (26) TV Speakers (26) PC Adjustment (27) 20 GB Programme/System/Channel/Label/AFT/ Audio Filter/Skip/Decoder/ATT/Confirm Digital Set Up (34) - Label/Skip Manual Programme Preset (31) - Overview of the menus The following options are available in parentheses for details of each menu...
...) Reset (23) Dual Sound (24) Auto Volume (24) 3 Screen Auto Format (25) Screen Format (25) RGB Center (25) 4 Features AV2 Output (26) TV Speakers (26) PC Adjustment (27) 20 GB Programme/System/Channel/Label/AFT/ Audio Filter/Skip/Decoder/ATT/Confirm Digital Set Up (34) - Label/Skip Manual Programme Preset (31) - Overview of the menus The following options are available in parentheses for details of each menu...

Operating Instructions
Page 21
Using the Menu Picture Adjustment menu Picture Adjustment Picture Mode Contrast Brightness Colour Hue Sharpness Colour Tone Reset Noise Reduction Iris Custom Max 50 50 0 15 Warm Auto High You can change the picture mode by pressing repeatedly. Tip When you set the "Picture Mode" option to "Vivid" or "Standard," you to store your own prefered settings. Select: Set: OK Back: End: MENU Picture Mode Selects the picture mode. 1 Press OK to select "Picture Mode". 2 Press m/M to select the option...
Using the Menu Picture Adjustment menu Picture Adjustment Picture Mode Contrast Brightness Colour Hue Sharpness Colour Tone Reset Noise Reduction Iris Custom Max 50 50 0 15 Warm Auto High You can change the picture mode by pressing repeatedly. Tip When you set the "Picture Mode" option to "Vivid" or "Standard," you to store your own prefered settings. Select: Set: OK Back: End: MENU Picture Mode Selects the picture mode. 1 Press OK to select "Picture Mode". 2 Press m/M to select the option...
Operating Instructions
Page 29
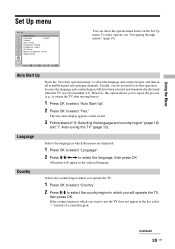
... Manual Programme Preset Digital Set Up You can select the options listed below on the screen. 3 Follow steps of "6: Selecting the language and country/region" (page 12) and "7: Auto-tuning the TV" (page 13). Select: Set: OK Back: End: MENU Auto Start Up Starts the "first time operation menu" to select the language and country/region, and tune in which the menus are displayed...
... Manual Programme Preset Digital Set Up You can select the options listed below on the screen. 3 Follow steps of "6: Selecting the language and country/region" (page 12) and "7: Auto-tuning the TV" (page 13). Select: Set: OK Back: End: MENU Auto Start Up Starts the "first time operation menu" to select the language and country/region, and tune in which the menus are displayed...

Operating Instructions
Page 34
.... Programme List Edit Removes any unwanted digital channels stored on the TV, and changes the order of the digital channels stored on the TV. 1 Press m/M to select the channel you do not need to do this option allows you want to remove or move other channels if required. 3 Press To display the previous or next five channels Press the red button (previous) or the green button (next). 2 Remove or change the...
.... Programme List Edit Removes any unwanted digital channels stored on the TV, and changes the order of the digital channels stored on the TV. 1 Press m/M to select the channel you do not need to do this option allows you want to remove or move other channels if required. 3 Press To display the previous or next five channels Press the red button (previous) or the green button (next). 2 Remove or change the...
Operating Instructions
Page 39
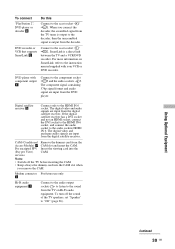
... instruction manual supplied with component output F Connect to the component socket 3 and the audio sockets 3. I Hi-Fi audio equipment J Connect to the audio output sockets to listen to the sound from the decoder. For encripted PPV Insert the viewing card into the CAM slot when you connect the decoder, the scrambled signal from the DVD player. SmartLink is output to the HDMI IN 6 socket. services. The digital video and audio signals are input from the TV tuner...
... instruction manual supplied with component output F Connect to the component socket 3 and the audio sockets 3. I Hi-Fi audio equipment J Connect to the audio output sockets to listen to the sound from the decoder. For encripted PPV Insert the viewing card into the CAM slot when you connect the decoder, the scrambled signal from the DVD player. SmartLink is output to the HDMI IN 6 socket. services. The digital video and audio signals are input from the TV tuner...

Operating Instructions
Page 41
... cover. Additional Information 41 GB Replacing the lamp When the lamp becomes dark or the picture colour is not securely attached, the picture may become dirty, the picture quality may deteriorate or the lamp life may reduce picture quality or lamp life. 4 Remove the outside lamp cover 5 Remove the lamp door. Tips • Only use another lamp, it may cause damage to the TV set . • Consult your hand inside the lamp...
... cover. Additional Information 41 GB Replacing the lamp When the lamp becomes dark or the picture colour is not securely attached, the picture may become dirty, the picture quality may deteriorate or the lamp life may reduce picture quality or lamp life. 4 Remove the outside lamp cover 5 Remove the lamp door. Tips • Only use another lamp, it may cause damage to the TV set . • Consult your hand inside the lamp...
Operating Instructions
Page 44
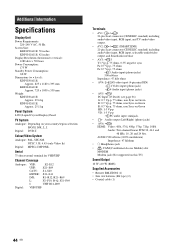
...-F10, B-Q, F21-F69 I . Additional Information Specifications Display Unit Power Requirements: 220-240 V AC, 50 Hz Screen Size: KDF-E50A11E: 50 inches KDF-E42A11E: 42 inches Display Resolution (horizontal x vertical): 1280 dots x 720 lines Power Consumption: 175 W Standby Power Consumption: 0,8 W Dimensions (w × h × d): KDF-E50A11E: Approx. 825 x 1180 x 395 mm KDF-E42A11E: Approx. 720 x 1000 x 350 mm Weight: KDF-E50A11E: Approx. 29.6 kg KDF-E42A11E: Approx. 25.1 kg Panel System LCD (Liquid Crystal Display) Panel TV System Analogue: Depending on your country...
...-F10, B-Q, F21-F69 I . Additional Information Specifications Display Unit Power Requirements: 220-240 V AC, 50 Hz Screen Size: KDF-E50A11E: 50 inches KDF-E42A11E: 42 inches Display Resolution (horizontal x vertical): 1280 dots x 720 lines Power Consumption: 175 W Standby Power Consumption: 0,8 W Dimensions (w × h × d): KDF-E50A11E: Approx. 825 x 1180 x 395 mm KDF-E42A11E: Approx. 720 x 1000 x 350 mm Weight: KDF-E50A11E: Approx. 29.6 kg KDF-E42A11E: Approx. 25.1 kg Panel System LCD (Liquid Crystal Display) Panel TV System Analogue: Depending on your country...
Operating Instructions
Page 46
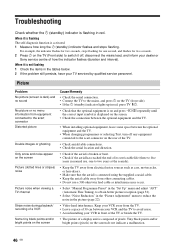
...; The picture of a display unit is composed of pixels. Picture Problem No picture (screen is dark) and no sound No picture or no menu information from other connecting cables. • Do not use , one second, and flashes for one to two years at the seaside). • Keep the TV away from electrical noise sources such as interference may occur. • Select "Manual Programme Preset" in the "Set Up" menu and adjust...
...; The picture of a display unit is composed of pixels. Picture Problem No picture (screen is dark) and no sound No picture or no menu information from other connecting cables. • Do not use , one second, and flashes for one to two years at the seaside). • Keep the TV away from electrical noise sources such as interference may occur. • Select "Manual Programme Preset" in the "Set Up" menu and adjust...
Operating Instructions
Page 47
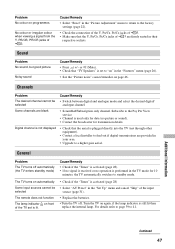
... TV turns off . Sound Problem No sound, but good picture Noisy sound Cause/Remedy • Press 2 +/- Channels Problem The desired channel cannot be selected The remote does not function The lamp indicator on programmes No colour or irregular colour when viewing a signal from the Y, PB/CB, PR/CR jacks of 3 Cause/Remedy • Select "Reset" in the "Picture Adjustment" menu to return to the factory settings (page 22). • Check the connection...
... TV turns off . Sound Problem No sound, but good picture Noisy sound Cause/Remedy • Press 2 +/- Channels Problem The desired channel cannot be selected The remote does not function The lamp indicator on programmes No colour or irregular colour when viewing a signal from the Y, PB/CB, PR/CR jacks of 3 Cause/Remedy • Select "Reset" in the "Picture Adjustment" menu to return to the factory settings (page 22). • Check the connection...
Operating Instructions
Page 48
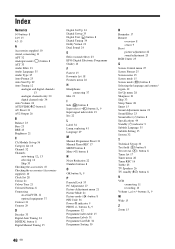
... 23 Dual Sound 24 E Effect (sound effect) 23 EPG (Digital Electronic Programme Guide) 16 F Fastext 15 Favourite list 18 Features menu 26 H Headphones connecting 37 Hue 21 I Info ( ) button 8 Input select ( ) button 8, 9 Input signal index table 19 Iris 22 L Label 32 Lamp, replacing 41 Language 29 M Manual Programme Preset 31 Manual Timer REC 17 MENU button 8 Mute (%) button 8 N Noise Reduction 22 Number buttons 8 O OK button 8, 9 P Parental Lock 35 PC Adjustment 27 Picture Adjustment menu 21 Picture Mode 21 Picture mode ( ) button 8 PIN Code 36 Power (\) indicator...
... 23 Dual Sound 24 E Effect (sound effect) 23 EPG (Digital Electronic Programme Guide) 16 F Fastext 15 Favourite list 18 Features menu 26 H Headphones connecting 37 Hue 21 I Info ( ) button 8 Input select ( ) button 8, 9 Input signal index table 19 Iris 22 L Label 32 Lamp, replacing 41 Language 29 M Manual Programme Preset 31 Manual Timer REC 17 MENU button 8 Mute (%) button 8 N Noise Reduction 22 Number buttons 8 O OK button 8, 9 P Parental Lock 35 PC Adjustment 27 Picture Adjustment menu 21 Picture Mode 21 Picture mode ( ) button 8 PIN Code 36 Power (\) indicator...


