Operating Instructions
Page 8
... noticeable during lightning storms or when unused for KDF-55WF655 or KDF-60WF655. Do not expose the screen to rain...LCD projection TV, and within 60º of the vertical and 130º of the horizontal viewing area for KDF-42WE655 or KDF50WE655, or within 55...KDF-42WE655 or KDF-50WE655, or approx. 6.8 or 7 ft. (2.1 or 2.2 m) for replacement of the obsolete outlet. 10) Protect the power cord from being walked on the LCD screen. This is a structural property of the LCD panel and is a structural property of the LCD projection TV. About the LCD projection TV Although the LCD projection TV...
... noticeable during lightning storms or when unused for KDF-55WF655 or KDF-60WF655. Do not expose the screen to rain...LCD projection TV, and within 60º of the vertical and 130º of the horizontal viewing area for KDF-42WE655 or KDF50WE655, or within 55...KDF-42WE655 or KDF-50WE655, or approx. 6.8 or 7 ft. (2.1 or 2.2 m) for replacement of the obsolete outlet. 10) Protect the power cord from being walked on the LCD screen. This is a structural property of the LCD panel and is a structural property of the LCD projection TV. About the LCD projection TV Although the LCD projection TV...
Operating Instructions
Page 9
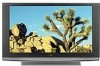
... the Sony LCD Projection TV Presenting the Sony LCD Projection TV 11 Package Contents 11 Using This Manual 11 Features 12 Enjoying Your LCD Projection TV 14 Notes on the LCD Projection TV 15 Cleaning the Screen Surface 15 Replacing the Lamp 16 Setting Up the LCD Projection TV Overview 23 LCD Projection TV Front Panel and Connectors ..24 Front Panel 24 Front and Rear Panel Connectors 26 Installing the LCD Projection TV 28 Carrying Your LCD Projection TV 28...
... the Sony LCD Projection TV Presenting the Sony LCD Projection TV 11 Package Contents 11 Using This Manual 11 Features 12 Enjoying Your LCD Projection TV 14 Notes on the LCD Projection TV 15 Cleaning the Screen Surface 15 Replacing the Lamp 16 Setting Up the LCD Projection TV Overview 23 LCD Projection TV Front Panel and Connectors ..24 Front Panel 24 Front and Rear Panel Connectors 26 Installing the LCD Projection TV 28 Carrying Your LCD Projection TV 28...
Operating Instructions
Page 13
... the best video quality for a set-top box - HDMI supports enhanced, or highdefinition video, plus multi-channel digital audio. 13 Introducing the Sony LCD Projection TV Introducing the Sony LCD Projection TV ❑ CableCARD™ slot: Provides cable subscribers with your cable TV company, is inserted into the TV's rear panel CableCARD slot. that will enable you to digitally encrypted cable channels -
... the best video quality for a set-top box - HDMI supports enhanced, or highdefinition video, plus multi-channel digital audio. 13 Introducing the Sony LCD Projection TV Introducing the Sony LCD Projection TV ❑ CableCARD™ slot: Provides cable subscribers with your cable TV company, is inserted into the TV's rear panel CableCARD slot. that will enable you to digitally encrypted cable channels -
Operating Instructions
Page 14
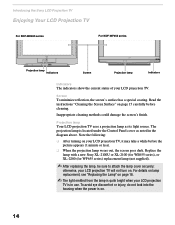
... into the housing when the power is located under the Control Panel cover as its light source. Projection lamp Your LCD projection TV uses a projection lamp as noted in use. otherwise, your LCD projection TV is in the diagram above. Note the following: ❑ After...less). ❑ When the projection lamp wears out, the screen goes dark. The projection lamp is on . Introducing the Sony LCD Projection TV Enjoying Your LCD Projection TV For KDF-WE655 series For KDF-WF655 series POWER STANDBY TIMER LAMP Projection lamp Indicators Screen Projection lamp LAMP STD/DUO PRO...
... into the housing when the power is located under the Control Panel cover as its light source. Projection lamp Your LCD projection TV uses a projection lamp as noted in use. otherwise, your LCD projection TV is in the diagram above. Note the following: ❑ After...less). ❑ When the projection lamp wears out, the screen goes dark. The projection lamp is on . Introducing the Sony LCD Projection TV Enjoying Your LCD Projection TV For KDF-WE655 series For KDF-WF655 series POWER STANDBY TIMER LAMP Projection lamp Indicators Screen Projection lamp LAMP STD/DUO PRO...
Operating Instructions
Page 17
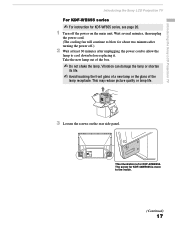
The screw for KDF-42WE655 is for KDF-50WE655. Introducing the Sony LCD Projection TV Introducing the Sony LCD Projection TV For KDF-WE655 series ✍ For instruction for KDF-WF655 series, see page 20. 1 Turn off .) 2 Wait at least 30 minutes after turning the power off the power on the rear side panel. Wait several minutes, then unplug the power cord. (The cooling fan...
The screw for KDF-42WE655 is for KDF-50WE655. Introducing the Sony LCD Projection TV Introducing the Sony LCD Projection TV For KDF-WE655 series ✍ For instruction for KDF-WF655 series, see page 20. 1 Turn off .) 2 Wait at least 30 minutes after turning the power off the power on the rear side panel. Wait several minutes, then unplug the power cord. (The cooling fan...
Operating Instructions
Page 18
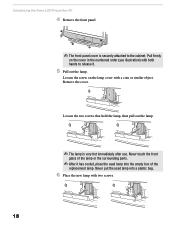
... of the replacement lamp. Never touch the front glass of the lamp or the surrounding parts. ✍ After it . 5 Pull out the lamp. Introducing the Sony LCD Projection TV 4 Remove the front panel. ✍ The front panel cover is very hot immediately after use.
... of the replacement lamp. Never touch the front glass of the lamp or the surrounding parts. ✍ After it . 5 Pull out the lamp. Introducing the Sony LCD Projection TV 4 Remove the front panel. ✍ The front panel cover is very hot immediately after use.
Operating Instructions
Page 19
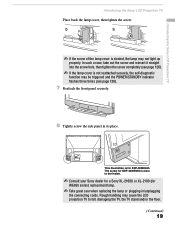
...it straight into the screw hole, then tighten the screw completely (see page 126). 7 Reattach the front panel securely. 8 Tightly screw the side panel in /unplugging the connecting cords. This illustration is not reattached securely, the self-diagnostic function may be ... The screw for KDF-42WE655 is slanted, the lamp may cause the LCD projection TV to the inside. ✍ Consult your Sony dealer for a Sony XL-2100U or XL-2100 (for KDF-50WE655. Rough handling may not light up properly. Introducing the Sony LCD Projection TV Introducing the Sony LCD Projection TV Place back the ...
...it straight into the screw hole, then tighten the screw completely (see page 126). 7 Reattach the front panel securely. 8 Tightly screw the side panel in /unplugging the connecting cords. This illustration is not reattached securely, the self-diagnostic function may be ... The screw for KDF-42WE655 is slanted, the lamp may cause the LCD projection TV to the inside. ✍ Consult your Sony dealer for a Sony XL-2100U or XL-2100 (for KDF-50WE655. Rough handling may not light up properly. Introducing the Sony LCD Projection TV Introducing the Sony LCD Projection TV Place back the ...
Operating Instructions
Page 20
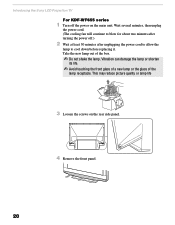
...; Do not shake the lamp. STD/DUO PRO POWER Introducing the Sony LCD Projection TV For KDF-WF655 series 1 Turn off .) 2 Wait at least 30 minutes after unplugging the power cord to allow the lamp to blow for about two minutes after turning the power off the power on the rear side panel. 20 4 Remove the front...
...; Do not shake the lamp. STD/DUO PRO POWER Introducing the Sony LCD Projection TV For KDF-WF655 series 1 Turn off .) 2 Wait at least 30 minutes after unplugging the power cord to allow the lamp to blow for about two minutes after turning the power off the power on the rear side panel. 20 4 Remove the front...
Operating Instructions
Page 22
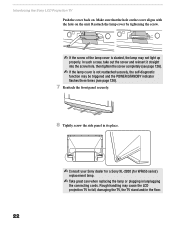
..., take out the screw and reinsert it straight into the screw hole, then tighten the screw completely (see page 126). 7 Reattach the front panel securely. Introducing the Sony LCD Projection TV Push the cover back on the unit. Make sure that the hole on the cover aligns with the hole on . Reattach the lamp cover...
..., take out the screw and reinsert it straight into the screw hole, then tighten the screw completely (see page 126). 7 Reattach the front panel securely. Introducing the Sony LCD Projection TV Push the cover back on the unit. Make sure that the hole on the cover aligns with the hole on . Reattach the lamp cover...
Operating Instructions
Page 23
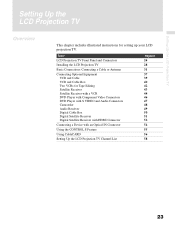
Topic LCD Projection TV Front Panel and Connectors Installing the LCD Projection TV Basic Connections: Connecting a Cable or Antenna Connecting Optional Equipment VCR and Cable VCR and Cable Box Two VCRs for setting up your LCD projection TV. Setting Up the LCD Projection TV Setting Up the LCD Projection TV Overview This chapter includes illustrated instructions for Tape Editing ...Connector Connecting a Device with an Optical IN Connector Using the CONTROL S Feature Using CableCARD Setting Up the LCD Projection TV Channel List Page(s) 24 28 31 37 39 40 42 43 44 46 47 48 49 50 51 52 54...
Topic LCD Projection TV Front Panel and Connectors Installing the LCD Projection TV Basic Connections: Connecting a Cable or Antenna Connecting Optional Equipment VCR and Cable VCR and Cable Box Two VCRs for setting up your LCD projection TV. Setting Up the LCD Projection TV Setting Up the LCD Projection TV Overview This chapter includes illustrated instructions for Tape Editing ...Connector Connecting a Device with an Optical IN Connector Using the CONTROL S Feature Using CableCARD Setting Up the LCD Projection TV Channel List Page(s) 24 28 31 37 39 40 42 43 44 46 47 48 49 50 51 52 54...
Operating Instructions
Page 24
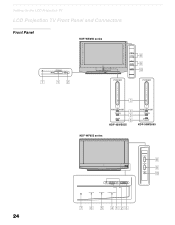
Setting Up the LCD Projection TV LCD Projection TV Front Panel and Connectors Front Panel KDF-WE655 series STD/DUO PRO 7 12 + CHANNEL 8 + VOLUME 9 POWER STANDBY TV/VIDEO q; TIMER LAMP POWER POWER 3 POWER/STANDBY TIMER LAMP 4 5 6 KDF-42WE655 POWER/STANDBY TIMER LAMP KDF-50WE655 KDF-WF655 series 24 LAMP STD/DUO PRO POWER TIMER POWER/STANDBY LAMP STD/DUO PRO POWER TIMER POWER/STANDBY 7 6 5 4123 CHANNEL 3 VOLUME 3 # TV/VIDEO 8 9 q;
Setting Up the LCD Projection TV LCD Projection TV Front Panel and Connectors Front Panel KDF-WE655 series STD/DUO PRO 7 12 + CHANNEL 8 + VOLUME 9 POWER STANDBY TV/VIDEO q; TIMER LAMP POWER POWER 3 POWER/STANDBY TIMER LAMP 4 5 6 KDF-42WE655 POWER/STANDBY TIMER LAMP KDF-50WE655 KDF-WF655 series 24 LAMP STD/DUO PRO POWER TIMER POWER/STANDBY LAMP STD/DUO PRO POWER TIMER POWER/STANDBY 7 6 5 4123 CHANNEL 3 VOLUME 3 # TV/VIDEO 8 9 q;
Operating Instructions
Page 26
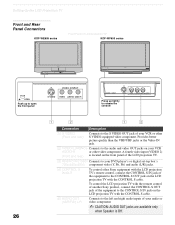
...the LCD projection TV with the remote control of another Sony product, connect the CONTROL S OUT jack of the equipment to the CONTROL S IN jack on the LCD projection TV with the CONTROL S cable. A fourth video input (VIDEO 2) (Front and rear) is located on the front panel of the LCD projection TV. ...quality than the VHF/UHF jacks or the Video IN jack. 2 VIDEO/ L(MONO)- Setting Up the LCD Projection TV Front and Rear Panel Connectors KDF-WE655 series Front Panel of LCD projection TV KDF-WF655 series VIDEO 2 INPUT S-VIDEO VIDEO L(MONO) -AUDIO-R POWER STANDBY TIMER LAMP LAMP STD/DUO...
...the LCD projection TV with the remote control of another Sony product, connect the CONTROL S OUT jack of the equipment to the CONTROL S IN jack on the LCD projection TV with the CONTROL S cable. A fourth video input (VIDEO 2) (Front and rear) is located on the front panel of the LCD projection TV. ...quality than the VHF/UHF jacks or the Video IN jack. 2 VIDEO/ L(MONO)- Setting Up the LCD Projection TV Front and Rear Panel Connectors KDF-WE655 series Front Panel of LCD projection TV KDF-WF655 series VIDEO 2 INPUT S-VIDEO VIDEO L(MONO) -AUDIO-R POWER STANDBY TIMER LAMP LAMP STD/DUO...

Operating Instructions
Page 28
When moving the LCD projection TV, place one hand in the illustration below. 28 Doing so may cause these parts to break off. Do not hold the pedestal or the front panel of the TV while grasping the top with the other hand, as shown in the hole on the lower portion of the LCD projection TV. Setting Up the LCD Projection TV Installing the LCD Projection TV Carrying Your LCD Projection TV Carrying the LCD projection TV requires at least two people. Do not grasp the pedestal or the front panel of the LCD projection TV.
When moving the LCD projection TV, place one hand in the illustration below. 28 Doing so may cause these parts to break off. Do not hold the pedestal or the front panel of the TV while grasping the top with the other hand, as shown in the hole on the lower portion of the LCD projection TV. Setting Up the LCD Projection TV Installing the LCD Projection TV Carrying Your LCD Projection TV Carrying the LCD projection TV requires at least two people. Do not grasp the pedestal or the front panel of the LCD projection TV.
Operating Instructions
Page 56
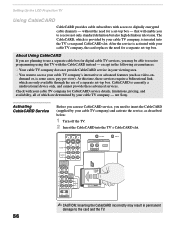
..., pricing, and availability, all of a separate set-top box. Check with your cable TV company) and activate the service, as video-on- not Sony. VIDEO IN 1 3 4 S VIDEO VIDEO L (MONO) AUDIO R HD/DVD IN... the CableCARD incorrectly may be able to the card and the TV. Setting Up the LCD Projection TV Using CableCARD CableCARD provides cable subscribers with access to receive not ...TV with your cable TV company, is provided by your cable TV company's interactive or advanced features (such as described below: 1 Turn off the TV. 2 Insert the CableCARD into the TV's rear panel...
..., pricing, and availability, all of a separate set-top box. Check with your cable TV company) and activate the service, as video-on- not Sony. VIDEO IN 1 3 4 S VIDEO VIDEO L (MONO) AUDIO R HD/DVD IN... the CableCARD incorrectly may be able to the card and the TV. Setting Up the LCD Projection TV Using CableCARD CableCARD provides cable subscribers with access to receive not ...TV with your cable TV company, is provided by your cable TV company's interactive or advanced features (such as described below: 1 Turn off the TV. 2 Insert the CableCARD into the TV's rear panel...
Operating Instructions
Page 84
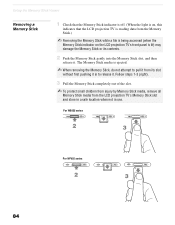
... 84 The Memory Stick media is lit) may damage the Memory Stick or its slot without first pushing it in to pull it from the LCD projection TV's Memory Stick slot and store in a safe location when not in use. Follow steps 1-3 (right). 3 Pull the Memory Stick completely out of...is off. (When the light is on, this indicates that the LCD projection TV is reading data from the Memory Stick.) ✍ Removing the Memory Stick while a file is being accessed (when the Memory Stick indicator on the LCD projection TV's front panel is ejected. ✍ When removing the Memory Stick, do not ...
... 84 The Memory Stick media is lit) may damage the Memory Stick or its slot without first pushing it in to pull it from the LCD projection TV's Memory Stick slot and store in a safe location when not in use. Follow steps 1-3 (right). 3 Pull the Memory Stick completely out of...is off. (When the light is on, this indicates that the LCD projection TV is reading data from the Memory Stick.) ✍ Removing the Memory Stick while a file is being accessed (when the Memory Stick indicator on the LCD projection TV's front panel is ejected. ✍ When removing the Memory Stick, do not ...

Operating Instructions
Page 116
... provider. 116 Press or press b to confirm each setting and move to a specific channel at two scheduled viewing times. An LED on the front panel will vary, depending on and off the Timer. (Your previous settings are saved.) 3 If you set the current time (day, hour, minute, ... 2 You can be set until you selected Program in providing information to highlight Timer 1 or Timer 2. This can use the Timers to program the LCD projection TV to the next setting. To set the Timer by day, time, duration, and channel. Current Time You can set the current time. 1 Press ...
... provider. 116 Press or press b to confirm each setting and move to a specific channel at two scheduled viewing times. An LED on the front panel will vary, depending on and off the Timer. (Your previous settings are saved.) 3 If you set the current time (day, hour, minute, ... 2 You can be set until you selected Program in providing information to highlight Timer 1 or Timer 2. This can use the Timers to program the LCD projection TV to the next setting. To set the Timer by day, time, duration, and channel. Current Time You can set the current time. 1 Press ...
Operating Instructions
Page 125
...; In the password screen (see page 102). TIMER/STANDBY LED on , then shuts off front panel is lit when the picture is not set to VCR The replacement lamp does not ❏ The... ❏ Turn on time it completely (see page 19 for KDF-WE655 series, see page 98). TV cabinet creaks ❏ When the TV is in gray, this LED will turn itself off . The ... This is set (24 or 126). How to expand or contract and may be recorded to the LCD projection TV Cannot operate Menu ❏ If a menu option appears in use a special bi-directional splitter that the...
...; In the password screen (see page 102). TIMER/STANDBY LED on , then shuts off front panel is lit when the picture is not set to VCR The replacement lamp does not ❏ The... ❏ Turn on time it completely (see page 19 for KDF-WE655 series, see page 98). TV cabinet creaks ❏ When the TV is in gray, this LED will turn itself off . The ... This is set (24 or 126). How to expand or contract and may be recorded to the LCD projection TV Cannot operate Menu ❏ If a menu option appears in use a special bi-directional splitter that the...
Operating Instructions
Page 127
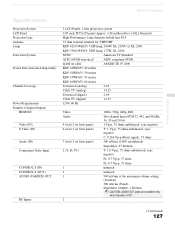
... RF Inputs 3 LCD Panels, 1 lens projection system 0.87 inch TFT LCD panel Approx. 3.28 million dots (1,042,168 pixels) High Performance, large diameter hybrid lens F2.4 75 ohm external terminal for VHF/UHF KDF-42/50 WE655: UHP lamp, 100W, XL-2100U or XL-2100 KDF-55/60 WF655: UHP lamp, 132W, XL-2200 NTSC American TV Standard ATSC...
... RF Inputs 3 LCD Panels, 1 lens projection system 0.87 inch TFT LCD panel Approx. 3.28 million dots (1,042,168 pixels) High Performance, large diameter hybrid lens F2.4 75 ohm external terminal for VHF/UHF KDF-42/50 WE655: UHP lamp, 100W, XL-2100U or XL-2100 KDF-55/60 WF655: UHP lamp, 132W, XL-2200 NTSC American TV Standard ATSC...


