Operating Instructions
Page 3
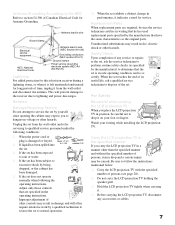
... the receiving antennas. ❑ Increase the separation between the equipment and receiver. ❑ Connect the equipment into an outlet on UHF, VHF, transmitted by one or more of important operating and maintenance (servicing) instructions in a particular installation. These types of imprints are not covered by your projection TV, keep the brightness and contrast functions at a high brightness or contrast setting, the image can be determined by turning the...
... the receiving antennas. ❑ Increase the separation between the equipment and receiver. ❑ Connect the equipment into an outlet on UHF, VHF, transmitted by one or more of important operating and maintenance (servicing) instructions in a particular installation. These types of imprints are not covered by your projection TV, keep the brightness and contrast functions at a high brightness or contrast setting, the image can be determined by turning the...
Operating Instructions
Page 4
... show poor color. If you are not of a set-top box. This television also includes a QAM demodulator which should fall inside the cabinet, unplug the LCD projection TV immediately and have it checked by qualified service personnel before turning on page 5. Never pull on the cord. ❑ For details concerning safety precautions, see "Important Safeguards" on the LCD projection TV. ❑ To obtain the best picture, do...
... show poor color. If you are not of a set-top box. This television also includes a QAM demodulator which should fall inside the cabinet, unplug the LCD projection TV immediately and have it checked by qualified service personnel before turning on page 5. Never pull on the cord. ❑ For details concerning safety precautions, see "Important Safeguards" on the LCD projection TV. ❑ To obtain the best picture, do...
Operating Instructions
Page 5
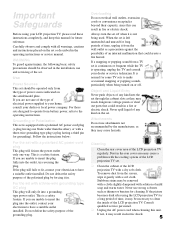
... the set. Consult qualified service personnel. ❑ Unplug the AC power cord when cleaning this can result in the installation, use strong solvents such as thinner or benzine for a long period of any kind on the serial/model plate. For those sets designed to operate from the wall outlet as they may cause a problem with the cooling system of the LCD projection TV set. ❑ Clean the...
... the set. Consult qualified service personnel. ❑ Unplug the AC power cord when cleaning this can result in the installation, use strong solvents such as thinner or benzine for a long period of any kind on the serial/model plate. For those sets designed to operate from the wall outlet as they may cause a problem with the cooling system of the LCD projection TV set. ❑ Clean the...
Operating Instructions
Page 7
... installing the LCD projection TV. Adjust only those controls that are required, be sure the service technician certifies in position, be caused. Improper adjustment of any accessories or cables. 7 Carry the LCD projection TV in the specified manner If you place the LCD projection TV in writing that he has used replacement parts specified by the manufacturer that the set does not operate normally when following conditions: ❑ When the power cord...
... installing the LCD projection TV. Adjust only those controls that are required, be sure the service technician certifies in position, be caused. Improper adjustment of any accessories or cables. 7 Carry the LCD projection TV in the specified manner If you place the LCD projection TV in writing that he has used replacement parts specified by the manufacturer that the set does not operate normally when following conditions: ❑ When the power cord...
Operating Instructions
Page 8
... LCD projection TV, and within 55º of the vertical and 125º of light (red, blue, or green) may pop inside the lamp unit. (See "Replacing the Lamp" on or pinched particularly at least 4 inches (10 cm) from the wall. ❑ Avoid installing the LCD projection TV near water. 6) Clean only with dry cloth. 7) Do not block any way, such as power-supply cord or plug is not a defect. Projection lamp ❑ Your LCD projection TV uses a projection lamp...
... LCD projection TV, and within 55º of the vertical and 125º of light (red, blue, or green) may pop inside the lamp unit. (See "Replacing the Lamp" on or pinched particularly at least 4 inches (10 cm) from the wall. ❑ Avoid installing the LCD projection TV near water. 6) Clean only with dry cloth. 7) Do not block any way, such as power-supply cord or plug is not a defect. Projection lamp ❑ Your LCD projection TV uses a projection lamp...
Operating Instructions
Page 9
... 46 DVD Player with S VIDEO and Audio Connectors 47 Camcorder 48 Audio Receiver 49 Digital Cable Box 50 Digital Satellite Receiver 51 Digital Satellite Receiver with HDMI Connector 52 Connecting a Device with an Optical IN Connector 54 Using the CONTROL S Feature 55 Using CableCARD 56 About Using CableCARD 56 Activating CableCARD Service 56 Removing the CableCARD 57 Setting Up the LCD Projection TV Channel List..58 Using Initial Setup 58 Using the Remote Control Overview 59 Inserting Batteries into the Remote Control ..........59 Button Descriptions 60 Programming the Remote...
... 46 DVD Player with S VIDEO and Audio Connectors 47 Camcorder 48 Audio Receiver 49 Digital Cable Box 50 Digital Satellite Receiver 51 Digital Satellite Receiver with HDMI Connector 52 Connecting a Device with an Optical IN Connector 54 Using the CONTROL S Feature 55 Using CableCARD 56 About Using CableCARD 56 Activating CableCARD Service 56 Removing the CableCARD 57 Setting Up the LCD Projection TV Channel List..58 Using Initial Setup 58 Using the Remote Control Overview 59 Inserting Batteries into the Remote Control ..........59 Button Descriptions 60 Programming the Remote...
Operating Instructions
Page 11
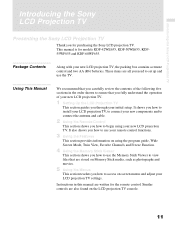
... fully understand the operation of your new LCD projection TV. 1 Setting Up the LCD Projection TV This section guides you need to begin using the program guide, Wide Screen Mode, Twin View, Favorite Channels and Freeze Function. 4 Using the Memory Stick Viewer This section shows you how to install your LCD projection TV, to connect your new LCD projection TV, the packing box contains a remote control and two AA (R6) batteries. Similar controls are written for the remote control. Instructions in the order...
... fully understand the operation of your new LCD projection TV. 1 Setting Up the LCD Projection TV This section guides you need to begin using the program guide, Wide Screen Mode, Twin View, Favorite Channels and Freeze Function. 4 Using the Memory Stick Viewer This section shows you how to install your LCD projection TV, to connect your new LCD projection TV, the packing box contains a remote control and two AA (R6) batteries. Similar controls are written for the remote control. Instructions in the order...
Operating Instructions
Page 12
... on one picture and listen to the program in the digital processing system, Composite Component Processor (CCP-X), which enhances input signal-tonoise ratio by chroma decoder digital processing. ● DRC® (Digital Reality Creation)-MF V1: Unlike conventional line doublers, the DRC Multifunction feature replaces the signal's NTSC waveform with your LCD projection TV screen. ❑ Parental Control: V-Chip technology allows parents to watch pictures from younger...
... on one picture and listen to the program in the digital processing system, Composite Component Processor (CCP-X), which enhances input signal-tonoise ratio by chroma decoder digital processing. ● DRC® (Digital Reality Creation)-MF V1: Unlike conventional line doublers, the DRC Multifunction feature replaces the signal's NTSC waveform with your LCD projection TV screen. ❑ Parental Control: V-Chip technology allows parents to watch pictures from younger...
Operating Instructions
Page 13
... your cable TV company, the card replaces the need for a separate set top box, DVD player, and A/V receiver. Introducing the Sony LCD Projection TV Introducing the Sony LCD Projection TV ❑ CableCARD™ slot: Provides cable subscribers with your cable TV company, is consistent output between programs and commercials. ❑ HDMI (High-Definition Multimedia Interface): Provides an uncompressed, all-digital audio/video interface between this manual, see page 56.) ❑ Component Video Inputs: Offers the best video quality for DVD (480p, 480i) and digital set-top box...
... your cable TV company, the card replaces the need for a separate set top box, DVD player, and A/V receiver. Introducing the Sony LCD Projection TV Introducing the Sony LCD Projection TV ❑ CableCARD™ slot: Provides cable subscribers with your cable TV company, is consistent output between programs and commercials. ❑ HDMI (High-Definition Multimedia Interface): Provides an uncompressed, all-digital audio/video interface between this manual, see page 56.) ❑ Component Video Inputs: Offers the best video quality for DVD (480p, 480i) and digital set-top box...
Operating Instructions
Page 14
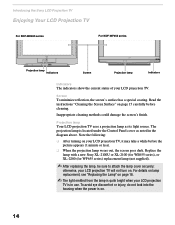
... when the power is located under the Control Panel cover as its light source. Introducing the Sony LCD Projection TV Enjoying Your LCD Projection TV For KDF-WE655 series For KDF-WF655 series POWER STANDBY TIMER LAMP Projection lamp Indicators Screen Projection lamp LAMP STD/DUO PRO POWER TIMER POWER/STANDBY Indicators Indicators The indicators show the current status of your LCD projection TV is in the diagram above. Read the instructions "Cleaning the Screen Surface" on . 14 The projection lamp is on page 15 carefully before the picture appears (1 minute...
... when the power is located under the Control Panel cover as its light source. Introducing the Sony LCD Projection TV Enjoying Your LCD Projection TV For KDF-WE655 series For KDF-WF655 series POWER STANDBY TIMER LAMP Projection lamp Indicators Screen Projection lamp LAMP STD/DUO PRO POWER TIMER POWER/STANDBY Indicators Indicators The indicators show the current status of your LCD projection TV is in the diagram above. Read the instructions "Cleaning the Screen Surface" on . 14 The projection lamp is on page 15 carefully before the picture appears (1 minute...
Operating Instructions
Page 17
... power cord to allow the lamp to the inside. (Continued) 17 Vibration can damage the lamp or shorten its life. ✍ Avoid touching the front glass of a new lamp or the glass of the box. ✍ Do not shake the lamp. Introducing the Sony LCD Projection TV Introducing the Sony LCD Projection TV For KDF-WE655 series ✍ For instruction for KDF-42WE655 is for about two minutes after turning the power...
... power cord to allow the lamp to the inside. (Continued) 17 Vibration can damage the lamp or shorten its life. ✍ Avoid touching the front glass of a new lamp or the glass of the box. ✍ Do not shake the lamp. Introducing the Sony LCD Projection TV Introducing the Sony LCD Projection TV For KDF-WE655 series ✍ For instruction for KDF-42WE655 is for about two minutes after turning the power...
Operating Instructions
Page 20
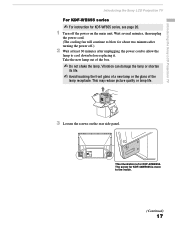
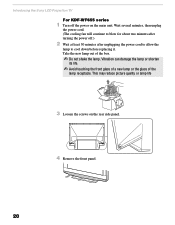
... the lamp receptacle. This may reduce picture quality or lamp life 3 Loosen the screws on the main unit. STD/DUO PRO POWER Introducing the Sony LCD Projection TV For KDF-WF655 series 1 Turn off .) 2 Wait at least 30 minutes after unplugging the power cord to allow the lamp to blow for about two minutes after turning the power off the power on the rear side panel. 20 4 Remove the front panel.
... the lamp receptacle. This may reduce picture quality or lamp life 3 Loosen the screws on the main unit. STD/DUO PRO POWER Introducing the Sony LCD Projection TV For KDF-WF655 series 1 Turn off .) 2 Wait at least 30 minutes after unplugging the power cord to allow the lamp to blow for about two minutes after turning the power off the power on the rear side panel. 20 4 Remove the front panel.
Operating Instructions
Page 26
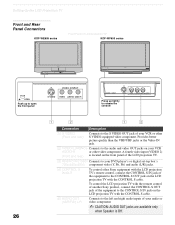
A fourth video input (VIDEO 2) (Front and rear) is located on the front panel of the LCD projection TV. 3 HD/DVD IN (1080i/ Connects to your DVD player's or digital set-top box's 720p/480p/480i) component video (Y, PB, PR) and audio (L/R) jacks. 4 CONTROL S IN/OUT To control other Sony equipment with the LCD projection TV's remote control, connect the CONTROL S IN jack of the equipment to the CONTROL S OUT jack on the LCD projection TV with the CONTROL S cable. 5 AUDIO OUT (VAR/FIX) L/R Connects to the left and...
A fourth video input (VIDEO 2) (Front and rear) is located on the front panel of the LCD projection TV. 3 HD/DVD IN (1080i/ Connects to your DVD player's or digital set-top box's 720p/480p/480i) component video (Y, PB, PR) and audio (L/R) jacks. 4 CONTROL S IN/OUT To control other Sony equipment with the LCD projection TV's remote control, connect the CONTROL S IN jack of the equipment to the CONTROL S OUT jack on the LCD projection TV with the CONTROL S cable. 5 AUDIO OUT (VAR/FIX) L/R Connects to the left and...
Operating Instructions
Page 27
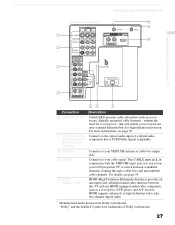
... the need for a set -top box, DVD player, and A/V receiver. HDMI (High-Definition Multimedia Interface) provides an uncompressed, all-digital audio/video interface between scrambled channels (coming through a cable box) and unscrambled cable channels. This CABLE input jack, in conjunction with access to secure, digitally encrypted cable channels - Connects to your VHF/UHF antenna or cable box output jack. Setting Up the LCD Projection TV Setting Up the LCD Projection TV 1 2 3 4 Rear of LCD projection TV VIDEO IN 1 3 4 S VIDEO 7 VHF/UHF VIDEO L (MONO) AUDIO R HD/DVD IN...
... the need for a set -top box, DVD player, and A/V receiver. HDMI (High-Definition Multimedia Interface) provides an uncompressed, all-digital audio/video interface between scrambled channels (coming through a cable box) and unscrambled cable channels. This CABLE input jack, in conjunction with access to secure, digitally encrypted cable channels - Connects to your VHF/UHF antenna or cable box output jack. Setting Up the LCD Projection TV Setting Up the LCD Projection TV 1 2 3 4 Rear of LCD projection TV VIDEO IN 1 3 4 S VIDEO 7 VHF/UHF VIDEO L (MONO) AUDIO R HD/DVD IN...
Operating Instructions
Page 67
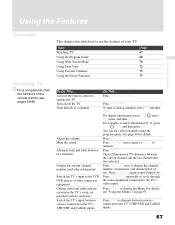
... a channel Adjust the volume Mute the sound Alternate back and forth between two channels Display the current channel number (and other information) Switch the TV's input to use the features of the remote control, see "Using the Menus" on /off . Activate the remote control to display the Menu. Using the Features Using the Features Overview Watching TV z For a complete list of all the functions of your TV. Topic Watching TV Using the Program Guide Using Wide Screen Mode Using Twin View Using Favorite Channels Using the...
... a channel Adjust the volume Mute the sound Alternate back and forth between two channels Display the current channel number (and other information) Switch the TV's input to use the features of the remote control, see "Using the Menus" on /off . Activate the remote control to display the Menu. Using the Features Using the Features Overview Watching TV z For a complete list of all the functions of your TV. Topic Watching TV Using the Program Guide Using Wide Screen Mode Using Twin View Using Favorite Channels Using the...
Operating Instructions
Page 119
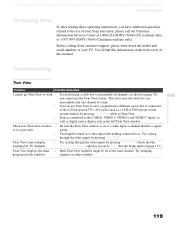
... changing program in both windows channels in the left Twin View window. Troubleshooting Twin View Problem Possible Remedies I cannot get Twin View to work ❏ If you are using a cable box to unscramble all channels (as digital source display only in either window. Check that the anything but TV channels Label Video Inputs option is connected to the LCD projection TV's A/V jacks (such as a VCR or DVD player) in the second window by pressing TV/VIDEO. Twin View cannot display...
... changing program in both windows channels in the left Twin View window. Troubleshooting Twin View Problem Possible Remedies I cannot get Twin View to work ❏ If you are using a cable box to unscramble all channels (as digital source display only in either window. Check that the anything but TV channels Label Video Inputs option is connected to the LCD projection TV's A/V jacks (such as a VCR or DVD player) in the second window by pressing TV/VIDEO. Twin View cannot display...
Operating Instructions
Page 123
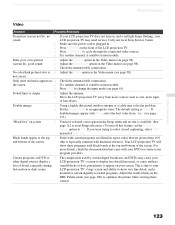
... reset Setup selections.) To turn on, and a red light keeps flashing, your sound LCD projection TV may solve the problem. ❏ Set the Image Shift to an appropriate value. Black bands appear at the top and bottom of the screen (this feature, set the Caption Vision option to appear on DVD or ❏ The compression used by certain digital broadcasts and DVDs may cause your screen. it could be station trouble. Call your program provider). Dark...
... reset Setup selections.) To turn on, and a red light keeps flashing, your sound LCD projection TV may solve the problem. ❏ Set the Image Shift to an appropriate value. Black bands appear at the top and bottom of the screen (this feature, set the Caption Vision option to appear on DVD or ❏ The compression used by certain digital broadcasts and DVDs may cause your screen. it could be station trouble. Call your program provider). Dark...
Operating Instructions
Page 124
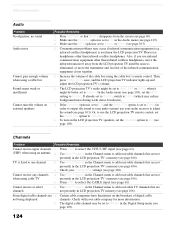
... input (see page 61). (UHF) when using the cable box's remote control. If already set to Stereo, switch to Mono (which may be better set to Hidden in LCD projection TV memory (see page 106). Cannot receive or select ❏ Use Auto Program in the Channel menu to add receivable channels that are not presently in the Channel menu to adjust the sound (see page 103). TV is fixed to one channel ❏ Use Auto Program in the Channel menu to add receivable TV channels...
... input (see page 61). (UHF) when using the cable box's remote control. If already set to Stereo, switch to Mono (which may be better set to Hidden in LCD projection TV memory (see page 106). Cannot receive or select ❏ Use Auto Program in the Channel menu to add receivable channels that are not presently in the Channel menu to adjust the sound (see page 103). TV is fixed to one channel ❏ Use Auto Program in the Channel menu to add receivable TV channels...
Operating Instructions
Page 130
... View screen 72 Adding channels to the channel list 107 Adjusting audio, Steady Sound 102 Advanced Video 100 Alternate Audio 69 Alternate Video 69 ANT button 61 Antenna, connecting 31, 32 Audio Menu 97, 102 Audio receiver, connecting 49 Auto Program (channel setup) 58 B Balance, adjusting 102 Bass, adjusting 102 Batteries, inserting in Twin View 74 ENT button 60 error messages, Memory Stick 122 F Favorite Channel setting up 58 Clock/Timers 115 closed caption modes 97, 112 Color temperature, adjusting 99 Color, adjusting 98 Connecting Audio receiver 49 Cable box 40 Cable or antenna 32...
... View screen 72 Adding channels to the channel list 107 Adjusting audio, Steady Sound 102 Advanced Video 100 Alternate Audio 69 Alternate Video 69 ANT button 61 Antenna, connecting 31, 32 Audio Menu 97, 102 Audio receiver, connecting 49 Auto Program (channel setup) 58 B Balance, adjusting 102 Bass, adjusting 102 Batteries, inserting in Twin View 74 ENT button 60 error messages, Memory Stick 122 F Favorite Channel setting up 58 Clock/Timers 115 closed caption modes 97, 112 Color temperature, adjusting 99 Color, adjusting 98 Connecting Audio receiver 49 Cable box 40 Cable or antenna 32...

Operating Instructions
Page 131
... Password, changing 109 PICTURE button 60 Picture contrast, adjusting 98 Picture size, adjusting in Twin View 74 POWER ON/STAND BY indicator 25, 126 POWER/STANDBY 126 problems, troubleshooting 119- 125 Program Guide 69 Program Options menu 69 progressive 118 Protect 88 R Ratings setting 110 viewing blocked programs 109 Rear panel controls and connections 27 Remote control inserting batteries 59 programming 62-63 Removing channels from the channel list 107 RESET button 60 Resetting Audio options 102 Video options 98 S Satellite receiver connecting 43 using with TV remote control 64 Screen Menu...
... Password, changing 109 PICTURE button 60 Picture contrast, adjusting 98 Picture size, adjusting in Twin View 74 POWER ON/STAND BY indicator 25, 126 POWER/STANDBY 126 problems, troubleshooting 119- 125 Program Guide 69 Program Options menu 69 progressive 118 Protect 88 R Ratings setting 110 viewing blocked programs 109 Rear panel controls and connections 27 Remote control inserting batteries 59 programming 62-63 Removing channels from the channel list 107 RESET button 60 Resetting Audio options 102 Video options 98 S Satellite receiver connecting 43 using with TV remote control 64 Screen Menu...


