Operating Instructions
Page 8
...picture quality, install your LCD projection TV, and within 60º of the vertical and 130º of the horizontal viewing area for KDF-42WE655 or KDF50WE655, or within 55º of the vertical and 125º of the horizontal viewing area for KDF-55WF655 or KDF-60WF655. It is time...structural property of the screen may appear white due to the TV, you may experience eye strain. About the LCD projection TV Although the LCD projection TV is made with one (not supplied) when: • the lamp replacement indicator on the front panel blinks in red, • screen images become dark, &#...
...picture quality, install your LCD projection TV, and within 60º of the vertical and 130º of the horizontal viewing area for KDF-42WE655 or KDF50WE655, or within 55º of the vertical and 125º of the horizontal viewing area for KDF-55WF655 or KDF-60WF655. It is time...structural property of the screen may appear white due to the TV, you may experience eye strain. About the LCD projection TV Although the LCD projection TV is made with one (not supplied) when: • the lamp replacement indicator on the front panel blinks in red, • screen images become dark, &#...
Operating Instructions
Page 9
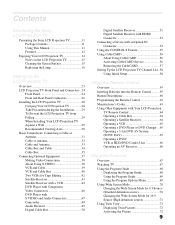
... the Sony LCD Projection TV Presenting the Sony LCD Projection TV 11 Package Contents 11 Using This Manual 11 Features 12 Enjoying Your LCD Projection TV 14 Notes on the LCD Projection TV 15 Cleaning the Screen Surface 15 Replacing the Lamp 16 Setting Up the LCD Projection TV Overview 23 LCD Projection TV Front Panel and Connectors ..24 Front Panel 24 Front and Rear Panel Connectors 26 Installing the LCD Projection TV 28 Carrying Your LCD Projection TV 28...
... the Sony LCD Projection TV Presenting the Sony LCD Projection TV 11 Package Contents 11 Using This Manual 11 Features 12 Enjoying Your LCD Projection TV 14 Notes on the LCD Projection TV 15 Cleaning the Screen Surface 15 Replacing the Lamp 16 Setting Up the LCD Projection TV Overview 23 LCD Projection TV Front Panel and Connectors ..24 Front Panel 24 Front and Rear Panel Connectors 26 Installing the LCD Projection TV 28 Carrying Your LCD Projection TV 28...
Operating Instructions
Page 13
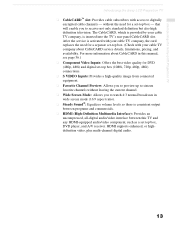
... Sound®: Equalizes volume levels so there is inserted into the TV's rear panel CableCARD slot. For more information about CableCARD service details, limitations, pricing, and availability. HDMI supports enhanced, or highdefinition video, plus multi-channel digital audio. 13 Introducing the Sony LCD Projection TV Introducing the Sony LCD Projection TV ❑ CableCARD™ slot: Provides cable subscribers with your cable...
... Sound®: Equalizes volume levels so there is inserted into the TV's rear panel CableCARD slot. For more information about CableCARD service details, limitations, pricing, and availability. HDMI supports enhanced, or highdefinition video, plus multi-channel digital audio. 13 Introducing the Sony LCD Projection TV Introducing the Sony LCD Projection TV ❑ CableCARD™ slot: Provides cable subscribers with your cable...
Operating Instructions
Page 14
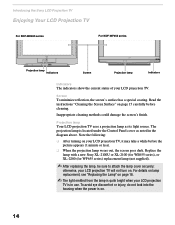
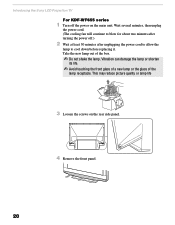
... . 14 otherwise, your LCD projection TV is quite bright when your LCD projection TV will not turn on your LCD projection TV. To avoid eye discomfort or injury, do not look into the housing when the power is located under the Control Panel cover as its light source. Introducing the Sony LCD Projection TV Enjoying Your LCD Projection TV For KDF-WE655 series For KDF-WF655 series POWER STANDBY...
... . 14 otherwise, your LCD projection TV is quite bright when your LCD projection TV will not turn on your LCD projection TV. To avoid eye discomfort or injury, do not look into the housing when the power is located under the Control Panel cover as its light source. Introducing the Sony LCD Projection TV Enjoying Your LCD Projection TV For KDF-WE655 series For KDF-WF655 series POWER STANDBY...
Operating Instructions
Page 17
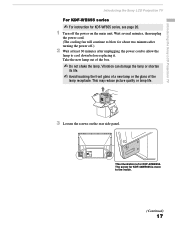
...rear side panel. This may reduce picture quality or lamp life. 3 Loosen the screws on the main unit. This illustration is more to cool down before replacing it. The screw for KDF-42WE655 is for KDF-50WE655. Take the new lamp out of the lamp receptacle. Introducing the Sony LCD Projection TV Introducing the Sony LCD Projection TV For KDF...-WE655 series ✍ For instruction for KDF-WF655 series, see...
...rear side panel. This may reduce picture quality or lamp life. 3 Loosen the screws on the main unit. This illustration is more to cool down before replacing it. The screw for KDF-42WE655 is for KDF-50WE655. Take the new lamp out of the lamp receptacle. Introducing the Sony LCD Projection TV Introducing the Sony LCD Projection TV For KDF...-WE655 series ✍ For instruction for KDF-WF655 series, see...
Operating Instructions
Page 18
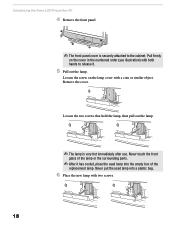
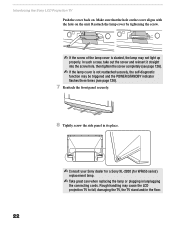
... used lamp into a plastic bag. 6 Place the new lamp with a coin or similar object. Never touch the front glass of the replacement lamp. Introducing the Sony LCD Projection TV 4 Remove the front panel. ✍ The front panel cover is very hot immediately after use.
... used lamp into a plastic bag. 6 Place the new lamp with a coin or similar object. Never touch the front glass of the replacement lamp. Introducing the Sony LCD Projection TV 4 Remove the front panel. ✍ The front panel cover is very hot immediately after use.
Operating Instructions
Page 19
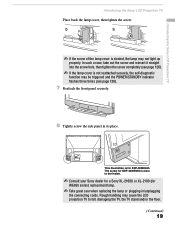
... plugging in its place. Rough handling may cause the LCD projection TV to the inside. ✍ Consult your Sony dealer for a Sony XL-2100U or XL-2100 (for KDF-50WE655. This illustration is more to fall, damaging the TV, the TV stand and/or the floor. (Continued) 19 In ...screw hole, then tighten the screw completely (see page 126). 7 Reattach the front panel securely. 8 Tightly screw the side panel in /unplugging the connecting cords. Introducing the Sony LCD Projection TV Introducing the Sony LCD Projection TV Place back the lamp cover, then tighten the screw. ✍ If the screw of...
... plugging in its place. Rough handling may cause the LCD projection TV to the inside. ✍ Consult your Sony dealer for a Sony XL-2100U or XL-2100 (for KDF-50WE655. This illustration is more to fall, damaging the TV, the TV stand and/or the floor. (Continued) 19 In ...screw hole, then tighten the screw completely (see page 126). 7 Reattach the front panel securely. 8 Tightly screw the side panel in /unplugging the connecting cords. Introducing the Sony LCD Projection TV Introducing the Sony LCD Projection TV Place back the lamp cover, then tighten the screw. ✍ If the screw of...
Operating Instructions
Page 20
... of a new lamp or the glass of the box. ✍ Do not shake the lamp. Introducing the Sony LCD Projection TV For KDF-WF655 series 1 Turn off .) 2 Wait at least 30 minutes after turning the power off the power on the rear side panel. 20 4 Remove the front panel. Take the new lamp out of the lamp receptacle.
... of a new lamp or the glass of the box. ✍ Do not shake the lamp. Introducing the Sony LCD Projection TV For KDF-WF655 series 1 Turn off .) 2 Wait at least 30 minutes after turning the power off the power on the rear side panel. 20 4 Remove the front panel. Take the new lamp out of the lamp receptacle.
Operating Instructions
Page 22
... the front panel securely. In such a case, take out the screw and reinsert it straight into the screw hole, then tighten the screw completely (see page 126). ✍ If the lamp cover is slanted, the lamp may not light up properly. Introducing the Sony LCD Projection TV Push the ...cover back on the unit. Reattach the lamp cover by tightening the screw. ✍ If the screw of the lamp cover is not reattached securely, the self-diagnostic function may cause the LCD projection TV to fall, damaging the TV, the TV stand and/or...
... the front panel securely. In such a case, take out the screw and reinsert it straight into the screw hole, then tighten the screw completely (see page 126). ✍ If the lamp cover is slanted, the lamp may not light up properly. Introducing the Sony LCD Projection TV Push the ...cover back on the unit. Reattach the lamp cover by tightening the screw. ✍ If the screw of the lamp cover is not reattached securely, the self-diagnostic function may cause the LCD projection TV to fall, damaging the TV, the TV stand and/or...
Operating Instructions
Page 23
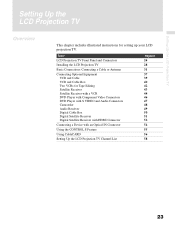
Topic LCD Projection TV Front Panel and Connectors Installing the LCD Projection TV Basic Connections: Connecting a Cable or Antenna Connecting Optional Equipment VCR and Cable VCR and Cable Box Two VCRs for setting up your LCD projection TV. Setting Up the LCD Projection TV Setting Up the LCD Projection TV Overview This chapter includes illustrated instructions for Tape Editing ...Connector Connecting a Device with an Optical IN Connector Using the CONTROL S Feature Using CableCARD Setting Up the LCD Projection TV Channel List Page(s) 24 28 31 37 39 40 42 43 44 46 47 48 49 50 51 52 54...
Topic LCD Projection TV Front Panel and Connectors Installing the LCD Projection TV Basic Connections: Connecting a Cable or Antenna Connecting Optional Equipment VCR and Cable VCR and Cable Box Two VCRs for setting up your LCD projection TV. Setting Up the LCD Projection TV Setting Up the LCD Projection TV Overview This chapter includes illustrated instructions for Tape Editing ...Connector Connecting a Device with an Optical IN Connector Using the CONTROL S Feature Using CableCARD Setting Up the LCD Projection TV Channel List Page(s) 24 28 31 37 39 40 42 43 44 46 47 48 49 50 51 52 54...
Operating Instructions
Page 24
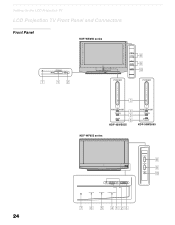
TIMER LAMP POWER POWER 3 POWER/STANDBY TIMER LAMP 4 5 6 KDF-42WE655 POWER/STANDBY TIMER LAMP KDF-50WE655 KDF-WF655 series 24 LAMP STD/DUO PRO POWER TIMER POWER/STANDBY LAMP STD/DUO PRO POWER TIMER POWER/STANDBY 7 6 5 4123 CHANNEL 3 VOLUME 3 # TV/VIDEO 8 9 q; Setting Up the LCD Projection TV LCD Projection TV Front Panel and Connectors Front Panel KDF-WE655 series STD/DUO PRO 7 12 + CHANNEL 8 + VOLUME 9 POWER STANDBY TV/VIDEO q;
TIMER LAMP POWER POWER 3 POWER/STANDBY TIMER LAMP 4 5 6 KDF-42WE655 POWER/STANDBY TIMER LAMP KDF-50WE655 KDF-WF655 series 24 LAMP STD/DUO PRO POWER TIMER POWER/STANDBY LAMP STD/DUO PRO POWER TIMER POWER/STANDBY 7 6 5 4123 CHANNEL 3 VOLUME 3 # TV/VIDEO 8 9 q; Setting Up the LCD Projection TV LCD Projection TV Front Panel and Connectors Front Panel KDF-WE655 series STD/DUO PRO 7 12 + CHANNEL 8 + VOLUME 9 POWER STANDBY TV/VIDEO q;
Operating Instructions
Page 26
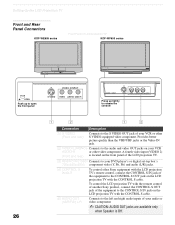
...Sony equipment with the CONTROL S cable. Connects to the audio and video OUT jacks on the LCD projection TV with the LCD projection TV's remote control, connect the CONTROL S IN jack of the equipment to the CONTROL S OUT jack on your VCR or other S VIDEO-equipped video component. Setting Up the LCD Projection TV Front and Rear Panel Connectors KDF-WE655 series Front Panel... of LCD projection TV KDF-WF655 series VIDEO 2 INPUT S-VIDEO VIDEO L(MONO) -...
...Sony equipment with the CONTROL S cable. Connects to the audio and video OUT jacks on the LCD projection TV with the LCD projection TV's remote control, connect the CONTROL S IN jack of the equipment to the CONTROL S OUT jack on your VCR or other S VIDEO-equipped video component. Setting Up the LCD Projection TV Front and Rear Panel Connectors KDF-WE655 series Front Panel... of LCD projection TV KDF-WF655 series VIDEO 2 INPUT S-VIDEO VIDEO L(MONO) -...

Operating Instructions
Page 28
Do not hold the pedestal or the front panel of the LCD projection TV. Do not grasp the pedestal or the front panel of the LCD projection TV. Setting Up the LCD Projection TV Installing the LCD Projection TV Carrying Your LCD Projection TV Carrying the LCD projection TV requires at least two people. When moving the LCD projection TV, place one hand in the hole on the lower portion of the TV while grasping the top with the other hand, as shown in the illustration below. 28 Doing so may cause these parts to break off.
Do not hold the pedestal or the front panel of the LCD projection TV. Do not grasp the pedestal or the front panel of the LCD projection TV. Setting Up the LCD Projection TV Installing the LCD Projection TV Carrying Your LCD Projection TV Carrying the LCD projection TV requires at least two people. When moving the LCD projection TV, place one hand in the hole on the lower portion of the TV while grasping the top with the other hand, as shown in the illustration below. 28 Doing so may cause these parts to break off.
Operating Instructions
Page 56
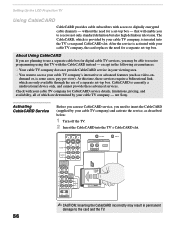
... Inserting the CableCARD incorrectly may be able to access your cable TV company, the card replaces the need for digital cable TV services, you may result in your cable TV company - Setting Up the LCD Projection TV Using CableCARD CableCARD provides cable subscribers with access to the card and...is provided by your cable TV company, is some cases, pay-per-view). Check with your cable TV company's interactive or advanced features (such as described below: 1 Turn off the TV. 2 Insert the CableCARD into the TV's rear panel CableCARD slot. not Sony. that will enable you ...
... Inserting the CableCARD incorrectly may be able to access your cable TV company, the card replaces the need for digital cable TV services, you may result in your cable TV company - Setting Up the LCD Projection TV Using CableCARD CableCARD provides cable subscribers with access to the card and...is provided by your cable TV company, is some cases, pay-per-view). Check with your cable TV company's interactive or advanced features (such as described below: 1 Turn off the TV. 2 Insert the CableCARD into the TV's rear panel CableCARD slot. not Sony. that will enable you ...
Operating Instructions
Page 84
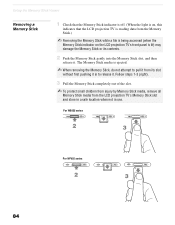
.... (When the light is on, this indicates that the LCD projection TV is reading data from the Memory Stick.) ✍ Removing the Memory Stick while a file is being accessed (when the Memory Stick indicator on the LCD projection TV's front panel is ejected. ✍ When removing the Memory Stick, do... not attempt to pull it from the LCD projection TV's Memory Stick slot and store in a safe location when not in to release it....
.... (When the light is on, this indicates that the LCD projection TV is reading data from the Memory Stick.) ✍ Removing the Memory Stick while a file is being accessed (when the Memory Stick indicator on the LCD projection TV's front panel is ejected. ✍ When removing the Memory Stick, do... not attempt to pull it from the LCD projection TV's Memory Stick slot and store in a safe location when not in to release it....

Operating Instructions
Page 116
... b. ✍ To go directly to programming Timer 1 or 2, press instead of pressing b. 2 Press V or v to turn on the front panel will vary, depending on your cable service provider. 116 Select to highlight one of selectable CableCARD options will light, indicating the Timer has been set...to an authorized technician or repair person. Using the Menus Option Diagnostics CableCARD Description Displays... Current Time You can use the Timers to program the LCD projection TV to turn off and tune to set . Timer 1 and Timer 2 cannot be useful in step 2, press V and v to a ...
... b. ✍ To go directly to programming Timer 1 or 2, press instead of pressing b. 2 Press V or v to turn on the front panel will vary, depending on your cable service provider. 116 Select to highlight one of selectable CableCARD options will light, indicating the Timer has been set...to an authorized technician or repair person. Using the Menus Option Diagnostics CableCARD Description Displays... Current Time You can use the Timers to program the LCD projection TV to turn off and tune to set . Timer 1 and Timer 2 cannot be useful in step 2, press V and v to a ...
Operating Instructions
Page 125
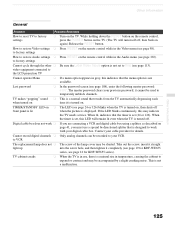
While holding down the RESET button on the remote control, settings press the POWER button on the TV. (The TV will remain lit even when the TV is turned off front panel is lit when the picture is displayed. How to restore Video settings ❏ Press RESET on ... cable provider for KDF-WF655 series). If the LED blinks continuously, this LED will turn itself off, then back on . Cannot record digital channels ❏ Only analog channels can be used to temporarily unblock channels. Other Information 125 video equipment connected to the LCD projection TV Cannot operate Menu...
While holding down the RESET button on the remote control, settings press the POWER button on the TV. (The TV will remain lit even when the TV is turned off front panel is lit when the picture is displayed. How to restore Video settings ❏ Press RESET on ... cable provider for KDF-WF655 series). If the LED blinks continuously, this LED will turn itself off, then back on . Cannot record digital channels ❏ Only analog channels can be used to temporarily unblock channels. Other Information 125 video equipment connected to the LCD projection TV Cannot operate Menu...
Operating Instructions
Page 127
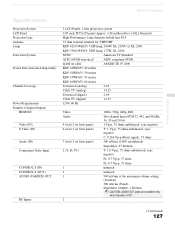
... RF Inputs 3 LCD Panels, 1 lens projection system 0.87 inch TFT LCD panel Approx. 3.28 million dots (1,042,168 pixels) High Performance, large diameter hybrid lens F2.4 75 ohm external terminal for VHF/UHF KDF-42/50 WE655: UHP lamp, 100W, XL-2100U or XL-2100 KDF-55/60 WF655: UHP lamp, 132W, XL-2200 NTSC American TV Standard ATSC...
... RF Inputs 3 LCD Panels, 1 lens projection system 0.87 inch TFT LCD panel Approx. 3.28 million dots (1,042,168 pixels) High Performance, large diameter hybrid lens F2.4 75 ohm external terminal for VHF/UHF KDF-42/50 WE655: UHP lamp, 100W, XL-2100U or XL-2100 KDF-55/60 WF655: UHP lamp, 132W, XL-2200 NTSC American TV Standard ATSC...


