Operating Instructions
Page 8
... LCD projection TV, and within 55º of the vertical and 125º of light (red, blue, or green) may appear constantly on page 16.) ❑ When the lamp eventually burns out, you may be more noticeable during lightning storms or when unused for KDF-55WF655 or KDF-60WF655. If you sit too close to replace the lamp with...
... LCD projection TV, and within 55º of the vertical and 125º of light (red, blue, or green) may appear constantly on page 16.) ❑ When the lamp eventually burns out, you may be more noticeable during lightning storms or when unused for KDF-55WF655 or KDF-60WF655. If you sit too close to replace the lamp with...
Operating Instructions
Page 9
...Sony LCD Projection TV Presenting the Sony LCD Projection TV 11 Package Contents 11 Using This Manual 11 Features 12 Enjoying Your LCD Projection TV 14 Notes on the LCD Projection TV 15 Cleaning the Screen Surface 15 Replacing the Lamp 16 Setting Up the LCD Projection TV Overview 23 LCD Projection TV Front Panel and Connectors ..24 Front Panel 24 Front and Rear... Connector 54 Using the CONTROL S Feature 55 Using CableCARD 56 About Using CableCARD 56 Activating CableCARD Service 56 Removing the CableCARD 57 Setting Up the LCD Projection TV Channel List..58 Using Initial Setup 58 ...
...Sony LCD Projection TV Presenting the Sony LCD Projection TV 11 Package Contents 11 Using This Manual 11 Features 12 Enjoying Your LCD Projection TV 14 Notes on the LCD Projection TV 15 Cleaning the Screen Surface 15 Replacing the Lamp 16 Setting Up the LCD Projection TV Overview 23 LCD Projection TV Front Panel and Connectors ..24 Front Panel 24 Front and Rear... Connector 54 Using the CONTROL S Feature 55 Using CableCARD 56 About Using CableCARD 56 Activating CableCARD Service 56 Removing the CableCARD 57 Setting Up the LCD Projection TV Channel List..58 Using Initial Setup 58 ...
Operating Instructions
Page 14
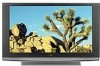
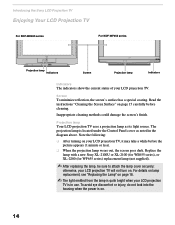
...) replacement lamp (not supplied). ✍ After replacing the lamp, be sure to attach the lamp cover securely; Inappropriate cleaning methods could damage the screen's finish. The projection lamp is located under the Control Panel cover as its light source. Introducing the Sony LCD Projection TV Enjoying Your LCD Projection TV For KDF-WE655 series For KDF-WF655 series POWER STANDBY TIMER LAMP Projection lamp Indicators Screen Projection lamp LAMP STD...
...) replacement lamp (not supplied). ✍ After replacing the lamp, be sure to attach the lamp cover securely; Inappropriate cleaning methods could damage the screen's finish. The projection lamp is located under the Control Panel cover as its light source. Introducing the Sony LCD Projection TV Enjoying Your LCD Projection TV For KDF-WE655 series For KDF-WF655 series POWER STANDBY TIMER LAMP Projection lamp Indicators Screen Projection lamp LAMP STD...
Operating Instructions
Page 16
Introducing the Sony LCD Projection TV Replacing the Lamp The projection lamp, which illuminates the picture, has a limited life. The surface of the lamp remains extremely hot for any purpose other lamp may cause injury or fire. ❑ Before replacing the lamp, turn the power off .) ❑ Allow the lamp to go dark. ❑ Do not touch the glass of the new lamp with...
Introducing the Sony LCD Projection TV Replacing the Lamp The projection lamp, which illuminates the picture, has a limited life. The surface of the lamp remains extremely hot for any purpose other lamp may cause injury or fire. ❑ Before replacing the lamp, turn the power off .) ❑ Allow the lamp to go dark. ❑ Do not touch the glass of the new lamp with...
Operating Instructions
Page 17
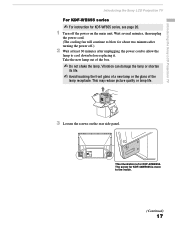
... main unit. Introducing the Sony LCD Projection TV Introducing the Sony LCD Projection TV For KDF-WE655 series ✍ For instruction for KDF-50WE655. This illustration is more to cool down before replacing it. The screw for about two minutes after turning the power off the power on the rear side panel. Vibration can damage the lamp or shorten its life...
... main unit. Introducing the Sony LCD Projection TV Introducing the Sony LCD Projection TV For KDF-WE655 series ✍ For instruction for KDF-50WE655. This illustration is more to cool down before replacing it. The screw for about two minutes after turning the power off the power on the rear side panel. Vibration can damage the lamp or shorten its life...
Operating Instructions
Page 18
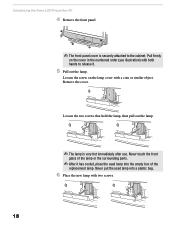
... or similar object. Loosen the two screws that hold the lamp, then pull out the lamp. ✍ The lamp is securely attached to release it. 5 Pull out the lamp. Never put the used lamp into a plastic bag. 6 Place the new lamp with both hands to the cabinet. Never touch the front ...parts. ✍ After it has cooled, place the used lamp into the empty box of the replacement lamp. Remove the cover. Loosen the screw on the cover in the numbered order (see illustration) with two screws. 18 Introducing the Sony LCD Projection TV 4 Remove the front panel. ✍ The front panel ...
... or similar object. Loosen the two screws that hold the lamp, then pull out the lamp. ✍ The lamp is securely attached to release it. 5 Pull out the lamp. Never put the used lamp into a plastic bag. 6 Place the new lamp with both hands to the cabinet. Never touch the front ...parts. ✍ After it has cooled, place the used lamp into the empty box of the replacement lamp. Remove the cover. Loosen the screw on the cover in the numbered order (see illustration) with two screws. 18 Introducing the Sony LCD Projection TV 4 Remove the front panel. ✍ The front panel ...
Operating Instructions
Page 19
... when replacing the lamp or plugging in its place. Rough handling may cause the LCD projection TV to the inside. ✍ Consult your Sony dealer for a Sony XL-2100U or XL-2100 (for KDF-50WE655. This illustration is not reattached securely, the self-diagnostic function may not light up properly. Introducing the Sony LCD Projection TV Introducing the Sony LCD Projection TV Place...
... when replacing the lamp or plugging in its place. Rough handling may cause the LCD projection TV to the inside. ✍ Consult your Sony dealer for a Sony XL-2100U or XL-2100 (for KDF-50WE655. This illustration is not reattached securely, the self-diagnostic function may not light up properly. Introducing the Sony LCD Projection TV Introducing the Sony LCD Projection TV Place...
Operating Instructions
Page 20
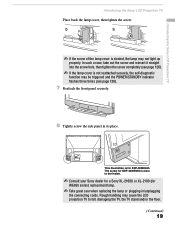
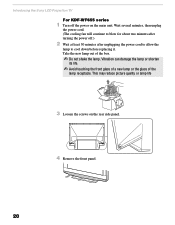
... two minutes after unplugging the power cord to allow the lamp to cool down before replacing it. STD/DUO PRO POWER Introducing the Sony LCD Projection TV For KDF-WF655 series 1 Turn off .) 2 Wait at least 30 minutes after turning the power off the power on the rear side panel. 20 4 Remove the front panel. This may...
... two minutes after unplugging the power cord to allow the lamp to cool down before replacing it. STD/DUO PRO POWER Introducing the Sony LCD Projection TV For KDF-WF655 series 1 Turn off .) 2 Wait at least 30 minutes after turning the power off the power on the rear side panel. 20 4 Remove the front panel. This may...
Operating Instructions
Page 21
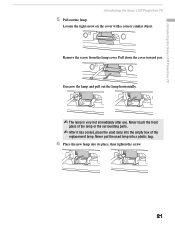
... use. Never touch the front glass of the replacement lamp. Never put the used lamp into the empty box of the lamp or the surrounding parts. ✍ After it has cooled, place the used lamp into a plastic bag. 6 Place the new lamp into its place, then tighten the screw. 21... Loosen the right screw on the cover with a coin or similar object. Introducing the Sony LCD Projection TV Introducing the Sony LCD Projection TV 5...
... use. Never touch the front glass of the replacement lamp. Never put the used lamp into the empty box of the lamp or the surrounding parts. ✍ After it has cooled, place the used lamp into a plastic bag. 6 Place the new lamp into its place, then tighten the screw. 21... Loosen the right screw on the cover with a coin or similar object. Introducing the Sony LCD Projection TV Introducing the Sony LCD Projection TV 5...
Operating Instructions
Page 22
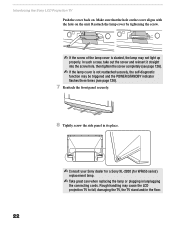
... PRO POWER 8 Tightly screw the side panel in its place. ✍ Consult your Sony dealer for a Sony XL-2200 (for WF655 series) replacement lamp. ✍ Take great care when replacing the lamp or plugging in/unplugging the connecting cords. Rough handling may be triggered and the POWER/STANDBY... Reattach the lamp cover by tightening the screw. ✍ If the screw of the lamp cover is not reattached securely, the self-diagnostic function may cause the LCD projection TV to fall, damaging the TV, the TV stand and/or the floor. 22 Introducing the Sony LCD Projection TV Push the ...
... PRO POWER 8 Tightly screw the side panel in its place. ✍ Consult your Sony dealer for a Sony XL-2200 (for WF655 series) replacement lamp. ✍ Take great care when replacing the lamp or plugging in/unplugging the connecting cords. Rough handling may be triggered and the POWER/STANDBY... Reattach the lamp cover by tightening the screw. ✍ If the screw of the lamp cover is not reattached securely, the self-diagnostic function may cause the LCD projection TV to fall, damaging the TV, the TV stand and/or the floor. 22 Introducing the Sony LCD Projection TV Push the ...

Operating Instructions
Page 25
If the LED blinks continuously, this LED will remain lit even if the TV set . TV/VIDEO Press to view on your LCD projection TV. For details, see "Replacing the Lamp" on /off the LCD projection TV. 4 POWER/ STANDBY LED Lights up when the main power is turned off . q;... control. 8 CHANNEL +/- Setting Up the LCD Projection TV Setting Up the LCD Projection TV Item Description 1 Memory Stick slot For inserting Memory Stick media to select between the TV's tuner and other video equipment inputs. 25 For details, see "Contacting Sony" on . Press to scan through channels. 9...
If the LED blinks continuously, this LED will remain lit even if the TV set . TV/VIDEO Press to view on your LCD projection TV. For details, see "Replacing the Lamp" on /off the LCD projection TV. 4 POWER/ STANDBY LED Lights up when the main power is turned off . q;... control. 8 CHANNEL +/- Setting Up the LCD Projection TV Setting Up the LCD Projection TV Item Description 1 Memory Stick slot For inserting Memory Stick media to select between the TV's tuner and other video equipment inputs. 25 For details, see "Contacting Sony" on . Press to scan through channels. 9...
Operating Instructions
Page 125
... Skip (see page 22 for KDF-WF655 series). video equipment connected to the LCD projection TV Cannot operate Menu ❏ If a menu option appears in gray, this indicates that results from the TV automatically degaussing each when turned on again.) Release the RESET button. TV makes "popping" sound ❏... must use , there is designed to expand or contract and may be recorded to VCR The replacement lamp does not ❏ The screw of the lamp cover may indicate the TV needs service. While holding down the RESET button on the remote control, settings press the POWER...
... Skip (see page 22 for KDF-WF655 series). video equipment connected to the LCD projection TV Cannot operate Menu ❏ If a menu option appears in gray, this indicates that results from the TV automatically degaussing each when turned on again.) Release the RESET button. TV makes "popping" sound ❏... must use , there is designed to expand or contract and may be recorded to VCR The replacement lamp does not ❏ The screw of the lamp cover may indicate the TV needs service. While holding down the RESET button on the remote control, settings press the POWER...
Operating Instructions
Page 126
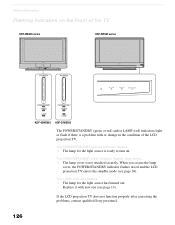
... after correcting the problems, contact qualified Sony personnel. 126 Replace it with or change in red and the LCD projection TV enters the standby mode (see page 16). The POWER/STANDBY (green) indicator flashes. ❑ The lamp for the light source has burned out. The LAMP indicator flashes. ❑ The lamp for the light source is ready...
... after correcting the problems, contact qualified Sony personnel. 126 Replace it with or change in red and the LCD projection TV enters the standby mode (see page 16). The POWER/STANDBY (green) indicator flashes. ❑ The lamp for the light source has burned out. The LAMP indicator flashes. ❑ The lamp for the light source is ready...
Operating Instructions
Page 130
...106 Channel Show Hide 107 Channels Auto Program 106 creating labels 107 setting up 106 using 75 Features 12 FREEZE button 60 Freeze, using with TV remote control 64 CableCARD 56 Camcorder, connecting 48 Caption Vision 112 CATV. Index Numerics 0-9 buttons 60 A Activating a Twin View screen 72 ...G GUIDE button 68 Guide menu 69 H Hue, adjusting 98 I Inputs, labeling 113 Installation of the projection TV 31-55 interlaced 118 J JUMP button 61, 67 L Label Channels 58, 107 video inputs 113 Lamp, replacing 16-22 M Memory Stick Duo 83 features 79 Index 85 indicator (LED) 25 insertion slot 24 panning...
...106 Channel Show Hide 107 Channels Auto Program 106 creating labels 107 setting up 106 using 75 Features 12 FREEZE button 60 Freeze, using with TV remote control 64 CableCARD 56 Camcorder, connecting 48 Caption Vision 112 CATV. Index Numerics 0-9 buttons 60 A Activating a Twin View screen 72 ...G GUIDE button 68 Guide menu 69 H Hue, adjusting 98 I Inputs, labeling 113 Installation of the projection TV 31-55 interlaced 118 J JUMP button 61, 67 L Label Channels 58, 107 video inputs 113 Lamp, replacing 16-22 M Memory Stick Duo 83 features 79 Index 85 indicator (LED) 25 insertion slot 24 panning...


