Operating Instructions
Page 3
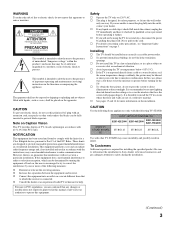
... precautions, see "Important Safety Instructions" on the cord. s Avoid operating the TV at temperatures below 41°F (5°C). s To obtain the best picture, do not expose the screen to install the TV in this manual could void your dealer. s See pages 13 and 14 for several days, disconnect the power by qualified service personnel before turning on , the user is no objects filled with...
... precautions, see "Important Safety Instructions" on the cord. s Avoid operating the TV at temperatures below 41°F (5°C). s To obtain the best picture, do not expose the screen to install the TV in this manual could void your dealer. s See pages 13 and 14 for several days, disconnect the power by qualified service personnel before turning on , the user is no objects filled with...
Operating Instructions
Page 6
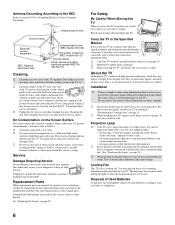
... TV with high-precision technology, black dots may appear or bright points of the TV. For the best picture quality, install your footing while installing the TV. Projection Lamp s Your TV uses a projection lamp as these may pop inside the lamp unit, but the lamp unit is low. s In rare instances, the bulb may scratch the screen's coating. The noise may be sprayed to contain all of broken glass pieces inside of light (red, blue, or green...
... TV with high-precision technology, black dots may appear or bright points of the TV. For the best picture quality, install your footing while installing the TV. Projection Lamp s Your TV uses a projection lamp as these may pop inside the lamp unit, but the lamp unit is low. s In rare instances, the bulb may scratch the screen's coating. The noise may be sprayed to contain all of broken glass pieces inside of light (red, blue, or green...

Operating Instructions
Page 7
... and Rear Panel 18 Connecting the TV Overview 20 Making Video and Audio Connections ...........20 About Using HDMI to DVI Adapter 21 About Using S VIDEO 21 Basic Connections 22 Cable System and/or VHF/UHF Antenna System 23 HD Cable Box/ HD Satellite Box 24 Equipment with DVI Connection 25 Satellite Receiver and Cable/Antenna ...........26 Equipment with Digital Audio (Optical)...........27 Setting Up the Channel List 28 Using Initial Setup 28 Connecting Optional Equipment 29 VCR and Cable 30 VCR and Cable Box 31 DVD Player with Component Video...
... and Rear Panel 18 Connecting the TV Overview 20 Making Video and Audio Connections ...........20 About Using HDMI to DVI Adapter 21 About Using S VIDEO 21 Basic Connections 22 Cable System and/or VHF/UHF Antenna System 23 HD Cable Box/ HD Satellite Box 24 Equipment with DVI Connection 25 Satellite Receiver and Cable/Antenna ...........26 Equipment with Digital Audio (Optical)...........27 Setting Up the Channel List 28 Using Initial Setup 28 Connecting Optional Equipment 29 VCR and Cable 30 VCR and Cable Box 31 DVD Player with Component Video...
Operating Instructions
Page 9
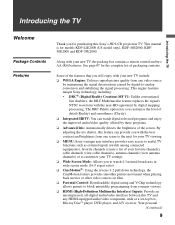
...HDMI (High-Definition Multimedia Interface) Inputs: Provide an uncompressed, all-digital audio/video interface between this feature can provide you with the best contrast and brightness from any HDMI-equipped audio/video component, such as external inputs (switch among connected equipments), favorite channels (create a list of your favorite channels), cable channels (view cable channels), antenna channels (view antenna channels) or to customize your TV settings. ❑ Wide Screen Mode: Allows you customize the level of detail (Reality) and smoothness (Clarity). ❑ Integrated HDTV...
...HDMI (High-Definition Multimedia Interface) Inputs: Provide an uncompressed, all-digital audio/video interface between this feature can provide you with the best contrast and brightness from any HDMI-equipped audio/video component, such as external inputs (switch among connected equipments), favorite channels (create a list of your favorite channels), cable channels (view cable channels), antenna channels (view antenna channels) or to customize your TV settings. ❑ Wide Screen Mode: Allows you customize the level of detail (Reality) and smoothness (Clarity). ❑ Integrated HDTV...
Operating Instructions
Page 12
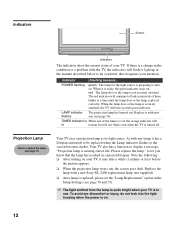
... that the lamp has reached its light source. Projection Lamp How to flash in the Setup Settings (see page 76. To avoid eye discomfort or injury, do not look into the light housing when the power is not securely attached. LAMP indicator The projection lamp has burned out. Please replace the lamp." Replace it with green indicator. Your TV uses a projection lamp as its expected lifespan. Indicators Screen PUSH OPEN TIMER LAMP POWER/STANDBY POWER Indicators...
... that the lamp has reached its light source. Projection Lamp How to flash in the Setup Settings (see page 76. To avoid eye discomfort or injury, do not look into the light housing when the power is not securely attached. LAMP indicator The projection lamp has burned out. Please replace the lamp." Replace it with green indicator. Your TV uses a projection lamp as its expected lifespan. Indicators Screen PUSH OPEN TIMER LAMP POWER/STANDBY POWER Indicators...
Operating Instructions
Page 17
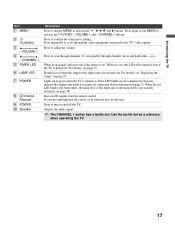
... the TV Item 1 MENU 2 TV/VIDEO 3 - Press to adjust the volume. For details, see page 78). Use the tactile dot as its function may indicate the display unit needs servicing (see "Replacing the Lamp" on . VOLUME + and - CHANNEL+ buttons. Press to confirm the selection or setting. To scan quickly through the video equipment connected to cycle through channels, press and hold either - When lit in green when the TV is set . Lights up in...
... the TV Item 1 MENU 2 TV/VIDEO 3 - Press to adjust the volume. For details, see page 78). Use the tactile dot as its function may indicate the display unit needs servicing (see "Replacing the Lamp" on . VOLUME + and - CHANNEL+ buttons. Press to confirm the selection or setting. To scan quickly through the video equipment connected to cycle through channels, press and hold either - When lit in green when the TV is set . Lights up in...
Operating Instructions
Page 20
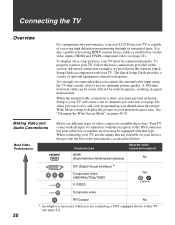
...). After you can receive and view programming you connect the antenna/cable input using the 75-ohm coaxial cable to display the picture in signal deterioration. When connecting your TV, use the inputs that are provided in this type. Making Video and Audio Connections Best Video Performance Below are connecting a DVI-equipped device to this TV (see page 21). 20 The Quick Setup Guide provides a variety of the DVI connector but your cable box or satellite receiver may be equipped...
...). After you can receive and view programming you connect the antenna/cable input using the 75-ohm coaxial cable to display the picture in signal deterioration. When connecting your TV, use the inputs that are provided in this type. Making Video and Audio Connections Best Video Performance Below are connecting a DVI-equipped device to this TV (see page 21). 20 The Quick Setup Guide provides a variety of the DVI connector but your cable box or satellite receiver may be equipped...
Operating Instructions
Page 24
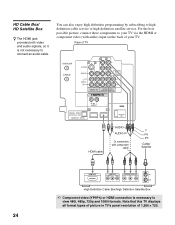
... Cable/ Satellite IN OUT High Definition Cable Box/High Definition Satellite Box ✍ Component video (YPBPR) or HDMI connection is not necessary to connect an audio cable. HD Cable Box/ HD Satellite Box z The HDMI jack provides both video and audio signals, so it is necessary to view 480i, 480p, 720p and 1080i formats. For the best possible picture, connect these components to high definition cable service or high definition satellite service. Note that this TV displays all format types of picture in TV's panel resolution...
... Cable/ Satellite IN OUT High Definition Cable Box/High Definition Satellite Box ✍ Component video (YPBPR) or HDMI connection is not necessary to connect an audio cable. HD Cable Box/ HD Satellite Box z The HDMI jack provides both video and audio signals, so it is necessary to view 480i, 480p, 720p and 1080i formats. For the best possible picture, connect these components to high definition cable service or high definition satellite service. Note that this TV displays all format types of picture in TV's panel resolution...
Operating Instructions
Page 53
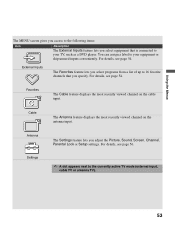
... 54. Antenna Settings The Settings feature lets you adjust the Picture, Sound, Screen, Channel, Parental Lock or Setup settings. For details, see page 54. The Antenna feature displays the most recently viewed channel on the antenna input. External Inputs The Favorites feature lets you select programs from a list of up to 16 favorite channels that is connected to your equipment or skip unused inputs conveniently. Favorites C Cable The Cable feature displays the most recently viewed channel on the cable input. You...
... 54. Antenna Settings The Settings feature lets you adjust the Picture, Sound, Screen, Channel, Parental Lock or Setup settings. For details, see page 54. The Antenna feature displays the most recently viewed channel on the antenna input. External Inputs The Favorites feature lets you select programs from a list of up to 16 favorite channels that is connected to your equipment or skip unused inputs conveniently. Favorites C Cable The Cable feature displays the most recently viewed channel on the cable input. You...
Operating Instructions
Page 76
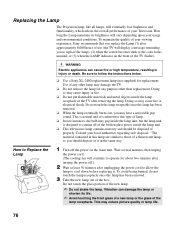
... the box. Wait several minutes, then unplug the power cord. (The cooling fan will continue to replace the lamp); (2) when the screen becomes dark or the color looks unusual; To maintain the quality of your Television. Be sure to Replace the Lamp WARNING Electric appliances can damage the lamp or shorten its brightness will display a message reminding you may damage the TV. ❑ Do not remove the lamp for replacement...
... the box. Wait several minutes, then unplug the power cord. (The cooling fan will continue to replace the lamp); (2) when the screen becomes dark or the color looks unusual; To maintain the quality of your Television. Be sure to Replace the Lamp WARNING Electric appliances can damage the lamp or shorten its brightness will display a message reminding you may damage the TV. ❑ Do not remove the lamp for replacement...
Operating Instructions
Page 78
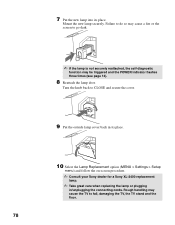
... Select the Lamp Replacement option (MENU > Settings > Setup menu) and follow the on-screen procedure. ✍ Consult your Sony dealer for a Sony XL-2400 replacement lamp. ✍ Take great care when replacing the lamp or plugging in/unplugging the connecting cords. Turn the knob back to go dark. ✍ If the lamp is not securely reattached, the self-diagnostic function may be triggered and the POWER indicator flashes three times (see...
... Select the Lamp Replacement option (MENU > Settings > Setup menu) and follow the on-screen procedure. ✍ Consult your Sony dealer for a Sony XL-2400 replacement lamp. ✍ Take great care when replacing the lamp or plugging in/unplugging the connecting cords. Turn the knob back to go dark. ✍ If the lamp is not securely reattached, the self-diagnostic function may be triggered and the POWER indicator flashes three times (see...
Operating Instructions
Page 81
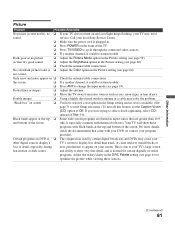
...) to appear on your local Sony Service Center. ❏ Make sure the power cord is available. (See page 71 to reset Setup selections.) To turn on and a red light keeps flashing, your program provider). Dark, poor or no picture ❏ Adjust the Picture Mode option in the Picture setting (see page 59). (screen lit), good sound ❏ Adjust the Brightness option in the Picture setting (see page 39). Your TV will show very fine detail, and...
...) to appear on your local Sony Service Center. ❏ Make sure the power cord is available. (See page 71 to reset Setup selections.) To turn on and a red light keeps flashing, your program provider). Dark, poor or no picture ❏ Adjust the Picture Mode option in the Picture setting (see page 59). (screen lit), good sound ❏ Adjust the Brightness option in the Picture setting (see page 39). Your TV will show very fine detail, and...
Operating Instructions
Page 82
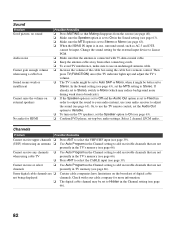
...). Sound Problem Good picture, no sound Audio noise Cannot gain enough volume when using a cable box Sound seems weak or insufficient Cannot raise the volume on external speakers No audio for HDMI Possible Remedies ❏ Press MUTING so that Muting disappears from other connecting cords. ❏ To avoid TV interference, make sure to use an undamaged antenna cable. ❏ Increase the volume of digital cable not being displayed channels. Cannot receive or select ❏ Use Auto Program in the Channel setting to add receivable channels...
...). Sound Problem Good picture, no sound Audio noise Cannot gain enough volume when using a cable box Sound seems weak or insufficient Cannot raise the volume on external speakers No audio for HDMI Possible Remedies ❏ Press MUTING so that Muting disappears from other connecting cords. ❏ To avoid TV interference, make sure to use an undamaged antenna cable. ❏ Increase the volume of digital cable not being displayed channels. Cannot receive or select ❏ Use Auto Program in the Channel setting to add receivable channels...
Operating Instructions
Page 83
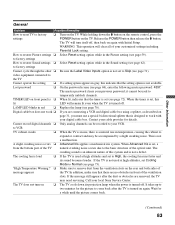
... high altitudes and set Cooling Mode to temporarily unblock channels. The cooling fan is loud ❏ If the TV is used to Normal (see page 73). If the TV is not a defect. How to factory settings Cannot cycle through the other ❏ Be sure the Label Video Inputs option is not a malfunction. to restore Picture settings ❏ Select Reset setting option while in red ❏ Replace the lamp (see page 76). TIMER LED...
... high altitudes and set Cooling Mode to temporarily unblock channels. The cooling fan is loud ❏ If the TV is used to Normal (see page 73). If the TV is not a defect. How to factory settings Cannot cycle through the other ❏ Be sure the Label Video Inputs option is not a malfunction. to restore Picture settings ❏ Select Reset setting option while in red ❏ Replace the lamp (see page 76). TIMER LED...
Operating Instructions
Page 84
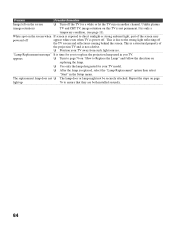
... strong light reflecting off the TV screen and reflections coming behind the screen. This is only a temporary condition, (see page 11). "Lamp Replacement message" It is replaced, select the "Lamp Replacement" option then select "Start" in you to replace the projection lamp used in the Setup menu. Repeat the steps on another channel. The replacement lamp does not ❏ The lamp door or lamp might not be securely attached. Problem Possible Remedies Image...
... strong light reflecting off the TV screen and reflections coming behind the screen. This is only a temporary condition, (see page 11). "Lamp Replacement message" It is replaced, select the "Lamp Replacement" option then select "Start" in you to replace the projection lamp used in the Setup menu. Repeat the steps on another channel. The replacement lamp does not ❏ The lamp door or lamp might not be securely attached. Problem Possible Remedies Image...
Operating Instructions
Page 88
... Channels 67 Label Video Inputs 71 LAMP LED 17 Lamp Replacement 73 Lamp, replacing 76-79 Language 72 88 Index 0-9 buttons 39 4:3 Default 65 5.1 Channel DVD using with remote control 44 A A/V Sync 63 Adding channels to the channel list 66 Adjusting audio, Steady Sound 62 Advanced Iris 59 Advanced Settings 61 Alternate Audio 63 ANT button 39 AUDIO (L/R) jacks, described 19 Audio Out 63 AUDIO OUT jack, described 19 Audio receiver, connecting 37 Auto Program 66 Auto Wide 65 B Balance, adjusting 62 Bass, adjusting 62...
... Channels 67 Label Video Inputs 71 LAMP LED 17 Lamp Replacement 73 Lamp, replacing 76-79 Language 72 88 Index 0-9 buttons 39 4:3 Default 65 5.1 Channel DVD using with remote control 44 A A/V Sync 63 Adding channels to the channel list 66 Adjusting audio, Steady Sound 62 Advanced Iris 59 Advanced Settings 61 Alternate Audio 63 ANT button 39 AUDIO (L/R) jacks, described 19 Audio Out 63 AUDIO OUT jack, described 19 Audio receiver, connecting 37 Auto Program 66 Auto Wide 65 B Balance, adjusting 62 Bass, adjusting 62...

Operating Instructions
Page 89
... Lock settings 58, 68 Password, changing 69 PC Wide Mode 64 Personal Computer connecting 35 Picture 60 PICTURE button 40 Picture Mode Custom 59 Standard 59 Vivid 59 Picture settings 57, 59 POWER button 17 POWER/STANDBY LED 17 Problems, Troubleshooting 80- 83 Product Information 73 Program Guide 48 Program Options menu 48 R Ratings setting 69 viewing blocked programs 69 Remote control inserting batteries 38 programming 41-42 Removing channels from the channel list 66 Reset 59, 62 S S VIDEO jack, described 19 Satellite receiver, using with remote control 43 with cable box, connecting...
... Lock settings 58, 68 Password, changing 69 PC Wide Mode 64 Personal Computer connecting 35 Picture 60 PICTURE button 40 Picture Mode Custom 59 Standard 59 Vivid 59 Picture settings 57, 59 POWER button 17 POWER/STANDBY LED 17 Problems, Troubleshooting 80- 83 Product Information 73 Program Guide 48 Program Options menu 48 R Ratings setting 69 viewing blocked programs 69 Remote control inserting batteries 38 programming 41-42 Removing channels from the channel list 66 Reset 59, 62 S S VIDEO jack, described 19 Satellite receiver, using with remote control 43 with cable box, connecting...
Limited Warranty (US Only)
Page 1
... Projection TV LCD Projection TV LIMITED WARRANTY (U.S. In the event of the television product (projection optical block - This Limited Warranty does not cover Sony products sold AS IS or WITH ALL FAULTS or consumables (such as set forth below . This Limited Warranty is provided "AS IS" unless expressly provided for thirty (30) inch (measured diagonally) or larger screen size products through a Sony-authorized service facility. For specific instructions...
... Projection TV LCD Projection TV LIMITED WARRANTY (U.S. In the event of the television product (projection optical block - This Limited Warranty does not cover Sony products sold AS IS or WITH ALL FAULTS or consumables (such as set forth below . This Limited Warranty is provided "AS IS" unless expressly provided for thirty (30) inch (measured diagonally) or larger screen size products through a Sony-authorized service facility. For specific instructions...
Marketing Specifications
Page 1
... heart of Sony's Grand WEGA™ televisions provide a bright picture, with video content such as movies that vary between brightness levels from a high output UHP lamp shines into a filtering system that splits the beam into red, green, and blue light streams. Each color goes through its own LCD chip, which reduces MPEG artifacts such as Edge Adaptive I /P (interlace-to improve overall picture quality. The Auto Mode has two settings designed to -digital) converters for wide...
... heart of Sony's Grand WEGA™ televisions provide a bright picture, with video content such as movies that vary between brightness levels from a high output UHP lamp shines into a filtering system that splits the beam into red, green, and blue light streams. Each color goes through its own LCD chip, which reduces MPEG artifacts such as Edge Adaptive I /P (interlace-to improve overall picture quality. The Auto Mode has two settings designed to -digital) converters for wide...

Marketing Specifications
Page 2
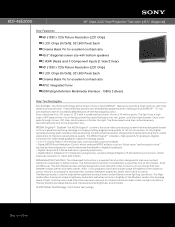
...: Timer 1, Timer 2 Caption Vision: On, Off, Program Clock: Yes Picture Freeze: Yes Remote Control: Yes Specifications General Aspect Ratio: 16:9 Television Type: Micro Display HDTV Display Viewing Angle (Right/Left): 130° Viewing Angle (Up/Down): 60° Screen Size (measured diagonally): 46" class (45.5") Native Resolution: 1280 x 720 Display Resolution: 1280 x 720p (HD) TV System Tuner (Cable): QAM Tuner (Terrestrial): ATSC (8 VSB) Video Horizontal Center: Yes (+5 to -5) Audio Audio Power Output: 20W (10W x2) Sound Enhancer: Dynamic, Standard, Custom Inputs and Outputs Component Video...
...: Timer 1, Timer 2 Caption Vision: On, Off, Program Clock: Yes Picture Freeze: Yes Remote Control: Yes Specifications General Aspect Ratio: 16:9 Television Type: Micro Display HDTV Display Viewing Angle (Right/Left): 130° Viewing Angle (Up/Down): 60° Screen Size (measured diagonally): 46" class (45.5") Native Resolution: 1280 x 720 Display Resolution: 1280 x 720p (HD) TV System Tuner (Cable): QAM Tuner (Terrestrial): ATSC (8 VSB) Video Horizontal Center: Yes (+5 to -5) Audio Audio Power Output: 20W (10W x2) Sound Enhancer: Dynamic, Standard, Custom Inputs and Outputs Component Video...


