
Operating Instructions
Page 3
...'s attention to Article 820-40 of the NEC that provides guidelines for a Class B digital device pursuant to constitute a risk of imprints are cautioned that interference will fit into the TV, unplug it and have it checked by qualified personnel before operating it further. If you...DE CHOQUE ELECTRICO NO ABRIR CAUTION: TO REDUCE THE RISK OF ELECTRIC SHOCK, DO NOT REMOVE COVER (OR BACK). CAUTION When using TV games, computers, and similar products with the instructions, may require authorization from Dolby Laboratories Licensing Corporation. Continuously watching the same channel ...
...'s attention to Article 820-40 of the NEC that provides guidelines for a Class B digital device pursuant to constitute a risk of imprints are cautioned that interference will fit into the TV, unplug it and have it checked by qualified personnel before operating it further. If you...DE CHOQUE ELECTRICO NO ABRIR CAUTION: TO REDUCE THE RISK OF ELECTRIC SHOCK, DO NOT REMOVE COVER (OR BACK). CAUTION When using TV games, computers, and similar products with the instructions, may require authorization from Dolby Laboratories Licensing Corporation. Continuously watching the same channel ...
Operating Instructions
Page 4
...Corrosion Do not use , and servicing of the set off . Water and Moisture Do not use attachments not recommended by yourself alone, or from a TV set may fall , causing serious injury to a child or an adult, and serious damage to be observed in the installation, use the set on ... beyond their capacity, since it may be equipped with a polarized alternating current line plug (a plug having one way. Turn off your TV and wait for some TV sets to make occasional snapping or popping sounds, particularly when being turned on the serial/model plate. Use Power Sources This set ....
...Corrosion Do not use , and servicing of the set off . Water and Moisture Do not use attachments not recommended by yourself alone, or from a TV set may fall , causing serious injury to a child or an adult, and serious damage to be observed in the installation, use the set on ... beyond their capacity, since it may be equipped with a polarized alternating current line plug (a plug having one way. Turn off your TV and wait for some TV sets to make occasional snapping or popping sounds, particularly when being turned on the serial/model plate. Use Power Sources This set ....

Operating Instructions
Page 6
...FD Trinitron WEGA Features 1 About this Manual 2 Batteries for the Remote Control 2 Front Panel Menu Controls 2 Using the Remote Control Remote Control Description 3 Connecting Your TV TV Rear Panel 5 Basic Connections 6 Connecting Additional Equipment 7 Setting Up the TV 13 Using the Digital Features Overview 14 Tuning to a Digital Channel 14 Using the Digital...the Digital Features Menu 29 Using the Digital Menus Menu Descriptions 30 Using the Remote Control to Display and Navigate the On-Screen Digital Menus 30 Using the Digital Channels Menu 31 Using the Digital Setup Menu 32 ...
...FD Trinitron WEGA Features 1 About this Manual 2 Batteries for the Remote Control 2 Front Panel Menu Controls 2 Using the Remote Control Remote Control Description 3 Connecting Your TV TV Rear Panel 5 Basic Connections 6 Connecting Additional Equipment 7 Setting Up the TV 13 Using the Digital Features Overview 14 Tuning to a Digital Channel 14 Using the Digital...the Digital Features Menu 29 Using the Digital Menus Menu Descriptions 30 Using the Remote Control to Display and Navigate the On-Screen Digital Menus 30 Using the Digital Channels Menu 31 Using the Digital Setup Menu 32 ...

Operating Instructions
Page 7
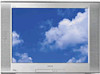
...FD Trinitron WEGA Features Some of the features you to receive both analog (NTSC) and digital (ATSC) programming. Delivers a picture with uncompromising accuracy and outstanding image detail via terrestrial signals over-the-air. ❏ Wide Screen Mode - Meets the ENERGY STAR® guidelines for KD-32FS170 and KD...their original widescreen format, or zoom to the on-screen menus without the use of the Sony FD Trinitron WEGA®. Select digital channels from an on TV by establishing rating limits. ❏ ClearEdge VM - Introduction Introduction Congratulations on your purchase ...
...FD Trinitron WEGA Features Some of the features you to receive both analog (NTSC) and digital (ATSC) programming. Delivers a picture with uncompromising accuracy and outstanding image detail via terrestrial signals over-the-air. ❏ Wide Screen Mode - Meets the ENERGY STAR® guidelines for KD-32FS170 and KD...their original widescreen format, or zoom to the on-screen menus without the use of the Sony FD Trinitron WEGA®. Select digital channels from an on TV by establishing rating limits. ❏ ClearEdge VM - Introduction Introduction Congratulations on your purchase ...
Operating Instructions
Page 8
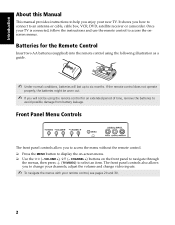
... controls allow you how to connect to change your channels, adjust the volume and change video inputs. ✍ To navigate the menus with your new TV. If the remote control does not operate properly, the batteries might be worn out. ✍ If you to an antenna or cable, cable box, VCR... illustration as a guide. ✍ Under normal conditions, batteries will last up to display the on the front panel to navigate through the menus, then press (TV/VIDEO) to access the onscreen menus. Once your TV is connected, follow the instructions and use the remote control to select an item.
... controls allow you how to connect to change your channels, adjust the volume and change video inputs. ✍ To navigate the menus with your new TV. If the remote control does not operate properly, the batteries might be worn out. ✍ If you to an antenna or cable, cable box, VCR... illustration as a guide. ✍ Under normal conditions, batteries will last up to display the on the front panel to navigate through the menus, then press (TV/VIDEO) to access the onscreen menus. Once your TV is connected, follow the instructions and use the remote control to select an item.

Operating Instructions
Page 9
...display. 4 56 3 SCREEN qf MODE 7 89 5 0 ENT 4 PICTURE MODE VOL 6 JUMP + 7 DIGITAL/ ANALOG 8 GUIDE 9 CH MENU qg 5 qh 6 JUMP 0 RESET qa EXIT SLEEP TV RM-YD006 qj 7 DIGITAL/ ANALOG qk 8 VOL (volume) D Press repeatedly the Screen Mode options. The channel will change according to display... Using the Remote Control Remote Control Description D Indicates feature available only in the Digital Setup menu (see page 32). qd TV/VIDEO Press to display the digital program guide. qs POWER Press to turn off the TV. Also available in an on page 21 for example, 2.1).
...display. 4 56 3 SCREEN qf MODE 7 89 5 0 ENT 4 PICTURE MODE VOL 6 JUMP + 7 DIGITAL/ ANALOG 8 GUIDE 9 CH MENU qg 5 qh 6 JUMP 0 RESET qa EXIT SLEEP TV RM-YD006 qj 7 DIGITAL/ ANALOG qk 8 VOL (volume) D Press repeatedly the Screen Mode options. The channel will change according to display... Using the Remote Control Remote Control Description D Indicates feature available only in the Digital Setup menu (see page 32). qd TV/VIDEO Press to display the digital program guide. qs POWER Press to turn off the TV. Also available in an on page 21 for example, 2.1).
Operating Instructions
Page 10
Press repeatedly until Sleep Off appears. ✍ If you want the TV to exit menus and other on before shutting off automatically. Cancel by pressing until the TV displays the time in minutes (15, 30, 45, 60, or 90) that you lose your remote control, see page 36. Remote Control 4 Button qj EXIT qk SLEEP Description Press to remain on -screen displays.
Press repeatedly until Sleep Off appears. ✍ If you want the TV to exit menus and other on before shutting off automatically. Cancel by pressing until the TV displays the time in minutes (15, 30, 45, 60, or 90) that you lose your remote control, see page 36. Remote Control 4 Button qj EXIT qk SLEEP Description Press to remain on -screen displays.
Operating Instructions
Page 11
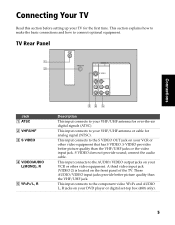
...AUDIO/VIDEO input jacks provide better picture quality than the VHF/UHF jacks or the video input jack. Connecting Your TV Read this section before setting up your DVD player or digital set-top box (480i only). 5 connect the audio cable. This input connects to your VHF/UHF antenna ...for over-the-air digital signals (ATSC). This input connects to the component video YPBPR and AUDIO L, R jacks on the front panel of the TV. S VIDEO does not provide sound; A third video input jack (VIDEO 2) is located on...
...AUDIO/VIDEO input jacks provide better picture quality than the VHF/UHF jacks or the video input jack. Connecting Your TV Read this section before setting up your DVD player or digital set-top box (480i only). 5 connect the audio cable. This input connects to your VHF/UHF antenna ...for over-the-air digital signals (ATSC). This input connects to the component video YPBPR and AUDIO L, R jacks on the front panel of the TV. S VIDEO does not provide sound; A third video input jack (VIDEO 2) is located on...
Operating Instructions
Page 12
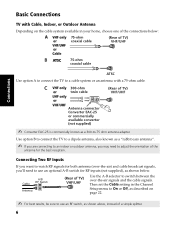
...to -75 ohm antenna adapter. Use option B to connect the TV to a dipole antenna, also known as shown below : 75-ohm coaxial cable (Rear of TV) VHF/UHF Connections 75-ohm coaxial cable ATSC Use option A to connect the TV to watch RF signals for the best reception. Connecting Two RF ... Indoor, or Outdoor Antenna Depending on page 22. ✍ For best results, be sure to use an RF switch, as shown above, instead of TV) VHF/UHF Antenna connector Converter EAC-25 or commercially available converter (not supplied) ✍ Converter EAC-25 is commercially known as a 300-to adjust the...
...to -75 ohm antenna adapter. Use option B to connect the TV to a dipole antenna, also known as shown below : 75-ohm coaxial cable (Rear of TV) VHF/UHF Connections 75-ohm coaxial cable ATSC Use option A to connect the TV to watch RF signals for the best reception. Connecting Two RF ... Indoor, or Outdoor Antenna Depending on page 22. ✍ For best results, be sure to use an RF switch, as shown above, instead of TV) VHF/UHF Antenna connector Converter EAC-25 or commercially available converter (not supplied) ✍ Converter EAC-25 is commercially known as a 300-to adjust the...
Operating Instructions
Page 13
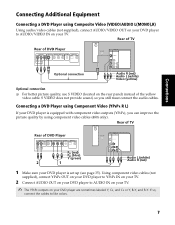
... cables (not supplied), connect YPBPR OUT on your DVD player to YPBPR IN on your TV. 2 Connect AUDIO OUT on your DVD player to AUDIO IN on your TV. ✍ The YPBPR outputs on your TV. Rear of TV ATSC Rear of DVD Player Connections Optional connection Audio R (red) Audio L (white) Video (yellow... of DVD Player PPRB (red) (blue) Y (green) 2 1 Audio L (white) Audio R (red) 1 Make sure your DVD player is set up (see page 35). Rear of TV ATSC Rear of the yellow video cable. S VIDEO does not provide sound, so you can improve the picture quality by using component video cables (480i...
... cables (not supplied), connect YPBPR OUT on your DVD player to YPBPR IN on your TV. 2 Connect AUDIO OUT on your DVD player to AUDIO IN on your TV. ✍ The YPBPR outputs on your TV. Rear of TV ATSC Rear of DVD Player Connections Optional connection Audio R (red) Audio L (white) Video (yellow... of DVD Player PPRB (red) (blue) Y (green) 2 1 Audio L (white) Audio R (red) 1 Make sure your DVD player is set up (see page 35). Rear of TV ATSC Rear of the yellow video cable. S VIDEO does not provide sound, so you can improve the picture quality by using component video cables (480i...

Operating Instructions
Page 14
...; If your VCR is equipped with video outputs, you still must connect the audio cables. ✍ To watch video programs from your VCR, tune your TV to Channel 3 or 4 (as set on the rear of your VCR). ✍ You can get better picture quality by connecting audio/video cables (not ... picture quality, use the button to the VHF/UHF jack on the rear panel) instead of TV 2 1 From cable/antenna VCR Audio R (red) Audio L (white) Video (yellow) Optional connection 1 Connect the coaxial cable from your TV antenna or cable service to the IN jack on your VCR. 2 Connect a coaxial cable (not ...
...; If your VCR is equipped with video outputs, you still must connect the audio cables. ✍ To watch video programs from your VCR, tune your TV to Channel 3 or 4 (as set on the rear of your VCR). ✍ You can get better picture quality by connecting audio/video cables (not ... picture quality, use the button to the VHF/UHF jack on the rear panel) instead of TV 2 1 From cable/antenna VCR Audio R (red) Audio L (white) Video (yellow) Optional connection 1 Connect the coaxial cable from your TV antenna or cable service to the IN jack on your VCR. 2 Connect a coaxial cable (not ...
Operating Instructions
Page 15
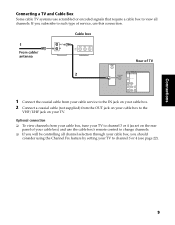
... selection through your cable box, you will be controlling all channels. Cable box 1 From cable/ antenna VIDEO AUDIO L AUDIO R LINE OUT 2 ATSC Rear of TV 1 Connect the coaxial cable from your cable service to the IN jack on your cable box. 2 Connect a coaxial cable (not supplied) from your cable box..., tune your TV to channel 3 or 4 (as set on your cable box) and use this connection. If you subscribe to change channels. ❏ If you should consider...
... selection through your cable box, you will be controlling all channels. Cable box 1 From cable/ antenna VIDEO AUDIO L AUDIO R LINE OUT 2 ATSC Rear of TV 1 Connect the coaxial cable from your cable service to the IN jack on your cable box. 2 Connect a coaxial cable (not supplied) from your cable box..., tune your TV to channel 3 or 4 (as set on your cable box) and use this connection. If you subscribe to change channels. ❏ If you should consider...
Operating Instructions
Page 16
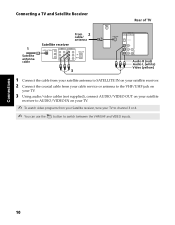
... Satellite Receiver ATSC Rear of TV 1 Satellite antenna cable Satellite receiver From 2 cable/ antenna 3 Audio R (red) Audio L (white) Video (yellow) ...the coaxial cable from your cable service or antenna to the VHF/UHF jack on your TV. 3 Using audio/video cables (not supplied), connect AUDIO/VIDEO OUT on your satellite receiver to AUDIO/VIDEO IN on... your TV. ✍ To watch video programs from your Satellite receiver, tune your TV to channel 3 or 4. ✍ You can use the button to switch between the...
... Satellite Receiver ATSC Rear of TV 1 Satellite antenna cable Satellite receiver From 2 cable/ antenna 3 Audio R (red) Audio L (white) Video (yellow) ...the coaxial cable from your cable service or antenna to the VHF/UHF jack on your TV. 3 Using audio/video cables (not supplied), connect AUDIO/VIDEO OUT on your satellite receiver to AUDIO/VIDEO IN on... your TV. ✍ To watch video programs from your Satellite receiver, tune your TV to channel 3 or 4. ✍ You can use the button to switch between the...
Operating Instructions
Page 17
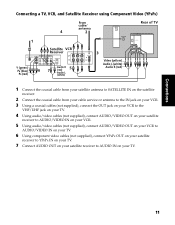
..., and Satellite Receiver using Component Video (YPBPR) From cable/ antenna 4 2 Rear of TV ATSC 1 Satellite VCR Receiver Y (green) PB (blue) PR (red) 6 7 Audio R (red) 5 Audio L (white) 3 Video (...Using a coaxial cables (not supplied), connect the OUT jack on your VCR to the VHF/UHF jack on your TV. 4 Using audio/video cables (not supplied), connect AUDIO/VIDEO OUT on your satellite receiver to AUDIO/VIDEO IN ...connect AUDIO/VIDEO OUT on your VCR to AUDIO/VIDEO IN on your TV. 6 Using component video cables (not supplied), connect YPBPR OUT on your satellite receiver to YPBPR IN on...
..., and Satellite Receiver using Component Video (YPBPR) From cable/ antenna 4 2 Rear of TV ATSC 1 Satellite VCR Receiver Y (green) PB (blue) PR (red) 6 7 Audio R (red) 5 Audio L (white) 3 Video (...Using a coaxial cables (not supplied), connect the OUT jack on your VCR to the VHF/UHF jack on your TV. 4 Using audio/video cables (not supplied), connect AUDIO/VIDEO OUT on your satellite receiver to AUDIO/VIDEO IN ...connect AUDIO/VIDEO OUT on your VCR to AUDIO/VIDEO IN on your TV. 6 Using component video cables (not supplied), connect YPBPR OUT on your satellite receiver to YPBPR IN on...

Operating Instructions
Page 18
...so you still must connect the audio cables. Connecting for Video Tape Editing (VCR and Camcorder) Camcorder (for playback) A/V output 1b or 1a Rear of TV ATSC VCR (for playback) LINE IN VIDEO AUDIO L AUDIO R LINE OUT LINE IN VIDEO AUDIO L AUDIO R LINE OUT VCR (for playback) To ... on your VCR (option 1b). 2 Using audio/video cables (not supplied), connect AUDIO/VIDEO OUT on the second VCR to AUDIO/VIDEO IN on your TV. 12 Connecting a Camcorder (for recording) Video (yellow) Audio L (white) Audio R (red) 2 1 For video tape editing, connect the VCR to the following sources: &#...
...so you still must connect the audio cables. Connecting for Video Tape Editing (VCR and Camcorder) Camcorder (for playback) A/V output 1b or 1a Rear of TV ATSC VCR (for playback) LINE IN VIDEO AUDIO L AUDIO R LINE OUT LINE IN VIDEO AUDIO L AUDIO R LINE OUT VCR (for playback) To ... on your VCR (option 1b). 2 Using audio/video cables (not supplied), connect AUDIO/VIDEO OUT on the second VCR to AUDIO/VIDEO IN on your TV. 12 Connecting a Camcorder (for recording) Video (yellow) Audio L (white) Audio R (red) 2 1 For video tape editing, connect the VCR to the following sources: &#...
Operating Instructions
Page 19
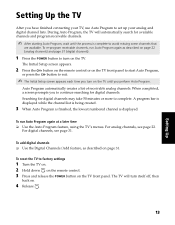
...until you to exit. ✍ The Initial Setup screen appears each time you turn on the TV until the process is displayed. For analog channels, see page 31. The TV will automatically search for digital channels may take 50 minutes or more to avoid missing some channels that are available. A progress ...Setup screen appears. 2 Press the CH+ button on the remote control or on the TV front panel to turn itself off, then back on. 4 Release . 13 Setting Up To add digital channels ❏ Use the Digital Channels/Add feature, as described on page 31. To run Auto Program again as ...
...until you to exit. ✍ The Initial Setup screen appears each time you turn on the TV until the process is displayed. For analog channels, see page 31. The TV will automatically search for digital channels may take 50 minutes or more to avoid missing some channels that are available. A progress ...Setup screen appears. 2 Press the CH+ button on the remote control or on the TV front panel to turn itself off, then back on. 4 Release . 13 Setting Up To add digital channels ❏ Use the Digital Channels/Add feature, as described on page 31. To run Auto Program again as ...

Operating Instructions
Page 20
... +1+3, and then press . ✍ Digital (ATSC) programming is in digital tuner, which enables you need to switch the TV between analog and digital tuning modes by pressing the button on the remote control to a Digital Channel This TV is equipped with digital channels. Using Features 14 In order to ...enjoy the digital features of your TV that are designed to a digital channel: 1 If the TV is ...
... +1+3, and then press . ✍ Digital (ATSC) programming is in digital tuner, which enables you need to switch the TV between analog and digital tuning modes by pressing the button on the remote control to a Digital Channel This TV is equipped with digital channels. Using Features 14 In order to ...enjoy the digital features of your TV that are designed to a digital channel: 1 If the TV is ...

Operating Instructions
Page 21
... number, call letters (if available) Using Features ✍ Program information in analog tuning mode, press the digital tuning mode. To display the digital program guide: 1 If the TV is in the guide is set to ✍ You can also see the current tuning mode and switch ... 15 Press b. Using the Digital Program Guide The digital program guide lets you review program information and select digital channels. ✍ The digital program guide cannot be displayed when: the TV is in analog tuning mode, when there are no digital channels available, when the TV is tuned to one of the...
... number, call letters (if available) Using Features ✍ Program information in analog tuning mode, press the digital tuning mode. To display the digital program guide: 1 If the TV is in the guide is set to ✍ You can also see the current tuning mode and switch ... 15 Press b. Using the Digital Program Guide The digital program guide lets you review program information and select digital channels. ✍ The digital program guide cannot be displayed when: the TV is in analog tuning mode, when there are no digital channels available, when the TV is tuned to one of the...

Operating Instructions
Page 23
... be black bars visible at the left, right, top, and bottom sides. m Zoom enlarges the picture uniformly. If the program was upconverted to digital tuning mode. Some clipping may occur. Horizontal Expand m Vertical Expand stretches the picture SCREEN vertically. Using Features Vertical Expand 17 SCREEN Some clipping may occur... off). ✍ The Screen Mode option is in its original aspect ratio. Before using the Screen Mode feature ❏ If the TV is available only for optimal viewing on your TV's 4:3 aspect ratio screen. Some clipping may occur.
... be black bars visible at the left, right, top, and bottom sides. m Zoom enlarges the picture uniformly. If the program was upconverted to digital tuning mode. Some clipping may occur. Horizontal Expand m Vertical Expand stretches the picture SCREEN vertically. Using Features Vertical Expand 17 SCREEN Some clipping may occur... off). ✍ The Screen Mode option is in its original aspect ratio. Before using the Screen Mode feature ❏ If the TV is available only for optimal viewing on your TV's 4:3 aspect ratio screen. Some clipping may occur.
Operating Instructions
Page 24
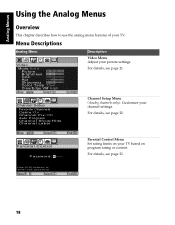
... Overview This chapter describes how to enter new password Move Select End 18 Channel Setup Menu (Analog channels only): Customize your TV. Menu Descriptions Analog Menu Video Mode:Vivid Picture Brightness Color Hue Sharpness Color Temp.:Cool ClearEdge VM:High Move Select End Channel... Setup Favorite Channels Cable:On Channel Fix:Off Auto Program Channel Show/Hide Channel Label Description Video Menu Adjust your TV based on your picture settings. For details, see page 21. Move Select End Parental Control Password: Parental Control Menu Set ...
... Overview This chapter describes how to enter new password Move Select End 18 Channel Setup Menu (Analog channels only): Customize your TV. Menu Descriptions Analog Menu Video Mode:Vivid Picture Brightness Color Hue Sharpness Color Temp.:Cool ClearEdge VM:High Move Select End Channel... Setup Favorite Channels Cable:On Channel Fix:Off Auto Program Channel Show/Hide Channel Label Description Video Menu Adjust your TV based on your picture settings. For details, see page 21. Move Select End Parental Control Password: Parental Control Menu Set ...


