
Operation Guide
Page 2
... "Memory Stick Duo" into the "Memory Stick Duo" Adaptor. 2 When recording in HDV/DV format, Sony recommends that you can use mini DV cassettes. Read this first Before operating this unit, please read this manual thoroughly, and retain it in your camcorder.) b Notes • You cannot use any "Memory Stick" that you use...
... "Memory Stick Duo" into the "Memory Stick Duo" Adaptor. 2 When recording in HDV/DV format, Sony recommends that you can use mini DV cassettes. Read this first Before operating this unit, please read this manual thoroughly, and retain it in your camcorder.) b Notes • You cannot use any "Memory Stick" that you use...
Operation Guide
Page 4
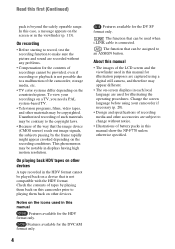
...may be copyrighted. The function that can be played back on a device that is not possible due to playing them back on this camcorder prior to a malfunction of recording media and other materials may appear different. • The on the recording conditions. Notes on other... laws. • Because of such materials may be notable in this manual Features available for the HDV format only. To view your camcorder if necessary (p. 20). • Design and specifications of the camcorder, storage media, etc. • TV color systems differ depending on a TV, you need a...
...may be copyrighted. The function that can be played back on a device that is not possible due to playing them back on this camcorder prior to a malfunction of recording media and other materials may appear different. • The on the recording conditions. Notes on other... laws. • Because of such materials may be notable in this manual Features available for the HDV format only. To view your camcorder if necessary (p. 20). • Design and specifications of the camcorder, storage media, etc. • TV color systems differ depending on a TV, you need a...
Operation Guide
Page 6
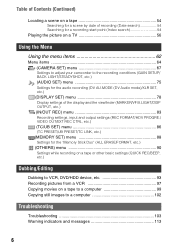
... Playing the picture on a TV 56 Using the Menu Using the menu items 62 Menu items 64 (CAMERA SET) menu 67 Settings to adjust your camcorder to the recording conditions (GAIN SETUP/ BACK LIGHT/STEADYSHOT, etc.) (AUDIO SET) menu 75 Settings for the audio recording (DV AU.MODE (DV Audio mode... of the display and the viewfinder (MARKER/VF B.LIGHT/DISP OUTPUT, etc.) (IN/OUT REC) menu 83 Recording settings, input and output settings (REC FORMAT/HDV PROGRE./ VIDEO OUT/EXT REC CTRL, etc.) (TC/UB SET) menu 86 (TC PRESET/UB PRESET/TC LINK, etc.) (MEMORY SET) menu 88 Settings for...
... Playing the picture on a TV 56 Using the Menu Using the menu items 62 Menu items 64 (CAMERA SET) menu 67 Settings to adjust your camcorder to the recording conditions (GAIN SETUP/ BACK LIGHT/STEADYSHOT, etc.) (AUDIO SET) menu 75 Settings for the audio recording (DV AU.MODE (DV Audio mode... of the display and the viewfinder (MARKER/VF B.LIGHT/DISP OUTPUT, etc.) (IN/OUT REC) menu 83 Recording settings, input and output settings (REC FORMAT/HDV PROGRE./ VIDEO OUT/EXT REC CTRL, etc.) (TC/UB SET) menu 86 (TC PRESET/UB PRESET/TC LINK, etc.) (MEMORY SET) menu 88 Settings for...
Operation Guide
Page 7
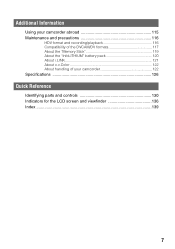
Additional Information Using your camcorder abroad 115 Maintenance and precautions 116 HDV format and recording/playback 116 Compatibility of the DVCAM/DV formats 117 About the "Memory Stick 119 About the "InfoLITHIUM" battery pack 120 About i.LINK 121 About x.v.Color 122 About handling of your camcorder 122 Specifications 126 Quick Reference Identifying parts and controls 130 Indicators for the LCD screen and viewfinder 136 Index ...139 7
Additional Information Using your camcorder abroad 115 Maintenance and precautions 116 HDV format and recording/playback 116 Compatibility of the DVCAM/DV formats 117 About the "Memory Stick 119 About the "InfoLITHIUM" battery pack 120 About i.LINK 121 About x.v.Color 122 About handling of your camcorder 122 Specifications 126 Quick Reference Identifying parts and controls 130 Indicators for the LCD screen and viewfinder 136 Index ...139 7
Operation Guide
Page 13
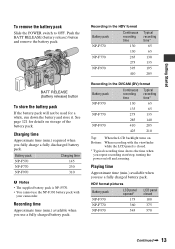
...285 140 NP-F970 410 205 425 210 Top: When the LCD backlight turns on storage of the battery pack. Bottom: When recording with your camcorder. Battery pack NP-F570 NP-F770 NP-F970 Charging time 145 230 310 b Notes • The supplied battery pack is NP-F570. •...min.) available when you fully charge a fully discharged battery pack. Charging time Approximate time (min.) required when you use a fully charged battery pack. HDV format pictures Battery pack NP-F570 NP-F770 NP-F970 LCD panel opened* 175 360 545 LCD panel closed . * Typical recording time shows the time...
...285 140 NP-F970 410 205 425 210 Top: When the LCD backlight turns on storage of the battery pack. Bottom: When recording with your camcorder. Battery pack NP-F570 NP-F770 NP-F970 Charging time 145 230 310 b Notes • The supplied battery pack is NP-F570. •...min.) available when you fully charge a fully discharged battery pack. Charging time Approximate time (min.) required when you use a fully charged battery pack. HDV format pictures Battery pack NP-F570 NP-F770 NP-F970 LCD panel opened* 175 360 545 LCD panel closed . * Typical recording time shows the time...
Operation Guide
Page 23
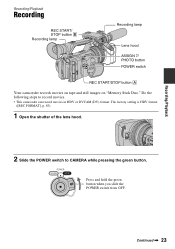
... B Recording lamp Recording lamp Lens hood ASSIGN 7/ PHOTO button POWER switch REC START/STOP button A Your camcorder records movies on tape and still images on "Memory Stick Duo." The factory setting is HDV format ([REC FORMAT], p. 83). 1 Open the shutter of the lens hood. 2 Slide the POWER switch... to record movies. • This camcorder can record movies in HDV or DVCAM (DV) format. Continued , 23 Do the following steps...
... B Recording lamp Recording lamp Lens hood ASSIGN 7/ PHOTO button POWER switch REC START/STOP button A Your camcorder records movies on tape and still images on "Memory Stick Duo." The factory setting is HDV format ([REC FORMAT], p. 83). 1 Open the shutter of the lens hood. 2 Slide the POWER switch... to record movies. • This camcorder can record movies in HDV or DVCAM (DV) format. Continued , 23 Do the following steps...
Operation Guide
Page 25
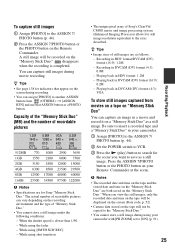
... 17000 48000 60000 16GB 25500 34500 97500 122000 b Notes • Specifications are both saved on the recording environment and the type of Sony's ClearVid CMOS sensor and image processing system (Enhanced Imaging Processor) allows for the scene you view the still images, only the recorded ...; You can vary depending on the "Memory Stick Duo." While using your Remote Commander at the scene. Playing back in HDV format/DVCAM (DV) format (16:9): 1.2M - Playing back in your camcorder. 1 Assign [PHOTO] to the ASSIGN 7/ PHOTO button (p. 44). 2 Set the POWER switch to VCR. 3 Press the N...
... 17000 48000 60000 16GB 25500 34500 97500 122000 b Notes • Specifications are both saved on the recording environment and the type of Sony's ClearVid CMOS sensor and image processing system (Enhanced Imaging Processor) allows for the scene you view the still images, only the recorded ...; You can vary depending on the "Memory Stick Duo." While using your Remote Commander at the scene. Playing back in HDV format/DVCAM (DV) format (16:9): 1.2M - Playing back in your camcorder. 1 Assign [PHOTO] to the ASSIGN 7/ PHOTO button (p. 44). 2 Set the POWER switch to VCR. 3 Press the N...
Operation Guide
Page 43
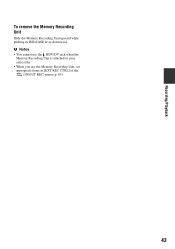
Recording/Playback To remove the Memory Recording Unit Slide the Memory Recording Unit upward while pushing its RELEASE lever downward. b Notes • You cannot use the HDV/DV jack when the Memory Recording Unit is attached to your camcorder. • When you use the Memory Recording Unit, set appropriate items in [EXT REC CTRL] of the (IN/OUT REC) menu (p. 85). 43
Recording/Playback To remove the Memory Recording Unit Slide the Memory Recording Unit upward while pushing its RELEASE lever downward. b Notes • You cannot use the HDV/DV jack when the Memory Recording Unit is attached to your camcorder. • When you use the Memory Recording Unit, set appropriate items in [EXT REC CTRL] of the (IN/OUT REC) menu (p. 85). 43
Operation Guide
Page 49
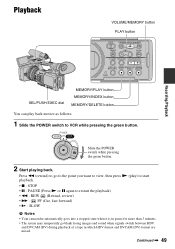
...: PAUSE (Press N or X again to restart the playback) • m : REW (Rewind, review) • M : FF (Cue, fast forward) • y : SLOW b Notes • Your camcorder automatically goes into a stopped state when it is in pause for more than 3 minutes. • The screen may temporarily go to the point you want...back movies as follows: 1 Slide the POWER switch to go blank losing images and sound when signals switch between HDV and DVCAM (DV) during playback of a tape in which HDV format and DVCAM (DV) format are mixed. Press m (rewind) to VCR while pressing the green button. Continued...
...: PAUSE (Press N or X again to restart the playback) • m : REW (Rewind, review) • M : FF (Cue, fast forward) • y : SLOW b Notes • Your camcorder automatically goes into a stopped state when it is in pause for more than 3 minutes. • The screen may temporarily go to the point you want...back movies as follows: 1 Slide the POWER switch to go blank losing images and sound when signals switch between HDV and DVCAM (DV) during playback of a tape in which HDV format and DVCAM (DV) format are mixed. Press m (rewind) to VCR while pressing the green button. Continued...
Operation Guide
Page 50
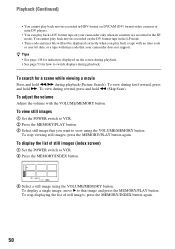
...the MEMORY/INDEX button. 101-0050 1 / 19 101 3 Select a still image using the VOLUME/MEMORY button. To display a single image, move B to that your camcorder only when its contents are recorded in the SP mode. To stop viewing still images, press the MEMORY/PLAY button again. You cannot play back... not be displayed correctly when you want to view using the VOLUME/MEMORY button. Playback (Continued) • You cannot play back movies recorded in HDV format on DVCAM (DV) format video cameras or mini DV players. • You can play back a DV format tape on the screen during ...
...the MEMORY/INDEX button. 101-0050 1 / 19 101 3 Select a still image using the VOLUME/MEMORY button. To display a single image, move B to that your camcorder only when its contents are recorded in the SP mode. To stop viewing still images, press the MEMORY/PLAY button again. You cannot play back... not be displayed correctly when you want to view using the VOLUME/MEMORY button. Playback (Continued) • You cannot play back movies recorded in HDV format on DVCAM (DV) format video cameras or mini DV players. • You can play back a DV format tape on the screen during ...
Operation Guide
Page 53
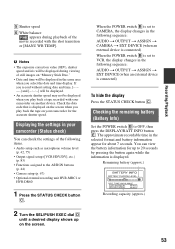
... DEVICE (when an external device is set to VCR, the display changes in the selected format and battery information appear for up on your camcorder (Status check) You can view the battery information for about 7 seconds. When the POWER switch B is set to OFF, then press ...setup such as microphone volume level (p. 42, 75) • Output signal setup ([VCR HDV/DV], etc.) (p. 83) • Functions assigned to the ASSIGN buttons (p. 44) • Camera setup (p. 67) • Optional external recording unit HVR-MRC1 or HVR-DR60 1 Press the STATUS CHECK button C. 2 Turn the SEL/PUSH EXEC dial D...
... DEVICE (when an external device is set to VCR, the display changes in the selected format and battery information appear for up on your camcorder (Status check) You can view the battery information for about 7 seconds. When the POWER switch B is set to OFF, then press ...setup such as microphone volume level (p. 42, 75) • Output signal setup ([VCR HDV/DV], etc.) (p. 83) • Functions assigned to the ASSIGN buttons (p. 44) • Camera setup (p. 67) • Optional external recording unit HVR-MRC1 or HVR-DR60 1 Press the STATUS CHECK button C. 2 Turn the SEL/PUSH EXEC dial D...
Operation Guide
Page 56
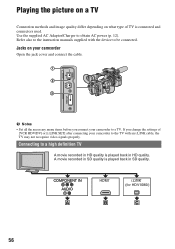
...back in HD quality. COMPONENT IN AUDIO A HHDDMMI I ii..LLIINNKK (for HDV1080i) B C 56 Jacks on what type of [VCR HDV/DV] or [i.LINK SET] after connecting your camcorder to the TV with the device to be connected. b Notes • Set all the necessary menu items before you change the settings... of TV is connected and connectors used. If you connect your camcorder Open the jack cover and connect the cable. Refer also to the instruction manuals supplied with an i.LINK cable, the TV may not recognize ...
...back in HD quality. COMPONENT IN AUDIO A HHDDMMI I ii..LLIINNKK (for HDV1080i) B C 56 Jacks on what type of [VCR HDV/DV] or [i.LINK SET] after connecting your camcorder to the TV with the device to be connected. b Notes • Set all the necessary menu items before you change the settings... of TV is connected and connectors used. If you connect your camcorder Open the jack cover and connect the cable. Refer also to the instruction manuals supplied with an i.LINK cable, the TV may not recognize ...
Operation Guide
Page 57
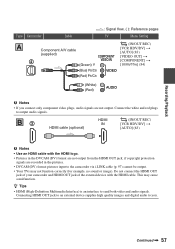
...HDV/DV] t [AUTO] (83) b Notes • Use an HDMI cable with the HDMI cable. This may not function correctly (for example, no sound or image). Connect the white and red plugs to send both video and audio signals. Continued , 57 Do not connect the HDMI OUT jack of your camcorder... are recorded in the DVCAM (DV) format are not output from the HDMI OUT jack, if copyright protection signals are not output. Recording/Playback Type Camcorder Cable A 2 Component A/V cable (supplied) (Green) Y (Blue) PB/CB (Red) PR/CR (White) (Red) : Signal flow, ( ): Reference pages TV Menu ...
...HDV/DV] t [AUTO] (83) b Notes • Use an HDMI cable with the HDMI cable. This may not function correctly (for example, no sound or image). Connect the white and red plugs to send both video and audio signals. Continued , 57 Do not connect the HDMI OUT jack of your camcorder... are recorded in the DVCAM (DV) format are not output from the HDMI OUT jack, if copyright protection signals are not output. Recording/Playback Type Camcorder Cable A 2 Component A/V cable (supplied) (Green) Y (Blue) PB/CB (Red) PR/CR (White) (Red) : Signal flow, ( ): Reference pages TV Menu ...
Operation Guide
Page 58
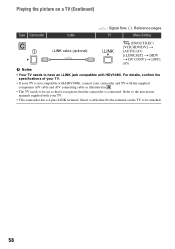
... to be set so that it recognizes that fits the terminal on a TV (Continued) Type Camcorder Cable : Signal flow, ( ): Reference pages TV Menu Setting C 1 i.LINK cable (optional) (IN/OUT REC) [VCR HDV/DV] t [AUTO] (83) [i.LINK SET] t [HDV t DV CONV] t [OFF] (85) b Notes • Your TV needs to have an i.LINK jack compatible...
... to be set so that it recognizes that fits the terminal on a TV (Continued) Type Camcorder Cable : Signal flow, ( ): Reference pages TV Menu Setting C 1 i.LINK cable (optional) (IN/OUT REC) [VCR HDV/DV] t [AUTO] (83) [i.LINK SET] t [HDV t DV CONV] t [OFF] (85) b Notes • Your TV needs to have an i.LINK jack compatible...
Operation Guide
Page 60
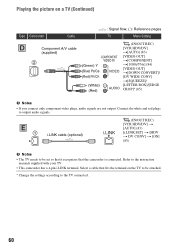
... to output audio signals. Playing the picture on the TV to be set so that it recognizes that the camcorder is connected. Select a cable that fits the terminal on a TV (Continued) Type Camcorder Cable D Component A/V cable (supplied) 2 (Green) Y (Blue) PB/CB (Red) PR/CR (White) ...(Red) : Signal flow, ( ): Reference pages TV Menu Setting (IN/OUT REC) [VCR HDV/DV] t[AUTO] (83) [VIDEO OUT] t[COMPONENT] t[1080i/576i] ...
... to output audio signals. Playing the picture on the TV to be set so that it recognizes that the camcorder is connected. Select a cable that fits the terminal on a TV (Continued) Type Camcorder Cable D Component A/V cable (supplied) 2 (Green) Y (Blue) PB/CB (Red) PR/CR (White) ...(Red) : Signal flow, ( ): Reference pages TV Menu Setting (IN/OUT REC) [VCR HDV/DV] t[AUTO] (83) [VIDEO OUT] t[COMPONENT] t[1080i/576i] ...
Operation Guide
Page 61
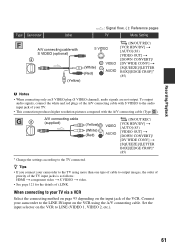
... video t S VIDEO t video. • See page 121 for the details of the VCR. Connect your camcorder to the TV using the A/V connecting cable. A/V connecting cable 2 (supplied) (Yellow) (White) (Red) (IN/OUT REC) [VCR HDV/DV] t [AUTO] (83) [VIDEO OUT] t [DOWN CONVERT]/ [DV WIDE CONV] t [SQUEEZE]/[LETTER...resolution pictures compared with the A/V connecting cable (Type ). Set the input selector on the input jack of i.LINK. Recording/Playback Type Camcorder Cable A/V connecting cable with S VIDEO to the audio input jack of your TV via a VCR Select the connecting method on page ...
... video t S VIDEO t video. • See page 121 for the details of the VCR. Connect your camcorder to the TV using the A/V connecting cable. A/V connecting cable 2 (supplied) (Yellow) (White) (Red) (IN/OUT REC) [VCR HDV/DV] t [AUTO] (83) [VIDEO OUT] t [DOWN CONVERT]/ [DV WIDE CONV] t [SQUEEZE]/[LETTER...resolution pictures compared with the A/V connecting cable (Type ). Set the input selector on the input jack of i.LINK. Recording/Playback Type Camcorder Cable A/V connecting cable with S VIDEO to the audio input jack of your TV via a VCR Select the connecting method on page ...

Operation Guide
Page 81
... selected for the setting. When [SCAN TYPE] is set to [BRIGHT]. • When you connect your camcorder reads image data from the image sensor is calculated based on [SCAN TYPE], see [HDV PROGRE.] (p. 83) or [DV PROGRE.] (p. 84). LCD BRIGHT You can adjust the brightness of the LCD...as 360 degrees. LCD BL LEVEL You can select how to display the focal distance during manual focus. b Notes • When you connect your camcorder to outside power sources, [LCD BL LEVEL] is automatically set to [50], 1/50 second is slightly reduced. B METER Displays the focal distance in...
... selected for the setting. When [SCAN TYPE] is set to [BRIGHT]. • When you connect your camcorder reads image data from the image sensor is calculated based on [SCAN TYPE], see [HDV PROGRE.] (p. 83) or [DV PROGRE.] (p. 84). LCD BRIGHT You can adjust the brightness of the LCD...as 360 degrees. LCD BL LEVEL You can select how to display the focal distance during manual focus. b Notes • When you connect your camcorder to outside power sources, [LCD BL LEVEL] is automatically set to [50], 1/50 second is slightly reduced. B METER Displays the focal distance in...

Operation Guide
Page 83
...8226; Make sure to disconnect the i.LINK cable prior to your camcorder to and from an external device via the HDV/ DV (i.LINK) jack for details on the device. DVCAM (DV) signals are outputted without any conversion. - [HDV]: HDV signals are selected. (IN/OUT REC) menu Recording settings, input.... - [DV]: DVCAM (DV) signals are outputted without any conversion. During the i.LINK connection, inputs or outputs only HDV signals to your camcorder to or from the external device via the HDV/DV (i.LINK) jack for recording or playback. See page 62 for recording or playback. VCR...
...8226; Make sure to disconnect the i.LINK cable prior to your camcorder to and from an external device via the HDV/ DV (i.LINK) jack for details on the device. DVCAM (DV) signals are outputted without any conversion. - [HDV]: HDV signals are selected. (IN/OUT REC) menu Recording settings, input.... - [DV]: DVCAM (DV) signals are outputted without any conversion. During the i.LINK connection, inputs or outputs only HDV signals to your camcorder to or from the external device via the HDV/DV (i.LINK) jack for recording or playback. See page 62 for recording or playback. VCR...

Operation Guide
Page 84
... aspect ratio that matches that of a TV that you want to connect for recording in an interlace scan. 25 Captures 25 frames per second in HDV format. B 50 Captures 50 fields per second. DV REC MODE (DV Recording mode) This function is [INTERLACE]. b Notes • Selectable [... (p. 84). • The aspect ratio will be properly connected between the scenes recorded in DVCAM/DV format. B 1080i/576i Supports connection between your camcorder and a TV with a component input jack that come with the TV. Press the MENU button t select the (IN/OUT REC) with a component...
... aspect ratio that matches that of a TV that you want to connect for recording in an interlace scan. 25 Captures 25 frames per second in HDV format. B 50 Captures 50 fields per second. DV REC MODE (DV Recording mode) This function is [INTERLACE]. b Notes • Selectable [... (p. 84). • The aspect ratio will be properly connected between the scenes recorded in DVCAM/DV format. B 1080i/576i Supports connection between your camcorder and a TV with a component input jack that come with the TV. Press the MENU button t select the (IN/OUT REC) with a component...
Operation Guide
Page 85
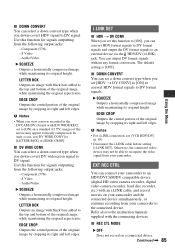
... CONV You can connect your camcorder to an HDV/DVCAM/DV compatible device (digital HD video camera recorder, digital video camera recorder, hard disc recorder, etc.) with black bars added to [LETTER BOX] or [EDGE CROP]. b Notes • For i.LINK connection, see [VCR HDV/DV] (p. 83). •...horizontally compressed image while maintaining its right and left edges. You can select a down -covert HDV signal to the connected device. Use this function for signals outputting from your camcorder. Continued , 85 Using the Menu LETTER BOX Outputs an image with black bars added to ...
... CONV You can connect your camcorder to an HDV/DVCAM/DV compatible device (digital HD video camera recorder, digital video camera recorder, hard disc recorder, etc.) with black bars added to [LETTER BOX] or [EDGE CROP]. b Notes • For i.LINK connection, see [VCR HDV/DV] (p. 83). •...horizontally compressed image while maintaining its right and left edges. You can select a down -covert HDV signal to the connected device. Use this function for signals outputting from your camcorder. Continued , 85 Using the Menu LETTER BOX Outputs an image with black bars added to ...


