
Operation Guide
Page 3
... Microphone holder About menu items, LCD panel, viewfinder, and lens • A menu item that appear constantly on the viewfinder or lens and damage the internal parts of the manufacturing process and do not affect the recording in any way. Using the camcorder • Do not hold the camcorder by placing it...
... Microphone holder About menu items, LCD panel, viewfinder, and lens • A menu item that appear constantly on the viewfinder or lens and damage the internal parts of the manufacturing process and do not affect the recording in any way. Using the camcorder • Do not hold the camcorder by placing it...
Operation Guide
Page 7
Additional Information Using your camcorder abroad 115 Maintenance and precautions 116 HDV format and recording/playback 116 Compatibility of the DVCAM/DV formats 117 About the "Memory Stick 119 About the "InfoLITHIUM" battery pack 120 About i.LINK 121 About x.v.Color 122 About handling of your camcorder 122 Specifications 126 Quick Reference Identifying parts and controls 130 Indicators for the LCD screen and viewfinder 136 Index ...139 7
Additional Information Using your camcorder abroad 115 Maintenance and precautions 116 HDV format and recording/playback 116 Compatibility of the DVCAM/DV formats 117 About the "Memory Stick 119 About the "InfoLITHIUM" battery pack 120 About i.LINK 121 About x.v.Color 122 About handling of your camcorder 122 Specifications 126 Quick Reference Identifying parts and controls 130 Indicators for the LCD screen and viewfinder 136 Index ...139 7
Operation Guide
Page 14
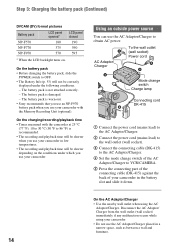
... which you use your camcorder. On the battery pack • Before changing the battery pack, slide the POWER switch to VCR/CAMERA. 5 Press the connecting part of the connecting cable (DK-415) against the back of your camcorder in the battery slot and slide it down. The battery pack is recommended... as between a wall and furniture. 14 Using an outside power source You can use the AC Adaptor/Charger to 86 °F) is worn-out. • Sony recommends that you use an NP-F970 battery pack when you use your camcorder with the camcorder at 25 °C (77 °F). 10 to 30...
... which you use your camcorder. On the battery pack • Before changing the battery pack, slide the POWER switch to VCR/CAMERA. 5 Press the connecting part of the connecting cable (DK-415) against the back of your camcorder in the battery slot and slide it down. The battery pack is recommended... as between a wall and furniture. 14 Using an outside power source You can use the AC Adaptor/Charger to 86 °F) is worn-out. • Sony recommends that you use an NP-F970 battery pack when you use your camcorder with the camcorder at 25 °C (77 °F). 10 to 30...

Operation Guide
Page 18
You can attach the large eyecup facing either the right or left side. Large eyecup (supplied) Attach with the eyecup groove in the viewfinder clearly under bright circumstances, use the supplied large eyecup. Step 5: Adjusting the LCD panel and viewfinder (Continued) When the picture in the viewfinder is hard to see If you cannot see the picture in the viewfinder. To attach the large eyecup, stretch it slightly and align it with the protruding part at the top. 18 b Notes • Do not remove the pre-attached eyecup.
You can attach the large eyecup facing either the right or left side. Large eyecup (supplied) Attach with the eyecup groove in the viewfinder clearly under bright circumstances, use the supplied large eyecup. Step 5: Adjusting the LCD panel and viewfinder (Continued) When the picture in the viewfinder is hard to see If you cannot see the picture in the viewfinder. To attach the large eyecup, stretch it slightly and align it with the protruding part at the top. 18 b Notes • Do not remove the pre-attached eyecup.

Operation Guide
Page 78
... is [OFF]. The default setting is [70]. See page 62 for adjusting brightness. The zebra pattern will not be recorded on the screen when the part is a strip pattern displayed over a part of the image brightness. x LEVEL You can adjust the iris while referring to a histogram.
... is [OFF]. The default setting is [70]. See page 62 for adjusting brightness. The zebra pattern will not be recorded on the screen when the part is a strip pattern displayed over a part of the image brightness. x LEVEL You can adjust the iris while referring to a histogram.

Operation Guide
Page 118
.... (there will be limited depending on editing" (p. 119). Even if the tape is played back, quality of the playback cannot be partly misadjusted. 118 Source tape Player's Recorder's Recording format format format DV formatted (SP mode only) DVCAM DVCAM DV DVCAM 1) DV DV DV ...recording format of edited tapes is defined according to the source tape and the recorder's format as described below . The time code format will be partly misadjusted. 3) Some mini DV video equipment may be no effect on the recorded picture except in certain cases.) 2) If the tape that indicated...
.... (there will be limited depending on editing" (p. 119). Even if the tape is played back, quality of the playback cannot be partly misadjusted. 118 Source tape Player's Recorder's Recording format format format DV formatted (SP mode only) DVCAM DVCAM DV DVCAM 1) DV DV DV ...recording format of edited tapes is defined according to the source tape and the recorder's format as described below . The time code format will be partly misadjusted. 3) Some mini DV video equipment may be no effect on the recorded picture except in certain cases.) 2) If the tape that indicated...

Operation Guide
Page 128
... to +140 °F) Dimensions (approx.) 123 × 53 × 135 mm (4 7/8 × 2 1/8 × 5 3/8 in .) (w/h/d) including the projecting parts with the battery pack (NP-F570) Mass (approx.) 2.2 kg (5 lb 1 oz) including the lens hood with lens cover 2.5 kg (5 lb 6 oz) including the... battery pack (NP-F570), cassette (PHDVM63DM), lens hood with lens cover and microphone (ECM-XM1) * When the HVR-MRC1 is used, the average power consumption increases about 2.5 W. Specifications (Continued) Dimensions (approx.) 169 × 188 × 451 mm (6 3/4 × 7 ...
... to +140 °F) Dimensions (approx.) 123 × 53 × 135 mm (4 7/8 × 2 1/8 × 5 3/8 in .) (w/h/d) including the projecting parts with the battery pack (NP-F570) Mass (approx.) 2.2 kg (5 lb 1 oz) including the lens hood with lens cover 2.5 kg (5 lb 6 oz) including the... battery pack (NP-F570), cassette (PHDVM63DM), lens hood with lens cover and microphone (ECM-XM1) * When the HVR-MRC1 is used, the average power consumption increases about 2.5 W. Specifications (Continued) Dimensions (approx.) 169 × 188 × 451 mm (6 3/4 × 7 ...

Operation Guide
Page 130
... in the direction opposite to that of the arrow on the accessory shoe plate and remove it from the accessory shoe mount. Quick Reference Identifying parts and controls The numbers in the direction of the arrow on the plate surface until the end of the plate engages the end of the...
... in the direction opposite to that of the arrow on the accessory shoe plate and remove it from the accessory shoe mount. Quick Reference Identifying parts and controls The numbers in the direction of the arrow on the plate surface until the end of the plate engages the end of the...

Operation Guide
Page 132
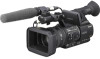
Identifying parts and controls (Continued) A ASSIGN 4 button (44) B ASSIGN 5 button* (44) C ASSIGN 6 button (44) D Memory Recording Unit jack (42) For an optional memory recording unit (HVR-DR60 or HVR-MRC1) E HDV/DV jack (56) F A/V Remote Connector (56) G HDMI OUT jack (56) H i (headphones) jack For stereo mini-jack headphones I REC START/STOP button (23) J INPUT2...
Identifying parts and controls (Continued) A ASSIGN 4 button (44) B ASSIGN 5 button* (44) C ASSIGN 6 button (44) D Memory Recording Unit jack (42) For an optional memory recording unit (HVR-DR60 or HVR-MRC1) E HDV/DV jack (56) F A/V Remote Connector (56) G HDMI OUT jack (56) H i (headphones) jack For stereo mini-jack headphones I REC START/STOP button (23) J INPUT2...

Operation Guide
Page 134
... battery is low. 134 * PLAY button, VOLUME/MEMORY button, and MEMORY/INDEX button have raised tactile dots for your convenience in locating the buttons. Identifying parts and controls (Continued) A TC/U-BIT button Switches between time code and user bit to the default. B DATA CODE button (52) C Video control buttons (STOP/REW...
... battery is low. 134 * PLAY button, VOLUME/MEMORY button, and MEMORY/INDEX button have raised tactile dots for your convenience in locating the buttons. Identifying parts and controls (Continued) A TC/U-BIT button Switches between time code and user bit to the default. B DATA CODE button (52) C Video control buttons (STOP/REW...


