
Operation Guide
Page 2
Notes on use Types of cassette you can use in your camcorder Your camcorder is adopted in BS (broadcast satellite) digital and terrestrial digital HDTV broadcastings and in your camcorder You can use in DVCAM format, Sony recommends that has the following markings. When recording in HDV, DVCAM and...8226; You cannot use it for future reference. Types of recording in HDV/DV format, Sony recommends that you use any "Memory Stick" that you use mini DV cassettes. Your camcorder does not support the Cassette Memory function (p. 116). Read this first Before operating this unit,...
Notes on use Types of cassette you can use in your camcorder Your camcorder is adopted in BS (broadcast satellite) digital and terrestrial digital HDTV broadcastings and in your camcorder You can use in DVCAM format, Sony recommends that has the following markings. When recording in HDV, DVCAM and...8226; You cannot use it for future reference. Types of recording in HDV/DV format, Sony recommends that you use any "Memory Stick" that you use mini DV cassettes. Your camcorder does not support the Cassette Memory function (p. 116). Read this first Before operating this unit,...

Operation Guide
Page 3
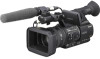
...screen and the viewfinder. Protect this device by always closing the lens cover or by the following part. Using the camcorder • Do not hold the camcorder by placing it in its bag when not in use . These points are normal results of the pixels are manufactured... technology, so over 99.99% of the manufacturing process and do not affect the recording in a malfunction of your camcorder's viewfinder, lens, or LCD screen to your camcorder or battery Continued , 3 Lens hood LCD panel Internal microphone Microphone or Microphone holder About menu items, LCD panel, ...
...screen and the viewfinder. Protect this device by always closing the lens cover or by the following part. Using the camcorder • Do not hold the camcorder by placing it in its bag when not in use . These points are normal results of the pixels are manufactured... technology, so over 99.99% of the manufacturing process and do not affect the recording in a malfunction of your camcorder's viewfinder, lens, or LCD screen to your camcorder or battery Continued , 3 Lens hood LCD panel Internal microphone Microphone or Microphone holder About menu items, LCD panel, ...
Operation Guide
Page 4
...recordings on a TV, you need a PAL system-based TV. • Television programs, films, video tapes, and other devices. To view your camcorder if necessary (p. 20). • Design and specifications of recording media and other devices A tape recorded in displays having high motion resolution. Check the...used in this manual for the DV SP format only. Read this first (Continued) pack is not possible due to a malfunction of the camcorder, storage media, etc. • TV color systems differ depending on the countries/regions. The function that can be contrary to the copyright ...
...recordings on a TV, you need a PAL system-based TV. • Television programs, films, video tapes, and other devices. To view your camcorder if necessary (p. 20). • Design and specifications of recording media and other devices A tape recorded in displays having high motion resolution. Check the...used in this manual for the DV SP format only. Read this first (Continued) pack is not possible due to a malfunction of the camcorder, storage media, etc. • TV color systems differ depending on the countries/regions. The function that can be contrary to the copyright ...
Operation Guide
Page 5
...supplied microphone and the lens hood with lens cover 9 Step 3: Charging the battery pack 12 Step 4: Turning the power on and holding your camcorder properly .....16 Step 5: Adjusting the LCD panel and viewfinder 17 Step 6: Setting the date and time 19 Changing the language setting 20 Step 7:... Inserting a tape or a "Memory Stick Duo 21 Recording/Playback Recording 23 Changing the settings of your camcorder recordings 26 Adjusting the zoom 26 Adjusting the focus manually 27 Adjusting the image brightness 28 Adjusting to natural color (White balance 31 ...
...supplied microphone and the lens hood with lens cover 9 Step 3: Charging the battery pack 12 Step 4: Turning the power on and holding your camcorder properly .....16 Step 5: Adjusting the LCD panel and viewfinder 17 Step 6: Setting the date and time 19 Changing the language setting 20 Step 7:... Inserting a tape or a "Memory Stick Duo 21 Recording/Playback Recording 23 Changing the settings of your camcorder recordings 26 Adjusting the zoom 26 Adjusting the focus manually 27 Adjusting the image brightness 28 Adjusting to natural color (White balance 31 ...
Operation Guide
Page 6
... Playing the picture on a TV 56 Using the Menu Using the menu items 62 Menu items 64 (CAMERA SET) menu 67 Settings to adjust your camcorder to the recording conditions (GAIN SETUP/ BACK LIGHT/STEADYSHOT, etc.) (AUDIO SET) menu 75 Settings for the audio recording (DV AU.MODE (DV Audio mode...
... Playing the picture on a TV 56 Using the Menu Using the menu items 62 Menu items 64 (CAMERA SET) menu 67 Settings to adjust your camcorder to the recording conditions (GAIN SETUP/ BACK LIGHT/STEADYSHOT, etc.) (AUDIO SET) menu 75 Settings for the audio recording (DV AU.MODE (DV Audio mode...
Operation Guide
Page 7
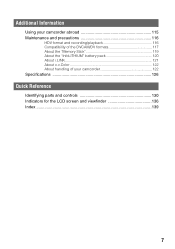
Additional Information Using your camcorder abroad 115 Maintenance and precautions 116 HDV format and recording/playback 116 Compatibility of the DVCAM/DV formats 117 About the "Memory Stick 119 About the "InfoLITHIUM" battery pack 120 About i.LINK 121 About x.v.Color 122 About handling of your camcorder 122 Specifications 126 Quick Reference Identifying parts and controls 130 Indicators for the LCD screen and viewfinder 136 Index ...139 7
Additional Information Using your camcorder abroad 115 Maintenance and precautions 116 HDV format and recording/playback 116 Compatibility of the DVCAM/DV formats 117 About the "Memory Stick 119 About the "InfoLITHIUM" battery pack 120 About i.LINK 121 About x.v.Color 122 About handling of your camcorder 122 Specifications 126 Quick Reference Identifying parts and controls 130 Indicators for the LCD screen and viewfinder 136 Index ...139 7
Operation Guide
Page 8
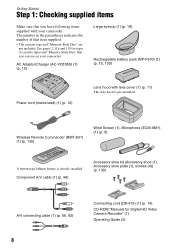
Getting Started Step 1: Checking supplied items Make sure that you can use on your camcorder. Component A/V cable (1) (p. 56) Accessory shoe kit (Accessory shoe (1), Accessory shoe plate (1), screws (4)) (p. 130) A/V connecting cable (1) (p. 56, 93) 8 Connecting cord (DK-... 12) Large eyecup (1) (p. 18) Rechargeable battery pack (NP-F570) (1) (p. 12, 120) Power cord (mains lead) (1) (p. 12) Lens hood with your camcorder. See pages 2, 116 and 119 for Digital HD Video Camera Recorder" (1) Operating Guide (2) The number in the parentheses indicates the number of cassette tapes and...
Getting Started Step 1: Checking supplied items Make sure that you can use on your camcorder. Component A/V cable (1) (p. 56) Accessory shoe kit (Accessory shoe (1), Accessory shoe plate (1), screws (4)) (p. 130) A/V connecting cable (1) (p. 56, 93) 8 Connecting cord (DK-... 12) Large eyecup (1) (p. 18) Rechargeable battery pack (NP-F570) (1) (p. 12, 120) Power cord (mains lead) (1) (p. 12) Lens hood with your camcorder. See pages 2, 116 and 119 for Digital HD Video Camera Recorder" (1) Operating Guide (2) The number in the parentheses indicates the number of cassette tapes and...

Operation Guide
Page 11
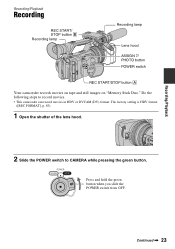
... To open or close the shutter of the arrow 2. PUSH (lens hood release) button Align the marks on the lens hood to those on the camcorder, and turn the lens hood in the direction of the lens hood with lens cover Turn the lens hood in the opposite direction to close...
... To open or close the shutter of the arrow 2. PUSH (lens hood release) button Align the marks on the lens hood to those on the camcorder, and turn the lens hood in the direction of the lens hood with lens cover Turn the lens hood in the opposite direction to close...

Operation Guide
Page 12
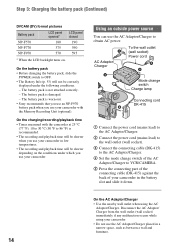
... off until the battery mark with the supplied AC Adaptor/Charger. To attach the battery pack Press the battery pack against the back of your camcorder and slide it down , and slide it down . Remove the battery pack from the AC Adaptor/Charger when the charge is completed. b Notes • You...
... off until the battery mark with the supplied AC Adaptor/Charger. To attach the battery pack Press the battery pack against the back of your camcorder and slide it down , and slide it down . Remove the battery pack from the AC Adaptor/Charger when the charge is completed. b Notes • You...
Operation Guide
Page 13
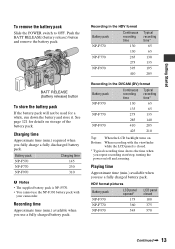
..., turning the power on/off and zooming. Getting Started To remove the battery pack Slide the POWER switch to OFF. Bottom: When recording with your camcorder. Push the BATT RELEASE (battery release) button and remove the battery pack.
..., turning the power on/off and zooming. Getting Started To remove the battery pack Slide the POWER switch to OFF. Bottom: When recording with your camcorder. Push the BATT RELEASE (battery release) button and remove the battery pack.
Operation Guide
Page 14
... the LCD backlight turns on the conditions under the following conditions. - The battery pack is worn-out. • Sony recommends that you use an NP-F970 battery pack when you use your camcorder with the camcorder at 25 °C (77 °F). 10 to 30 °C (50 °F to 86 °F) is not ...change switch of the AC Adaptor/Charger to VCR/CAMERA. 5 Press the connecting part of the connecting cable (DK-415) against the back of your camcorder. • Do not use the AC Adaptor/Charger to OFF. • The Battery Info (p. 53) will be correctly displayed under which you use your...
... the LCD backlight turns on the conditions under the following conditions. - The battery pack is worn-out. • Sony recommends that you use an NP-F970 battery pack when you use your camcorder with the camcorder at 25 °C (77 °F). 10 to 30 °C (50 °F to 86 °F) is not ...change switch of the AC Adaptor/Charger to VCR/CAMERA. 5 Press the connecting part of the connecting cable (DK-415) against the back of your camcorder. • Do not use the AC Adaptor/Charger to OFF. • The Battery Info (p. 53) will be correctly displayed under which you use your...

Operation Guide
Page 15
Getting Started • Do not short-circuit the DC plug of the AC Adaptor/Charger or battery terminal with any metallic objects. This may cause a malfunction. • Even if your camcorder is turned off, AC power (house current) is still supplied to it while connected to the wall outlet (wall socket) via the AC Adaptor/Charger. 15
Getting Started • Do not short-circuit the DC plug of the AC Adaptor/Charger or battery terminal with any metallic objects. This may cause a malfunction. • Even if your camcorder is turned off, AC power (house current) is still supplied to it while connected to the wall outlet (wall socket) via the AC Adaptor/Charger. 15

Operation Guide
Page 16
...Notes • The current date and time appear on the LCD screen for the first time, the [CLOCK SET] screen appears (p. 19). 2 Hold the camcorder properly. POWER switch 1 Slide the POWER switch to OFF while pressing the green button. Slide the POWER switch while pressing the green button. CAMERA: To... record pictures. b Notes • If warning messages appear on the screen, follow the instructions. 16 When you use your camcorder once you turn off the power Slide the POWER switch to CAMERA or VCR while you press the green button. 3 Ensure a good grip, then ...
...Notes • The current date and time appear on the LCD screen for the first time, the [CLOCK SET] screen appears (p. 19). 2 Hold the camcorder properly. POWER switch 1 Slide the POWER switch to OFF while pressing the green button. Slide the POWER switch while pressing the green button. CAMERA: To... record pictures. b Notes • If warning messages appear on the screen, follow the instructions. 16 When you use your camcorder once you turn off the power Slide the POWER switch to CAMERA or VCR while you press the green button. 3 Ensure a good grip, then ...

Operation Guide
Page 17
... image on the LCD backlight, press and hold the DISPLAY/BATT INFO button for a few seconds until appears. This is practical when you use your camcorder in the viewfinder, set [VF COLOR] to record or play back (2). 1Open 180 degrees. 290 degrees (max.) 2180 degrees (max.) The viewfinder Viewfinder lens adjustment...
... image on the LCD backlight, press and hold the DISPLAY/BATT INFO button for a few seconds until appears. This is practical when you use your camcorder in the viewfinder, set [VF COLOR] to record or play back (2). 1Open 180 degrees. 290 degrees (max.) 2180 degrees (max.) The viewfinder Viewfinder lens adjustment...

Operation Guide
Page 19
... battery and then set the date and time, [CLOCK SET] screen appears every time you do not use your camcorder for the first time. If you turn on your camcorder for about 3 months, the built-in rechargeable battery gets discharged and the date and time settings may be cleared... from the memory. CLOCK SET --:--:--:-- Getting Started Step 6: Setting the date and time Set the date and time when using your camcorder or change the POWER...
... battery and then set the date and time, [CLOCK SET] screen appears every time you do not use your camcorder for the first time. If you turn on your camcorder for about 3 months, the built-in rechargeable battery gets discharged and the date and time settings may be cleared... from the memory. CLOCK SET --:--:--:-- Getting Started Step 6: Setting the date and time Set the date and time when using your camcorder or change the POWER...

Operation Guide
Page 22
... may be careful with the "Memory Stick Duo" from popping out and dropping. 22 b Notes • When the access lamp is lit or flashing, your camcorder, turn the power off, eject the "Memory Stick Duo," or remove the battery pack. Step 7: Inserting a tape or a "Memory Stick Duo" (Continued) 2 Insert the "Memory...
... may be careful with the "Memory Stick Duo" from popping out and dropping. 22 b Notes • When the access lamp is lit or flashing, your camcorder, turn the power off, eject the "Memory Stick Duo," or remove the battery pack. Step 7: Inserting a tape or a "Memory Stick Duo" (Continued) 2 Insert the "Memory...
Operation Guide
Page 23
.... The factory setting is HDV format ([REC FORMAT], p. 83). 1 Open the shutter of the lens hood. 2 Slide the POWER switch to record movies. • This camcorder can record movies in HDV or DVCAM (DV) format. Press and hold the green button when you slide the POWER switch from OFF. Recording/Playback... Recording/Playback Recording REC START/ STOP button B Recording lamp Recording lamp Lens hood ASSIGN 7/ PHOTO button POWER switch REC START/STOP button A Your camcorder records movies on tape and still images on "Memory Stick Duo." Continued , 23
.... The factory setting is HDV format ([REC FORMAT], p. 83). 1 Open the shutter of the lens hood. 2 Slide the POWER switch to record movies. • This camcorder can record movies in HDV or DVCAM (DV) format. Press and hold the green button when you slide the POWER switch from OFF. Recording/Playback... Recording/Playback Recording REC START/ STOP button B Recording lamp Recording lamp Lens hood ASSIGN 7/ PHOTO button POWER switch REC START/STOP button A Your camcorder records movies on tape and still images on "Memory Stick Duo." Continued , 23
Operation Guide
Page 25
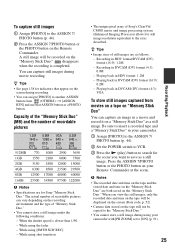
..." You can capture an image in a movie and record it on the "Memory Stick Duo." Playing back in HDV format: 1.2M - Playing back in your camcorder. 1 Assign [PHOTO] to the ASSIGN 7/ PHOTO button (p. 44). 2 Set the POWER switch to VCR. 3 Press the N (play) button to search for ...slower than 1/50. - The actual number of recordable pictures can capture still images during using shot transition • The unique pixel array of Sony's ClearVid CMOS sensor and image processing system (Enhanced Imaging Processor) allows for the scene you view the still images, only the recorded date and...
..." You can capture an image in a movie and record it on the "Memory Stick Duo." Playing back in HDV format: 1.2M - Playing back in your camcorder. 1 Assign [PHOTO] to the ASSIGN 7/ PHOTO button (p. 44). 2 Set the POWER switch to VCR. 3 Press the N (play) button to search for ...slower than 1/50. - The actual number of recordable pictures can capture still images during using shot transition • The unique pixel array of Sony's ClearVid CMOS sensor and image processing system (Enhanced Imaging Processor) allows for the scene you view the still images, only the recorded date and...

Operation Guide
Page 26
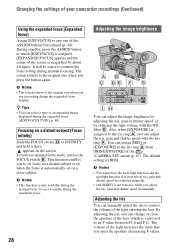
...the settings of the zoom position (p. 71). • Be sure to keep your finger on a subject within 80 cm (about 2 5/8 feet) from your camcorder. • When you turn it further for a slower zoom. Using the zoom lever Move the power zoom lever D slightly for a faster zoom. Wide ...view: (Wide angle) Close view: (Telephoto) z Tips • The minimum distance required between your camcorder and the subject for focus is set to [OFF], you move your camcorder recordings Adjusting the zoom . Using the zoom ring You can zoom at a moderate speed. If you cannot focus on...
...the settings of the zoom position (p. 71). • Be sure to keep your finger on a subject within 80 cm (about 2 5/8 feet) from your camcorder. • When you turn it further for a slower zoom. Using the zoom lever Move the power zoom lever D slightly for a faster zoom. Wide ...view: (Wide angle) Close view: (Telephoto) z Tips • The minimum distance required between your camcorder and the subject for focus is set to [OFF], you move your camcorder recordings Adjusting the zoom . Using the zoom ring You can zoom at a moderate speed. If you cannot focus on...
Operation Guide
Page 28
... ring A, you can select a type of the (CAMERA SET) menu (p. 67). Also, when [EXPOSURE] is not available during manual focusing. Changing the settings of your camcorder recordings (Continued) Using the expanded focus (Expanded focus) Assign [EXP.FOCUS] to any one of the light entering the lens. It will be easier to...
... ring A, you can select a type of the (CAMERA SET) menu (p. 67). Also, when [EXPOSURE] is not available during manual focusing. Changing the settings of your camcorder recordings (Continued) Using the expanded focus (Expanded focus) Assign [EXP.FOCUS] to any one of the light entering the lens. It will be easier to...


