
Operating Instructions
Page 6
... speakers 62 (System Audio Control) Turning off the TV, system, and connected components 64 (System Power Off) Enjoying the components while the system is in standby mode 65 (HDMI Pass Through) Tuner Functions Listening to FM/AM radio using the GUI menu 66 Listening to FM/AM radio using the front panel display of the subwoofer ....... 68 Advanced Settings Controlling connected Sony components with the remote 72 Changing the input button assignments of the remote 75 Setting the speaker level 78 Adjusting the delay between the sound and the image 79 (A/V Sync...
... speakers 62 (System Audio Control) Turning off the TV, system, and connected components 64 (System Power Off) Enjoying the components while the system is in standby mode 65 (HDMI Pass Through) Tuner Functions Listening to FM/AM radio using the GUI menu 66 Listening to FM/AM radio using the front panel display of the subwoofer ....... 68 Advanced Settings Controlling connected Sony components with the remote 72 Changing the input button assignments of the remote 75 Setting the speaker level 78 Adjusting the delay between the sound and the image 79 (A/V Sync...
Operating Instructions
Page 28
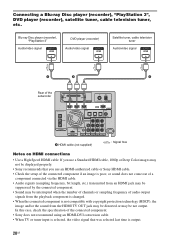
...-ray Disc player (recorder), "PlayStation 3" Audio/video signal DVD player (recorder) Audio/video signal Satellite tuner, cable television tuner Audio/video signal A A A Rear of audio output signals from the playback component is changed. • When the connected component is output. 28US In this case, check the specification of the connected component. • Sony does not recommend using an HDMI-DVI conversion cable. • When TV or tuner input is selected, the video signal that you use an HDMI-authorized cable or Sony HDMI cable. • Check the setup of the connected...
...-ray Disc player (recorder), "PlayStation 3" Audio/video signal DVD player (recorder) Audio/video signal Satellite tuner, cable television tuner Audio/video signal A A A Rear of audio output signals from the playback component is changed. • When the connected component is output. 28US In this case, check the specification of the connected component. • Sony does not recommend using an HDMI-DVI conversion cable. • When TV or tuner input is selected, the video signal that you use an HDMI-authorized cable or Sony HDMI cable. • Check the setup of the connected...

Operating Instructions
Page 31
... the TV. Connecting a component to the VIDEO 1 jacks The following illustration shows how to the subwoofer's audio jacks. DVD player (recorder), "PlayStation 2," satellite/cable television tuner, etc. Set up the system using the front panel display of the playback component is not output from the speaker connected to the subwoofer, be sure to - turn off the system when video of the subwoofer (page 95). • Do not turn off the TV's volume. Audio signal Video signal A B Rear of the subwoofer. - connect the audio output jacks of the...
... the TV. Connecting a component to the VIDEO 1 jacks The following illustration shows how to the subwoofer's audio jacks. DVD player (recorder), "PlayStation 2," satellite/cable television tuner, etc. Set up the system using the front panel display of the playback component is not output from the speaker connected to the subwoofer, be sure to - turn off the system when video of the subwoofer (page 95). • Do not turn off the TV's volume. Audio signal Video signal A B Rear of the subwoofer. - connect the audio output jacks of the...
Operating Instructions
Page 34
In this case, set the connected component to the operating instructions of the connected component, the sound may output in multi channel sound format (PCM, DTS, Dolby Digital). Setting up the sound output of the connected component Depending on audio output settings, refer to output the sound in 2 channel sound format only. For details on the audio output settings of the connected component. 34US
In this case, set the connected component to the operating instructions of the connected component, the sound may output in multi channel sound format (PCM, DTS, Dolby Digital). Setting up the sound output of the connected component Depending on audio output settings, refer to output the sound in 2 channel sound format only. For details on the audio output settings of the connected component. 34US

Operating Instructions
Page 41
... sound at low volume" (page 59). [Video] You can adjust the bass and treble level easily. continued 41US For details, see "Preparing for the "BRAVIA" Sync" (page 60). For details, see "Changing the brightness of analog video input signals" (page 82). [HDMI] You can adjust or operate useful functions related to the HDMI jacks. Operation via the GUI screen DISPLAY C, X, x, c, YELLOW BLUE RED GREEN DISPLAY GUI MENU GUI MENU RETURN/ EXIT RETURN/ EXIT HOME MENU TOOLS/ OPTIONS PRESET REPLAY ADVANCE PRESET TUNING TUNING...
... sound at low volume" (page 59). [Video] You can adjust the bass and treble level easily. continued 41US For details, see "Preparing for the "BRAVIA" Sync" (page 60). For details, see "Changing the brightness of analog video input signals" (page 82). [HDMI] You can adjust or operate useful functions related to the HDMI jacks. Operation via the GUI screen DISPLAY C, X, x, c, YELLOW BLUE RED GREEN DISPLAY GUI MENU GUI MENU RETURN/ EXIT RETURN/ EXIT HOME MENU TOOLS/ OPTIONS PRESET REPLAY ADVANCE PRESET TUNING TUNING...

Operating Instructions
Page 48
...] menu is inserted in the subwoofer and the system transmits the sound. J Message display area Displays volume, selected input source, audio input signal, etc. C SLEEP (96) Flashes when the Sleep Timer function is received. Front panel display (subwoofer) POWER / ACTIVE STANDBY A POWER / ACTIVE STANDBY indicator Lights as follows: Green: the system is in use. F HDMI (27, 98) Lights up according to [ON]. No light: the system is turned off . B Audio decoding indicators Lights up when HDMI equipment is turned on. I MUTING Lights up in NIGHT mode. 48US...
...] menu is inserted in the subwoofer and the system transmits the sound. J Message display area Displays volume, selected input source, audio input signal, etc. C SLEEP (96) Flashes when the Sleep Timer function is received. Front panel display (subwoofer) POWER / ACTIVE STANDBY A POWER / ACTIVE STANDBY indicator Lights as follows: Green: the system is in use. F HDMI (27, 98) Lights up according to [ON]. No light: the system is turned off . B Audio decoding indicators Lights up when HDMI equipment is turned on. I MUTING Lights up in NIGHT mode. 48US...

Operating Instructions
Page 50
... TV INPUT AV SYSTEM STANDBY BD DVD SAT/CATV DMPORT TUNER/ VIDEO1 VIDEO2 VIDEO3 BAND ?/1 /CLEAR YELLOW BLUE ENT RED GREEN DISPLAY GUI MENU 1 Turn on the remote. 4 Adjust the volume of the TV is displayed on the TV screen automatically by pressing the TV (white) button. RETURN/ EXIT HOME MENU TOOLS/ OPTIONS PRESET REPLAY ADVANCE PRESET TUNING TUNING TV TV VOL TV CH VOLUME CHANNEL MUTING SOUND SYSTEM THEATER FIELD MENU GUIDE BD/DVD TOP MENU MENU F1 F2 JUMP PICTURE WIDE...
... TV INPUT AV SYSTEM STANDBY BD DVD SAT/CATV DMPORT TUNER/ VIDEO1 VIDEO2 VIDEO3 BAND ?/1 /CLEAR YELLOW BLUE ENT RED GREEN DISPLAY GUI MENU 1 Turn on the remote. 4 Adjust the volume of the TV is displayed on the TV screen automatically by pressing the TV (white) button. RETURN/ EXIT HOME MENU TOOLS/ OPTIONS PRESET REPLAY ADVANCE PRESET TUNING TUNING TV TV VOL TV CH VOLUME CHANNEL MUTING SOUND SYSTEM THEATER FIELD MENU GUIDE BD/DVD TOP MENU MENU F1 F2 JUMP PICTURE WIDE...

Operating Instructions
Page 51
... you connect the component to the system using an HDMI cable to output the sound in multi channel PCM, if possible. For details, refer to the operating instructions of the TV. 5 Adjust the volume of the TV. 2 Turn on the satellite/cable television tuner and the system. 3 Press SAT/CATV on the remote. 4 Change the TV input. Enjoying Blu-ray Disc, DVD, or "PlayStation 3" 1 Turn on the TV. 2 Turn on the Blu-ray Disc/DVD player (recorder) or "PlayStation 3" and the system. 3 Press DVD or...
... you connect the component to the system using an HDMI cable to output the sound in multi channel PCM, if possible. For details, refer to the operating instructions of the TV. 5 Adjust the volume of the TV. 2 Turn on the satellite/cable television tuner and the system. 3 Press SAT/CATV on the remote. 4 Change the TV input. Enjoying Blu-ray Disc, DVD, or "PlayStation 3" 1 Turn on the TV. 2 Turn on the Blu-ray Disc/DVD player (recorder) or "PlayStation 3" and the system. 3 Press DVD or...

Operating Instructions
Page 53
Selecting the operation screen You can select an operation screen using the remote. • Do not connect or disconnect the DIGITAL MEDIA PORT adapter while the system is turned on. • Depending on the TV screen. 4 Press TOOLS/OPTIONS to display [Function List]. YELLOW BLUE RED GREEN C, X, x, c, DISPLAY GUI MENU GUI MENU RETURN/ EXIT HOME MENU TOOLS/ OPTIONS PRESET REPLAY ADVANCE PRESET TUNING TUNING TOOLS/ OPTIONS 1 Press GUI MENU. The list of tracks will change to the connected component's name. The component connected to the...
Selecting the operation screen You can select an operation screen using the remote. • Do not connect or disconnect the DIGITAL MEDIA PORT adapter while the system is turned on. • Depending on the TV screen. 4 Press TOOLS/OPTIONS to display [Function List]. YELLOW BLUE RED GREEN C, X, x, c, DISPLAY GUI MENU GUI MENU RETURN/ EXIT HOME MENU TOOLS/ OPTIONS PRESET REPLAY ADVANCE PRESET TUNING TUNING TOOLS/ OPTIONS 1 Press GUI MENU. The list of tracks will change to the connected component's name. The component connected to the...

Operating Instructions
Page 58
... TV CH VOLUME CHANNEL MUTING SOUND FIELD SOUND SYSTEM THEATER FIELD MENU GUIDE BD/DVD TOP MENU MENU F1 F2 JUMP PICTURE WIDE FAVORITES Adjusting the bass and treble level You can adjust the bass and treble level easily. YELLOW BLUE RED GREEN C, X, x, c, DISPLAY GUI MENU GUI MENU RETURN/ EXIT HOME MENU TOOLS/ OPTIONS PRESET REPLAY ADVANCE PRESET TUNING TUNING 1 Press GUI MENU. Note • If you select the [Music] sound field for each input are retained even if you disconnect the AC power cord (mains...
... TV CH VOLUME CHANNEL MUTING SOUND FIELD SOUND SYSTEM THEATER FIELD MENU GUIDE BD/DVD TOP MENU MENU F1 F2 JUMP PICTURE WIDE FAVORITES Adjusting the bass and treble level You can adjust the bass and treble level easily. YELLOW BLUE RED GREEN C, X, x, c, DISPLAY GUI MENU GUI MENU RETURN/ EXIT HOME MENU TOOLS/ OPTIONS PRESET REPLAY ADVANCE PRESET TUNING TUNING 1 Press GUI MENU. Note • If you select the [Music] sound field for each input are retained even if you disconnect the AC power cord (mains...

Operating Instructions
Page 60
... set the Control for HDMI function to the operating instructions of the system. • System Power Off: When you connect this system to output the sound from the connected component is displayed. 60US "BRAVIA" Sync is "BRAVIA" Sync? Input buttons TV TV INPUT AV SYSTEM STANDBY BD DVD SAT/CATV DMPORT TUNER/ VIDEO1 VIDEO2 VIDEO3 BAND ?/1 /CLEAR YELLOW BLUE ENT RED GREEN C, X, x, c, DISPLAY GUI MENU GUI MENU RETURN/ EXIT HOME MENU TOOLS/ OPTIONS 1 Make sure that an image from the TV speaker or the speakers...
... set the Control for HDMI function to the operating instructions of the system. • System Power Off: When you connect this system to output the sound from the connected component is displayed. 60US "BRAVIA" Sync is "BRAVIA" Sync? Input buttons TV TV INPUT AV SYSTEM STANDBY BD DVD SAT/CATV DMPORT TUNER/ VIDEO1 VIDEO2 VIDEO3 BAND ?/1 /CLEAR YELLOW BLUE ENT RED GREEN C, X, x, c, DISPLAY GUI MENU GUI MENU RETURN/ EXIT HOME MENU TOOLS/ OPTIONS 1 Make sure that an image from the TV speaker or the speakers...

Operating Instructions
Page 62
... speakers (System Audio Control) You can adjust the volume and turn on the system. For details, refer to turn off . Tip • You can enjoy the TV sound from the speaker of the system. Input buttons TV TV INPUT AV SYSTEM STANDBY BD DVD SAT/CATV DMPORT TUNER/ VIDEO1 VIDEO2 VIDEO3 BAND ?/1 62US /CLEAR YELLOW BLUE ENT RED GREEN C, X, x, c, DISPLAY GUI MENU GUI MENU RETURN/ EXIT HOME MENU TOOLS/ OPTIONS Press ?/1 to the operating instructions of a simple operation. The system...
... speakers (System Audio Control) You can adjust the volume and turn on the system. For details, refer to turn off . Tip • You can enjoy the TV sound from the speaker of the system. Input buttons TV TV INPUT AV SYSTEM STANDBY BD DVD SAT/CATV DMPORT TUNER/ VIDEO1 VIDEO2 VIDEO3 BAND ?/1 62US /CLEAR YELLOW BLUE ENT RED GREEN C, X, x, c, DISPLAY GUI MENU GUI MENU RETURN/ EXIT HOME MENU TOOLS/ OPTIONS Press ?/1 to the operating instructions of a simple operation. The system...

Operating Instructions
Page 65
... GUI MENU. The [HDMI Pass Through] menu appears. 5 Press X/x repeatedly to select the setting you use the components and a TV connected to the TV via the subwoofer. This setting saves power in the standby mode, the system outputs HDMI signals from the system's HDMI output jack. Note • When [AUTO] is selected, it may take a little more time for HDMI] is in the standby mode compared with the [ON] setting. The default setting is compatible with "BRAVIA" Sync, how the system is turned...
... GUI MENU. The [HDMI Pass Through] menu appears. 5 Press X/x repeatedly to select the setting you use the components and a TV connected to the TV via the subwoofer. This setting saves power in the standby mode, the system outputs HDMI signals from the system's HDMI output jack. Note • When [AUTO] is selected, it may take a little more time for HDMI] is in the standby mode compared with the [ON] setting. The default setting is compatible with "BRAVIA" Sync, how the system is turned...

Operating Instructions
Page 73
... the volume. +/- wh Number buttons Selects channels. Press 3 ENT to select channels or input sources and change the settings for your TV. wk INPUT Selects input. continued 73US Advanced Settings Allows you connect the TV and the system with a yellow dot or yellow printing. Turns off the sound. ws C, X, x, c, Selects a menu item and enters the selection. wg Selects digital channels using with the THEATER button function. Remote Button 4 TOOLS/ OPTIONS 5 MENU/HOME q; Selects the next (+) or previous (-) channel. Also, audio is automatically switched to the audio output...
... the volume. +/- wh Number buttons Selects channels. Press 3 ENT to select channels or input sources and change the settings for your TV. wk INPUT Selects input. continued 73US Advanced Settings Allows you connect the TV and the system with a yellow dot or yellow printing. Turns off the sound. ws C, X, x, c, Selects a menu item and enters the selection. wg Selects digital channels using with the THEATER button function. Remote Button 4 TOOLS/ OPTIONS 5 MENU/HOME q; Selects the next (+) or previous (-) channel. Also, audio is automatically switched to the audio output...

Operating Instructions
Page 74
... control the SAT Remote Button 5 MENU/HOME qa GUIDE (Guide) ws C, X, x, c, Function Displays the menu. ws C, X, x, c, Moves the highlight (cursor) and selects the item. qf BD/DVD MENU qg BD/DVD TOP MENU Displays the top menu/disc menu. qd F1 Selects the HDD. REPLAY < • Jumps backward. To control the DVD player/Blu-ray Disc player Remote Button Function 5 MENU/HOME Displays the menu. 6 ADVANCE • , Jumps forward. 7 ./> Skips chapters. 8 m/M To fast reverse or to fast forward the disc when pressed during playback. 9 N (playback)/X Play mode buttons...
... control the SAT Remote Button 5 MENU/HOME qa GUIDE (Guide) ws C, X, x, c, Function Displays the menu. ws C, X, x, c, Moves the highlight (cursor) and selects the item. qf BD/DVD MENU qg BD/DVD TOP MENU Displays the top menu/disc menu. qd F1 Selects the HDD. REPLAY < • Jumps backward. To control the DVD player/Blu-ray Disc player Remote Button Function 5 MENU/HOME Displays the menu. 6 ADVANCE • , Jumps forward. 7 ./> Skips chapters. 8 m/M To fast reverse or to fast forward the disc when pressed during playback. 9 N (playback)/X Play mode buttons...
Operating Instructions
Page 97
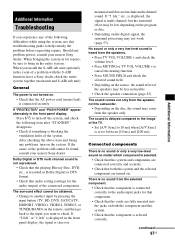
... input button (TV, BD, DVD, SAT/CATV, DMPORT, VIDEO1, VIDEO2, VIDEO3, or TUNER/BAND) on the digital signal, the surround processing may not work (page 57). Press ?/1 to the audio input jacks for the audio output) of the system. Dolby Digital or DTS multi channel sound is not reproduced. • Check that the playing Blu-ray Disc, DVD, etc., is blocking the ventilation holes of the connected component. No sound or only a very low-level sound is heard from the selected component...
... input button (TV, BD, DVD, SAT/CATV, DMPORT, VIDEO1, VIDEO2, VIDEO3, or TUNER/BAND) on the digital signal, the surround processing may not work (page 57). Press ?/1 to the audio input jacks for the audio output) of the system. Dolby Digital or DTS multi channel sound is not reproduced. • Check that the playing Blu-ray Disc, DVD, etc., is blocking the ventilation holes of the connected component. No sound or only a very low-level sound is heard from the selected component...

Operating Instructions
Page 98
... HDMI-connected component's video output is set the [Video Direct] setting in the GUI menu. • Make sure the connected component is compatible with the Control for HDMI function. • Check the Control for HDMI settings on again. Use the "RESOLUTION" menu in the system menu to the operating instructions of each component. • Use a High Speed HDMI cable. If you use a Standard HDMI cable, 1080p or Deep Color images may not be appropriate. For details, refer to change the HDMI connection, or connect/disconnect the AC power cord...
... HDMI-connected component's video output is set the [Video Direct] setting in the GUI menu. • Make sure the connected component is compatible with the Control for HDMI function. • Check the Control for HDMI settings on again. Use the "RESOLUTION" menu in the system menu to the operating instructions of each component. • Use a High Speed HDMI cable. If you use a Standard HDMI cable, 1080p or Deep Color images may not be appropriate. For details, refer to change the HDMI connection, or connect/disconnect the AC power cord...

Operating Instructions
Page 100
... remote. AUDIO POWER SPECIFICATIONS for this system are weak. • Make sure you select the correct input on HDMI) Dolby Digital Plus Dolby True HD DTS-HD Supported/Not supported a a a a × × × * Linear PCM accepts sampling frequencies of no more than 1 % total harmonic distortion from the TV speaker to the default settings. The system menu, sound field, etc., return to the system speaker. • The Volume Limit function is reset. models: Power output (reference): RMS output power FL/FR/C*: 100 watts (per channel...
... remote. AUDIO POWER SPECIFICATIONS for this system are weak. • Make sure you select the correct input on HDMI) Dolby Digital Plus Dolby True HD DTS-HD Supported/Not supported a a a a × × × * Linear PCM accepts sampling frequencies of no more than 1 % total harmonic distortion from the TV speaker to the default settings. The system menu, sound field, etc., return to the system speaker. • The Volume Limit function is reset. models: Power output (reference): RMS output power FL/FR/C*: 100 watts (per channel...

Operating Instructions
Page 101
..., 60 Hz Power consumption On: 110 W Standby mode: 0.3 W (when "CTRL: HDMI" and "S-AIR STBY" are set to "OFF.") Power output (DIGITAL MEDIA PORT) DC OUT: 5 V, 700 mA Design and specifications are subject to change without notice. • Standby power consumption 0.3 W. • Halogenated flame retardants are not used in the certain printed wiring boards. • Over 85 % power efficiency of amplifier block is achieved with the full digital amplifier, S-master. 101US
..., 60 Hz Power consumption On: 110 W Standby mode: 0.3 W (when "CTRL: HDMI" and "S-AIR STBY" are set to "OFF.") Power output (DIGITAL MEDIA PORT) DC OUT: 5 V, 700 mA Design and specifications are subject to change without notice. • Standby power consumption 0.3 W. • Halogenated flame retardants are not used in the certain printed wiring boards. • Over 85 % power efficiency of amplifier block is achieved with the full digital amplifier, S-master. 101US

Operating Instructions
Page 105
..." Sync 60 C Control for HDMI 60 D DIGITAL MEDIA PORT 53 DIGITAL MEDIA PORT adapter connecting 45 Display setting 84 DVD player (recorder) connecting 28, 30 F Front panel display 48, 104 G GUI (Graphical User Interface) 39 H HDMI connecting 27 I Installing 10 iPod 54, 55 M Message list 56 Muting 49 N Naming preset stations 68, 70 Network Client 55 P "PlayStation 3" connecting 28 Presetting radio stations 67, 68 R Remote assignments 75 operating 49, 72 S S-AIR receiver 85 Satellite tuner connecting 28, 30 Sleep timer 96 Sound field 57 System menu...
..." Sync 60 C Control for HDMI 60 D DIGITAL MEDIA PORT 53 DIGITAL MEDIA PORT adapter connecting 45 Display setting 84 DVD player (recorder) connecting 28, 30 F Front panel display 48, 104 G GUI (Graphical User Interface) 39 H HDMI connecting 27 I Installing 10 iPod 54, 55 M Message list 56 Muting 49 N Naming preset stations 68, 70 Network Client 55 P "PlayStation 3" connecting 28 Presetting radio stations 67, 68 R Remote assignments 75 operating 49, 72 S S-AIR receiver 85 Satellite tuner connecting 28, 30 Sleep timer 96 Sound field 57 System menu...


