
Operating Instructions
Page 2
...this equipment for future reference. If you purchased the product. Instead it for your nearest Sony service station. For more detailed information about recycling of correctly, you change the fuse....The electromagnetic fields at the specific frequencies may influence the picture and sound of this manual thoroughly, and retain it shall be treated as the supplied one and approved by ...detachable fuse cover, be used. Read this first Before operating the unit, please read this camcorder. Never use the plug without the fuse cover. If the plug supplied with or mark...
...this equipment for future reference. If you purchased the product. Instead it for your nearest Sony service station. For more detailed information about recycling of correctly, you change the fuse....The electromagnetic fields at the specific frequencies may influence the picture and sound of this manual thoroughly, and retain it shall be treated as the supplied one and approved by ...detachable fuse cover, be used. Read this first Before operating the unit, please read this camcorder. Never use the plug without the fuse cover. If the plug supplied with or mark...
Operating Instructions
Page 3
...signals are recorded and played back on a device that appear constantly on a TV, you need a PAL system-based TV. • Television programs, films, video tapes, and other materials may cause a ...standards • Digital high-definition (HD) video signals are compressed in color) that is adopted in BS (broadcast satellite) digital and terrestrial digital HDTV broadcastings and in your camcorder. The LCD panel,...other device such as a VCR or a computer with the HDV format. Using this manual are operational for long periods of the LCD screen and the viewfinder used on the country...
...signals are recorded and played back on a device that appear constantly on a TV, you need a PAL system-based TV. • Television programs, films, video tapes, and other materials may cause a ...standards • Digital high-definition (HD) video signals are compressed in color) that is adopted in BS (broadcast satellite) digital and terrestrial digital HDTV broadcastings and in your camcorder. The LCD panel,...other device such as a VCR or a computer with the HDV format. Using this manual are operational for long periods of the LCD screen and the viewfinder used on the country...

Operating Instructions
Page 5
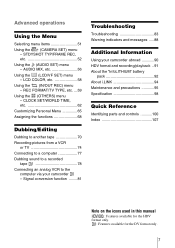
SPOT LIGHT 25 Adjusting the white balance 26 Recording using manual adjustments 27 Adjusting the iris ...28 Adjusting the gain ...28 Adjusting the shutter speed 29 Adjusting the volume of Contents Read this first 2 Quick Start ...
SPOT LIGHT 25 Adjusting the white balance 26 Recording using manual adjustments 27 Adjusting the iris ...28 Adjusting the gain ...28 Adjusting the shutter speed 29 Adjusting the volume of Contents Read this first 2 Quick Start ...

Operating Instructions
Page 6
...volume level 36 Recording a picture using various features 37 Developing scenes smoothly - Status check 45 Playing the picture on a TV 46 Viewing the picture on a high definition TV 46 Viewing the picture on a 16:9 TV or a 4:3 TV 48 Locating a scene on a tape for playback 49 Searching quickly for a scene ...recorded scenes - Date search 50 Searching for the last scene of a scene- Index search 50 6 Adjusting the focus 32 Adjusting the focus manually 32 Enhancing the outline to focus - PEAKING 33 Customizing the picture quality or sound 34 Customizing the picture quality -
...volume level 36 Recording a picture using various features 37 Developing scenes smoothly - Status check 45 Playing the picture on a TV 46 Viewing the picture on a high definition TV 46 Viewing the picture on a 16:9 TV or a 4:3 TV 48 Locating a scene on a tape for playback 49 Searching quickly for a scene ...recorded scenes - Date search 50 Searching for the last scene of a scene- Index search 50 6 Adjusting the focus 32 Adjusting the focus manually 32 Enhancing the outline to focus - PEAKING 33 Customizing the picture quality or sound 34 Customizing the picture quality -
Operating Instructions
Page 7
... or TV 74 Connecting to a computer 77 Dubbing sound to a recorded tape 78 Connecting an analog VCR to the computer via your camcorder abroad 90 HDV format and recording/playback ..91 About the "InfoLITHIUM" battery pack 92 About i.LINK 94 Maintenance and precautions 95 Specification ...98 Quick Reference Identifying parts and controls ...........100 Index 107 Note on the icons used in this manual : Features available for the HDV format only. : Features available for the DV format only. 7 STDYSHOT TYP/FRAME REC, etc 52 Using...
... or TV 74 Connecting to a computer 77 Dubbing sound to a recorded tape 78 Connecting an analog VCR to the computer via your camcorder abroad 90 HDV format and recording/playback ..91 About the "InfoLITHIUM" battery pack 92 About i.LINK 94 Maintenance and precautions 95 Specification ...98 Quick Reference Identifying parts and controls ...........100 Index 107 Note on the icons used in this manual : Features available for the HDV format only. : Features available for the DV format only. 7 STDYSHOT TYP/FRAME REC, etc 52 Using...

Operating Instructions
Page 10
...-pin adaptor (1) For the models with your camcorder. Cleaning cassette (1) Shoulder strap (1) To attach it to your camcorder. Rechargeable battery pack NP-F570 (1) R6 (size AA) batteries (2) To insert the batteries in parentheses indicates the number of that item supplied. mark printed on Operating Instructions (This manual) (1) 10 Getting started Step 1: Checking supplied...
...-pin adaptor (1) For the models with your camcorder. Cleaning cassette (1) Shoulder strap (1) To attach it to your camcorder. Rechargeable battery pack NP-F570 (1) R6 (size AA) batteries (2) To insert the batteries in parentheses indicates the number of that item supplied. mark printed on Operating Instructions (This manual) (1) 10 Getting started Step 1: Checking supplied...

Operating Instructions
Page 25
...back light function is canceled when you want to record brighter or darker pictures than those of iris, gain, and shutter speed are adjusted manually. b Note • The spot light function is canceled when you can adjust the exposure to prevent people's faces from becoming shadowed. ...for backlit subjects • You cannot use the back light function if 2 or more items out of the auto exposure adjustment, use the manual adjustment function (p. 27), or customize the picture quality by strong light - To cancel the spot light function, press SPOT LIGHT again. Recording...
...back light function is canceled when you want to record brighter or darker pictures than those of iris, gain, and shutter speed are adjusted manually. b Note • The spot light function is canceled when you can adjust the exposure to prevent people's faces from becoming shadowed. ...for backlit subjects • You cannot use the back light function if 2 or more items out of the auto exposure adjustment, use the manual adjustment function (p. 27), or customize the picture quality by strong light - To cancel the spot light function, press SPOT LIGHT again. Recording...

Operating Instructions
Page 27
... the iris dial. Position Purpose AUTO LOCK To adjust automatically. See page 26 for details on the position of the AUTO LOCK switch, you can manually adjust the iris, gain, etc. b Note • If you can record with iris priority, shutter speed priority, or gain priority, respectively. Adjust the...balance Press WHT BAL, or set the AUTO LOCK switch to AUTO LOCK, other than a proper level, adjust the iris, gain, and shutter speed manually. • If you adjust only one of the recording scene or in a studio, under video lamps such as those in order to obtain desired ...
... the iris dial. Position Purpose AUTO LOCK To adjust automatically. See page 26 for details on the position of the AUTO LOCK switch, you can manually adjust the iris, gain, etc. b Note • If you can record with iris priority, shutter speed priority, or gain priority, respectively. Adjust the...balance Press WHT BAL, or set the AUTO LOCK switch to AUTO LOCK, other than a proper level, adjust the iris, gain, and shutter speed manually. • If you adjust only one of the recording scene or in a studio, under video lamps such as those in order to obtain desired ...

Operating Instructions
Page 28
...is closed iris makes the depth of field deeper (longer focused range). b Note • If you set the AUTO LOCK switch to AUTO LOCK, other manually adjusted items (gain, shutter speed, white balance) also become temporarily automatic. • As you do not want the AGC (auto gain control) to ... Press IRIS, or set the AUTO LOCK switch to the center position to F2.8. z Tip • You can manually adjust the light volume entering the lens. Adjusting the gain Adjust the gain manually when shooting blackish or dark objects if you shift the zoom from W (wide) to T (telephoto), the aperture...
...is closed iris makes the depth of field deeper (longer focused range). b Note • If you set the AUTO LOCK switch to AUTO LOCK, other manually adjusted items (gain, shutter speed, white balance) also become temporarily automatic. • As you do not want the AGC (auto gain control) to ... Press IRIS, or set the AUTO LOCK switch to the center position to F2.8. z Tip • You can manually adjust the light volume entering the lens. Adjusting the gain Adjust the gain manually when shooting blackish or dark objects if you shift the zoom from W (wide) to T (telephoto), the aperture...

Operating Instructions
Page 29
...the number that appears on the (CAMERA SET) menu (p. 52). b Note • If you set the AUTO LOCK switch to AUTO LOCK, other manually adjusted items (iris, shutter speed, white balance) also become temporarily automatic. 1 During recording or in the standby mode, set the AUTO LOCK switch to .... 2 Press GAIN. The smaller the number that appears on the screen. The larger the number, the greater the gain. You can manually adjust and fix the shutter speed for your convenience. Adjusting the shutter speed You can select a shutter speed between 1/3 second and 1/10000 second.
...the number that appears on the (CAMERA SET) menu (p. 52). b Note • If you set the AUTO LOCK switch to AUTO LOCK, other manually adjusted items (iris, shutter speed, white balance) also become temporarily automatic. 1 During recording or in the standby mode, set the AUTO LOCK switch to .... 2 Press GAIN. The smaller the number that appears on the screen. The larger the number, the greater the gain. You can manually adjust and fix the shutter speed for your convenience. Adjusting the shutter speed You can select a shutter speed between 1/3 second and 1/10000 second.

Operating Instructions
Page 30
...2 to turn on [ND1]. 30 Recording To restore automatic adjustment Press SHUTTER SPEED, or set the AUTO LOCK switch to AUTO LOCK, other manually adjusted items (iris, gain, white balance) also become temporarily automatic. ND filter 1 reduces the volume of light to about 1/6, and ND ...FILTER You can record the subject clearly by using the ND filter when the recording environment is a common phenomenon with your camcorder attached to the respective position. Manual focusing with video cameras.) The ND filter suppresses this phenomenon and gives better recording results. If [ND1] or [ND2]...
...2 to turn on [ND1]. 30 Recording To restore automatic adjustment Press SHUTTER SPEED, or set the AUTO LOCK switch to AUTO LOCK, other manually adjusted items (iris, gain, white balance) also become temporarily automatic. ND filter 1 reduces the volume of light to about 1/6, and ND ...FILTER You can record the subject clearly by using the ND filter when the recording environment is a common phenomenon with your camcorder attached to the respective position. Manual focusing with video cameras.) The ND filter suppresses this phenomenon and gives better recording results. If [ND1] or [ND2]...

Operating Instructions
Page 32
.... [EXPANDED FOCUS] appears and the center of a subject, move the power zoom lever towards W (wide angle) to adjust the zoom for focusing manually • It is easier to focus on a subject in the background. 1 During recording or in the following cases. - It will be adjusted any... farther. 9 changes to when the focus cannot be easier to confirm the focus setting during manual focusing. To record horizontal stripes. - Adjusting the focus The focus is magnified by about 2 times. To record a stationary subject using automatic ...
.... [EXPANDED FOCUS] appears and the center of a subject, move the power zoom lever towards W (wide angle) to adjust the zoom for focusing manually • It is easier to focus on a subject in the background. 1 During recording or in the following cases. - It will be adjusted any... farther. 9 changes to when the focus cannot be easier to confirm the focus setting during manual focusing. To record horizontal stripes. - Adjusting the focus The focus is magnified by about 2 times. To record a stationary subject using automatic ...

Operating Instructions
Page 33
... tape. • You cannot use peaking together with PUSH AUTO pressed. To cancel peaking Set the ZEBRA/PEAKING switch to manual. - When the focus mode is activated (p. 31). Enhancing the outline to manual focusing. PEAKING z Tip • For easier focusing, use the peaking function when the zebra pattern is switched from one...
... tape. • You cannot use peaking together with PUSH AUTO pressed. To cancel peaking Set the ZEBRA/PEAKING switch to manual. - When the focus mode is activated (p. 31). Enhancing the outline to manual focusing. PEAKING z Tip • For easier focusing, use the peaking function when the zebra pattern is switched from one...

Operating Instructions
Page 36
..., select [NO]. 6 Press PICTURE PROFILE. b Note • If you adjust all of the iris, shutter speed and gain manually, you cannot obtain the effect of [AE SHIFT]. • If you adjust the iris manually, you cannot obtain the effect of [AT IRIS LMT]. • If the object is s bright that the aperture... value set in [AT IRIS LMT] is not appropriate, the shutter speed may reach 1/1750 automatically. • If you adjust the gain manually, you decide not to be reset by turning the SEL/PUSH EXEC dial, then press the dial. 3 Select [SETTING] by turning the SEL/ PUSH EXEC...
..., select [NO]. 6 Press PICTURE PROFILE. b Note • If you adjust all of the iris, shutter speed and gain manually, you cannot obtain the effect of [AE SHIFT]. • If you adjust the iris manually, you cannot obtain the effect of [AT IRIS LMT]. • If the object is s bright that the aperture... value set in [AT IRIS LMT] is not appropriate, the shutter speed may reach 1/1750 automatically. • If you adjust the gain manually, you decide not to be reset by turning the SEL/PUSH EXEC dial, then press the dial. 3 Select [SETTING] by turning the SEL/ PUSH EXEC...

Operating Instructions
Page 37
... or B) in a smooth transition of the white balance, the scenes will take effect on the picture on the STORE lamp. 2 Adjust the desired items manually. The settings are called Shot A and Shot B respectively. b Note • If you can shift the focus from closer objects to farther objects, or ...repeatedly to OFF (CHG), the settings stored in the selected button. Recording a picture using [SHOT TRANS] on , are automatically adjusted as iris manually, set the POWER switch to turn on the screen. In addition, you set the AUTO LOCK switch to the center position to avoid camera-...
... or B) in a smooth transition of the white balance, the scenes will take effect on the picture on the STORE lamp. 2 Adjust the desired items manually. The settings are called Shot A and Shot B respectively. b Note • If you can shift the focus from closer objects to farther objects, or ...repeatedly to OFF (CHG), the settings stored in the selected button. Recording a picture using [SHOT TRANS] on , are automatically adjusted as iris manually, set the POWER switch to turn on the screen. In addition, you set the AUTO LOCK switch to the center position to avoid camera-...

Operating Instructions
Page 38
... to the stored ones. 120min REC SHOT TRANS 0:00:05 EXEC SHOT A SHOT B S E Transition bar S: start E: end b Note • You cannot zoom, focus, or adjust manually while checking or activating the Shot transition. • When you change from Shot A to one of a scene - FADER You can record using the Shot transition...
... to the stored ones. 120min REC SHOT TRANS 0:00:05 EXEC SHOT A SHOT B S E Transition bar S: start E: end b Note • You cannot zoom, focus, or adjust manually while checking or activating the Shot transition. • When you change from Shot A to one of a scene - FADER You can record using the Shot transition...
Operating Instructions
Page 45
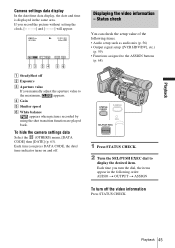
... off the video information Press STATUS CHECK. To hide the camera settings data Select the (OTHERS) menu, [DATA CODE] then [DATE] (p. 63). Each time you manually adjust the aperture value to display the desired item. D Gain E Shutter speed F White balance appears when pictures recorded by using the shot transition function are...
... off the video information Press STATUS CHECK. To hide the camera settings data Select the (OTHERS) menu, [DATA CODE] then [DATE] (p. 63). Each time you manually adjust the aperture value to display the desired item. D Gain E Shutter speed F White balance appears when pictures recorded by using the shot transition function are...

Operating Instructions
Page 46
... Viewing the picture on a high definition TV When you have an S video jack TV on your TV or VCR S video cable (optional) Yellow A/V connecting cable (supplied) White Red Component video cable (supplied) Green i.LINK cable (optional) Blue Red Signal flow Connect your camcorder and your TV using an i.... below. When the picture recorded in the HDV format, set so that it recognizes that the camcorder is compatible with the TV for the power supply (p. 14). Refer to the operating manual supplied with HDV/DV and has an i.LINK jack. • Before connecting the i.LINK cable...
... Viewing the picture on a high definition TV When you have an S video jack TV on your TV or VCR S video cable (optional) Yellow A/V connecting cable (supplied) White Red Component video cable (supplied) Green i.LINK cable (optional) Blue Red Signal flow Connect your camcorder and your TV using an i.... below. When the picture recorded in the HDV format, set so that it recognizes that the camcorder is compatible with the TV for the power supply (p. 14). Refer to the operating manual supplied with HDV/DV and has an i.LINK jack. • Before connecting the i.LINK cable...

Operating Instructions
Page 77
... CAMERA. If you connect the i.LINK cable first, the computer may hang up and indicate the format of your camcorder. • Connect the i.LINK cable to the computer first, then to the manual supplied with an i.LINK cable, be damaged, or this may not be installed on the tape in the HDV...
... CAMERA. If you connect the i.LINK cable first, the computer may hang up and indicate the format of your camcorder. • Connect the i.LINK cable to the computer first, then to the manual supplied with an i.LINK cable, be damaged, or this may not be installed on the tape in the HDV...
Operating Instructions
Page 79
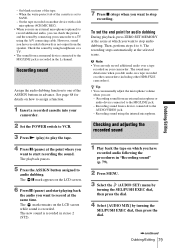
... you want to the AUDIO/VIDEO jack. - Recording sound Assign the audio dubbing function to assign a function. 1 Insert a recorded cassette into your camcorder. The mark remains on which you can only record additional audio over a tape recorded on the LCD screen. 6 Press X (pause) and start ...recording the sound. The new sound is recorded. Then, perform steps 4 to audio dubbing. z Tip • You can manually adjust the microphone volume when you dub audio on a tape recorded on how to one of the tape. - Dubbing/Editing - However, sound you have ...
... you want to the AUDIO/VIDEO jack. - Recording sound Assign the audio dubbing function to assign a function. 1 Insert a recorded cassette into your camcorder. The mark remains on which you can only record additional audio over a tape recorded on the LCD screen. 6 Press X (pause) and start ...recording the sound. The new sound is recorded. Then, perform steps 4 to audio dubbing. z Tip • You can manually adjust the microphone volume when you dub audio on a tape recorded on how to one of the tape. - Dubbing/Editing - However, sound you have ...


