
Operating Instructions
Page 6
...point - Date search 50 Searching for the last scene of the most recently recorded scenes - Index search 50 6 PICTURE PROFILE 34 Adjusting the audio recording level - FADER 38 Recording an index signal at the beginning of recording 39 Recording in and out of recording - END SEARCH 44 ... Customizing the picture quality or sound 34 Customizing the picture quality - Status check 45 Playing the picture on a TV 46 Viewing the picture on a high definition TV 46 Viewing the picture on a 16:9 TV or a 4:3 TV 48 Locating a scene on a tape for playback 49 Searching quickly for a...
...point - Date search 50 Searching for the last scene of the most recently recorded scenes - Index search 50 6 PICTURE PROFILE 34 Adjusting the audio recording level - FADER 38 Recording an index signal at the beginning of recording 39 Recording in and out of recording - END SEARCH 44 ... Customizing the picture quality or sound 34 Customizing the picture quality - Status check 45 Playing the picture on a TV 46 Viewing the picture on a high definition TV 46 Viewing the picture on a 16:9 TV or a 4:3 TV 48 Locating a scene on a tape for playback 49 Searching quickly for a...

Operating Instructions
Page 36
2 Select the number of audio input from the AUDIO/VIDEO jack or the HDV/DV jack. Microphone volume level You can also...CINEFRAME 25] when the shutter speed is slower than 1/12, the shutter speed is automatically set to AUTO. The audio level meter appears. 2 During recording or in the standby mode, adjust the volume by turning the SEL/PUSH EXEC... detail, press STATUS CHECK (p. 24). To restore automatic adjustment Set the AUTO/MAN switch to 1/25. Adjusting the audio recording level - You can adjust the microphone volume when recording. b Note • If you adjust all of the...
2 Select the number of audio input from the AUDIO/VIDEO jack or the HDV/DV jack. Microphone volume level You can also...CINEFRAME 25] when the shutter speed is slower than 1/12, the shutter speed is automatically set to AUTO. The audio level meter appears. 2 During recording or in the standby mode, adjust the volume by turning the SEL/PUSH EXEC... detail, press STATUS CHECK (p. 24). To restore automatic adjustment Set the AUTO/MAN switch to 1/25. Adjusting the audio recording level - You can adjust the microphone volume when recording. b Note • If you adjust all of the...
Operating Instructions
Page 45
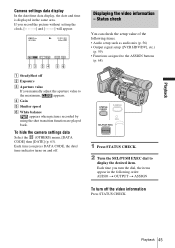
.... 2 Turn the SEL/PUSH EXEC dial to the maximum, appears. Status check You can check the setup value of the following order: AUDIO t OUTPUT t ASSIGN To turn off B Exposure C Aperture value If you record the picture without setting the clock and [--:--:--] will appear.... 6 0min HDV1080i 0:00:00 6 0min AUTO F 1 . 7 6 dB 1 0 0 Displaying the video information - D Gain E Shutter speed F White balance appears when pictures recorded by using the shot transition function are played back. Playback 45 To hide the...
.... 2 Turn the SEL/PUSH EXEC dial to the maximum, appears. Status check You can check the setup value of the following order: AUDIO t OUTPUT t ASSIGN To turn off B Exposure C Aperture value If you record the picture without setting the clock and [--:--:--] will appear.... 6 0min HDV1080i 0:00:00 6 0min AUTO F 1 . 7 6 dB 1 0 0 Displaying the video information - D Gain E Shutter speed F White balance appears when pictures recorded by using the shot transition function are played back. Playback 45 To hide the...

Operating Instructions
Page 47
..., connect the white and red plugs of the A/V connecting cable (supplied). The audio will not be connected, connect it with your camcorder by the S video jacks using an S video cable (optional) instead of the yellow video plug of the A/V connecting cable to the LINE IN input on the VCR using the A/V... connecting cable. When your TV is connected to a VCR Connect your camcorder to the audio input jack of cables to LINE. format is played back, an equivalent signal with the S video cable alone. This connection produces pictures more than one type of your TV using the ...
..., connect the white and red plugs of the A/V connecting cable (supplied). The audio will not be connected, connect it with your camcorder by the S video jacks using an S video cable (optional) instead of the yellow video plug of the A/V connecting cable to the LINE IN input on the VCR using the A/V... connecting cable. When your TV is connected to a VCR Connect your camcorder to the audio input jack of cables to LINE. format is played back, an equivalent signal with the S video cable alone. This connection produces pictures more than one type of your TV using the ...

Operating Instructions
Page 48
To connect the TV using an S video cable (optional) instead of the yellow video plug of your TV (p. 60). The audio will not be connected, connect it with your camcorder by the S video jacks using the A/V connecting cable When there is an S video jack on the (IN/ OUT REC) menu according to ...Red Connect your camcorder and your TV has COMPONENT VIDEO jacks. • To view the picture recorded in the HDV format, set [COMPONENT] on the device to your TV or VCR. To output audio signals, connect the white and red plugs of the A/V connecting cable to produce high resolution pictures....
To connect the TV using an S video cable (optional) instead of the yellow video plug of your TV (p. 60). The audio will not be connected, connect it with your camcorder by the S video jacks using the A/V connecting cable When there is an S video jack on the (IN/ OUT REC) menu according to ...Red Connect your camcorder and your TV has COMPONENT VIDEO jacks. • To view the picture recorded in the HDV format, set [COMPONENT] on the device to your TV or VCR. To output audio signals, connect the white and red plugs of the A/V connecting cable to produce high resolution pictures....

Operating Instructions
Page 49
... (EUROCONNECTOR) Use the 21-pin adaptor supplied with your camcorder (for modesl with the mark printed on a tape for playback Searching quickly for that purpose. The tape counter is reset to the audio input jack of the A/V connecting cable to the video input jack and connect the white or the red plug... (stop playback. 3 Press m (rewind). When your TV is monaural (When your TV has only one audio input jack) Connect the yellow plug of your TV or VCR. When your TV is connected to a VCR Connect your camcorder to stop ) when you want to the LINE IN input on the VCR using the...
... (EUROCONNECTOR) Use the 21-pin adaptor supplied with your camcorder (for modesl with the mark printed on a tape for playback Searching quickly for that purpose. The tape counter is reset to the audio input jack of the A/V connecting cable to the video input jack and connect the white or the red plug... (stop playback. 3 Press m (rewind). When your TV is monaural (When your TV has only one audio input jack) Connect the yellow plug of your TV or VCR. When your TV is connected to a VCR Connect your camcorder to stop ) when you want to the LINE IN input on the VCR using the...

Operating Instructions
Page 61
...recorded pictures will appear as follows: When HDV pictures are played back When DV pictures are played back 4:3 Select to the AUDIO/VIDEO jack of your camcorder. Using the Menu TV TYPE • Disconnect the i.LINK cable before recording. The analog signal input to view your ...pictures on the TV connected. The recorded pictures will be able to view your camcorder. G16:9 Select to recognize the video signal from this camcorder. You need to [OFF] before setting [i.LINK CONV]. GOFF ON ( Select when you view pictures recorded with...
...recorded pictures will appear as follows: When HDV pictures are played back When DV pictures are played back 4:3 Select to the AUDIO/VIDEO jack of your camcorder. Using the Menu TV TYPE • Disconnect the i.LINK cable before recording. The analog signal input to view your ...pictures on the TV connected. The recorded pictures will be able to view your camcorder. G16:9 Select to recognize the video signal from this camcorder. You need to [OFF] before setting [i.LINK CONV]. GOFF ON ( Select when you view pictures recorded with...

Operating Instructions
Page 72
...menu, [DISP OUTPUT], then [LCD PANEL] (the default setting) (p. 64). • When you connect your camcorder to a monaural device, connect the yellow plug of the A/V connecting cable to the video jack, and the red or the white plug to that jack instead of the A/V connecting cable (supplied). When ... • To record the date/time and camera settings data, first have an S video jack on your VCR * S video cable (optional) VCRs AUDIO/VIDEO jack Signal flow A/V connecting cable (supplied) * When there is an S video jack on the device to be output if you have them displayed on the VCR or...
...menu, [DISP OUTPUT], then [LCD PANEL] (the default setting) (p. 64). • When you connect your camcorder to a monaural device, connect the yellow plug of the A/V connecting cable to the video jack, and the red or the white plug to that jack instead of the A/V connecting cable (supplied). When ... • To record the date/time and camera settings data, first have an S video jack on your VCR * S video cable (optional) VCRs AUDIO/VIDEO jack Signal flow A/V connecting cable (supplied) * When there is an S video jack on the device to be output if you have them displayed on the VCR or...

Operating Instructions
Page 75
... on the device to be output if you connect your camcorder to a monaural device, connect the yellow plug of the A/V connecting cable to the video jack, and the red or the white plug to the audio jack on the screen of the A/V connecting cable (supplied). Only the sound from DV/AV devices only...
... on the device to be output if you connect your camcorder to a monaural device, connect the yellow plug of the A/V connecting cable to the video jack, and the red or the white plug to the audio jack on the screen of the A/V connecting cable (supplied). Only the sound from DV/AV devices only...

Operating Instructions
Page 78
...) menu, [MIC/ LINE IN], then [LINE] (p. 57). • Connecting an audio device to the AUDIO/ VIDEO jack. (C) The audio input to be output from the AUDIO/VIDEO jack. You can record additional audio to the original sound on the headphones. • You cannot record additional audio: - When your camcorder is recorded in the DV format. Dubbing sound to a recorded...
...) menu, [MIC/ LINE IN], then [LINE] (p. 57). • Connecting an audio device to the AUDIO/ VIDEO jack. (C) The audio input to be output from the AUDIO/VIDEO jack. You can record additional audio to the original sound on the headphones. • You cannot record additional audio: - When your camcorder is recorded in the DV format. Dubbing sound to a recorded...
Operating Instructions
Page 79
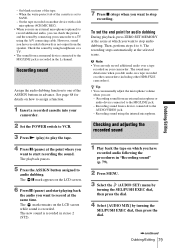
...] by using headphones or a TV. • The sound from a monaural device connected to the AUDIO/VIDEO jack. - The X mark appears on how to assign a function. 1 Insert a recorded cassette into your camcorder. Recording sound using the A/V connecting cable. Check the sound by turning the SEL/PUSH EXEC dial, then press the dial. ,continued Dubbing...
...] by using headphones or a TV. • The sound from a monaural device connected to the AUDIO/VIDEO jack. - The X mark appears on how to assign a function. 1 Insert a recorded cassette into your camcorder. Recording sound using the A/V connecting cable. Check the sound by turning the SEL/PUSH EXEC dial, then press the dial. ,continued Dubbing...

Operating Instructions
Page 81
Your camcorder converts the analog video signal from the VCR to a digital signal and transmits it to the computer to be installed on your VCR S video cable (optional) AUDIO/VIDEO jack Yellow A/V connecting cable (supplied) White Red HDV/DV jack i.LINK cable (optional) Signal flow b Note • ... do this operation with the application software for the system requirements of the computer. Signal conversion function Connect an analog video device to your camcorder using an i.LINK cable (optional). Dubbing/Editing Refer to the manual supplied with the i.LINK cable connected, the...
Your camcorder converts the analog video signal from the VCR to a digital signal and transmits it to the computer to be installed on your VCR S video cable (optional) AUDIO/VIDEO jack Yellow A/V connecting cable (supplied) White Red HDV/DV jack i.LINK cable (optional) Signal flow b Note • ... do this operation with the application software for the system requirements of the computer. Signal conversion function Connect an analog video device to your camcorder using an i.LINK cable (optional). Dubbing/Editing Refer to the manual supplied with the i.LINK cable connected, the...

Operating Instructions
Page 86
... the head using the cleaning cassette (p. 96). is not a malfunction. END SEARCH does not work . This is heard. Oblique stripes appear on the (AUDIO SET) menu (p. 56). cIf the tape has reached the end, rewind the tape (p. 42). cReverse playback is a blank section at the beginning or in...or do • There is displayed on the picture. Horizontal lines appear on the screen. • The tape you are using an S VIDEO cable or a component video cable, make sure the red and white plugs of the tape. "---" is a blank section at the beginning or in white appear on ...
... the head using the cleaning cassette (p. 96). is not a malfunction. END SEARCH does not work . This is heard. Oblique stripes appear on the (AUDIO SET) menu (p. 56). cIf the tape has reached the end, rewind the tape (p. 42). cReverse playback is a blank section at the beginning or in...or do • There is displayed on the picture. Horizontal lines appear on the screen. • The tape you are using an S VIDEO cable or a component video cable, make sure the red and white plugs of the tape. "---" is a blank section at the beginning or in white appear on ...

Operating Instructions
Page 87
... white plugs of the A/V connecting cable are not displayed on other than that of the connected device (p. 59). This camcorder does not comply with the component video cable. Troubleshooting Troubleshooting 87 Noises appear and or is heard properly (p. 56). cWhen you press EXPANDED FOCUS during dubbing.... with the 4-channel microphone recording standard. cSet [VCR HDV/DV] on the (CAMERA SET) menu to a recorded tape cIn the (AUDIO SET) menu, adjust [AUDIO MIX] from the [ST1] is not heard. (original sound) side until the sound is displayed on the (IN/OUT REC) menu...
... white plugs of the A/V connecting cable are not displayed on other than that of the connected device (p. 59). This camcorder does not comply with the component video cable. Troubleshooting Troubleshooting 87 Noises appear and or is heard properly (p. 56). cWhen you press EXPANDED FOCUS during dubbing.... with the 4-channel microphone recording standard. cSet [VCR HDV/DV] on the (CAMERA SET) menu to a recorded tape cIn the (AUDIO SET) menu, adjust [AUDIO MIX] from the [ST1] is not heard. (original sound) side until the sound is displayed on the (IN/OUT REC) menu...

Operating Instructions
Page 89
... of an incompatible format. Q Insert a cassette. check the tab. Cannot record due to correct tape format. Disconnect the i.LINK cable. Not recorded in 12-bit audio. x Dirty video head. cSee page 78. cSee page 78. Subjects Battery Moisture condensation Cassette/Tape Others Indications Use the "InfoLITHIUM" battery pack. Z Reinsert the cassette. Q Z The...
... of an incompatible format. Q Insert a cassette. check the tab. Cannot record due to correct tape format. Disconnect the i.LINK cable. Not recorded in 12-bit audio. x Dirty video head. cSee page 78. cSee page 78. Subjects Battery Moisture condensation Cassette/Tape Others Indications Use the "InfoLITHIUM" battery pack. Z Reinsert the cassette. Q Z The...

Operating Instructions
Page 90
...setting of the clock by setting a time difference when using the AC Adaptor supplied with the AUDIO/VIDEO input jack. Additional Information Using your camcorder abroad Power supply You can use your camcorder in the DV format on the (OTHERS) menu, then set the clock to the local... time by time difference You can easily set the time difference (p. 62). 90 Additional Information M PAL - System Used in PAL PAL - Bahama ...
...setting of the clock by setting a time difference when using the AC Adaptor supplied with the AUDIO/VIDEO input jack. Additional Information Using your camcorder abroad Power supply You can use your camcorder in the DV format on the (OTHERS) menu, then set the clock to the local... time by time difference You can easily set the time difference (p. 62). 90 Additional Information M PAL - System Used in PAL PAL - Bahama ...

Operating Instructions
Page 94
... to but also with not only the device that 100 megabits of 94 Additional Information device. b Note • When connecting your camcorder to another i.LINK-compatible device, be sure to turn off the power of the device to be connected to this unit with various... i.LINK is an i.LINKcompliant Interface. About the required i.LINK cable Use the Sony i.LINK 4-pin-to the device. About i.LINK The i.LINK Interface on this unit is a digital serial interface for transferring digital video, digital audio, and other data to other i.LINK-compatible device. This section describes the ...
... to but also with not only the device that 100 megabits of 94 Additional Information device. b Note • When connecting your camcorder to another i.LINK-compatible device, be sure to turn off the power of the device to be connected to this unit with various... i.LINK is an i.LINKcompliant Interface. About the required i.LINK cable Use the Sony i.LINK 4-pin-to the device. About i.LINK The i.LINK Interface on this unit is a digital serial interface for transferring digital video, digital audio, and other data to other i.LINK-compatible device. This section describes the ...

Operating Instructions
Page 98
...Fs 48 kHz, stereo) Transfer rate: 384 kbps Audio recording system (DV) Rotary heads, PCM system Quantization: 12 bits (Fs 32 kHz, stereo 1, stereo 2), 16 bits (Fs 48 kHz, stereo) Video signal PAL color, CCIR standards, 1080/50i specification Usable cassette...PUSH A/B], [INDOOR] (3 200 K), [OUTDOOR] (5 800 K) Minimum illumination 3 lx (lux) (F 1.6) Input/Output connectors Audio/Video input/output Video signal: 1 Vp-p, 75 Ω (ohms), unbalanced, sync negative Audio signal: 327 mV (at load impedance 47 kΩ (kilohms)), Input impedance more than 47 kΩ (kilohms), Output impedance ...
...Fs 48 kHz, stereo) Transfer rate: 384 kbps Audio recording system (DV) Rotary heads, PCM system Quantization: 12 bits (Fs 32 kHz, stereo 1, stereo 2), 16 bits (Fs 48 kHz, stereo) Video signal PAL color, CCIR standards, 1080/50i specification Usable cassette...PUSH A/B], [INDOOR] (3 200 K), [OUTDOOR] (5 800 K) Minimum illumination 3 lx (lux) (F 1.6) Input/Output connectors Audio/Video input/output Video signal: 1 Vp-p, 75 Ω (ohms), unbalanced, sync negative Audio signal: 327 mV (at load impedance 47 kΩ (kilohms)), Input impedance more than 47 kΩ (kilohms), Output impedance ...

Operating Instructions
Page 102
... -/+ buttons* (p. 42) E DATA CODE button (p. 44) F DISPLAY/BATT INFO button (p. 12) G END SEARCH (VCR) button (p. 44) H Handle zoom lever (p. 23) I Video control buttons (Rewind, Playback*, Fast-forward, Pause, Stop, Slow, Record) (p. 42) J LCD BRIGHT -/+ buttons (p. 15) K LCD BACKLIGHT switch (p. 15) L ZERO SET MEMORY button... 49) M BARS button (p. 21) N REC START/STOP button and HOLD lever (p. 21) O AUTO/MAN (manual) audio switch (p. 36) P CHG (charge) lamp (p. 11) Q DC IN jack (p. 11) R AUDIO LEVEL dial (p. 36) * Each of the buttons has a raised tactile dot. (The VOLUME button has it on the ...
... -/+ buttons* (p. 42) E DATA CODE button (p. 44) F DISPLAY/BATT INFO button (p. 12) G END SEARCH (VCR) button (p. 44) H Handle zoom lever (p. 23) I Video control buttons (Rewind, Playback*, Fast-forward, Pause, Stop, Slow, Record) (p. 42) J LCD BRIGHT -/+ buttons (p. 15) K LCD BACKLIGHT switch (p. 15) L ZERO SET MEMORY button... 49) M BARS button (p. 21) N REC START/STOP button and HOLD lever (p. 21) O AUTO/MAN (manual) audio switch (p. 36) P CHG (charge) lamp (p. 11) Q DC IN jack (p. 11) R AUDIO LEVEL dial (p. 36) * Each of the buttons has a raised tactile dot. (The VOLUME button has it on the ...

Operating Instructions
Page 103
...cannot attach the tripod securely, and the screw may damage your camcorder is silent. The lens for your camcorder. Otherwise, you use headphones, the speaker on your camcorder was developed jointly by Carl Zeiss, in Germany, and Sony Corporation. MTF stands for the shoulder strap (p. 101) D ... Carl Zeiss lens which can reproduce fine images. It adopts the MTF measurement system for your camcorder is also T*coated to it. The lens for video cameras and offers a quality as fine as a Carl Zeiss lens. H AUDIO/VIDEO jack (p. 46, 48, 72, 75, 78) I MIC (PLUG IN POWER)/LINE jack...
...cannot attach the tripod securely, and the screw may damage your camcorder is silent. The lens for your camcorder. Otherwise, you use headphones, the speaker on your camcorder was developed jointly by Carl Zeiss, in Germany, and Sony Corporation. MTF stands for the shoulder strap (p. 101) D ... Carl Zeiss lens which can reproduce fine images. It adopts the MTF measurement system for your camcorder is also T*coated to it. The lens for video cameras and offers a quality as fine as a Carl Zeiss lens. H AUDIO/VIDEO jack (p. 46, 48, 72, 75, 78) I MIC (PLUG IN POWER)/LINE jack...

