Operating Guide
Page 8
... LCD screen or in the viewfinder (p. 53). Do not turn on the recording media. The camcorder may be saved or recorded. Insulation sheet Rechargeable battery pack NP-FH60 (1) CD-ROM "Handycam Application Software" (1) "PMB" (software, including "PMB Guide") "Handycam Handbook" (PDF) "Operating Guide" (This manual) (1) See page 43 for the "Memory Stick" media you repeat recording/deleting images for a long time, fragmentation of an airplane (HDR-XR500V/XR520V). To protect the internal hard disk...
... LCD screen or in the viewfinder (p. 53). Do not turn on the recording media. The camcorder may be saved or recorded. Insulation sheet Rechargeable battery pack NP-FH60 (1) CD-ROM "Handycam Application Software" (1) "PMB" (software, including "PMB Guide") "Handycam Handbook" (PDF) "Operating Guide" (This manual) (1) See page 43 for the "Memory Stick" media you repeat recording/deleting images for a long time, fragmentation of an airplane (HDR-XR500V/XR520V). To protect the internal hard disk...
Operating Guide
Page 9
... points (white, red, blue, or green in color) that you need a NTSC system-based TV. Television programs, films, video tapes, and other compatible device. To view your recordings on a compatible Blu-ray Disc player/recorder or other materials may be played on a TV, you save your computer. DVD media containing AVCHD footage should not be some type of the LCD screen used in this manual for illustration purposes are captured using a digital still camera, and...
... points (white, red, blue, or green in color) that you need a NTSC system-based TV. Television programs, films, video tapes, and other compatible device. To view your recordings on a compatible Blu-ray Disc player/recorder or other materials may be played on a TV, you save your computer. DVD media containing AVCHD footage should not be some type of the LCD screen used in this manual for illustration purposes are captured using a digital still camera, and...

Operating Guide
Page 11
... 1: Charging the battery pack 13 Charging the battery pack abroad 14 Step 2: Turning the power on, and setting the date and time 15 Changing the language setting 16 Recording Recording 17 Recording and playing movies and photos easily (Easy Handycam operation 20 Acquiring recording location information using the GPS (HDR-XR500V/XR520V 20 Playback Playback on the camcorder 21 Playing images on a TV 24 Saving movies and photos with a computer Preparing a computer (Windows 26 When using a Macintosh 26 Selecting the method for creating a disc (computer...
... 1: Charging the battery pack 13 Charging the battery pack abroad 14 Step 2: Turning the power on, and setting the date and time 15 Changing the language setting 16 Recording Recording 17 Recording and playing movies and photos easily (Easy Handycam operation 20 Acquiring recording location information using the GPS (HDR-XR500V/XR520V 20 Playback Playback on the camcorder 21 Playing images on a TV 24 Saving movies and photos with a computer Preparing a computer (Windows 26 When using a Macintosh 26 Selecting the method for creating a disc (computer...
Operating Guide
Page 12
... image quality (SD) disc with a recorder, etc. (A/V connecting cable connection 39 Making good use of your camcorder Deleting movies and photos 41 Coping with shooting conditions 42 Changing the recording medium 43 To check the recording media settings 43 Dubbing or copying movies and photos from the internal hard disk to a "Memory Stick PRO Duo" media 44 Customizing your camcorder with menus 45 Using the HELP function 45 Getting detailed information from the "Handycam Handbook 51 Additional information Troubleshooting 52 Precautions 54 Specifications 57 Screen indicators 61 Parts...
... image quality (SD) disc with a recorder, etc. (A/V connecting cable connection 39 Making good use of your camcorder Deleting movies and photos 41 Coping with shooting conditions 42 Changing the recording medium 43 To check the recording media settings 43 Dubbing or copying movies and photos from the internal hard disk to a "Memory Stick PRO Duo" media 44 Customizing your camcorder with menus 45 Using the HELP function 45 Getting detailed information from the "Handycam Handbook 51 Additional information Troubleshooting 52 Precautions 54 Specifications 57 Screen indicators 61 Parts...

Operating Guide
Page 15
... during playback. Step 2: Turning the power on the recording media, and can turn on your camcorder. To display the date and time, touch (HOME) (SETTINGS) [VIEW IMAGES SET] [DATA CODE] [DATE/TIME You can be displayed during recording, but they are automatically recorded on , and setting the date and time 1 Open the LCD screen of your camcorder when the LCD screen is turned on. To turn off the operation beeps by touching (HOME) (SETTINGS) [SOUND/DISP SET] ...
... during playback. Step 2: Turning the power on the recording media, and can turn on your camcorder. To display the date and time, touch (HOME) (SETTINGS) [VIEW IMAGES SET] [DATA CODE] [DATE/TIME You can be displayed during recording, but they are automatically recorded on , and setting the date and time 1 Open the LCD screen of your camcorder when the LCD screen is turned on. To turn off the operation beeps by touching (HOME) (SETTINGS) [SOUND/DISP SET] ...

Operating Guide
Page 19
... image file size is 8.3M when recording high definition image quality (HD) movies. Your camcorder flashes automatically when there is recorded. Move the power zoom lever slightly for a faster zoom. You can check the recordable number of the screen becomes 4:3. US 19 Zoom lever Wide Telephoto Flashes Lights up When disappears, the photo is insufficient ambient light. The flash does not work during movie recording by touching (HOME) (SETTINGS) [PHOTO SETTINGS] [FLASH MODE...
... image file size is 8.3M when recording high definition image quality (HD) movies. Your camcorder flashes automatically when there is recorded. Move the power zoom lever slightly for a faster zoom. You can check the recordable number of the screen becomes 4:3. US 19 Zoom lever Wide Telephoto Flashes Lights up When disappears, the photo is insufficient ambient light. The flash does not work during movie recording by touching (HOME) (SETTINGS) [PHOTO SETTINGS] [FLASH MODE...
Operating Guide
Page 20
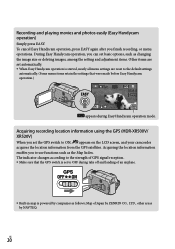
... all menu settings are reset to OFF during Easy Handycam operation mode. US 20 Recording and playing movies and photos easily (Easy Handycam operation) Simply press EASY. During Easy Handycam operation, you set to the default settings automatically. (Some menu items retain the settings that the GPS switch is set the GPS switch to use functions such as changing the image size or deleting images, among the setting and adjustment items. Other items are set automatically. When Easy Handycam operation is powered by...
... all menu settings are reset to OFF during Easy Handycam operation mode. US 20 Recording and playing movies and photos easily (Easy Handycam operation) Simply press EASY. During Easy Handycam operation, you set to the default settings automatically. (Some menu items retain the settings that the GPS switch is set the GPS switch to use functions such as changing the image size or deleting images, among the setting and adjustment items. Other items are set automatically. When Easy Handycam operation is powered by...
Operating Guide
Page 26
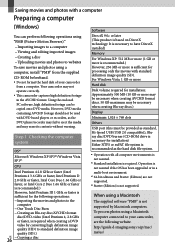
...://guide.d-imaging.sony.co.jp/mac/ ms/us/ Operation is not assured if the OS has been upgraded or in the AVCHD format. Saving movies and photos with a computer Preparing a computer (Windows) You can be provided as standard, Hi-Speed USB (USB 2.0 compatible)), Bluray disc/DVD burner (CD-ROM drive is necessary for installation) Either NTFS or exFAT file system is recommended as the DVD player/recorder may fail to eject the media and may erase...
...://guide.d-imaging.sony.co.jp/mac/ ms/us/ Operation is not assured if the OS has been upgraded or in the AVCHD format. Saving movies and photos with a computer Preparing a computer (Windows) You can be provided as standard, Hi-Speed USB (USB 2.0 compatible)), Bluray disc/DVD burner (CD-ROM drive is necessary for installation) Either NTFS or exFAT file system is recommended as the DVD player/recorder may fail to eject the media and may erase...

Operating Guide
Page 32
... [USB SELECT] screen appears on the camcorder screen. Do not close the LCD screen when the camcorder is completed, a screen to indicate that have not yet been saved with the USB cable. Movies and photos are imported to ] [Handycam (Hard Disk Drive)]/[Handycam (Memory Stick)]. When the operation is completed, the "PMB" screen appears. When the operation is connected to your camcorder. It may be lost. 2 Touch [ USB CONNECT] to import images from the internal hard disk, or [ USB CONNECT] to import images from...
... [USB SELECT] screen appears on the camcorder screen. Do not close the LCD screen when the camcorder is completed, a screen to indicate that have not yet been saved with the USB cable. Movies and photos are imported to ] [Handycam (Hard Disk Drive)]/[Handycam (Memory Stick)]. When the operation is completed, the "PMB" screen appears. When the operation is connected to your camcorder. It may be lost. 2 Touch [ USB CONNECT] to import images from the internal hard disk, or [ USB CONNECT] to import images from...
Operating Guide
Page 38
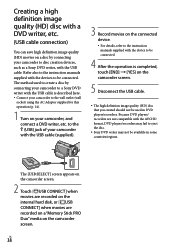
... Creating a high definition image quality (HD) disc with a DVD writer, etc. (USB cable connection) You can save high definition image quality (HD) movies on the camcorder screen. Refer also to eject the disc. Sony DVD writer may not be connected. The [USB SELECT] screen appears on the camcorder screen. 2 Touch [ USB CONNECT] when movies are recorded on the internal hard disk, or [ USB CONNECT] when movies are not compatible with the AVCHD format, DVD players/recorders may fail to the instruction manuals supplied with the USB cable.
... Creating a high definition image quality (HD) disc with a DVD writer, etc. (USB cable connection) You can save high definition image quality (HD) movies on the camcorder screen. Refer also to eject the disc. Sony DVD writer may not be connected. The [USB SELECT] screen appears on the camcorder screen. 2 Touch [ USB CONNECT] when movies are recorded on the internal hard disk, or [ USB CONNECT] when movies are not compatible with the AVCHD format, DVD players/recorders may fail to the instruction manuals supplied with the USB cable.
Operating Guide
Page 42
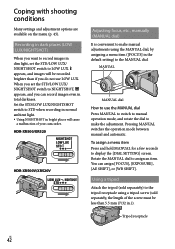
... operation mode between manual and automatic. Using a tripod Attach the tripod (sold separately, the length of your camcorder. HDR-XR500/XR520 HDR-XR500V/XR520V Adjusting focus, etc., manually (MANUAL dial) It is convenient to make the adjustment. Set the STD/LOW LUX/NIGHTSHOT switch to make manual adjustments using the MANUAL dial, by assigning a menu item ([FOCUS] in the default setting) to the tripod receptacle using a tripod screw (sold separately) to the MANUAL dial. MANUAL MANUAL...
... operation mode between manual and automatic. Using a tripod Attach the tripod (sold separately, the length of your camcorder. HDR-XR500/XR520 HDR-XR500V/XR520V Adjusting focus, etc., manually (MANUAL dial) It is convenient to make the adjustment. Set the STD/LOW LUX/NIGHTSHOT switch to make manual adjustments using the MANUAL dial, by assigning a menu item ([FOCUS] in the default setting) to the tripod receptacle using a tripod screw (sold separately) to the MANUAL dial. MANUAL MANUAL...

Operating Guide
Page 47
... the white balance. Sets how the remaining recording time of the media is horizontal or vertical. REC MODE Sets the mode to make sure the subject is to be played with HIGHLIGHT PLAYBACK. DISC BURN p. 31 DOWNLOAD MUSIC...... EMPTY MUSIC Deletes music files. When recording fast moving subject, a high image quality, such as free space. DIGITAL ZOOM p. 18 STEADYSHOT p. 18 X.V.COLOR p. 18 GUIDEFRAME Displays the frame to record movies. Adjusts the exposure for recording, playback, or editing movies. USB CONNECT USB CONNECT........... Connects the internal hard disk...
... the white balance. Sets how the remaining recording time of the media is horizontal or vertical. REC MODE Sets the mode to make sure the subject is to be played with HIGHLIGHT PLAYBACK. DISC BURN p. 31 DOWNLOAD MUSIC...... EMPTY MUSIC Deletes music files. When recording fast moving subject, a high image quality, such as free space. DIGITAL ZOOM p. 18 STEADYSHOT p. 18 X.V.COLOR p. 18 GUIDEFRAME Displays the frame to record movies. Adjusts the exposure for recording, playback, or editing movies. USB CONNECT USB CONNECT........... Connects the internal hard disk...

Operating Guide
Page 48
...COLOR Adjusts the color intensity of flash. WB SHIFT Adjusts the white balance. FACE FUNC. Sets the output image resolution when connecting your camcoder to make sure the subject is activated. SUMMERTIME p. 15 LANGUAGE SET......... REDEYE REDUC Prevents redeye when shooting with an HDMI cable. CONVERSION LENS....... Adjusts the exposure for recording, playback, or editing movies. Changes the [FACE DETECTION] and [FRAME SETTING] setting. STEADYSHOT Sets the SteadyShot function when recording photos. FLASH LEVEL Sets the brightness of the LCD screen. SMILE SHUTTER...
...COLOR Adjusts the color intensity of flash. WB SHIFT Adjusts the white balance. FACE FUNC. Sets the output image resolution when connecting your camcoder to make sure the subject is activated. SUMMERTIME p. 15 LANGUAGE SET......... REDEYE REDUC Prevents redeye when shooting with an HDMI cable. CONVERSION LENS....... Adjusts the exposure for recording, playback, or editing movies. Changes the [FACE DETECTION] and [FRAME SETTING] setting. STEADYSHOT Sets the SteadyShot function when recording photos. FLASH LEVEL Sets the brightness of the LCD screen. SMILE SHUTTER...

Operating Guide
Page 52
... turn on the problem. "PMB" does not work , press the RESET button (p. 63) using a pointed object: (If you for any problems using your camcorder, use the following table to save the data on the internal hard disk on other media (backup) before sending your camcorder is set to on the hard disk will be required to the camcorder (p. 13). Connect the plug of this period. The recording media is not a malfunction. Turn off your camcorder...
... turn on the problem. "PMB" does not work , press the RESET button (p. 63) using a pointed object: (If you for any problems using your camcorder, use the following table to save the data on the internal hard disk on other media (backup) before sending your camcorder is set to on the hard disk will be required to the camcorder (p. 13). Connect the plug of this period. The recording media is not a malfunction. Turn off your camcorder...

Operating Guide
Page 55
...; When the lens is attached. On charging the pre-installed rechargeable battery Your camcorder has a pre-installed rechargeable battery to retain the date, time, and other settings even when the camcorder is not a malfunction. Do not damage the power cord (mains lead) such as by recording and playing back images about 3 months if you use the LCD Cleaning Kit (sold separately), do not use a deformed or damaged battery pack. ...
...; When the lens is attached. On charging the pre-installed rechargeable battery Your camcorder has a pre-installed rechargeable battery to retain the date, time, and other settings even when the camcorder is not a malfunction. Do not damage the power cord (mains lead) such as by recording and playing back images about 3 months if you use the LCD Cleaning Kit (sold separately), do not use a deformed or damaged battery pack. ...
Operating Guide
Page 57
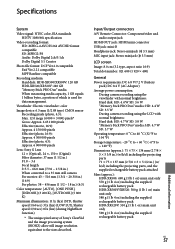
Specifications System Video signal: NTSC color, EIA standards HDTV 1080/60i specification Video recording format: HD: MPEG-4 AVC/H.264 AVCHD format compatible SD: MPEG2-PS Audio: Dolby Digital 2ch/5.1ch Dolby Digital 5.1 Creator Photo file format: DCF Ver.2.0 compatible Exif Ver.2.21 compatible MPF Baseline compatible Recording medium: Hard disk: HDR-XR500/XR500V: 120 GB HDR-XR520/XR520V: 240 GB "Memory Stick PRO Duo" media When measuring media capacity, 1 GB equals 1 billion bytes, a portion of Sony's ClearVid and the image processing system (BIONZ...
Specifications System Video signal: NTSC color, EIA standards HDTV 1080/60i specification Video recording format: HD: MPEG-4 AVC/H.264 AVCHD format compatible SD: MPEG2-PS Audio: Dolby Digital 2ch/5.1ch Dolby Digital 5.1 Creator Photo file format: DCF Ver.2.0 compatible Exif Ver.2.21 compatible MPF Baseline compatible Recording medium: Hard disk: HDR-XR500/XR500V: 120 GB HDR-XR520/XR520V: 240 GB "Memory Stick PRO Duo" media When measuring media capacity, 1 GB equals 1 billion bytes, a portion of Sony's ClearVid and the image processing system (BIONZ...
Operating Guide
Page 58
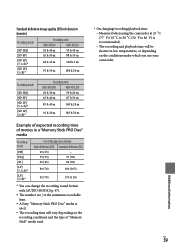
.../stop, turning the power on the AC Adaptor for the supplied battery pack (minute) Recording media Charging time (full charge) Continuous recording time Typical recording time Playback time Hard disk HD SD "Memory Stick PRO Duo" media HD SD 135 90 110 90 115 45 55 45 55 150 150 150 150 Recording and playback time is [HD SP] (p. 47). High definition image quality (HD) in the internal hard disk To set the recording mode, touch (HOME) (SETTINGS) [MOVIE SETTINGS...
.../stop, turning the power on the AC Adaptor for the supplied battery pack (minute) Recording media Charging time (full charge) Continuous recording time Typical recording time Playback time Hard disk HD SD "Memory Stick PRO Duo" media HD SD 135 90 110 90 115 45 55 45 55 150 150 150 150 Recording and playback time is [HD SP] (p. 47). High definition image quality (HD) in the internal hard disk To set the recording mode, touch (HOME) (SETTINGS) [MOVIE SETTINGS...
Operating Guide
Page 59
...) 90 (70) 160 (105) 95 (70) 170 (110) * You can change the recording sound format with [AUDIO MODE] (p. 47). The number in ( ) is the minimum recordable time. A Sony "Memory Stick PRO Duo" media is used. The recording time will vary depending on the recording conditions and the type of "Memory Stick" media used. On charging/recording/playback time Measured when using the camcorder at 25 C (77 ˚F) (10 C to 30 C (50...
...) 90 (70) 160 (105) 95 (70) 170 (110) * You can change the recording sound format with [AUDIO MODE] (p. 47). The number in ( ) is the minimum recordable time. A Sony "Memory Stick PRO Duo" media is used. The recording time will vary depending on the recording conditions and the type of "Memory Stick" media used. On charging/recording/playback time Measured when using the camcorder at 25 C (77 ˚F) (10 C to 30 C (50...
Operating Guide
Page 63
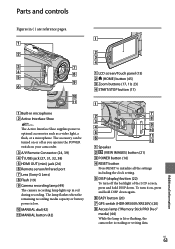
... LCD screen, press and hold DISP down again. EASY button (20) GPS switch (HDR-XR500V/XR520V) (20) Access lamp ("Memory Stick PRO Duo" media) (44) While the lamp is lit or flashing, the camcorder is low. MANUAL dial (42) MANUAL button (42) Speaker (VIEW IMAGES) button (21) POWER button (16) RESET button Press RESET to initialize all the settings including the clock setting. DISP (display) button (22) To turn...
... LCD screen, press and hold DISP down again. EASY button (20) GPS switch (HDR-XR500V/XR520V) (20) Access lamp ("Memory Stick PRO Duo" media) (44) While the lamp is lit or flashing, the camcorder is low. MANUAL dial (42) MANUAL button (42) Speaker (VIEW IMAGES) button (21) POWER button (16) RESET button Press RESET to initialize all the settings including the clock setting. DISP (display) button (22) To turn...
Operating Guide
Page 65
... Operation flow 10 OPTION MENU 45, 50 P Parts and controls 63 Photos 18, 22 Playback 21 Playing a high definition image quality (HD) disc 34 PMB (Picture Motion Browser 26, 27 PMB Guide 33 Precautions 54 R Recording 17 Recording and playback time....58 Recording media 43 Repair 52 RESET 63 S Screen indicators 61 Self-diagnosis display 53 Setting the date and time...........15 Software 27 Specifications 57 Supplied items 8 T Tripod 42 Troubleshooting 52 Turning the power on 15 TV 24 TV CONNECT Guide...
... Operation flow 10 OPTION MENU 45, 50 P Parts and controls 63 Photos 18, 22 Playback 21 Playing a high definition image quality (HD) disc 34 PMB (Picture Motion Browser 26, 27 PMB Guide 33 Precautions 54 R Recording 17 Recording and playback time....58 Recording media 43 Repair 52 RESET 63 S Screen indicators 61 Self-diagnosis display 53 Setting the date and time...........15 Software 27 Specifications 57 Supplied items 8 T Tripod 42 Troubleshooting 52 Turning the power on 15 TV 24 TV CONNECT Guide...


