Instruction Manual
Page 7
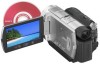
... is not dustproofed, dripproofed or waterproofed. Pushing the plug forcibly into the Memory Stick Duo Adaptor. Memory Stick Duo Adaptor Battery • The camcorder is on a "Memory Stick Duo" or a Memory Stick Duo Adaptor. See "Handling your camcorder" (p. 109). • To prevent discs from being lost, do not ...highprecision technology, so over 99.99% of the pixels are operational for effective use. Types of "Memory Stick" you can use in your camcorder You can be used with your camcorder to another device with an HDMI cable, a component video cable, or a USB cable, be sure...
... is not dustproofed, dripproofed or waterproofed. Pushing the plug forcibly into the Memory Stick Duo Adaptor. Memory Stick Duo Adaptor Battery • The camcorder is on a "Memory Stick Duo" or a Memory Stick Duo Adaptor. See "Handling your camcorder" (p. 109). • To prevent discs from being lost, do not ...highprecision technology, so over 99.99% of the pixels are operational for effective use. Types of "Memory Stick" you can use in your camcorder You can be used with your camcorder to another device with an HDMI cable, a component video cable, or a USB cable, be sure...
Instruction Manual
Page 10
... after finalizing 64 Customizing Your Camcorder What you 26 Step 5: Inserting a disc or a "Memory Stick Duo 27 Recording/Playback Easy...high quality still images during movie recording (Dual Rec 36 Recording in dark places (NightShot 37 Adjusting the exposure for backlit subjects 37 Recording in mirror mode 37 10 Recording the fast action in slowmotion (SMTH SLW REC 38 Controlling the image settings manually with the camera control dial (HDR-UX7...or DVD/HDD recorders 53 Printing recorded images (PictBridge compliant printer 54 Utilizing Recording Media (MANAGE DISC/MEMORY) category...
... after finalizing 64 Customizing Your Camcorder What you 26 Step 5: Inserting a disc or a "Memory Stick Duo 27 Recording/Playback Easy...high quality still images during movie recording (Dual Rec 36 Recording in dark places (NightShot 37 Adjusting the exposure for backlit subjects 37 Recording in mirror mode 37 10 Recording the fast action in slowmotion (SMTH SLW REC 38 Controlling the image settings manually with the camera control dial (HDR-UX7...or DVD/HDD recorders 53 Printing recorded images (PictBridge compliant printer 54 Utilizing Recording Media (MANAGE DISC/MEMORY) category...
Instruction Manual
Page 11
...90 Troubleshooting Troubleshooting 91 Warning indicators and messages 100 Additional Information Using your camcorder abroad ....103 Precautions and maintenance ....105 About the Disc 105 About the AVCHD format 106 About the "Memory Stick 107 About the "InfoLITHIUM" battery pack 108 About the x.v.Color ...109 Handling your camcorder 109 Specifications 112 Quick Reference Identifying parts and controls ......118 ...
...90 Troubleshooting Troubleshooting 91 Warning indicators and messages 100 Additional Information Using your camcorder abroad ....103 Precautions and maintenance ....105 About the Disc 105 About the AVCHD format 106 About the "Memory Stick 107 About the "InfoLITHIUM" battery pack 108 About the x.v.Color ...109 Handling your camcorder 109 Specifications 112 Quick Reference Identifying parts and controls ......118 ...
Instruction Manual
Page 13
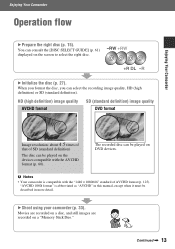
... on DVD devices. B Initialize the disc (p. 27). HD (high definition) image quality AVCHD format SD (standard definition) image quality DVD format Image resolution: about 4.5 times of that of AVCHD format (p. 125). "AVCHD 1080i format" is compatible with the AVCHD format (p. 60). B Shoot using your camcorder (p. 33...definition) The disc can consult the [DISC SELECT GUIDE] (p. 61) displayed on a "Memory Stick Duo." Continued , 13 When you format the disc, you can be described in more detail. The recorded disc can select the recording image quality, HD (high definition...
... on DVD devices. B Initialize the disc (p. 27). HD (high definition) image quality AVCHD format SD (standard definition) image quality DVD format Image resolution: about 4.5 times of that of AVCHD format (p. 125). "AVCHD 1080i format" is compatible with the AVCHD format (p. 60). B Shoot using your camcorder (p. 33...definition) The disc can consult the [DISC SELECT GUIDE] (p. 61) displayed on a "Memory Stick Duo." Continued , 13 When you format the disc, you can be described in more detail. The recorded disc can select the recording image quality, HD (high definition...
Instruction Manual
Page 17
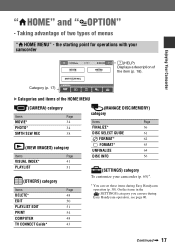
... 80. Taking advantage of two types of the item (p. 18). the starting point for operations with your camcorder (p. 65)*. * You can use during Easy Handycam operation (p. 30). Enjoying Your Camcorder Category (p. 17) B Categories and items of the HOME MENU (CAMERA) category Items Page MOVIE* 34 ...) category Items Page DELETE* 48 EDIT 50 PLAYLIST EDIT 51 PRINT 54 COMPUTER 48 TV CONNECT Guide* 43 (MANAGE DISC/MEMORY) category Items Page FINALIZE* 56 DISC SELECT GUIDE 61 FORMAT* 62 FORMAT* 63 UNFINALIZE 64 DISC INFO 56 (SETTINGS) category To ...
... 80. Taking advantage of two types of the item (p. 18). the starting point for operations with your camcorder (p. 65)*. * You can use during Easy Handycam operation (p. 30). Enjoying Your Camcorder Category (p. 17) B Categories and items of the HOME MENU (CAMERA) category Items Page MOVIE* 34 ...) category Items Page DELETE* 48 EDIT 50 PLAYLIST EDIT 51 PRINT 54 COMPUTER 48 TV CONNECT Guide* 43 (MANAGE DISC/MEMORY) category Items Page FINALIZE* 56 DISC SELECT GUIDE 61 FORMAT* 62 FORMAT* 63 UNFINALIZE 64 DISC INFO 56 (SETTINGS) category To ...

Instruction Manual
Page 25
... battery power ([A.SHUT OFF], p. 78). In that the clock is correctly set the date and time again (p. 112). • It takes a few seconds for your camcorder to 12:00 PM. Getting Started 3 Set [DST SET] or [SUMMERTIME], then touch [NEXT]. 4 Set [Y] (year) with v/V. 5 Select [M] with b/B, then set the...power is displayed for about 3 months, the built-in rechargeable battery and then set , then touch . For midday, set it to be cleared from the memory. To select the screen language, touch (SETTINGS) t [CLOCK/ LANG] t [ LANGUAGE SET] (p. 66). To turn off automatically if you do not ...
... battery power ([A.SHUT OFF], p. 78). In that the clock is correctly set the date and time again (p. 112). • It takes a few seconds for your camcorder to 12:00 PM. Getting Started 3 Set [DST SET] or [SUMMERTIME], then touch [NEXT]. 4 Set [Y] (year) with v/V. 5 Select [M] with b/B, then set the...power is displayed for about 3 months, the built-in rechargeable battery and then set , then touch . For midday, set it to be cleared from the memory. To select the screen language, touch (SETTINGS) t [CLOCK/ LANG] t [ LANGUAGE SET] (p. 66). To turn off automatically if you do not ...
Instruction Manual
Page 27
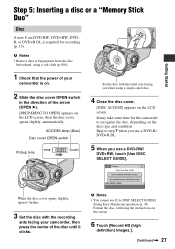
...Memory Stick Duo" Disc A new 8 cm DVD-RW, DVD+RW, DVDR, or DVD+R DL is on. 2 Slide the disc cover OPEN switch in the direction of the disc until it further. 3 Set the disc with the label side facing out when using a soft cloth (p.106). 1 Check that the power of your camcorder... [Record HD (high definition) images.]. b Notes • You cannot use a DVD-RW/ DVD+RW, touch [Use DISC SELECT GUIDE]. ACCESS lamp (Disc) Disc cover OPEN switch Pickup lens Set the disc with the recording side facing your camcorder is required for the camcorder to step 7 when you use a DVD-R/ DVD+R DL. 5...
...Memory Stick Duo" Disc A new 8 cm DVD-RW, DVD+RW, DVDR, or DVD+R DL is on. 2 Slide the disc cover OPEN switch in the direction of the disc until it further. 3 Set the disc with the label side facing out when using a soft cloth (p.106). 1 Check that the power of your camcorder... [Record HD (high definition) images.]. b Notes • You cannot use a DVD-RW/ DVD+RW, touch [Use DISC SELECT GUIDE]. ACCESS lamp (Disc) Disc cover OPEN switch Pickup lens Set the disc with the recording side facing your camcorder is required for the camcorder to step 7 when you use a DVD-R/ DVD+R DL. 5...
Instruction Manual
Page 28
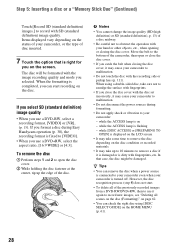
... cannot change the image quality (HD (high definition) or SD (standard definition), p. 13) of a disc midway. • Be careful not to your camcorder even when your hand or other objects, etc., when opening or closing the disc cover, it may cause your camcorder to malfunction. • Do not disconnect..."Memory Stick Duo" (Continued) Touch [Record SD (standard definition) images.] to open or close the disc cover with the disc set incorrectly, it may take some time to remove the disc depending on the status of your camcorder: - while the ACCESS lamp is right for you use a DVD+RW...
... cannot change the image quality (HD (high definition) or SD (standard definition), p. 13) of a disc midway. • Be careful not to your camcorder even when your hand or other objects, etc., when opening or closing the disc cover, it may cause your camcorder to malfunction. • Do not disconnect..."Memory Stick Duo" (Continued) Touch [Record SD (standard definition) images.] to open or close the disc cover with the disc set incorrectly, it may take some time to remove the disc depending on the status of your camcorder: - while the ACCESS lamp is right for you use a DVD+RW...

Instruction Manual
Page 29
b Notes • When the access lamp is lit or flashing, your camcorder, turn the power off, eject the "Memory Stick Duo," or remove the battery pack. Otherwise, image data may be damaged. • If you force the "Memory Stick Duo" into the "Memory Stick Duo" slot in the right direction until it clicks. Access lamp...
b Notes • When the access lamp is lit or flashing, your camcorder, turn the power off, eject the "Memory Stick Duo," or remove the battery pack. Otherwise, image data may be damaged. • If you force the "Memory Stick Duo" into the "Memory Stick Duo" slot in the right direction until it clicks. Access lamp...

Instruction Manual
Page 33
Recording/Playback Recording the images Recording/Playback (HOME) D (HOME) E PHOTO F Lens cover Opens in the order shown below, then hold your camcorder, and do not disconnect the battery or AC Adaptor. Do not apply shock or vibration to OFF (CHG), slide it while pressing the green button. (... in accordance with the setting of the POWER switch. START/STOP C POWER switch A If the POWER switch is still being written onto the disc or "Memory Stick Duo." Continued , 33 b Notes • If the ACCESS lamp (p. 27, 29) is on after recording is finished, it means that data is set to...
Recording/Playback Recording the images Recording/Playback (HOME) D (HOME) E PHOTO F Lens cover Opens in the order shown below, then hold your camcorder, and do not disconnect the battery or AC Adaptor. Do not apply shock or vibration to OFF (CHG), slide it while pressing the green button. (... in accordance with the setting of the POWER switch. START/STOP C POWER switch A If the POWER switch is still being written onto the disc or "Memory Stick Duo." Continued , 33 b Notes • If the ACCESS lamp (p. 27, 29) is on after recording is finished, it means that data is set to...

Instruction Manual
Page 34
... the HOME MENU, touch (CAMERA) t [MOVIE] or [PHOTO]. 34 Still images Still images are recorded on the "Memory Stick Duo." See page 71 for the recording time. To record high resolution still images on the "Memory Stick Duo" during shooting a movie (Dual Rec) See page 36. When the red disappears, the image is...
... the HOME MENU, touch (CAMERA) t [MOVIE] or [PHOTO]. 34 Still images Still images are recorded on the "Memory Stick Duo." See page 71 for the recording time. To record high resolution still images on the "Memory Stick Duo" during shooting a movie (Dual Rec) See page 36. When the red disappears, the image is...
Instruction Manual
Page 36
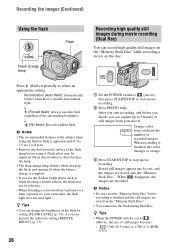
...can prevent the redeye by setting [FLASH LEVEL] (p. 73), or you can capture up to 8 feet). • Remove any dust from your camcorder, the flash light does not emit light. Flash effect may not be impaired if heat discoloration or dust obscures the lamp. • The flash ...Recording the images (Continued) Using the flash Flash Flash charge lamp Recording high quality still images during movie recording (Dual Rec) You can record high quality still images on the "Memory Stick Duo" while recording a movie on the "Memory Stick Duo." • You cannot use the flash in flash is set...
...can prevent the redeye by setting [FLASH LEVEL] (p. 73), or you can capture up to 8 feet). • Remove any dust from your camcorder, the flash light does not emit light. Flash effect may not be impaired if heat discoloration or dust obscures the lamp. • The flash ...Recording the images (Continued) Using the flash Flash Flash charge lamp Recording high quality still images during movie recording (Dual Rec) You can record high quality still images on the "Memory Stick Duo" while recording a movie on the "Memory Stick Duo." • You cannot use the flash in flash is set...
Instruction Manual
Page 48
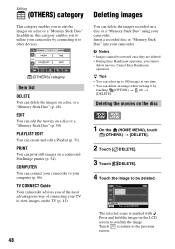
... the movies on a connected PictBridge printer (p. 54). PLAYLIST EDIT You can delete the images recorded on a disc or a "Memory Stick Duo" using your camcorder to the previous screen. 48 Touch to return to your camcorder by connecting it by touching (OPTION) t tab t [DELETE]. b Notes • Images cannot be deleted. Deleting the movies on...
... the movies on a connected PictBridge printer (p. 54). PLAYLIST EDIT You can delete the images recorded on a disc or a "Memory Stick Duo" using your camcorder to the previous screen. 48 Touch to return to your camcorder by connecting it by touching (OPTION) t tab t [DELETE]. b Notes • Images cannot be deleted. Deleting the movies on...
Instruction Manual
Page 49
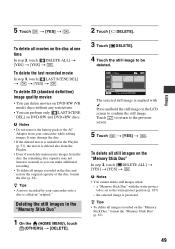
...only [ LAST SCENE DEL] on the LCD screen to be deleted. a "Memory Stick Duo" with . the selected image is called an "original." To delete SD (standard definition) image quality movies • You can delete movies on DVD-RW (VR mode) discs without any restrictions. • You can make ...z Tips • A movie recorded by your camcorder while editing images. Deleting the still images in the disc and restore the original capacity of the disc, format the disc (p. 62). To delete all still images on the "Memory Stick Duo," format the "Memory Stick Duo" (p. 63). 49 Editing Press and...
...only [ LAST SCENE DEL] on the LCD screen to be deleted. a "Memory Stick Duo" with . the selected image is called an "original." To delete SD (standard definition) image quality movies • You can delete movies on DVD-RW (VR mode) discs without any restrictions. • You can make ...z Tips • A movie recorded by your camcorder while editing images. Deleting the still images in the disc and restore the original capacity of the disc, format the disc (p. 62). To delete all still images on the "Memory Stick Duo," format the "Memory Stick Duo" (p. 63). 49 Editing Press and...

Instruction Manual
Page 54
... printer) You can guarantee the operation of your camcorder to the printer using a PictBridge compliant printer, without connecting the camcorder to the recording device (VCR or DVD/ HDD recorder) with the A/V connecting cable (supplied) 1 or an A/V connecting cable with your camcorder to the printer 1 Turn on the "Memory Stick Duo" will be displayed. Connecting your...
... printer) You can guarantee the operation of your camcorder to the printer using a PictBridge compliant printer, without connecting the camcorder to the recording device (VCR or DVD/ HDD recorder) with the A/V connecting cable (supplied) 1 or an A/V connecting cable with your camcorder to the printer 1 Turn on the "Memory Stick Duo" will be displayed. Connecting your...
Instruction Manual
Page 55
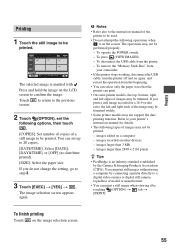
...) ratio, the left edges of model or manufacturer. • You can print still images without using a computer by connecting a printer directly to your camcorder • If the printer stops working, disconnect the USB cable, turn the printer off and on the screen. b Notes • Refer also to ...still camera, regardless of images may not be used. • Do not attempt the following operations when is marked with . To remove the "Memory Stick Duo" from the printer. - To finish printing Touch on other devices - To disconnect the USB cable from your printer's instruction manual ...
...) ratio, the left edges of model or manufacturer. • You can print still images without using a computer by connecting a printer directly to your camcorder • If the printer stops working, disconnect the USB cable, turn the printer off and on the screen. b Notes • Refer also to ...still camera, regardless of images may not be used. • Do not attempt the following operations when is marked with . To remove the "Memory Stick Duo" from the printer. - To finish printing Touch on other devices - To disconnect the USB cable from your printer's instruction manual ...
Instruction Manual
Page 56
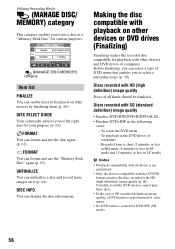
...In the case of SD (standard definition) image quality, a DVD menu is created instead of computers. Utilizing Recording Media (MANAGE DISC/ MEMORY) category This category enables you to use a disc or a "Memory Stick Duo" for various purposes. (MANAGE DISC/MEMORY) category Item list FINALIZE You can ...camcorder advises you can display the disc information. Making the disc compatible with playback on other devices and DVD drives of a disc menu. • No DVD menu is not guaranteed. • Only the devices compatible with the AVCHD format can play the discs recorded with HD (high definition...
...In the case of SD (standard definition) image quality, a DVD menu is created instead of computers. Utilizing Recording Media (MANAGE DISC/ MEMORY) category This category enables you to use a disc or a "Memory Stick Duo" for various purposes. (MANAGE DISC/MEMORY) category Item list FINALIZE You can ...camcorder advises you can display the disc information. Making the disc compatible with playback on other devices and DVD drives of a disc menu. • No DVD menu is not guaranteed. • Only the devices compatible with the AVCHD format can play the discs recorded with HD (high definition...
Instruction Manual
Page 58
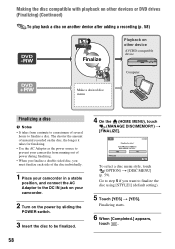
... the AC Adaptor to the DC IN jack on your camcorder from a minute to a maximum of material recorded on other device AVCHD-compatible device Computer Make a desired disc menu. Making the disc compatible with playback on other devices or DVD drives (Finalizing) (Continued) To play back a disc ... finalizing. • Use the AC Adaptor as the power source to prevent your camcorder. 2 Turn on the power by sliding the POWER switch. 3 Insert the disc to be finalized. 4 On the (HOME MENU), touch (MANAGE DISC/MEMORY) t [FINALIZE]. Finalizing starts. 6 When [Completed.] appears, touch . 58 ...
... the AC Adaptor to the DC IN jack on your camcorder from a minute to a maximum of material recorded on other device AVCHD-compatible device Computer Make a desired disc menu. Making the disc compatible with playback on other devices or DVD drives (Finalizing) (Continued) To play back a disc ... finalizing. • Use the AC Adaptor as the power source to prevent your camcorder. 2 Turn on the power by sliding the POWER switch. 3 Insert the disc to be finalized. 4 On the (HOME MENU), touch (MANAGE DISC/MEMORY) t [FINALIZE]. Finalizing starts. 6 When [Completed.] appears, touch . 58 ...

Instruction Manual
Page 61
...right disc for your purposes. 1 On the (HOME MENU), touch (MANAGE DISC/MEMORY). Volume label z Tips • Images in the following folders: - DISC SELECT GUIDE Select the option that is right for you on the screen. DVD-RW (VR mode) DVD_RTAV folder - When you insert the same type of ...for you. Utilizing Recording Media 61 The volume label of the disc recorded with SD (standard definition) image quality The date when the disc was first used is formatted with SD (standard definition) image quality are stored in discs recorded with the options you selected. When the disc was...
...right disc for your purposes. 1 On the (HOME MENU), touch (MANAGE DISC/MEMORY). Volume label z Tips • Images in the following folders: - DISC SELECT GUIDE Select the option that is right for you on the screen. DVD-RW (VR mode) DVD_RTAV folder - When you insert the same type of ...for you. Utilizing Recording Media 61 The volume label of the disc recorded with SD (standard definition) image quality The date when the disc was first used is formatted with SD (standard definition) image quality are stored in discs recorded with the options you selected. When the disc was...
Instruction Manual
Page 62
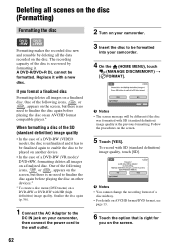
... (MANAGE DISC/MEMORY) t [ FORMAT]. The recording capacity of a disc midway. • For details on your camcorder. b Notes • The screen message will be different if the disc was formatted with HD (high definition) image quality, finalize the disc again (p. 56). 1 Connect the AC Adaptor to the DC IN jack on AVCHD format/DVD format, see page...
... (MANAGE DISC/MEMORY) t [ FORMAT]. The recording capacity of a disc midway. • For details on your camcorder. b Notes • The screen message will be different if the disc was formatted with HD (high definition) image quality, finalize the disc again (p. 56). 1 Connect the AC Adaptor to the DC IN jack on AVCHD format/DVD format, see page...


