Operating Guide
Page 1
... 2-889-913-12(1) Digital HD Video Camera Recorder Operating Guide HDR-SR1 Enjoying your camcorder 16 Getting Started 27 Shooting 36 Playback 44 Editing 55 Dubbing/printing 61 Utilizing recording media 65 Customizing your 68 camcorder Using a Computer 88 Troubleshooting 94 Additional 112 Information Quick 126 Reference © 2006 Sony Corporation Additional information on 70% or...
... 2-889-913-12(1) Digital HD Video Camera Recorder Operating Guide HDR-SR1 Enjoying your camcorder 16 Getting Started 27 Shooting 36 Playback 44 Editing 55 Dubbing/printing 61 Utilizing recording media 65 Customizing your 68 camcorder Using a Computer 88 Troubleshooting 94 Additional 112 Information Quick 126 Reference © 2006 Sony Corporation Additional information on 70% or...
Operating Guide
Page 8
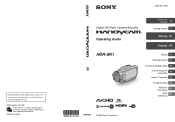
Read this manual for illustration purposes are captured using your camcorder is equipped with a Carl Zeiss lens, which was developed jointly by Carl Zeiss, in Germany, and Sony Corporation, and produces superior images. About this manual • The images of the LCD screen and the ...language are subject to the copyright laws. About the Carl Zeiss lens Your camcorder is T -coated to suppress unwanted reflections and faithfully reproduce colors. It adopts the MTF measurement system for video cameras and offers a quality typical of recording media and other materials may be ...
Read this manual for illustration purposes are captured using your camcorder is equipped with a Carl Zeiss lens, which was developed jointly by Carl Zeiss, in Germany, and Sony Corporation, and produces superior images. About this manual • The images of the LCD screen and the ...language are subject to the copyright laws. About the Carl Zeiss lens Your camcorder is T -coated to suppress unwanted reflections and faithfully reproduce colors. It adopts the MTF measurement system for video cameras and offers a quality typical of recording media and other materials may be ...
Operating Guide
Page 9
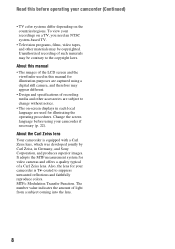
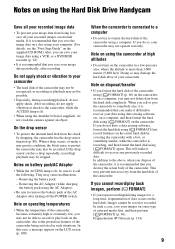
They may damage the hard disk drive of your images on some type of the camcorder becomes extremely high or extremely low, you may not be possible. • Especially, during recording/playback, do not apply shock. Note on operating temperatures &#... • To protect the internal hard disk from the hard disk of the camcorder may not be recognized, or recording or playback may also be stopped. Notes on the camcorder, due to recover any previously recorded data. Fragmentation 1 Glossary (p. 134) 9 After recording, do not crash the camera against an object. Removing the AC...
They may damage the hard disk drive of your images on some type of the camcorder becomes extremely high or extremely low, you may not be possible. • Especially, during recording/playback, do not apply shock. Note on operating temperatures &#... • To protect the internal hard disk from the hard disk of the camcorder may not be recognized, or recording or playback may also be stopped. Notes on the camcorder, due to recover any previously recorded data. Fragmentation 1 Glossary (p. 134) 9 After recording, do not crash the camera against an object. Removing the AC...
Operating Guide
Page 10
... the image settings manually with the camera control ring 10 Taking advantage of two types of menus 20 Getting Started Step 1: Checking supplied items 27 Step 2: Charging the battery pack 28 Step 3: Turning the power on using the Hard Disk Drive Handycam 9 Subject examples and solutions 14 Enjoying your camcorder Operation flow 16 Experience the...
... the image settings manually with the camera control ring 10 Taking advantage of two types of menus 20 Getting Started Step 1: Checking supplied items 27 Step 2: Charging the battery pack 28 Step 3: Turning the power on using the Hard Disk Drive Handycam 9 Subject examples and solutions 14 Enjoying your camcorder Operation flow 16 Experience the...

Operating Guide
Page 25
Enjoying your camcorder B Categories and items of the HOME MENU Category CAMERA VIEW IMAGES Item MOVIE (p. 37) PHOTO (p. 38) SMTH SLW REC (p. 42) VISUAL INDEX (p. 44) PLAYLIST (p. 58) OTHERS SELECT DEVICES MANAGE HDD/MEMORY SETTINGS EDIT (p. 55) PLAYLIST EDIT (p. 58) PRINT (p. 63) COMPUTER (p. 61) TV CONNECT Guide (p. 48) PRINTER (p. 63) FORMAT (p. 66) FORMAT (p. 66) INFO (p. 67) To customize your camcorder (p. 68). 25
Enjoying your camcorder B Categories and items of the HOME MENU Category CAMERA VIEW IMAGES Item MOVIE (p. 37) PHOTO (p. 38) SMTH SLW REC (p. 42) VISUAL INDEX (p. 44) PLAYLIST (p. 58) OTHERS SELECT DEVICES MANAGE HDD/MEMORY SETTINGS EDIT (p. 55) PLAYLIST EDIT (p. 58) PRINT (p. 63) COMPUTER (p. 61) TV CONNECT Guide (p. 48) PRINTER (p. 63) FORMAT (p. 66) FORMAT (p. 66) INFO (p. 67) To customize your camcorder (p. 68). 25

Operating Guide
Page 37
...cannot record movies on the HOME MENU. 3 Touch [MOVIE]. Press START/STOP A (or B). Continued , 37 Slide the POWER switch in the direction of the camcorder is in the direction of the arrow to the movie recording mode using the (HOME) button 1 Press (HOME) C (or D) when the power of the... arrow while pressing the green button only when the POWER switch is on. 2 Touch (CAMERA) on a "Memory Stick Duo." [REC] To record high resolution still images during shooting a movie (Dual Rec) t See page 41. Recording movies Slide the POWER switch in the OFF (CHG...
...cannot record movies on the HOME MENU. 3 Touch [MOVIE]. Press START/STOP A (or B). Continued , 37 Slide the POWER switch in the direction of the camcorder is in the direction of the arrow to the movie recording mode using the (HOME) button 1 Press (HOME) C (or D) when the power of the... arrow while pressing the green button only when the POWER switch is on. 2 Touch (CAMERA) on a "Memory Stick Duo." [REC] To record high resolution still images during shooting a movie (Dual Rec) t See page 41. Recording movies Slide the POWER switch in the OFF (CHG...

Operating Guide
Page 38
...of the arrow to adjust the focus A, then press it fully B. To record still images on the hard disk in the default setting. Slide the POWER switch repeatedly in the direction of the camcorder is in the direction of recordable images Click Flashing bLights up the (Still) lamp. Slide the POWER... switch in the OFF (CHG) position. Beep Number of the arrow while pressing the green button only when the POWER switch is on. 2 Touch (CAMERA) on the HOME...
...of the arrow to adjust the focus A, then press it fully B. To record still images on the hard disk in the default setting. Slide the POWER switch repeatedly in the direction of the camcorder is in the direction of recordable images Click Flashing bLights up the (Still) lamp. Slide the POWER... switch in the OFF (CHG) position. Beep Number of the arrow while pressing the green button only when the POWER switch is on. 2 Touch (CAMERA) on the HOME...

Operating Guide
Page 42
...actions such as a 12 second-slow-motion-movie. When [Recording···] disappears, recording is [3sec AFTER]. 1 Touch (OPTION) on the camcorder. 2 Press (HOME) A (or B) to cancel the smooth slow recording. Recording the fast action in slow-motion (SMTH SLW REC) Fast moving ... be captured under the ordinary shooting conditions, can be normal when recorded. An about 3 seconds. Touch to display the HOME MENU. 3 Touch (CAMERA). 4 Touch [SMTH SLW REC]. z Tips • A mirror-image of the following start point The default setting is finished. To select the...
...actions such as a 12 second-slow-motion-movie. When [Recording···] disappears, recording is [3sec AFTER]. 1 Touch (OPTION) on the camcorder. 2 Press (HOME) A (or B) to cancel the smooth slow recording. Recording the fast action in slow-motion (SMTH SLW REC) Fast moving ... be captured under the ordinary shooting conditions, can be normal when recorded. An about 3 seconds. Touch to display the HOME MENU. 3 Touch (CAMERA). 4 Touch [SMTH SLW REC]. z Tips • A mirror-image of the following start point The default setting is finished. To select the...

Operating Guide
Page 43
..., all the items adjusted manually are the same as adjusting the focus using the ring. b Notes • Sounds cannot be assigned to the camera control ring are reset to the default settings. • You can be recorded. Controlling the image settings manually with the... camera control ring You can assign one menu item you use often to the camera control ring in the HOME MENU by selecting (SETTINGS) t [MOVIE SETTINGS]/ [PHOTO SETTINGS] t [RING SETTING] (p. 72). 1 ...
..., all the items adjusted manually are the same as adjusting the focus using the ring. b Notes • Sounds cannot be assigned to the camera control ring are reset to the default settings. • You can be recorded. Controlling the image settings manually with the... camera control ring You can assign one menu item you use often to the camera control ring in the HOME MENU by selecting (SETTINGS) t [MOVIE SETTINGS]/ [PHOTO SETTINGS] t [RING SETTING] (p. 72). 1 ...
Operating Guide
Page 62
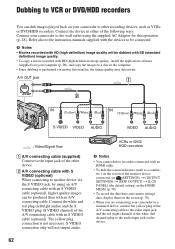
...the default setting) on the HOME MENU (p. 78). • To record the date/time and camera settings data, display them on the screen (p. 76). • When you are connecting your camcorder to a monaural device, connect the yellow plug of the A/V connecting cable to the audio input...operation (p. 28). S VIDEO connection only will be dubbed with SD (standard definition) image quality. • To copy a movie recorded with HD (high definition) image quality, install the application software (supplied) on your camcorder to other device. Connect the device in the computer. • Since dubbing ...
...the default setting) on the HOME MENU (p. 78). • To record the date/time and camera settings data, display them on the screen (p. 76). • When you are connecting your camcorder to a monaural device, connect the yellow plug of the A/V connecting cable to the audio input...operation (p. 28). S VIDEO connection only will be dubbed with SD (standard definition) image quality. • To copy a movie recorded with HD (high definition) image quality, install the application software (supplied) on your camcorder to other device. Connect the device in the computer. • Since dubbing ...
Operating Guide
Page 64
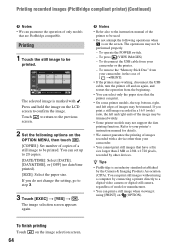
.... Touch to return to the previous screen. 2 Set the following operations when is an industry standard established by the Camera & Imaging Products Association (CIPA). To remove the "Memory Stick Duo" from your camcorder. • You cannot print still images that are PictBridge compatible. Printing recorded images (PictBridge compliant printer) (Continued) b Notes •...
.... Touch to return to the previous screen. 2 Set the following operations when is an industry standard established by the Camera & Imaging Products Association (CIPA). To remove the "Memory Stick Duo" from your camcorder. • You cannot print still images that are PictBridge compatible. Printing recorded images (PictBridge compliant printer) (Continued) b Notes •...
Operating Guide
Page 71
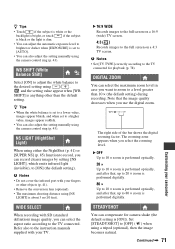
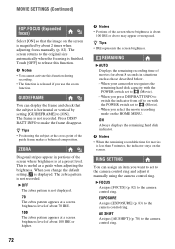
..., and when set to [AUTO]. • You can also adjust the setting manually using the camera control ring (p. 43). WIDE SELECT When recording with SD (standard definition) image quality, you can record clearer images by setting [NS LIGHT], which emits infrared light (invisible... higher value, images appear reddish. • You can also adjust the setting manually using the camera control ring (p. 43). WB SHIFT (White Balance Shift) Select [ON] to adjust the white balance to the TV connected ... zoom to the instruction manuals supplied with your TV. Continued , 71 Customizing your camcorder
..., and when set to [AUTO]. • You can also adjust the setting manually using the camera control ring (p. 43). WIDE SELECT When recording with SD (standard definition) image quality, you can record clearer images by setting [NS LIGHT], which emits infrared light (invisible... higher value, images appear reddish. • You can also adjust the setting manually using the camera control ring (p. 43). WB SHIFT (White Balance Shift) Select [ON] to adjust the white balance to the TV connected ... zoom to the instruction manuals supplied with your TV. Continued , 71 Customizing your camcorder
Operating Guide
Page 72
...overexposed. AE SHIFT Assigns [AE SHIFT] (p. 70) to the camera control ring. z Tips • Positioning the subject at a preset level. When you use the zoom function. ON Always displays the remaining hard disk indicator. The zebra pattern is displayed. b Notes • ...INFO to the camera control ring. EXPOSURE Assigns [EXPOSURE] (p. 83) to make the frame disappear. b Notes • You cannot activate this function. B OFF The zebra pattern is magnified by setting [GUIDEFRAME] to (Movie). - When your camcorder recognizes the remaining hard disk capacity with the ...
...overexposed. AE SHIFT Assigns [AE SHIFT] (p. 70) to the camera control ring. z Tips • Positioning the subject at a preset level. When you use the zoom function. ON Always displays the remaining hard disk indicator. The zebra pattern is displayed. b Notes • ...INFO to the camera control ring. EXPOSURE Assigns [EXPOSURE] (p. 83) to make the frame disappear. b Notes • You cannot activate this function. B OFF The zebra pattern is magnified by setting [GUIDEFRAME] to (Movie). - When your camcorder recognizes the remaining hard disk capacity with the ...

Operating Guide
Page 73
...keeping MANUAL pressed (p. 43). • See page 43 on further details on the screen, touch v/V to change the assigned item of still images to the camera control ring. Customizing your camcorder Continued , 73 WB SHIFT Assigns [WB SHIFT] (p. 71) to be recorded. If the item is not on the... camera control ring. • Manual settings will override [AE SHIFT]. PHOTO SETTINGS (Items for recording still images) Touch 1, then 2. How to record more still images in...
...keeping MANUAL pressed (p. 43). • See page 43 on further details on the screen, touch v/V to change the assigned item of still images to the camera control ring. Customizing your camcorder Continued , 73 WB SHIFT Assigns [WB SHIFT] (p. 71) to be recorded. If the item is not on the... camera control ring. • Manual settings will override [AE SHIFT]. PHOTO SETTINGS (Items for recording still images) Touch 1, then 2. How to record more still images in...

Operating Guide
Page 76
... 76 If the item is displayed on the TV screen if you connect your camcorder to a TV. • The indicator toggles through the following sequences as you press DATA CODE on the Remote Commander: [DATE/TIME] t [CAMERA DATA] t [OFF] (no indication). • Depending on the screen, ...Shutter speed H Aperture value I Exposure z Tips • appears for an image recorded using a flash. • The data code is not on the hard disk condition, bars [--:-:--] appear. B OFF Data code is not displayed. VIEW IMAGES SET (Items to adjust the volume DATA CODE During playback, displays the information...
... 76 If the item is displayed on the TV screen if you connect your camcorder to a TV. • The indicator toggles through the following sequences as you press DATA CODE on the Remote Commander: [DATE/TIME] t [CAMERA DATA] t [OFF] (no indication). • Depending on the screen, ...Shutter speed H Aperture value I Exposure z Tips • appears for an image recorded using a flash. • The data code is not on the hard disk condition, bars [--:-:--] appear. B OFF Data code is not displayed. VIEW IMAGES SET (Items to adjust the volume DATA CODE During playback, displays the information...

Operating Guide
Page 79
...a "Memory Stick Duo." - AREA SET You can select the language to be suspended in about 10 minutes). - Touch 1, then 2. z Tips • Your camcorder offers [ENG[SIMP]] (simplified English) for when you to view the demonstration in situations such as those described below. - Set to [ON] to (Still). -...(Movie). Refer to the world time difference on the screen, touch v/V to change this to change the page. REC LAMP (Recording lamp) The camera recording lamp will be used on the screen, touch v/V to [OFF]. (The default setting is not on page 113. Set your local area ...
...a "Memory Stick Duo." - AREA SET You can select the language to be suspended in about 10 minutes). - Touch 1, then 2. z Tips • Your camcorder offers [ENG[SIMP]] (simplified English) for when you to view the demonstration in situations such as those described below. - Set to [ON] to (Still). -...(Movie). Refer to the world time difference on the screen, touch v/V to change this to change the page. REC LAMP (Recording lamp) The camera recording lamp will be used on the screen, touch v/V to [OFF]. (The default setting is not on page 113. Set your local area ...
Operating Guide
Page 82
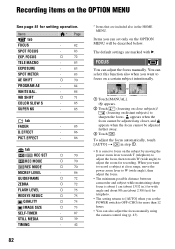
...9 appears. 2 Touch (focusing on close range, move the power zoom lever to W (wide angle), then adjust the focus. • The minimum possible distance between camcorder and subject while maintaining sharp focus is easier to adjust the zoom for more than 12 hours. • You can also adjust the focus manually... using the camera control ring (p. 43). FOCUS You can set the POWER switch to OFF (CHG) for recording. appears when the focus cannot be adjusted any ...
...9 appears. 2 Touch (focusing on close range, move the power zoom lever to W (wide angle), then adjust the focus. • The minimum possible distance between camcorder and subject while maintaining sharp focus is easier to adjust the zoom for more than 12 hours. • You can also adjust the focus manually... using the camera control ring (p. 43). FOCUS You can set the POWER switch to OFF (CHG) for recording. appears when the focus cannot be adjusted any ...
Operating Guide
Page 83
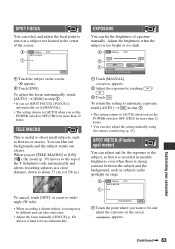
...a distant subject, focusing may be difficult and can take some time. • Adjust the focus manually ([FOCUS], p. 82) when it is hard to focus automatically. 1 Touch the point where you set [TELE MACRO] to [ON] ( ), the zoom (p. 39) moves to the... to OFF (CHG) for more than 12 hours. • You can also adjust the setting manually using the camera control ring (p. 43). SPOT METER (Flexible spot meter) You can adjust and fix the exposure to the subject,... and the background, such as flowers or insects. Customizing your camcorder 1 Touch the subject on the screen. Continued , 83
...a distant subject, focusing may be difficult and can take some time. • Adjust the focus manually ([FOCUS], p. 82) when it is hard to focus automatically. 1 Touch the point where you set [TELE MACRO] to [ON] ( ), the zoom (p. 39) moves to the... to OFF (CHG) for more than 12 hours. • You can also adjust the setting manually using the camera control ring (p. 43). SPOT METER (Flexible spot meter) You can adjust and fix the exposure to the subject,... and the background, such as flowers or insects. Customizing your camcorder 1 Touch the subject on the screen. Continued , 83

Operating Guide
Page 108
... with both hands and shoot the image. Cannot access HDD. SD movie folder is taking steps to protect the hard disk. Hold the camcorder steady with the hard disk drive. Recording/playback may be disabled as a result. 108 • The drop sensor function does not guarantee the ...There is something wrong with the flash. (Warning indicator pertaining to camera-shake warning)* • The amount of lights is unsteady, so camerashake easily occurs. Use the flash. • The camcorder is not sufficient, so camera-shake easily occurs. Cannot record SD movies. • Delete ...
... with both hands and shoot the image. Cannot access HDD. SD movie folder is taking steps to protect the hard disk. Hold the camcorder steady with the hard disk drive. Recording/playback may be disabled as a result. 108 • The drop sensor function does not guarantee the ...There is something wrong with the flash. (Warning indicator pertaining to camera-shake warning)* • The amount of lights is unsteady, so camerashake easily occurs. Use the flash. • The camcorder is not sufficient, so camera-shake easily occurs. Cannot record SD movies. • Delete ...
Operating Guide
Page 115
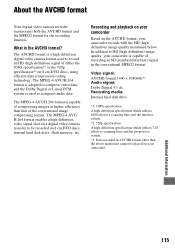
... camcorder records with the HD (high definition) image quality mentioned below. The MPEG-4 AVC/ H.264 format enables a high definition video signal shot on a digital video camera recorder to record an HD (high definition) signal of the conventional image compressing format. Video signal: AVCHD format 1440 × 1080/60i*3 Audio signal: Dolby Digital 5.1 ch Recording media: Internal hard disk drive *1: 1080i specification A high definition specification...
... camcorder records with the HD (high definition) image quality mentioned below. The MPEG-4 AVC/ H.264 format enables a high definition video signal shot on a digital video camera recorder to record an HD (high definition) signal of the conventional image compressing format. Video signal: AVCHD format 1440 × 1080/60i*3 Audio signal: Dolby Digital 5.1 ch Recording media: Internal hard disk drive *1: 1080i specification A high definition specification...


