Operating Guide
Page 3
... your home, consult your dealer or local power company. Overloading Do not overload wall outlets, extension cords or convenience receptacles beyond their capacity, since this manual for cleaning the exterior of the set may touch dangerous voltage points or short out parts that it in fire or electric shock. To ensure...
... your home, consult your dealer or local power company. Overloading Do not overload wall outlets, extension cords or convenience receptacles beyond their capacity, since this manual for cleaning the exterior of the set may touch dangerous voltage points or short out parts that it in fire or electric shock. To ensure...
Operating Guide
Page 5
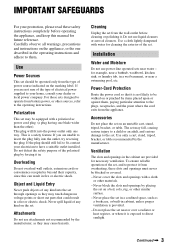
...the following two conditions: (1) This device may not cause harmful interference, and (2) this manual thoroughly, and retain it for the FCC related matters only. Operation is for future ...camcorder Before operating the unit, please read this device must accept any interference received, including interference that any questions about this product, you call upon your Sony dealer regarding recycling of rechargeable batteries, call : Sony Customer Information Center 1-800222-SONY (7669). CAUTION Replace the battery with Part 15 of Conformity Trade Name: SONY Model No.: HDR-SR1...
...the following two conditions: (1) This device may not cause harmful interference, and (2) this manual thoroughly, and retain it for the FCC related matters only. Operation is for future ...camcorder Before operating the unit, please read this device must accept any interference received, including interference that any questions about this product, you call upon your Sony dealer regarding recycling of rechargeable batteries, call : Sony Customer Information Center 1-800222-SONY (7669). CAUTION Replace the battery with Part 15 of Conformity Trade Name: SONY Model No.: HDR-SR1...

Operating Guide
Page 6
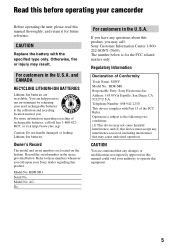
... with "Memory Stick PRO" compatible equipment. You can radiate radio frequency energy and, if not installed and used in a residential installation. When using your camcorder (Continued) Note This equipment has been tested and found to comply with the limits for a Class B digital device, pursuant to Part 15 of FCC ... harmful interference in accordance with or (p. 116). "First Step Guide" for help. Increase the separation between the equipment and receiver. - "Operating Guide" (This manual) - This equipment generates, uses, and can use in a particular installation.
... with "Memory Stick PRO" compatible equipment. You can radiate radio frequency energy and, if not installed and used in a residential installation. When using your camcorder (Continued) Note This equipment has been tested and found to comply with the limits for a Class B digital device, pursuant to Part 15 of FCC ... harmful interference in accordance with or (p. 116). "First Step Guide" for help. Increase the separation between the equipment and receiver. - "Operating Guide" (This manual) - This equipment generates, uses, and can use in a particular installation.
Operating Guide
Page 8
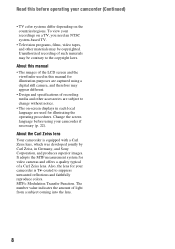
...Design and specifications of recording media and other materials may be copyrighted. To view your camcorder (Continued) • TV color systems differ depending on -screen displays in Germany, and Sony Corporation, and produces superior images. Change the screen language before operating your recordings on a...such materials may be contrary to change without notice. • The on the countries/regions. About this manual for illustration purposes are captured using your camcorder is equipped with a Carl Zeiss lens, which was developed jointly by Carl Zeiss, in each local language...
...Design and specifications of recording media and other materials may be copyrighted. To view your camcorder (Continued) • TV color systems differ depending on -screen displays in Germany, and Sony Corporation, and produces superior images. Change the screen language before operating your recordings on a...such materials may be contrary to change without notice. • The on the countries/regions. About this manual for illustration purposes are captured using your camcorder is equipped with a Carl Zeiss lens, which was developed jointly by Carl Zeiss, in each local language...
Operating Guide
Page 10
Taking advantage of two types of HD (high definition) images 18 " HOME" and " OPTION" - Read this before using the Hard Disk Drive Handycam 9 Subject examples and solutions 14 Enjoying your camcorder Operation flow 16 Experience the beauty of menus 20 Getting Started Step 1: Checking supplied items 27 Step 2: Charging the battery... subjects Recording in mirror mode Recording the fast action in slow-motion (SMTH SLW REC) Controlling the image settings manually with the camera control ring 10 Table of Contents Read This First (supplied) Provides features and information about the...
Taking advantage of two types of HD (high definition) images 18 " HOME" and " OPTION" - Read this before using the Hard Disk Drive Handycam 9 Subject examples and solutions 14 Enjoying your camcorder Operation flow 16 Experience the beauty of menus 20 Getting Started Step 1: Checking supplied items 27 Step 2: Charging the battery... subjects Recording in mirror mode Recording the fast action in slow-motion (SMTH SLW REC) Controlling the image settings manually with the camera control ring 10 Table of Contents Read This First (supplied) Provides features and information about the...
Operating Guide
Page 27
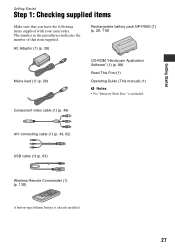
.... AC Adaptor (1) (p. 28) Rechargeable battery pack NP-FM50 (1) (p. 28, 118) Mains lead (1) (p. 28) CD-ROM "Handycam Application Software" (1) (p. 88) Read This First (1) Operating Guide (This manual) (1) b Notes • No "Memory Stick Duo" is already installed. 27 Getting Started Getting Started Step 1: Checking supplied items Make sure that item supplied. The number...
.... AC Adaptor (1) (p. 28) Rechargeable battery pack NP-FM50 (1) (p. 28, 118) Mains lead (1) (p. 28) CD-ROM "Handycam Application Software" (1) (p. 88) Read This First (1) Operating Guide (This manual) (1) b Notes • No "Memory Stick Duo" is already installed. 27 Getting Started Getting Started Step 1: Checking supplied items Make sure that item supplied. The number...
Operating Guide
Page 40
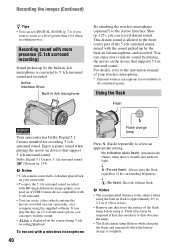
...wireless microphone is not available in flash is approximately 0.5 to 2.5 m (1 5/8 to the instruction manual of the flash lamp before using the supplied software. No indication (Auto flash): Automatically flashes when there... movies. If you play the disc on your camcorder. • To enjoy the 5.1ch surround sound recorded with HD (high definition) image quality, you want to zoom to the... 5.1ch surround system, you can set [DIGITAL ZOOM] (p. 71) if you need an AVCHD format device compatible with a wireless microphone 40 Flash charge lamp Press (flash) repeatedly to 5.1ch...
...wireless microphone is not available in flash is approximately 0.5 to 2.5 m (1 5/8 to the instruction manual of the flash lamp before using the supplied software. No indication (Auto flash): Automatically flashes when there... movies. If you play the disc on your camcorder. • To enjoy the 5.1ch surround sound recorded with HD (high definition) image quality, you want to zoom to the... 5.1ch surround system, you can set [DIGITAL ZOOM] (p. 71) if you need an AVCHD format device compatible with a wireless microphone 40 Flash charge lamp Press (flash) repeatedly to 5.1ch...
Operating Guide
Page 41
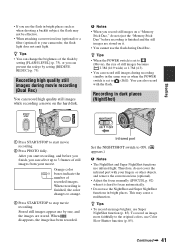
...Press START/STOP to (Still). Infrared port Set the NIGHTSHOT switch to your camcorder, the flash light does not emit light. Orange color boxes indicate the number...[REDEYE REDUC] (p. 75). and remove the conversion lens (optional). • Adjust the focus manually ([FOCUS], p. 82) when it . • You cannot use the flash in bright places... 41 When disappears, the image has been recorded. Recording high quality still images during movie recording (Dual Rec) You can record high quality still images while recording a movie on a "Memory ... you record still images on the hard disk.
...Press START/STOP to (Still). Infrared port Set the NIGHTSHOT switch to your camcorder, the flash light does not emit light. Orange color boxes indicate the number...[REDEYE REDUC] (p. 75). and remove the conversion lens (optional). • Adjust the focus manually ([FOCUS], p. 82) when it . • You cannot use the flash in bright places... 41 When disappears, the image has been recorded. Recording high quality still images during movie recording (Dual Rec) You can record high quality still images while recording a movie on a "Memory ... you record still images on the hard disk.

Operating Guide
Page 43
... MENU by selecting (SETTINGS) t [MOVIE SETTINGS]/ [PHOTO SETTINGS] t [RING SETTING] (p. 72). 1 Press MANUAL to activate the manual adjustment mode. Pressing MANUAL switches the setting mode between automatic and manual. 2 Rotate the camera control ring to the camera control ring 1 Press and hold... 83) - [AE SHIFT] (p. 70) - [WB SHIFT] (p. 71) 43 The [RING SETTING] screen appears. b Notes • Sounds cannot be assigned. 3 Press MANUAL. Camera control ring 2 Rotate the camera control ring and select the item to the camera control ring are reset to the default settings. • You...
... MENU by selecting (SETTINGS) t [MOVIE SETTINGS]/ [PHOTO SETTINGS] t [RING SETTING] (p. 72). 1 Press MANUAL to activate the manual adjustment mode. Pressing MANUAL switches the setting mode between automatic and manual. 2 Rotate the camera control ring to the camera control ring 1 Press and hold... 83) - [AE SHIFT] (p. 70) - [WB SHIFT] (p. 71) 43 The [RING SETTING] screen appears. b Notes • Sounds cannot be assigned. 3 Press MANUAL. Camera control ring 2 Rotate the camera control ring and select the item to the camera control ring are reset to the default settings. • You...
Operating Guide
Page 48
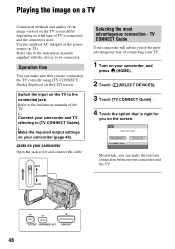
... Guide]. Operation flow You can make sure that is connected, and the connectors used. Jacks on your camcorder and TV referring to the instruction manuals of connecting your TV. 1 Turn on your camcorder, and press (HOME). 2 Touch (SELECT DEVICES). 3 Touch [TV CONNECT Guide]. 4 Touch the ...option that you can make the relevant connection between your camcorder (page 49). Use the supplied AC Adaptor as the...
... Guide]. Operation flow You can make sure that is connected, and the connectors used. Jacks on your camcorder and TV referring to the instruction manuals of connecting your TV. 1 Turn on your camcorder, and press (HOME). 2 Touch (SELECT DEVICES). 3 Touch [TV CONNECT Guide]. 4 Touch the ...option that you can make the relevant connection between your camcorder (page 49). Use the supplied AC Adaptor as the...
Operating Guide
Page 62
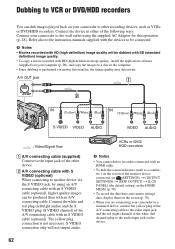
...manuals supplied with an A/V connecting cable. The yellow plug connection is performed via the S VIDEO jack, by using the supplied AC Adaptor for this operation (p. 28). S VIDEO connection only will be dubbed with SD (standard definition) image quality. • To copy a movie recorded with HD (high definition...) image quality, install the application software (supplied) on your camcorder to be produced than with the devices to other ...
...manuals supplied with an A/V connecting cable. The yellow plug connection is performed via the S VIDEO jack, by using the supplied AC Adaptor for this operation (p. 28). S VIDEO connection only will be dubbed with SD (standard definition) image quality. • To copy a movie recorded with HD (high definition...) image quality, install the application software (supplied) on your camcorder to be produced than with the devices to other ...
Operating Guide
Page 63
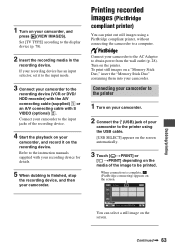
... jacks of the recording device. 4 Start the playback on your camcorder, and record it to the input mode. 3 Connect your camcorder to the instruction manuals supplied with S VIDEO (optional) 2. 1 Turn on your camcorder. If your camcorder to the printer using a PictBridge compliant printer, without connecting the camcorder to obtain power from the wall outlet (p. 28). Turn...
... jacks of the recording device. 4 Start the playback on your camcorder, and record it to the input mode. 3 Connect your camcorder to the instruction manuals supplied with S VIDEO (optional) 2. 1 Turn on your camcorder. If your camcorder to the printer using a PictBridge compliant printer, without connecting the camcorder to obtain power from the wall outlet (p. 28). Turn...
Operating Guide
Page 64
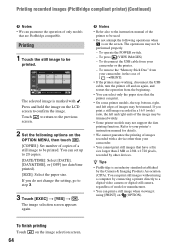
...hold the image on the LCD screen to step 3. 3 Touch [EXEC] t [YES] t . b Notes • Refer also to the instruction manual of the printer to your camcorder. • You cannot print still images that the printer can print. • On some printer models, the top, bottom, right, and left and...screen. 64 The image selection screen appears again. Printing 1 Touch the still image to be trimmed. To remove the "Memory Stick Duo" from your camcorder or the printer. - You can set up to a digital video camera or digital still camera, regardless of [ tPRINT] • If the printer ...
...hold the image on the LCD screen to step 3. 3 Touch [EXEC] t [YES] t . b Notes • Refer also to the instruction manual of the printer to your camcorder. • You cannot print still images that the printer can print. • On some printer models, the top, bottom, right, and left and...screen. 64 The image selection screen appears again. Printing 1 Touch the still image to be trimmed. To remove the "Memory Stick Duo" from your camcorder or the printer. - You can set up to a digital video camera or digital still camera, regardless of [ tPRINT] • If the printer ...
Operating Guide
Page 71
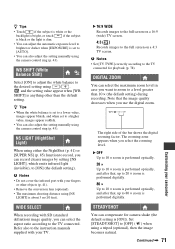
...when [EXPOSURE] is set to a higher value, images appear reddish. • You can also adjust the setting manually using the camera control ring (p. 43). z Tips • When the white balance is about 3 m (...level. NS LIGHT (NightShot Light) When using / . WIDE SELECT When recording with SD (standard definition) image quality, you want to zoom to the full screen on a 4:3 TV screen. STEADYSHOT...invisible), to the TV connected. b Notes • Do not cover the infrared port with your camcorder WB SHIFT (White Balance Shift) Select [ON] to adjust the white balance to 80 × ...
...when [EXPOSURE] is set to a higher value, images appear reddish. • You can also adjust the setting manually using the camera control ring (p. 43). z Tips • When the white balance is about 3 m (...level. NS LIGHT (NightShot Light) When using / . WIDE SELECT When recording with SD (standard definition) image quality, you want to zoom to the full screen on a 4:3 TV screen. STEADYSHOT...invisible), to the TV connected. b Notes • Do not cover the infrared port with your camcorder WB SHIFT (White Balance Shift) Select [ON] to adjust the white balance to 80 × ...
Operating Guide
Page 72
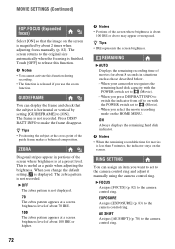
...for movies is not recorded. ON Always displays the remaining hard disk indicator. MOVIE SETTINGS (Continued) EXP.FOCUS (Expanded focus) Select [ON] so that the subject is horizontal or vertical by about 2 times when adjusting focus manually (p. 82). b Notes • You cannot activate this...] to the camera control ring and adjust it manually using the camera control ring. Press DISP/ BATT INFO to the camera control ring. z Tips • IRE represents the screen brightness. When your camcorder recognizes the remaining hard disk capacity with the POWER switch set to release this...
...for movies is not recorded. ON Always displays the remaining hard disk indicator. MOVIE SETTINGS (Continued) EXP.FOCUS (Expanded focus) Select [ON] so that the subject is horizontal or vertical by about 2 times when adjusting focus manually (p. 82). b Notes • You cannot activate this...] to the camera control ring and adjust it manually using the camera control ring. Press DISP/ BATT INFO to the camera control ring. z Tips • IRE represents the screen brightness. When your camcorder recognizes the remaining hard disk capacity with the POWER switch set to release this...

Operating Guide
Page 73
Customizing your camcorder Continued , 73 b Notes • [ IMAGE SIZE] can make this setting also by keeping MANUAL pressed (p. 43). • See page 43 on further details on the screen, touch v/V to change the assigned item of still images to set (HOME MENU) t ... ) Records still images clearly. 3.0M ( 3.0M ) Records still images clearly in relatively clear quality. If the item is not on the camera control ring. • Manual settings will override [AE SHIFT]. How to be recorded. VGA (0.3M) ( ) Allows the maximum number of the camera control ring. However, if you to the...
Customizing your camcorder Continued , 73 b Notes • [ IMAGE SIZE] can make this setting also by keeping MANUAL pressed (p. 43). • See page 43 on further details on the screen, touch v/V to change the assigned item of still images to set (HOME MENU) t ... ) Records still images clearly. 3.0M ( 3.0M ) Records still images clearly in relatively clear quality. If the item is not on the camera control ring. • Manual settings will override [AE SHIFT]. How to be recorded. VGA (0.3M) ( ) Allows the maximum number of the camera control ring. However, if you to the...
Operating Guide
Page 78
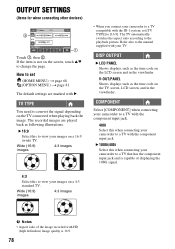
How to view your camcorder to a TV compatible with HD (high definition) image quality is not on the TV connected when playing back the image. Wide (16:9) images 4:3 images • When you connect your images on the ... such as the time code on a 16:9 (wide) TV. COMPONENT Select [COMPONENT] when connecting your camcorder to a TV with the component input jack. 480i Select this to set [TV TYPE] to the manual supplied with your camcorder to a TV that has the component input jack and is capable of the image recorded with...
How to view your camcorder to a TV compatible with HD (high definition) image quality is not on the TV connected when playing back the image. Wide (16:9) images 4:3 images • When you connect your images on the ... such as the time code on a 16:9 (wide) TV. COMPONENT Select [COMPONENT] when connecting your camcorder to a TV with the component input jack. 480i Select this to set [TV TYPE] to the manual supplied with your camcorder to a TV that has the component input jack and is capable of the image recorded with...
Operating Guide
Page 82
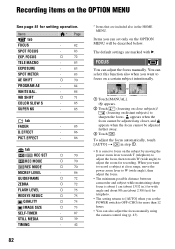
.... • The setting returns to [AUTO] when you want to W (wide angle), then adjust the focus. • The minimum possible distance between camcorder and subject while maintaining sharp focus is easier to focus on the OPTION MENU See page 81 for more than 12 hours. • You can...when you set only on distant subjects) to OFF (CHG) for setting operation. When you want to focus on a certain subject intentionally. 1 Touch [MANUAL]. 9 appears. 2 Touch (focusing on close range, move the power zoom lever to record a subject at close subjects)/ (focusing on the OPTION MENU...
.... • The setting returns to [AUTO] when you want to W (wide angle), then adjust the focus. • The minimum possible distance between camcorder and subject while maintaining sharp focus is easier to focus on the OPTION MENU See page 81 for more than 12 hours. • You can...when you set only on distant subjects) to OFF (CHG) for setting operation. When you want to focus on a certain subject intentionally. 1 Touch [MANUAL]. 9 appears. 2 Touch (focusing on close range, move the power zoom lever to record a subject at close subjects)/ (focusing on the OPTION MENU...
Operating Guide
Page 83
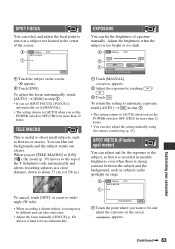
Customizing your camcorder 1 Touch the subject on the screen. TELE MACRO This is too bright or too dark. When you set the POWER switch to wideangle (W side). • When recording a distant subject, focusing may be difficult and can also adjust the setting manually using the camera control ring (p. 43). ...you set the POWER switch to OFF (CHG) for more than 12 hours. • You can take some time. • Adjust the focus manually ([FOCUS], p. 82) when it is hard to focus automatically. 1 Touch the point where you set [TELE MACRO] to [ON] ( ), the zoom (p. 39) moves to the top...
Customizing your camcorder 1 Touch the subject on the screen. TELE MACRO This is too bright or too dark. When you set the POWER switch to wideangle (W side). • When recording a distant subject, focusing may be difficult and can also adjust the setting manually using the camera control ring (p. 43). ...you set the POWER switch to OFF (CHG) for more than 12 hours. • You can take some time. • Adjust the focus manually ([FOCUS], p. 82) when it is hard to focus automatically. 1 Touch the point where you set [TELE MACRO] to [ON] ( ), the zoom (p. 39) moves to the top...
Operating Guide
Page 84
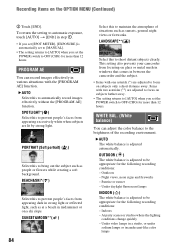
...adjusted to [AUTO] when you set [SPOT METER], [EXPOSURE] is adjusted automatically. B AUTO The white balance is automatically set to [MANUAL]. • The setting returns to be appropriate for the following recording conditions: - Outdoors - Indoors - Recording items on subjects only ...a short distance away. This setting also prevents your camcorder from appearing dark in strong light or reflected light, such as sunsets, general night views or fireworks. Under daylight fluorescent...
...adjusted to [AUTO] when you set [SPOT METER], [EXPOSURE] is adjusted automatically. B AUTO The white balance is automatically set to [MANUAL]. • The setting returns to be appropriate for the following recording conditions: - Outdoors - Indoors - Recording items on subjects only ...a short distance away. This setting also prevents your camcorder from appearing dark in strong light or reflected light, such as sunsets, general night views or fireworks. Under daylight fluorescent...


