Operating Guide
Page 27
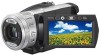
... Guide (This manual) (1) b Notes • No "Memory Stick Duo" is already installed. 27 Component video cable (1) (p. 49) A/V connecting cable (1) (p. 49, 62) USB cable (1) (p. 63) Wireless Remote Commander (1) (p. 130) A button-type lithium battery is included. The number in the parentheses indicates the number of that you have the following items supplied with...
... Guide (This manual) (1) b Notes • No "Memory Stick Duo" is already installed. 27 Component video cable (1) (p. 49) A/V connecting cable (1) (p. 49, 62) USB cable (1) (p. 63) Wireless Remote Commander (1) (p. 130) A button-type lithium battery is included. The number in the parentheses indicates the number of that you have the following items supplied with...

Operating Guide
Page 69
... SET 79 DST SET/SUMMERTIME 79 LANGUAGE SET 79 GENERAL SET (p. 79) Items Page DEMO MODE 79 REC LAMP 79 CALIBRATION 120 A.SHUT OFF 80 REMOTE CTRL 80 DISC BURN SET 80 DROP SENSOR 80 Continued , 69 Customizing your...
... SET 79 DST SET/SUMMERTIME 79 LANGUAGE SET 79 GENERAL SET (p. 79) Items Page DEMO MODE 79 REC LAMP 79 CALIBRATION 120 A.SHUT OFF 80 REMOTE CTRL 80 DISC BURN SET 80 DROP SENSOR 80 Continued , 69 Customizing your...

Operating Guide
Page 76
...IMAGES SET (Items to a TV. • The indicator toggles through the following sequences as you connect your camcorder to customize the sound volume and display) CAMERA DATA Movie Touch 1, then 2. DATE/TIME Still image C ... flash. • The data code is displayed on the TV screen if you press DATA CODE on the Remote Commander: [DATE/TIME] t [CAMERA DATA] t [OFF] (no indication). • Depending on the... and time. to change the page. B OFF Data code is not on the hard disk condition, bars [--:-:--] appear. How to set (HOME MENU) t page 68 (OPTION MENU) t page 81 The...
...IMAGES SET (Items to a TV. • The indicator toggles through the following sequences as you connect your camcorder to customize the sound volume and display) CAMERA DATA Movie Touch 1, then 2. DATE/TIME Still image C ... flash. • The data code is displayed on the TV screen if you press DATA CODE on the Remote Commander: [DATE/TIME] t [CAMERA DATA] t [OFF] (no indication). • Depending on the... and time. to change the page. B OFF Data code is not on the hard disk condition, bars [--:-:--] appear. How to set (HOME MENU) t page 68 (OPTION MENU) t page 81 The...

Operating Guide
Page 80
...you to use the camcorder. B ALL Saves all movies with HD (high definition) image quality, and still images. Otherwise when you drop the camcorder, you may be saved on the One Touch Disc Burn operation. b Notes • Set the drop sensor to [NEVER]. REMOTE CTRL (Remote control) The default ...DROP SENSOR] is automatically set [DROP SENSOR] to protect the internal hard disk. DISC BURN SET You can set to a command sent by another VCR remote control unit. b Notes • Set to [OFF] to prevent your camcorder from responding to [ON] after you remove the power source for...
...you to use the camcorder. B ALL Saves all movies with HD (high definition) image quality, and still images. Otherwise when you drop the camcorder, you may be saved on the One Touch Disc Burn operation. b Notes • Set the drop sensor to [NEVER]. REMOTE CTRL (Remote control) The default ...DROP SENSOR] is automatically set [DROP SENSOR] to protect the internal hard disk. DISC BURN SET You can set to a command sent by another VCR remote control unit. b Notes • Set to [OFF] to prevent your camcorder from responding to [ON] after you remove the power source for...

Operating Guide
Page 87
... operation. To cancel the count down, touch [RESET]. To cancel the self-timer, select [OFF]. • You can also operate by pressing PHOTO on the Remote Commander (p. 130). Customizing your camcorder 87 Press PHOTO when [SELF-TIMER] is set to [ON], and appears.
... operation. To cancel the count down, touch [RESET]. To cancel the self-timer, select [OFF]. • You can also operate by pressing PHOTO on the Remote Commander (p. 130). Customizing your camcorder 87 Press PHOTO when [SELF-TIMER] is set to [ON], and appears.

Operating Guide
Page 96
...on the LCD screen. • This occurs if you use a "Memory Stick Duo" formatted on a computer, format it again on your camcorder (or DISPLAY on the Remote Commander) (p. 33). Images cannot be deleted. • Release the lock on the write-protect tab of the "Memory Stick Duo" if there... the images protected on another device. Troubleshooting (Continued) LCD screen/viewfinder An unknown image appears on the LCD screen or viewfinder. • The camcorder is in the viewfinder has disappeared. • Close the LCD panel. Touch the LCD screen to cancel [DEMO MODE]. The buttons do not...
...on the LCD screen. • This occurs if you use a "Memory Stick Duo" formatted on a computer, format it again on your camcorder (or DISPLAY on the Remote Commander) (p. 33). Images cannot be deleted. • Release the lock on the write-protect tab of the "Memory Stick Duo" if there... the images protected on another device. Troubleshooting (Continued) LCD screen/viewfinder An unknown image appears on the LCD screen or viewfinder. • The camcorder is in the viewfinder has disappeared. • Close the LCD panel. Touch the LCD screen to cancel [DEMO MODE]. The buttons do not...

Operating Guide
Page 100
...or flickering, or changes in color. • This occurs when recording images under a fluorescent lamp, sodium lamp, or mercury lamp. Otherwise, the Remote Commander may not function properly. • Remove the conversion lens (optional) as direct sunlight or overhead lighting. polarities correctly matching the +/- This is... does not appear on the screen. • Press and hold DISP/BATT INFO for your DVD device, or cover the sensor of your camcorder Still images stored on a "Memory Stick Duo" are not played back in the actual size. • Still images recorded on the screen...
...or flickering, or changes in color. • This occurs when recording images under a fluorescent lamp, sodium lamp, or mercury lamp. Otherwise, the Remote Commander may not function properly. • Remove the conversion lens (optional) as direct sunlight or overhead lighting. polarities correctly matching the +/- This is... does not appear on the screen. • Press and hold DISP/BATT INFO for your DVD device, or cover the sensor of your camcorder Still images stored on a "Memory Stick Duo" are not played back in the actual size. • Still images recorded on the screen...

Operating Guide
Page 120
... may cause a malfunction to your local authorized Sony service facility. - This may not work correctly. x To clean the LCD screen If fingerprints or dust make the LCD screen dirty, it is recommended you connect your camcorder to a warm place, moisture may cause damage... on the LCD screen. x How to cancel. Maintenance and precautions (Continued) • Keep the Remote Commander and button-type battery out of "×" changes. Moisture condensation If your camcorder is not a malfunction. • While using the supplied AC Adaptor during the operation. 1 Turn on...
... may cause a malfunction to your local authorized Sony service facility. - This may not work correctly. x To clean the LCD screen If fingerprints or dust make the LCD screen dirty, it is recommended you connect your camcorder to a warm place, moisture may cause damage... on the LCD screen. x How to cancel. Maintenance and precautions (Continued) • Keep the Remote Commander and button-type battery out of "×" changes. Moisture condensation If your camcorder is not a malfunction. • While using the supplied AC Adaptor during the operation. 1 Turn on...

Operating Guide
Page 121
...About care and storage of the lens • Wipe the surface of the Remote Commander 1 While pressing on the lens surface. - In hot or humid locations - Use your camcorder is attached. x Procedures Connect your camcorder to OFF (CHG) for a long period of time. On charging the ... or the Remote Commander may explode if mistreated. In this case, replace the battery with above . b Notes • Do not use your camcorder at the seaside. • Store in optimum state for calibration. When there are not recording the date. Handling the camcorder with a Sony CR2025 lithium ...
...About care and storage of the lens • Wipe the surface of the Remote Commander 1 While pressing on the lens surface. - In hot or humid locations - Use your camcorder is attached. x Procedures Connect your camcorder to OFF (CHG) for a long period of time. On charging the ... or the Remote Commander may explode if mistreated. In this case, replace the battery with above . b Notes • Do not use your camcorder at the seaside. • Store in optimum state for calibration. When there are not recording the date. Handling the camcorder with a Sony CR2025 lithium ...

Operating Guide
Page 123
.../CR: +/- 350 mVp-p HDMI OUT jack Type A (19-pin) Headphone jack Stereo minijack (Ø 3.5 mm) USB jack mini-B MIC input jack Stereo minijack (Ø 3.5 mm) REMOTE jack Stereo mini-minijack (Ø 2.5 mm) LCD screen Image 8.8 cm (3.5 type, aspect ratio 16:9) Total dot number 211 200 (960 × 220) General Power requirements...
.../CR: +/- 350 mVp-p HDMI OUT jack Type A (19-pin) Headphone jack Stereo minijack (Ø 3.5 mm) USB jack mini-B MIC input jack Stereo minijack (Ø 3.5 mm) REMOTE jack Stereo mini-minijack (Ø 2.5 mm) LCD screen Image 8.8 cm (3.5 type, aspect ratio 16:9) Total dot number 211 200 (960 × 220) General Power requirements...

Operating Guide
Page 126
Quick Reference Identifying parts and controls The numbers in ( ) are reference pages. J Battery pack (28) K ACCESS lamp (Hard disk) (36) L REMOTE jack M i (headphones) jack N Grip belt (36) O START/STOP button (37) 126 A Power zoom lever (39, 47) B PHOTO button (38) C Eyecup D Viewfinder (33) E Viewfinder lens adjustment lever (33) F POWER switch (32) G (Movie)/ (Still) mode lamps (32) H CHG (charge) lamp (28) I Hooks for a shoulder belt Attach a shoulder belt (optional).
Quick Reference Identifying parts and controls The numbers in ( ) are reference pages. J Battery pack (28) K ACCESS lamp (Hard disk) (36) L REMOTE jack M i (headphones) jack N Grip belt (36) O START/STOP button (37) 126 A Power zoom lever (39, 47) B PHOTO button (38) C Eyecup D Viewfinder (33) E Viewfinder lens adjustment lever (33) F POWER switch (32) G (Movie)/ (Still) mode lamps (32) H CHG (charge) lamp (28) I Hooks for a shoulder belt Attach a shoulder belt (optional).

Operating Guide
Page 129
... Flash (40) C Lens (Carl Zeiss Lens) (8) D Camera control ring (43) E Camera recording lamp (79) Lights up in .)) to operate your camcorder. F (VIEW IMAGES) button (44) G BACK LIGHT button (42) H MANUAL button (43) I NIGHTSHOT switch (41) J BATT (battery release) lever ... (40) An Active Interface Shoe compatible microphone (optional) will take precedence when connected. L Remote sensor/Infrared port Point the Remote Commander (p. 130) towards the remote sensor to the tripod receptacle using a tripod screw. Continued , 129 Flashes when remaining hard disk space or battery power is low.
... Flash (40) C Lens (Carl Zeiss Lens) (8) D Camera control ring (43) E Camera recording lamp (79) Lights up in .)) to operate your camcorder. F (VIEW IMAGES) button (44) G BACK LIGHT button (42) H MANUAL button (43) I NIGHTSHOT switch (41) J BATT (battery release) lever ... (40) An Active Interface Shoe compatible microphone (optional) will take precedence when connected. L Remote sensor/Infrared port Point the Remote Commander (p. 130) towards the remote sensor to the tripod receptacle using a tripod screw. Continued , 129 Flashes when remaining hard disk space or battery power is low.

Operating Guide
Page 130
...• Remove the insulation sheet before using b / B / v / V. • To change the battery, see page 121. Identifying parts and controls (Continued) Remote Commander Insulation sheet A DATA CODE button (76) Displays the date and time or camera setting data of b / B / v / V, or ENTER again, the ... playback. B PHOTO button (38) The on the LCD screen using the Remote Commander. • Point the Remote Commander towards the remote sensor to operate your camcorder (p. 129). • When no commands have been sent from the Remote Commander in a certain period, the orange frame disappears.
...• Remove the insulation sheet before using b / B / v / V. • To change the battery, see page 121. Identifying parts and controls (Continued) Remote Commander Insulation sheet A DATA CODE button (76) Displays the date and time or camera setting data of b / B / v / V, or ENTER again, the ... playback. B PHOTO button (38) The on the LCD screen using the Remote Commander. • Point the Remote Commander towards the remote sensor to operate your camcorder (p. 129). • When no commands have been sent from the Remote Commander in a certain period, the orange frame disappears.
Operating Guide
Page 138
... Remaining Battery 29 Hard disk 67 "Memory Stick Duo" .., 39 REMAINING (movie) .........72 Remote Commander...100, 130 REMOTE CTRL (Remote control 80 Remote sensor 129 RESET 128 RING SETTING 72 S S VIDEO cable 52 S VIDEO jack 62 138 Saving images 54 SD movie files 114 SD QUALITY 70 SD REC MODE 70 SD (standard definition) image quality 18...
... Remaining Battery 29 Hard disk 67 "Memory Stick Duo" .., 39 REMAINING (movie) .........72 Remote Commander...100, 130 REMOTE CTRL (Remote control 80 Remote sensor 129 RESET 128 RING SETTING 72 S S VIDEO cable 52 S VIDEO jack 62 138 Saving images 54 SD movie files 114 SD QUALITY 70 SD REC MODE 70 SD (standard definition) image quality 18...


