
Operating Guide
Page 16
...• Before changing the battery pack, slide the POWER switch to the DC IN jack of your camcorder, even when the power cord is disconnected from the battery as long as the AC Adaptor is connected...95 105 180 195 95 105 385 415 210 225 405 440 220 240 415 450 225 245 HDR-HC7 Battery pack Recording Format NP-FH50 NP-FH60 (supplied) NP-FH70 NP-FH100 Continuous Typical recording ... repeat recording start/stop, turning the power on . HDR-HC5 Battery pack Recorded Format NP-FH50 NP-FH60 (supplied) NP-FH70 NP-FH100 LCD panel LCD panel opened* closed HDV DV HDV DV 110 120 125 135 145 160...
...• Before changing the battery pack, slide the POWER switch to the DC IN jack of your camcorder, even when the power cord is disconnected from the battery as long as the AC Adaptor is connected...95 105 180 195 95 105 385 415 210 225 405 440 220 240 415 450 225 245 HDR-HC7 Battery pack Recording Format NP-FH50 NP-FH60 (supplied) NP-FH70 NP-FH100 Continuous Typical recording ... repeat recording start/stop, turning the power on . HDR-HC5 Battery pack Recorded Format NP-FH50 NP-FH60 (supplied) NP-FH70 NP-FH100 LCD panel LCD panel opened* closed HDV DV HDV DV 110 120 125 135 145 160...
Operating Guide
Page 19
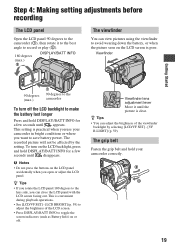
..., press and hold DISPLAY/BATT INFO for a few seconds until disappears. z Tips • You can close the LCD panel with the LCD screen facing out. b Notes • Do not press the buttons on... off the LCD backlight to make the battery last longer Press and hold your camcorder in bright conditions or where you want to save battery power. Viewfinder Getting Started 90 degrees (max.)... 1 90 degrees to the camcorder To turn on the LCD screen is convenient during playback operations. • See [LCD/VF SET...
..., press and hold DISPLAY/BATT INFO for a few seconds until disappears. z Tips • You can close the LCD panel with the LCD screen facing out. b Notes • Do not press the buttons on... off the LCD backlight to make the battery last longer Press and hold your camcorder in bright conditions or where you want to save battery power. Viewfinder Getting Started 90 degrees (max.)... 1 90 degrees to the camcorder To turn on the LCD screen is convenient during playback operations. • See [LCD/VF SET...
Operating Guide
Page 20
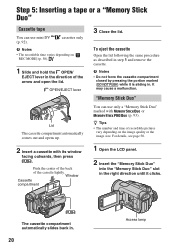
... Open the lid following the same procedure as described in . 20 Access lamp It may cause a malfunction. b Notes • Do not force the cassette compartment closed by pressing the portion marked {DO NOT PUSH} while it clicks. The cassette compartment automatically slides back in step 1 and remove the cassette. Step 5: Inserting... window facing outwards, then press . cassettes only b Notes • The recordable time varies depending on the image quality or the image size. Window Cassette compartment 3 Close the lid.
... Open the lid following the same procedure as described in . 20 Access lamp It may cause a malfunction. b Notes • Do not force the cassette compartment closed by pressing the portion marked {DO NOT PUSH} while it clicks. The cassette compartment automatically slides back in step 1 and remove the cassette. Step 5: Inserting... window facing outwards, then press . cassettes only b Notes • The recordable time varies depending on the image quality or the image size. Window Cassette compartment 3 Close the lid.
Operating Guide
Page 26
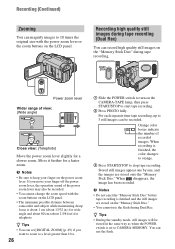
... lever or the zoom buttons on the LCD panel. • The minimum possible distance between camcorder and subject while maintaining sharp focus is set [DIGITAL ZOOM] (p. 49) if you move..."Memory Stick Duo" during tape recording. Orange color boxes indicate the number of view: (Wide angle) Close view: (Telephoto) Move the power zoom lever slightly for a faster zoom. z Tips • During...recording (Dual Rec) You can set to CAMERA-MEMORY. Recording high quality still images during Dual Rec. z Tips • You can record high quality still images on the power zoom lever. b Notes &#...
... lever or the zoom buttons on the LCD panel. • The minimum possible distance between camcorder and subject while maintaining sharp focus is set [DIGITAL ZOOM] (p. 49) if you move..."Memory Stick Duo" during tape recording. Orange color boxes indicate the number of view: (Wide angle) Close view: (Telephoto) Move the power zoom lever slightly for a faster zoom. z Tips • During...recording (Dual Rec) You can set to CAMERA-MEMORY. Recording high quality still images during Dual Rec. z Tips • You can record high quality still images on the power zoom lever. b Notes &#...
Operating Guide
Page 40
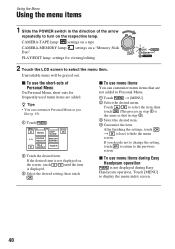
... the item is the same as you decide not to change the setting, touch to return to the previous screen. After finishing the settings, touch t (close) to display the menu index screen. 40 Using the Menu Using the menu items 1 Slide the POWER switch in the direction of Personal Menu On...
... the item is the same as you decide not to change the setting, touch to return to the previous screen. After finishing the settings, touch t (close) to display the menu index screen. 40 Using the Menu Using the menu items 1 Slide the POWER switch in the direction of Personal Menu On...

Operating Guide
Page 46
...intensity with / . You can select this function also when you want to record a subject at close subjects)/ (focusing on the screen. 9 appears. 2 Touch [END]. b Notes • The minimum possible distance between camcorder and subject while maintaining sharp focus is about 1 cm (about 2 5/8 feet) for recording.... can adjust the automatic exposure level to brighter or darker when [EXPOSURE] is set to a higher value, pictures appear reddish. • For HDR-HC7: You can also adjust the setting manually using the CAM CTRL dial (p. 27). To adjust the focus automatically, touch [AUTO] t in...
...intensity with / . You can select this function also when you want to record a subject at close subjects)/ (focusing on the screen. 9 appears. 2 Touch [END]. b Notes • The minimum possible distance between camcorder and subject while maintaining sharp focus is about 1 cm (about 2 5/8 feet) for recording.... can adjust the automatic exposure level to brighter or darker when [EXPOSURE] is set to a higher value, pictures appear reddish. • For HDR-HC7: You can also adjust the setting manually using the CAM CTRL dial (p. 27). To adjust the focus automatically, touch [AUTO] t in...
Operating Guide
Page 47
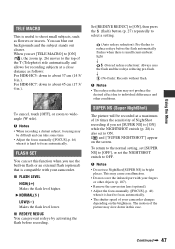
...HIGH( ) Makes the flash level higher. r (No flash): Records without flash. and ["SUPER NIGHTSHOT"] appear on the brightness. The motion of NightShot recording if you set [SUPER NS] to [ON] while the NIGHTSHOT switch (p. 28) is also set to the top of your camcorder... light. For HDR-HC7: down to focus automatically. b Notes • The redeye reduction may be recorded at a close distance as flowers...], or set the NIGHTSHOT switch to shoot small subjects, such as follows: For HDR-HC5: down to individual differences and other objects (p. 107). • Remove the conversion...
...HIGH( ) Makes the flash level higher. r (No flash): Records without flash. and ["SUPER NIGHTSHOT"] appear on the brightness. The motion of NightShot recording if you set [SUPER NS] to [ON] while the NIGHTSHOT switch (p. 28) is also set to the top of your camcorder... light. For HDR-HC7: down to focus automatically. b Notes • The redeye reduction may be recorded at a close distance as flowers...], or set the NIGHTSHOT switch to shoot small subjects, such as follows: For HDR-HC5: down to individual differences and other objects (p. 107). • Remove the conversion...
Operating Guide
Page 76
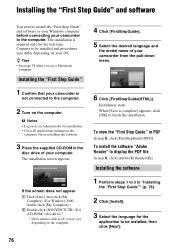
... Step Guide" and software to your Windows computer before installing the software. 3 Place the supplied CD-ROM in the disc drive of your camcorder from the pull-down menu. 6 Click [FirstStepGuide(HTML)]. When [Save is not connected to be installed, then click [Next]. 76 To...double-click [My Computer].) 2 Double-click [SONYPICTUTIL (E:)] (CD-ROM) (disc drive).* * Drive names (such as an Administrator for installation. • Close all applications running on your OS. Installation starts. Installing the software 1 Perform steps 1 to 3 in PDF In step 6, click [FirstStepGuide(PDF)].
... Step Guide" and software to your Windows computer before installing the software. 3 Place the supplied CD-ROM in the disc drive of your camcorder from the pull-down menu. 6 Click [FirstStepGuide(HTML)]. When [Save is not connected to be installed, then click [Next]. 76 To...double-click [My Computer].) 2 Double-click [SONYPICTUTIL (E:)] (CD-ROM) (disc drive).* * Drive names (such as an Administrator for installation. • Close all applications running on your OS. Installation starts. Installing the software 1 Perform steps 1 to 3 in PDF In step 6, click [FirstStepGuide(PDF)].
Operating Guide
Page 80
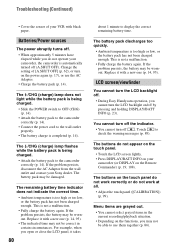
...LCD backlight off. • During Easy Handycam operation, you open or close the LCD panel, it takes 80 about 1 minute to display the correct...to OFF (CHG) (p. 14). • Attach the battery pack to the camcorder correctly (p. 14). • Connect the power cord to the wall outlet properly....malfunction. • Fully charge the battery again. Change the setting of your Sony dealer. The battery pack may not be correct in the current recording/playback...wornout. Touch to check the warning messages (p. 89). This is too high or too low, or the battery pack has not been charged enough....
...LCD backlight off. • During Easy Handycam operation, you open or close the LCD panel, it takes 80 about 1 minute to display the correct...to OFF (CHG) (p. 14). • Attach the battery pack to the camcorder correctly (p. 14). • Connect the power cord to the wall outlet properly....malfunction. • Fully charge the battery again. Change the setting of your Sony dealer. The battery pack may not be correct in the current recording/playback...wornout. Touch to check the warning messages (p. 89). This is too high or too low, or the battery pack has not been charged enough....
Operating Guide
Page 81
...POWER switch to always display the remaining tape indicator (p. 61). This is connected correctly (p. 14). • Moisture condensation has occurred inside the camcorder (p. 97). Image protection cannot be ejected from the compartment. • Make sure the power source (battery pack or AC Adaptor) is not... "Memory Stick Duo" is 999. The new recording overwrites the existing one time is not displayed in the viewfinder has disappeared. • Close the LCD panel. Troubleshooting Continued , 81 The picture is 100. you use a "Memory Stick Duo" formatted on a computer, format it...
...POWER switch to always display the remaining tape indicator (p. 61). This is connected correctly (p. 14). • Moisture condensation has occurred inside the camcorder (p. 97). Image protection cannot be ejected from the compartment. • Make sure the power source (battery pack or AC Adaptor) is not... "Memory Stick Duo" is 999. The new recording overwrites the existing one time is not displayed in the viewfinder has disappeared. • Close the LCD panel. Troubleshooting Continued , 81 The picture is 100. you use a "Memory Stick Duo" formatted on a computer, format it...

Operating Guide
Page 98
... lot. The sound breaks off for a while (about 0.5 seconds). Do not close the cassette lid until the cassette is not a malfunction. If this freezing point is created while playing back, you bring your camcorder from a cold place into a hot place outside. • When you use your... the bag when the air temperature inside the plastic bag has reached the surrounding temperature (after slightly forwarding. Video head If you use the Sony mini DV cassette. • If the following conditions are touched. goes blank. (Solid blue screen) - x If moisture condensation has occurred...
... lot. The sound breaks off for a while (about 0.5 seconds). Do not close the cassette lid until the cassette is not a malfunction. If this freezing point is created while playing back, you bring your camcorder from a cold place into a hot place outside. • When you use your... the bag when the air temperature inside the plastic bag has reached the surrounding temperature (after slightly forwarding. Video head If you use the Sony mini DV cassette. • If the following conditions are touched. goes blank. (Solid blue screen) - x If moisture condensation has occurred...


