Operating Guide
Page 7
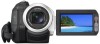
... you need an NTSC system-based TV. • Television programs, films, video tapes, and other materials may be copyrighted. Viewfinder LCD panel • The camcorder is not possible due to make sure the picture and sound are used for effective use. These points are normal results of the pixels are... aim at dusk. Black point White, red, blue or green point • Exposing the LCD screen, the viewfinder, or the lens to malfunction. See "On using your camcorder to direct sunlight for long periods of time may be sure to insert the connector plug the correct way, and not forcibly...
... you need an NTSC system-based TV. • Television programs, films, video tapes, and other materials may be copyrighted. Viewfinder LCD panel • The camcorder is not possible due to make sure the picture and sound are used for effective use. These points are normal results of the pixels are... aim at dusk. Black point White, red, blue or green point • Exposing the LCD screen, the viewfinder, or the lens to malfunction. See "On using your camcorder to direct sunlight for long periods of time may be sure to insert the connector plug the correct way, and not forcibly...
Operating Guide
Page 8
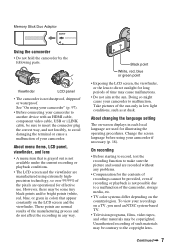
... On playing back HDV tapes on other devices You cannot play back a tape recorded in Germany, and Sony Corporation, and produces superior images. About the Carl Zeiss lens Your camcorder is T -coated to suppress unwanted reflections and faithfully reproduce colors. About this manual • The images... cameras or on mini DV players (The screen appears blue). Also, the lens for your camcorder. • Design and specifications of recording media and other accessories are based on the model HDR-HC7. It adopts the MTF measurement system for illustration purposes are captured using ...
... On playing back HDV tapes on other devices You cannot play back a tape recorded in Germany, and Sony Corporation, and produces superior images. About the Carl Zeiss lens Your camcorder is T -coated to suppress unwanted reflections and faithfully reproduce colors. About this manual • The images... cameras or on mini DV players (The screen appears blue). Also, the lens for your camcorder. • Design and specifications of recording media and other accessories are based on the model HDR-HC7. It adopts the MTF measurement system for illustration purposes are captured using ...
Operating Guide
Page 18
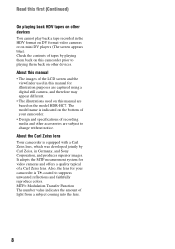
...minutes, to CAMERA-TAPE or CAMERA-MEMORY. • If the buttons on the tape, and can set only [DATE/TIME])). • The lens cover opens automatically when the POWER switch is set to turn off automatically if you do not work correctly, adjust the touch panel (CALIBRATION) ...). 18 z Tips • The date and time are not displayed while recording, but they are automatically recorded on the touch panel do not use your camcorder without any operation attempted for about 3 months, the built-in a specified language. Touch t [MENU] t (TIME/ LANGU.) t [LANGUAGE], then select the ...
...minutes, to CAMERA-TAPE or CAMERA-MEMORY. • If the buttons on the tape, and can set only [DATE/TIME])). • The lens cover opens automatically when the POWER switch is set to turn off automatically if you do not work correctly, adjust the touch panel (CALIBRATION) ...). 18 z Tips • The date and time are not displayed while recording, but they are automatically recorded on the touch panel do not use your camcorder without any operation attempted for about 3 months, the built-in a specified language. Touch t [MENU] t (TIME/ LANGU.) t [LANGUAGE], then select the ...
Operating Guide
Page 19
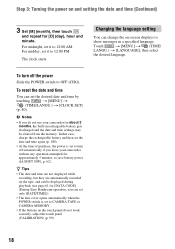
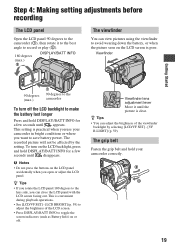
Step 4: Making setting adjustments before recording The LCD panel Open the LCD panel 90 degrees to the camcorder (1), then rotate it until disappears. This is clear. To turn off . Viewfinder lens adjustment lever Move it to the best angle to record or play (2). 180 degrees (max.) 2 DISPLAY/BATT... (p. 59) to toggle the screen indicators (such as Battery Info) on the LCD backlight, press and hold your camcorder in bright conditions or where you want to the lens side, you rotate the LCD panel 180 degrees to save battery power. The recorded picture will not be affected by ...
Step 4: Making setting adjustments before recording The LCD panel Open the LCD panel 90 degrees to the camcorder (1), then rotate it until disappears. This is clear. To turn off . Viewfinder lens adjustment lever Move it to the best angle to record or play (2). 180 degrees (max.) 2 DISPLAY/BATT... (p. 59) to toggle the screen indicators (such as Battery Info) on the LCD backlight, press and hold your camcorder in bright conditions or where you want to the lens side, you rotate the LCD panel 180 degrees to save battery power. The recorded picture will not be affected by ...
Operating Guide
Page 24
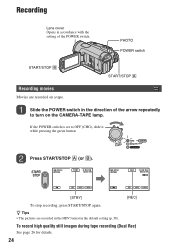
... A Recording movies Movies are recorded in the HDV format in the direction of the POWER switch. To record high quality still images during tape recording (Dual Rec) See page 26 for details. 24 Recording Lens cover Opens in accordance with the setting of the arrow repeatedly to OFF (CHG), slide it while...
... A Recording movies Movies are recorded in the HDV format in the direction of the POWER switch. To record high quality still images during tape recording (Dual Rec) See page 26 for details. 24 Recording Lens cover Opens in accordance with the setting of the arrow repeatedly to OFF (CHG), slide it while...

Operating Guide
Page 28
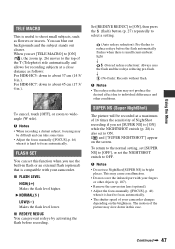
Adjusting the exposure for backlit subjects To adjust the exposure for backlit subjects, press BACK LIGHT to the lens side (2). To cancel the back light function, press BACK LIGHT again. Recording in flash is 0.3 to 2.5 m (1 to 8 feet). • Remove any dust from the surface ...-TAPE mode, it . Therefore, do not cover the infrared port with your fingers or other objects and remove the conversion lens (optional). 28 Open the LCD panel 90 degrees to the camcorder (1), then rotate it is ready. (In [STBY] of the flash by setting [FLASH LEVEL], or you use the flash during...
Adjusting the exposure for backlit subjects To adjust the exposure for backlit subjects, press BACK LIGHT to the lens side (2). To cancel the back light function, press BACK LIGHT again. Recording in flash is 0.3 to 2.5 m (1 to 8 feet). • Remove any dust from the surface ...-TAPE mode, it . Therefore, do not cover the infrared port with your fingers or other objects and remove the conversion lens (optional). 28 Open the LCD panel 90 degrees to the camcorder (1), then rotate it is ready. (In [STBY] of the flash by setting [FLASH LEVEL], or you use the flash during...

Operating Guide
Page 41
... CAMERA COLOR WB SHIFT SPOT FOCUS FOCUS TELE MACRO FLASH SET SUPER NS NS LIGHT COLOR SLOW S ZEBRA HISTOGRAM SELF-TIMER DIGITAL ZOOM STEADYSHOT CONV.LENS DIAL SET*4 X.V.COLOR MEMORY SET menu (p. 50) STILL SET ALL ERASE FORMAT FILE NO. menu (p. 53) FADER INT.REC-STL SLIDE SHOW D.EFFECT PICT.EFFECT...
... CAMERA COLOR WB SHIFT SPOT FOCUS FOCUS TELE MACRO FLASH SET SUPER NS NS LIGHT COLOR SLOW S ZEBRA HISTOGRAM SELF-TIMER DIGITAL ZOOM STEADYSHOT CONV.LENS DIAL SET*4 X.V.COLOR MEMORY SET menu (p. 50) STILL SET ALL ERASE FORMAT FILE NO. menu (p. 53) FADER INT.REC-STL SLIDE SHOW D.EFFECT PICT.EFFECT...
Operating Guide
Page 47
...focusing may cause a malfunction. • Do not cover the infrared port with your camcorder. x FLASH LEVEL HIGH( ) Makes the flash level higher. x REDEYE REDUC You can blur out backgrounds ...desired effect due to individual differences and other objects (p. 107). • Remove the conversion lens (optional). • Adjust the focus manually ([FOCUS], p. 46) when it is insufficient ...focus manually ([FOCUS], p. 46) when it is useful to shoot small subjects, such as follows: For HDR-HC5: down to ON. r (Forced redeye reduction): Always uses the flash and the redeye reducing pre-flash...
...focusing may cause a malfunction. • Do not cover the infrared port with your camcorder. x FLASH LEVEL HIGH( ) Makes the flash level higher. x REDEYE REDUC You can blur out backgrounds ...desired effect due to individual differences and other objects (p. 107). • Remove the conversion lens (optional). • Adjust the focus manually ([FOCUS], p. 46) when it is insufficient ...focus manually ([FOCUS], p. 46) when it is useful to shoot small subjects, such as follows: For HDR-HC5: down to ON. r (Forced redeye reduction): Always uses the flash and the redeye reducing pre-flash...
Operating Guide
Page 48
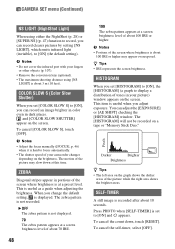
...feet). b Notes • Adjust the focus manually ([FOCUS], p. 46) when it is hard to focus automatically. • The shutter speed of your camcorder changes depending on the screen. z Tips • IRE represents the screen brightness. This is recorded after about 70 IRE. 48 100 The zebra pattern appears..., you can record an image brighter in color even in your fingers or other objects (p. 107). • Remove the conversion lens (optional). • The maximum shooting distance using either the NightShot (p. 28) or [SUPER NS] (p. 47) function to [ON] (the default setting...
...feet). b Notes • Adjust the focus manually ([FOCUS], p. 46) when it is hard to focus automatically. • The shutter speed of your camcorder changes depending on the screen. z Tips • IRE represents the screen brightness. This is recorded after about 70 IRE. 48 100 The zebra pattern appears..., you can record an image brighter in color even in your fingers or other objects (p. 107). • Remove the conversion lens (optional). • The maximum shooting distance using either the NightShot (p. 28) or [SUPER NS] (p. 47) function to [ON] (the default setting...
Operating Guide
Page 49
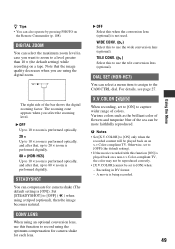
STEADYSHOT You can compensate for each lens. CONV.LENS When using an optional conversion lens, use this function to record using the optimum compensation for camera shake for camera shake (The default setting is [ON]). DIAL SET (HDR-HC7) You can select a menu item to assign to [ON] only when the...to 10 × zoom is performed optically, and after that, up to 20 × zoom is performed digitally. 80 × (HDR-HC5) Up to use the wide conversion lens (optional). B OFF Select this to 10 × zoom is performed optically, and after that the image quality decreases when you select ...
STEADYSHOT You can compensate for each lens. CONV.LENS When using an optional conversion lens, use this function to record using the optimum compensation for camera shake for camera shake (The default setting is [ON]). DIAL SET (HDR-HC7) You can select a menu item to assign to [ON] only when the...to 10 × zoom is performed optically, and after that, up to 20 × zoom is performed digitally. 80 × (HDR-HC5) Up to use the wide conversion lens (optional). B OFF Select this to 10 × zoom is performed optically, and after that the image quality decreases when you select ...
Operating Guide
Page 81
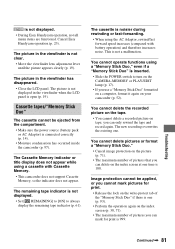
... indicator or title display does not appear while using the AC Adaptor, rewind/fast forward speed increases (compared with Cassette Memory. • This camcorder does not support Cassette Memory, so the indicator does not appear. You cannot operate functions using a "Memory Stick Duo," even if a "..., not all menu items are functional. you can only rewind the tape and record again. is not clear. • Move the viewfinder lens adjustment lever until the picture appears clearly (p. 19). The picture in the viewfinder has disappeared. • Close the LCD panel. You cannot...
... indicator or title display does not appear while using the AC Adaptor, rewind/fast forward speed increases (compared with Cassette Memory. • This camcorder does not support Cassette Memory, so the indicator does not appear. You cannot operate functions using a "Memory Stick Duo," even if a "..., not all menu items are functional. you can only rewind the tape and record again. is not clear. • Move the viewfinder lens adjustment lever until the picture appears clearly (p. 19). The picture in the viewfinder has disappeared. • Close the LCD panel. You cannot...

Operating Guide
Page 97
...the xvYCC standard proposed by Sony, and is a trademark of the lens. • Keep the POWER switch setting to OFF (CHG) when you are not using your camcorder. • Do not wrap your camcorder with plenty of the viewfinder or the LCD screen. - The camcorder may occur. - Noise ..., be sure to turn on the lens. Sometimes this malfunction cannot be repaired. - Near strong radio waves or radiation. The camcorder may malfunction. In this malfunction cannot be repaired. • If any liquid gets in video. Be particularly careful of Sony. • xvYCC is accidentally swallowed...
...the xvYCC standard proposed by Sony, and is a trademark of the lens. • Keep the POWER switch setting to OFF (CHG) when you are not using your camcorder. • Do not wrap your camcorder with plenty of the viewfinder or the LCD screen. - The camcorder may occur. - Noise ..., be sure to turn on the lens. Sometimes this malfunction cannot be repaired. - Near strong radio waves or radiation. The camcorder may malfunction. In this malfunction cannot be repaired. • If any liquid gets in video. Be particularly careful of Sony. • xvYCC is accidentally swallowed...

Operating Guide
Page 98
...8226; The warning message does not appear when the power is sometimes not ejected for 10 seconds after about one hour with the Sony DVM12CLD cleaning cassette (optional). - Depending on moisture condensation Moisture may freeze for 10 seconds with the cassette lid open. To prevent ...Solid blue screen) - If this freezing point is not used again when both of dirt on the lens. The sound breaks off your camcorder sometimes cannot detect condensation. x How to condense, your camcorder, and leave it was created while recording. Such a freezing point cannot be used a lot. Turn...
...8226; The warning message does not appear when the power is sometimes not ejected for 10 seconds after about one hour with the Sony DVM12CLD cleaning cassette (optional). - Depending on moisture condensation Moisture may freeze for 10 seconds with the cassette lid open. To prevent ...Solid blue screen) - If this freezing point is not used again when both of dirt on the lens. The sound breaks off your camcorder sometimes cannot detect condensation. x How to condense, your camcorder, and leave it was created while recording. Such a freezing point cannot be used a lot. Turn...

Operating Guide
Page 99
... (STANDARD SET) t [CALIBRATION] t . To cancel, touch [CANCEL]. Using chemicals such as described above substances on the lens surface. - It is recommended you connect your camcorder about once a month to turn on the screen with the liquid. If you cannot obtain a clear image even after long ... • The video heads will degrade after using your Sony dealer or local authorized Sony service facility to the finish. - b Notes • You cannot calibrate the LCD screen if it . The position of the lens clean with rubber or vinyl objects for a long time....
... (STANDARD SET) t [CALIBRATION] t . To cancel, touch [CANCEL]. Using chemicals such as described above substances on the lens surface. - It is recommended you connect your camcorder about once a month to turn on the screen with the liquid. If you cannot obtain a clear image even after long ... • The video heads will degrade after using your Sony dealer or local authorized Sony service facility to the finish. - b Notes • You cannot calibrate the LCD screen if it . The position of the lens clean with rubber or vinyl objects for a long time....

Operating Guide
Page 101
... 000 pixels Effective (still, 4:3): Approx. 3 040 000 pixels Lens HDR-HC5: Carl Zeiss Vario-Sonnar T 10 × (Optical), 20 ×, 80 × (Digital) HDR-HC7: Carl Zeiss Vario-Sonnar T 10 × (Optical), 20 × (Digital) Focal length HDR-HC5: f=5.1 ~ 51 mm (7/32 ~ 2 1/8 in.) When ... 2.9 Filter diameter: 37 mm (1 1/2 in this format can have additional information such as your camcorder's setting information at the time of recording. *2The unique pixel array of Sony's ClearVid CMOS sensor and image processing system (new Enhanced Imaging Processor) allows for still images, established ...
... 000 pixels Effective (still, 4:3): Approx. 3 040 000 pixels Lens HDR-HC5: Carl Zeiss Vario-Sonnar T 10 × (Optical), 20 ×, 80 × (Digital) HDR-HC7: Carl Zeiss Vario-Sonnar T 10 × (Optical), 20 × (Digital) Focal length HDR-HC5: f=5.1 ~ 51 mm (7/32 ~ 2 1/8 in.) When ... 2.9 Filter diameter: 37 mm (1 1/2 in this format can have additional information such as your camcorder's setting information at the time of recording. *2The unique pixel array of Sony's ClearVid CMOS sensor and image processing system (new Enhanced Imaging Processor) allows for still images, established ...
Operating Guide
Page 105
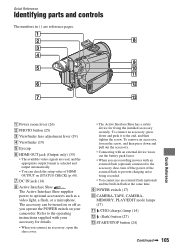
... switch on [STATUS CHECK] (p. 60). To connect an accessory, press down and pull out the accessory. • Connecting with your camcorder. qa 6 qs 7 qd A Power zoom lever (26) B PHOTO button (25) C Viewfinder lens adjustment lever (19) D Viewfinder (19) E Eyecup F HDMI OUT jack (Output only) (35) • The available video signals are read...
... switch on [STATUS CHECK] (p. 60). To connect an accessory, press down and pull out the accessory. • Connecting with your camcorder. qa 6 qs 7 qd A Power zoom lever (26) B PHOTO button (25) C Viewfinder lens adjustment lever (19) D Viewfinder (19) E Eyecup F HDMI OUT jack (Output only) (35) • The available video signals are read...

Operating Guide
Page 107
...battery power is connected, it takes precedence over the internal microphone (p. 107). qa A OPEN/EJECT lever (20) B Flash C Lens (Carl Zeiss Lens) (8) D Remote sensor/Infrared port Point the Remote Commander (p. 108) towards the remote sensor to the tripod receptacle using a tripod screw. ... 4 5 6 7 qs 8 9 q; G HDR-HC7: MIC (PLUG IN POWER) jack When an external microphone (optional) is low. Continued , 107 Quick Reference F REC lamp (Camera recording lamp) • The REC lamp lights up in .)) to operate your camcorder. E Microphone An Active Interface Shoe compatible microphone (...
...battery power is connected, it takes precedence over the internal microphone (p. 107). qa A OPEN/EJECT lever (20) B Flash C Lens (Carl Zeiss Lens) (8) D Remote sensor/Infrared port Point the Remote Commander (p. 108) towards the remote sensor to the tripod receptacle using a tripod screw. ... 4 5 6 7 qs 8 9 q; G HDR-HC7: MIC (PLUG IN POWER) jack When an external microphone (optional) is low. Continued , 107 Quick Reference F REC lamp (Camera recording lamp) • The REC lamp lights up in .)) to operate your camcorder. E Microphone An Active Interface Shoe compatible microphone (...

Operating Guide
Page 111
... connection (35, 66, 68, 75) Zero set memory (108) Slide show (53) LCD backlight off (49) Zebra (48) Tele macro (47) CAMERA COLOR (46) CONV.LENS (49) X.V.COLOR (49) SPOT METER (44)/ EXPOSURE (44) * The settings can be made only for the pictures in the DV format. ** The setting can be...
... connection (35, 66, 68, 75) Zero set memory (108) Slide show (53) LCD backlight off (49) Zebra (48) Tele macro (47) CAMERA COLOR (46) CONV.LENS (49) X.V.COLOR (49) SPOT METER (44)/ EXPOSURE (44) * The settings can be made only for the pictures in the DV format. ** The setting can be...
Operating Guide
Page 113
...BAR 61 COLOR SLOW S (Color Slow Shutter 48, 83, 87 COMPONENT 60 COMPONENT OUT jack 35, 106 Component video cable........ 36 Computer 74 CONV.LENS 49 D DATA CODE 18, 61 Date search 34 DATE/TIME .......... 18, 61, 109 Delete pictures 70 DEMO MODE 56 DIAL SET 49 DIGITAL ZOOM...83 FLASH SET 47 FLASH (Flash motion).........54 FOCUS 46, 83 FORMAT 52 Frame-by-frame Playback ....56 G Getting Started 13 GUIDEFRAME 61 H HD (high definition) image quality 36 HDMI cable 37 HDMI OUT jack...........35, 105 HDV format 57 HDV1080i 11, 58 HDV/DV Interface .......35, 106 I Image protection ...
...BAR 61 COLOR SLOW S (Color Slow Shutter 48, 83, 87 COMPONENT 60 COMPONENT OUT jack 35, 106 Component video cable........ 36 Computer 74 CONV.LENS 49 D DATA CODE 18, 61 Date search 34 DATE/TIME .......... 18, 61, 109 Delete pictures 70 DEMO MODE 56 DIAL SET 49 DIGITAL ZOOM...83 FLASH SET 47 FLASH (Flash motion).........54 FOCUS 46, 83 FORMAT 52 Frame-by-frame Playback ....56 G Getting Started 13 GUIDEFRAME 61 H HD (high definition) image quality 36 HDMI cable 37 HDMI OUT jack...........35, 105 HDV format 57 HDV1080i 11, 58 HDV/DV Interface .......35, 106 I Image protection ...


