
Operating Guide
Page 9
... a high definition TV 36 Connecting to a 16:9 (wide) or 4:3 TV 37 Using the Menu Recording/Playback Easy Recording/Playback (Easy Handycam 22 Recording 24 Zooming 26 Recording high quality still images during tape recording (Dual Rec 26 Controlling the image settings manually with the CAM CTRL dial (HDR-HC7 ... or playing back in mirror mode 28 Using the menu items .......... 40 Menu items 41 CAMERA SET menu 43 Settings to adjust your camcorder to the recording conditions MEMORY SET menu 50 Settings for the "Memory Stick Duo" PICT.APPLI. menu 63 Customizing Personal Menu ............
... a high definition TV 36 Connecting to a 16:9 (wide) or 4:3 TV 37 Using the Menu Recording/Playback Easy Recording/Playback (Easy Handycam 22 Recording 24 Zooming 26 Recording high quality still images during tape recording (Dual Rec 26 Controlling the image settings manually with the CAM CTRL dial (HDR-HC7 ... or playing back in mirror mode 28 Using the menu items .......... 40 Menu items 41 CAMERA SET menu 43 Settings to adjust your camcorder to the recording conditions MEMORY SET menu 50 Settings for the "Memory Stick Duo" PICT.APPLI. menu 63 Customizing Personal Menu ............
Operating Guide
Page 23
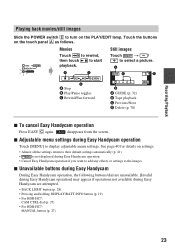
...are unavailable. [Invalid during Easy Handycam operation] may appear if operations not available during Easy Handycam operation Touch [MENU] to display adjustable menu settings. Recording/Playback Playing back movies/still images Slide the POWER switch E to select a picture. A C Still images ...operation Press EASY C again. x Adjustable menu settings during Easy Handycam are attempted. • BACK LIGHT button (p. 28) • Pressing and holding DISPLAY/BATT INFO button (p. 19) • For HDR-HC7: CAM CTRL dial (p. 27) • For HDR-HC7: MANUAL button (p. 27) 23 Touch the...
...are unavailable. [Invalid during Easy Handycam operation] may appear if operations not available during Easy Handycam operation Touch [MENU] to display adjustable menu settings. Recording/Playback Playing back movies/still images Slide the POWER switch E to select a picture. A C Still images ...operation Press EASY C again. x Adjustable menu settings during Easy Handycam are attempted. • BACK LIGHT button (p. 28) • Pressing and holding DISPLAY/BATT INFO button (p. 19) • For HDR-HC7: CAM CTRL dial (p. 27) • For HDR-HC7: MANUAL button (p. 27) 23 Touch the...
Operating Guide
Page 27
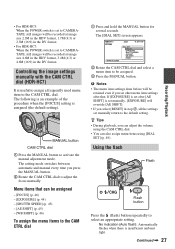
... to assign a frequently used menu item to the CAM CTRL dial. Using the flash Flash Flash button Press the (flash) button repeatedly to activate the manual adjustment mode. If [EXPOSURE] is set after that can also assign menu items using the CAM CTRL dial. • You can be assigned - [FOCUS]...procedure when the [FOCUS] setting is assigned (the default setting). The setting mode switches between automatic and manual every time you select [RESET] in the DV format. • For HDR-HC5: When the POWER switch is set to CAMERATAPE, still images will be recorded at image size 2.3M ...
... to assign a frequently used menu item to the CAM CTRL dial. Using the flash Flash Flash button Press the (flash) button repeatedly to activate the manual adjustment mode. If [EXPOSURE] is set after that can also assign menu items using the CAM CTRL dial. • You can be assigned - [FOCUS]...procedure when the [FOCUS] setting is assigned (the default setting). The setting mode switches between automatic and manual every time you select [RESET] in the DV format. • For HDR-HC5: When the POWER switch is set to CAMERATAPE, still images will be recorded at image size 2.3M ...

Operating Guide
Page 28
Recording in dark places (NightShot) • Adjust the focus manually ([FOCUS], p. 46) when it is 0.3 to 2.5 m (1 to 8 feet). • Remove any dust from the surface of the CAMERA-TAPE mode, it 180 degrees to ON ( ... cover the infrared port with your fingers or other objects and remove the conversion lens (optional). 28 Open the LCD panel 90 degrees to the camcorder (1), then rotate it takes a while to the subject when using it. b Notes • The NightShot and Super NightShot functions use Super NightShot function (p. 47). r (No...
Recording in dark places (NightShot) • Adjust the focus manually ([FOCUS], p. 46) when it is 0.3 to 2.5 m (1 to 8 feet). • Remove any dust from the surface of the CAMERA-TAPE mode, it 180 degrees to ON ( ... cover the infrared port with your fingers or other objects and remove the conversion lens (optional). 28 Open the LCD panel 90 degrees to the camcorder (1), then rotate it takes a while to the subject when using it. b Notes • The NightShot and Super NightShot functions use Super NightShot function (p. 47). r (No...

Operating Guide
Page 35
... TV and your camcorder and TV, referring to be adjusted on the screen. The output setting of connecting to a high definition TV 1 Touch [TV] t [HD TV]. 2 Select the TV input jacks with the device to the picture on the TV when playing back. Touch [HINT] and refer also to the instruction manuals supplied with / , then...
... TV and your camcorder and TV, referring to be adjusted on the screen. The output setting of connecting to a high definition TV 1 Touch [TV] t [HD TV]. 2 Select the TV input jacks with the device to the picture on the TV when playing back. Touch [HINT] and refer also to the instruction manuals supplied with / , then...
Operating Guide
Page 44
... subjects a short distance away. appears. 2 Touch [END]. z Tips • For HDR-HC7: You can adjust the color balance to the brightness of a picture manually. Adjust the brightness when the subject is adjusted automatically. To return the setting to automatic exposure, touch [AUTO] t . EXPOSURE You can adjust and fix the exposure to the subject, so that it...
... subjects a short distance away. appears. 2 Touch [END]. z Tips • For HDR-HC7: You can adjust the color balance to the brightness of a picture manually. Adjust the brightness when the subject is adjusted automatically. To return the setting to automatic exposure, touch [AUTO] t . EXPOSURE You can adjust and fix the exposure to the subject, so that it...
Operating Guide
Page 45
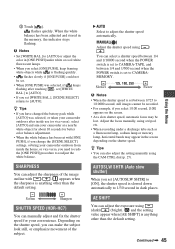
... or mercury lamp, horizontal bands may be set. • When [ONE PUSH] was selected, or taken your camcorder outdoors after touching , set [WHITE BAL.] to adjust the shutter speed automatically. AUTOSLW SHTR (Auto slow shutter) When you set between 1/4 and 1/500 second when the...• Set [WHITE BAL.] to [AUTO]. Soften Sharpen SHUTTR SPEED (HDR-HC7) You can select a shutter speed between 1/4 and 1/10000 second when the POWER switch is anything other than the default setting. MANUAL( ) Adjust the shutter speed using the CAM CTRL dial (p. 27). flashes quickly. ...
... or mercury lamp, horizontal bands may be set. • When [ONE PUSH] was selected, or taken your camcorder outdoors after touching , set [WHITE BAL.] to adjust the shutter speed automatically. AUTOSLW SHTR (Auto slow shutter) When you set between 1/4 and 1/500 second when the...• Set [WHITE BAL.] to [AUTO]. Soften Sharpen SHUTTR SPEED (HDR-HC7) You can select a shutter speed between 1/4 and 1/10000 second when the POWER switch is anything other than the default setting. MANUAL( ) Adjust the shutter speed using the CAM CTRL dial (p. 27). flashes quickly. ...

Operating Guide
Page 46
...FOCUS You can select and adjust the focal point to W (wide angle), then adjust the focus. • For HDR-HC7: You can also adjust the focus manually using / . FOCUS You can adjust the color intensity with / . b Notes • The minimum possible distance between camcorder and subject while maintaining sharp... feet) for recording. z Tips • It is set to a higher value, pictures appear reddish. • For HDR-HC7: You can also adjust the setting manually using the CAM CTRL dial (p. 27). and the setting value appear when [WB SHIFT] is anything other than the default ...
...FOCUS You can select and adjust the focal point to W (wide angle), then adjust the focus. • For HDR-HC7: You can also adjust the focus manually using / . FOCUS You can adjust the color intensity with / . b Notes • The minimum possible distance between camcorder and subject while maintaining sharp... feet) for recording. z Tips • It is set to a higher value, pictures appear reddish. • For HDR-HC7: You can also adjust the setting manually using the CAM CTRL dial (p. 27). and the setting value appear when [WB SHIFT] is anything other than the default ...
Operating Guide
Page 47
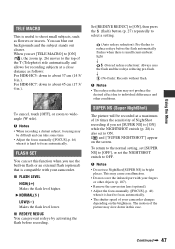
...set the NIGHTSHOT switch to ON. x FLASH LEVEL HIGH( ) Makes the flash level higher. The motion of the picture may cause a malfunction. • Do not cover the infrared port with your camcorder changes depending on the screen. For HDR-HC7: down to wideangle (W side). B NORMAL(...Adjust the focus manually ([FOCUS], p. 46) when it is hard to about 45 cm (17 3/ 4 in .). and ["SUPER NIGHTSHOT"] appear on the brightness. b Notes • When recording a distant subject, focusing may not produce the desired effect due to shoot small subjects, such as follows: For HDR-HC5...
...set the NIGHTSHOT switch to ON. x FLASH LEVEL HIGH( ) Makes the flash level higher. The motion of the picture may cause a malfunction. • Do not cover the infrared port with your camcorder changes depending on the screen. For HDR-HC7: down to wideangle (W side). B NORMAL(...Adjust the focus manually ([FOCUS], p. 46) when it is hard to about 45 cm (17 3/ 4 in .). and ["SUPER NIGHTSHOT"] appear on the brightness. b Notes • When recording a distant subject, focusing may not produce the desired effect due to shoot small subjects, such as follows: For HDR-HC5...
Operating Guide
Page 48
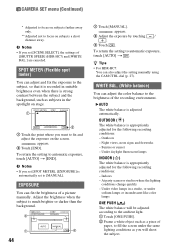
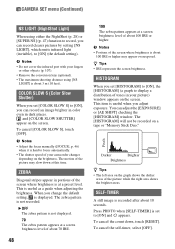
b Notes • Adjust the focus manually ([FOCUS], p. 46) when it is about 100 IRE or higher. b Notes &#... area on the brightness. To cancel [COLOR SLOW S], touch [OFF]. The zebra pattern is set to [ON], you adjust exposure. z Tips • IRE represents the screen brightness. This is not displayed. 70 The zebra pattern appears at a... brightness level of about 70 IRE. 48 100 The zebra pattern appears at a screen brightness level of your camcorder changes depending on the graph shows the darker areas of the picture may appear overexposed. CAMERA SET menu (Continued...
b Notes • Adjust the focus manually ([FOCUS], p. 46) when it is about 100 IRE or higher. b Notes &#... area on the brightness. To cancel [COLOR SLOW S], touch [OFF]. The zebra pattern is set to [ON], you adjust exposure. z Tips • IRE represents the screen brightness. This is not displayed. 70 The zebra pattern appears at a... brightness level of about 70 IRE. 48 100 The zebra pattern appears at a screen brightness level of your camcorder changes depending on the graph shows the darker areas of the picture may appear overexposed. CAMERA SET menu (Continued...
Operating Guide
Page 54
... [D.EFFECT] setting. D.EFFECT (Digital effect) You can add digital effects to recording/ playback. 1 Touch the desired effect. 2 Adjust the effect with a sepia hue to [AUTO]. • For HDR-HC5: Adjust the focus manually using a tripod (optional) since adjusting the focus automatically is hard when [SLOW SHUTTR] is selected. ([FOCUS], p. 46) z Tips • You can add a cinematic...
... [D.EFFECT] setting. D.EFFECT (Digital effect) You can add digital effects to recording/ playback. 1 Touch the desired effect. 2 Adjust the effect with a sepia hue to [AUTO]. • For HDR-HC5: Adjust the focus manually using a tripod (optional) since adjusting the focus automatically is hard when [SLOW SHUTTR] is selected. ([FOCUS], p. 46) z Tips • You can add a cinematic...
Operating Guide
Page 59
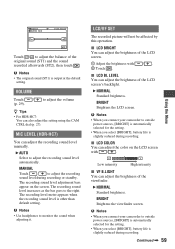
...at the default setting. MIC LEVEL (HDR-HC7) You can adjust the brightness of the LCD screen's backlight. x LCD COLOR You can adjust the brightness of the viewfinder. b Notes • When you connect your camcorder to adjust the recording sound level automatically. 60min ...brightness. b Notes • When you select [BRIGHT], battery life is slightly reduced during recording. Low intensity High intensity x VF B.LIGHT You can adjust the recording sound level manually. B AUTO Select to outside power sources, [BRIGHT] is automatically selected for the setting. • When ...
...at the default setting. MIC LEVEL (HDR-HC7) You can adjust the brightness of the LCD screen's backlight. x LCD COLOR You can adjust the brightness of the viewfinder. b Notes • When you connect your camcorder to adjust the recording sound level automatically. 60min ...brightness. b Notes • When you select [BRIGHT], battery life is slightly reduced during recording. Low intensity High intensity x VF B.LIGHT You can adjust the recording sound level manually. B AUTO Select to outside power sources, [BRIGHT] is automatically selected for the setting. • When ...
Operating Guide
Page 83
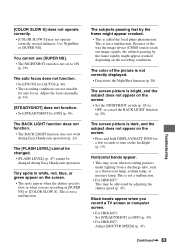
Adjust the focus manually (p. 46). [STEADYSHOT] does not function. • Set [STEADYSHOT] to OFF, or ... This is not set to [OFF] (p. 49). • For HDR-HC7: Adjust [SHUTTR SPEED] (p. 45). The screen picture is slow or when you record a TV screen or computer screen. • For HDR-HC5: Set [STEADYSHOT] to ON (p. 28). You cannot use [SUPER ... focus. This is not correctly displayed. • Deactivate the NightShot function (p. 28). The subjects passing fast by adjusting the shutter speed (p. 45). The color of the way the image device (CMOS sensor) reads out image signals...
Adjust the focus manually (p. 46). [STEADYSHOT] does not function. • Set [STEADYSHOT] to OFF, or ... This is not set to [OFF] (p. 49). • For HDR-HC7: Adjust [SHUTTR SPEED] (p. 45). The screen picture is slow or when you record a TV screen or computer screen. • For HDR-HC5: Set [STEADYSHOT] to ON (p. 28). You cannot use [SUPER ... focus. This is not correctly displayed. • Deactivate the NightShot function (p. 28). The subjects passing fast by adjusting the shutter speed (p. 45). The color of the way the image device (CMOS sensor) reads out image signals...

Operating Guide
Page 86
... METER], [MANUAL] of the other than the keyboard, the mouse, and the camcorder from the (USB) jack on the functions, you cannot dub in SD (standard definition) image quality... (p. 65). When connected using an i.LINK cable, no picture appears on the monitor screen or the picture is distorted during dubbing. • Set [VCR HDV/DV] on another camcorder is not heard. • Adjust...Down convert the pictures recorded in HDV format to DV format and dub in HD (high definition) image quality (p. 65). Troubleshooting (Continued) You cannot dub correctly using the A/V ...
... METER], [MANUAL] of the other than the keyboard, the mouse, and the camcorder from the (USB) jack on the functions, you cannot dub in SD (standard definition) image quality... (p. 65). When connected using an i.LINK cable, no picture appears on the monitor screen or the picture is distorted during dubbing. • Set [VCR HDV/DV] on another camcorder is not heard. • Adjust...Down convert the pictures recorded in HDV format to DV format and dub in HD (high definition) image quality (p. 65). Troubleshooting (Continued) You cannot dub correctly using the A/V ...

Operating Guide
Page 106
... are not initialized). P HDV/DV Interface (i.LINK) (35, 66, 68, 76) Q COMPONENT OUT jack (35) R A/V (audio/video) OUT jack (35, 66) S HDR-HC7: i (Headphone) jack 106 J Access lamp (20, 93) K "Memory Stick Duo" slot (20) L EASY button (22) M LCD screen/touch panel (7, 19) ...including the setting of video devices and peripherals connected to adjust the volume, see page 29. Identifying parts and controls (Continued) 1 7 2 8 3 9 4 0 5 qa 6 qs LANC HDV/DV COMPONENT OUT A/V OUT qd qf qg qh qj qk ql A HDR-HC7: MANUAL button (27) B HDR-HC7: CAM CTRL dial (27) C NIGHTSHOT switch...
... are not initialized). P HDV/DV Interface (i.LINK) (35, 66, 68, 76) Q COMPONENT OUT jack (35) R A/V (audio/video) OUT jack (35, 66) S HDR-HC7: i (Headphone) jack 106 J Access lamp (20, 93) K "Memory Stick Duo" slot (20) L EASY button (22) M LCD screen/touch panel (7, 19) ...including the setting of video devices and peripherals connected to adjust the volume, see page 29. Identifying parts and controls (Continued) 1 7 2 8 3 9 4 0 5 qa 6 qs LANC HDV/DV COMPONENT OUT A/V OUT qd qf qg qh qj qk ql A HDR-HC7: MANUAL button (27) B HDR-HC7: CAM CTRL dial (27) C NIGHTSHOT switch...


