Operating Guide
Page 3
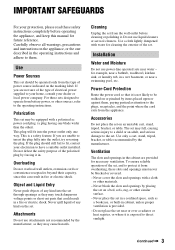
... will fit into the outlet, try reversing the plug. For those sets designed to the plugs, receptacles, and the point where the cord exits from battery power, or other ). IMPORTANT SAFEGUARDS For your dealer or local power company. If the plug should be equipped with a polarized ac power cord plug (a plug...
... will fit into the outlet, try reversing the plug. For those sets designed to the plugs, receptacles, and the point where the cord exits from battery power, or other ). IMPORTANT SAFEGUARDS For your dealer or local power company. If the plug should be equipped with a polarized ac power cord plug (a plug...

Operating Guide
Page 5
...FCC Rules. These limits are recyclable. and CANADA RECYCLING LITHIUM-ION BATTERIES Lithium-Ion batteries are designed to Part 15 of Conformity Trade Name: SONY Model No.: HDR-HC3 Responsible Party: Sony Electronics Inc. Owner's Record The model and serial numbers are cautioned ... cause harmful interference to radio communications. For more information regarding this product. Battery pack This device complies with the instructions, may cause undesired operation. For customers in the U.S.A. HDR-HC3 Serial No. For customers in the U.S.A. Operation is subject to the following...
...FCC Rules. These limits are recyclable. and CANADA RECYCLING LITHIUM-ION BATTERIES Lithium-Ion batteries are designed to Part 15 of Conformity Trade Name: SONY Model No.: HDR-HC3 Responsible Party: Sony Electronics Inc. Owner's Record The model and serial numbers are cautioned ... cause harmful interference to radio communications. For more information regarding this product. Battery pack This device complies with the instructions, may cause undesired operation. For customers in the U.S.A. HDR-HC3 Serial No. For customers in the U.S.A. Operation is subject to the following...
Operating Guide
Page 8
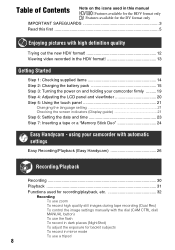
using your camcorder with automatic settings Easy Recording/Playback (Easy Handycam 26 Recording/Playback Recording 30 Playback 31 Functions used in this manual Features available for the HDV format only Features available for the DV format ... during tape recording (Dual Rec) To control the image settings manually with high definition quality Trying out the new HDV format 12 Viewing video recorded in the HDV format 13 Getting Started Step 1: Checking supplied items 14 Step 2: Charging the battery pack 15 Step 3: Turning the power on the icons used for backlit...
using your camcorder with automatic settings Easy Recording/Playback (Easy Handycam 26 Recording/Playback Recording 30 Playback 31 Functions used in this manual Features available for the HDV format only Features available for the DV format ... during tape recording (Dual Rec) To control the image settings manually with high definition quality Trying out the new HDV format 12 Viewing video recorded in the HDV format 13 Getting Started Step 1: Checking supplied items 14 Step 2: Charging the battery pack 15 Step 3: Turning the power on the icons used for backlit...

Operating Guide
Page 9
To use a Shoulder belt Playback To use PB zoom Recording/playback To check the remaining battery (Battery Info) To turn off the operation confirmation beep (BEEP) To initialize the settings (RESET) Other part names and functions Indicators displayed during recording/playback ... Settings while recording on a TV 42 High definition TV 42 16:9 (wide) or 4:3 TV 42 Connecting to a high definition TV 43 Connecting to a 16:9 (wide) or 4:3 TV 44 Using the Menu Using the menu items 48 Menu items 50 CAMERA SET menu 52 Settings to adjust your camcorder to the recording conditions (EXPOSURE/ WHITE...
To use a Shoulder belt Playback To use PB zoom Recording/playback To check the remaining battery (Battery Info) To turn off the operation confirmation beep (BEEP) To initialize the settings (RESET) Other part names and functions Indicators displayed during recording/playback ... Settings while recording on a TV 42 High definition TV 42 16:9 (wide) or 4:3 TV 42 Connecting to a high definition TV 43 Connecting to a 16:9 (wide) or 4:3 TV 44 Using the Menu Using the menu items 48 Menu items 50 CAMERA SET menu 52 Settings to adjust your camcorder to the recording conditions (EXPOSURE/ WHITE...

Operating Guide
Page 10
... Access to "Click to DVD 89 Troubleshooting Troubleshooting 92 Warning indicators and messages 107 Additional Information Using your camcorder abroad 111 Usable cassette tapes 112 About the "Memory Stick 114 About the "InfoLITHIUM" battery pack 116 About i.LINK 117 Maintenance and precautions 118 Specifications 123 Quick Reference Identifying parts and controls 127...
... Access to "Click to DVD 89 Troubleshooting Troubleshooting 92 Warning indicators and messages 107 Additional Information Using your camcorder abroad 111 Usable cassette tapes 112 About the "Memory Stick 114 About the "InfoLITHIUM" battery pack 116 About i.LINK 117 Maintenance and precautions 118 Specifications 123 Quick Reference Identifying parts and controls 127...
Operating Guide
Page 14
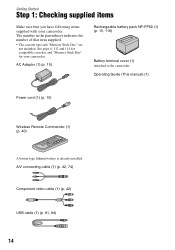
... (1) (p. 15) Wireless Remote Commander (1) (p. 40) A button-type lithium battery is already installed. AC Adaptor (1) (p. 15) Rechargeable battery pack NP-FP60 (1) (p. 15, 116) Battery terminal cover (1) Attached to the camcorder. The number in the parentheses indicates the number of that you have following items supplied with your camcorder. A/V connecting cable (1) (p. 42, 74) Component video cable (1) (p. 42...
... (1) (p. 15) Wireless Remote Commander (1) (p. 40) A button-type lithium battery is already installed. AC Adaptor (1) (p. 15) Rechargeable battery pack NP-FP60 (1) (p. 15, 116) Battery terminal cover (1) Attached to the camcorder. The number in the parentheses indicates the number of that you have following items supplied with your camcorder. A/V connecting cable (1) (p. 42, 74) Component video cable (1) (p. 42...

Operating Guide
Page 15
... it clicks. Getting Started Step 2: Charging the battery pack You can operate your camcorder connected to your camcorder. 1 Slide the BATT (battery release) lever and remove the battery terminal cover. If you attach it forcibly to your camcorder. • You cannot use the battery pack NP-FP30 with your camcorder (confirm the battery model on the back of your...
... it clicks. Getting Started Step 2: Charging the battery pack You can operate your camcorder connected to your camcorder. 1 Slide the BATT (battery release) lever and remove the battery terminal cover. If you attach it forcibly to your camcorder. • You cannot use the battery pack NP-FP30 with your camcorder (confirm the battery model on the back of your...

Operating Guide
Page 16
...power cord to OFF (CHG) (The default setting). The CHG (charge) lamp turns off when the battery is facing to the DC IN jack of your camcorder. Slide the BATT (battery release) lever and remove the battery pack. CHG (charge) lamp 3 Connect the AC Adaptor to the v mark on the DC plug... from the DC IN jack holding both the camcorder and the DC plug. The CHG (charge) lamp lights up and charging starts. Be sure that the v mark on your camcorder. To remove the battery pack Slide the POWER switch to protect the battery terminal. BATT (battery release) lever Open the jack cover.
...power cord to OFF (CHG) (The default setting). The CHG (charge) lamp turns off when the battery is facing to the DC IN jack of your camcorder. Slide the BATT (battery release) lever and remove the battery pack. CHG (charge) lamp 3 Connect the AC Adaptor to the v mark on the DC plug... from the DC IN jack holding both the camcorder and the DC plug. The CHG (charge) lamp lights up and charging starts. Be sure that the v mark on your camcorder. To remove the battery pack Slide the POWER switch to protect the battery terminal. BATT (battery release) lever Open the jack cover.

Operating Guide
Page 17
... conditions: Top: When the LCD backlight turns on /off . Playing time Approximate time (min.) available when you fully charge a fully discharged battery pack. Battery pack Charging time NP-FP50 125 NP-FP60 (supplied) 135 NP-FP70 155 NP-FP71 170 NP-FP90 220 Recording time Approximate time (min.)... available when you repeat recording start/stop, turning the power on . HDV format pictures Battery pack NP-FP50 NP-FP60 (supplied) NP-FP70 NP-FP71 NP-FP90 LCD panel opened* 75 115 160 195 290 LCD panel closed . ...
... conditions: Top: When the LCD backlight turns on /off . Playing time Approximate time (min.) available when you fully charge a fully discharged battery pack. Battery pack Charging time NP-FP50 125 NP-FP60 (supplied) 135 NP-FP70 155 NP-FP71 170 NP-FP90 220 Recording time Approximate time (min.)... available when you repeat recording start/stop, turning the power on . HDV format pictures Battery pack NP-FP50 NP-FP60 (supplied) NP-FP70 NP-FP71 NP-FP90 LCD panel opened* 75 115 160 195 290 LCD panel closed . ...

Operating Guide
Page 18
...* When the LCD backlight turns on the conditions under the following conditions. - The battery pack is not attached correctly. - On the AC Adaptor • Use the nearby wall outlet when using your camcorder in a narrow space, such as the AC Adaptor is connected to the DC IN...10 to 30 °C (50 °F to it is disconnected from the wall outlet immediately if any metallic objects. The battery pack is damaged. - PRECAUTION • Even if your camcorder is turned off, AC power (house current) is still supplied to 86 °F) is recommended). • The recording and...
...* When the LCD backlight turns on the conditions under the following conditions. - The battery pack is not attached correctly. - On the AC Adaptor • Use the nearby wall outlet when using your camcorder in a narrow space, such as the AC Adaptor is connected to the DC IN...10 to 30 °C (50 °F to it is disconnected from the wall outlet immediately if any metallic objects. The battery pack is damaged. - PRECAUTION • Even if your camcorder is turned off, AC power (house current) is still supplied to 86 °F) is recommended). • The recording and...

Operating Guide
Page 19
...play back, slide the POWER switch repeatedly to turn on a tape. To turn off automatically if you turn on the power of your camcorder, the current date and time will be displayed on the respective lamp. If the POWER switch is adjustable. CAMERA-MEMORY: To record on ...the [CLOCK SET] screen appears (p. 23). 2 Hold the camcorder correctly. When using it for approximately 5 minutes, to OFF (CHG), slide it while pressing the green button. The lens cover opens automatically when the POWER switch is set to save battery power ([A.SHUT OFF], p. 70). • If warning messages ...
...play back, slide the POWER switch repeatedly to turn on a tape. To turn off automatically if you turn on the power of your camcorder, the current date and time will be displayed on the respective lamp. If the POWER switch is adjustable. CAMERA-MEMORY: To record on ...the [CLOCK SET] screen appears (p. 23). 2 Hold the camcorder correctly. When using it for approximately 5 minutes, to OFF (CHG), slide it while pressing the green button. The lens cover opens automatically when the POWER switch is set to save battery power ([A.SHUT OFF], p. 70). • If warning messages ...

Operating Guide
Page 20
To turn off the LCD backlight to avoid wearing down the battery, or when the picture seen on the LCD screen is poor. Viewfinder lens adjustment lever Move it to the best angle to record or play (2). 190 degrees to the camcorder 2180 degrees (max.) To turn on the LCD backlight, press ... screen. The recorded picture will not be affected by selecting [LCD/VF SET] - [VF B.LIGHT] (p. 67). 20 This is practical when you use your camcorder in 1, and then close the LCD panel with the LCD screen facing out. The viewfinder You can close the LCD panel facing inward. Viewfinder 290...
To turn off the LCD backlight to avoid wearing down the battery, or when the picture seen on the LCD screen is poor. Viewfinder lens adjustment lever Move it to the best angle to record or play (2). 190 degrees to the camcorder 2180 degrees (max.) To turn on the LCD backlight, press ... screen. The recorded picture will not be affected by selecting [LCD/VF SET] - [VF B.LIGHT] (p. 67). 20 This is practical when you use your camcorder in 1, and then close the LCD panel with the LCD screen facing out. The viewfinder You can close the LCD panel facing inward. Viewfinder 290...

Operating Guide
Page 23
...can be displayed during playback (see page 68 for [DATA CODE] (during recording, but they are automatically recorded on your camcorder for about 3 months, the built-in rechargeable battery gets discharged and the date and time settings may be cleared from the memory. The clock starts. POWER switch Skip to ...12:00 PM. • The date and time does not appear during Easy Handycam operation, you do not set the date ...
...can be displayed during playback (see page 68 for [DATA CODE] (during recording, but they are automatically recorded on your camcorder for about 3 months, the built-in rechargeable battery gets discharged and the date and time settings may be cleared from the memory. The clock starts. POWER switch Skip to ...12:00 PM. • The date and time does not appear during Easy Handycam operation, you do not set the date ...

Operating Guide
Page 25
... once. • When the access lamp is reading/writing data. Do not shake or knock your camcorder is lit or flashing, your camcorder, turn the power off, eject the "Memory Stick Duo," or remove the battery pack. Otherwise, image data may be careful that the "Memory Stick Duo" does not pop out and...
... once. • When the access lamp is reading/writing data. Do not shake or knock your camcorder is lit or flashing, your camcorder, turn the power off, eject the "Memory Stick Duo," or remove the battery pack. Otherwise, image data may be careful that the "Memory Stick Duo" does not pop out and...
Operating Guide
Page 33
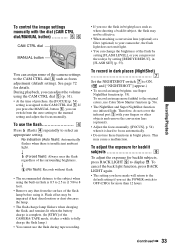
... impaired if heat discoloration or dust obscures the lamp. • The flash charge lamp flickers when charging the flash, and remains lit when the battery charge is complete. (In [STBY] of the CAMERA-TAPE mode, it takes a while to fully charge the flash lamp.) • You ...function (p. 56). • The NightShot and Super NightShot function use Super NightShot function (p. 55). Recording/Playback To control the image settings manually with your camcorder, the flash light does not emit light. • You can change the brightness of the flash by setting [REDEYE REDUC], in [FLASH SET] (p....
... impaired if heat discoloration or dust obscures the lamp. • The flash charge lamp flickers when charging the flash, and remains lit when the battery charge is complete. (In [STBY] of the CAMERA-TAPE mode, it takes a while to fully charge the flash lamp.) • You ...function (p. 56). • The NightShot and Super NightShot function use Super NightShot function (p. 55). Recording/Playback To control the image settings manually with your camcorder, the flash light does not emit light. • You can change the brightness of the flash by setting [REDEYE REDUC], in [FLASH SET] (p....

Operating Guide
Page 34
...appear for about 1.5 to display in still images) the original size. Recording/playback To check the remaining battery (Battery Info qs Set the POWER switch to 20 seconds by You can view the battery information for recording/playback, etc. (Continued) qh qs 0 qg qf qd 2 w; Functions used for...mode .......... Magnification can magnify images from about 1.1 to 5 times (from about 7 seconds. qh Open the LCD panel qh 90 degrees to the camcorder (1), then rotate it 180 degrees to its designated hook qd. To use a tripod wa Attach the tripod (optional: the length of the subject...
...appear for about 1.5 to display in still images) the original size. Recording/playback To check the remaining battery (Battery Info qs Set the POWER switch to 20 seconds by You can view the battery information for recording/playback, etc. (Continued) qh qs 0 qg qf qd 2 w; Functions used for...mode .......... Magnification can magnify images from about 1.1 to 5 times (from about 7 seconds. qh Open the LCD panel qh 90 degrees to the camcorder (1), then rotate it 180 degrees to its designated hook qd. To use a tripod wa Attach the tripod (optional: the length of the subject...

Operating Guide
Page 35
... (RESET w; Recording/Playback pressing DISP/BATT INFO again while the information is low. The REC lamp flashes if the remaining tape or battery power is displayed. Press RESET w; Remaining battery (approx.) 81 90 Recording capacity (approx.) To turn off the operation confirmation beep (BEEP qg See [BEEP] on Personal Menu are not...
... (RESET w; Recording/Playback pressing DISP/BATT INFO again while the information is low. The REC lamp flashes if the remaining tape or battery power is displayed. Press RESET w; Remaining battery (approx.) 81 90 Recording capacity (approx.) To turn off the operation confirmation beep (BEEP qg See [BEEP] on Personal Menu are not...

Operating Guide
Page 36
B Remaining battery (approx.) C Recording status ([STBY] (standby) or [REC] (recording)) D During recording: Tape counter (hour: minute: second) During playback: Time code (hour: minute: second: frame) E Recording capacity ...
B Remaining battery (approx.) C Recording status ([STBY] (standby) or [REC] (recording)) D During recording: Tape counter (hour: minute: second) During playback: Time code (hour: minute: second: frame) E Recording capacity ...

Operating Guide
Page 40
..., 34) I DISPLAY (p. 21) J Memory control buttons (Index*, -/+, Memory playback) (p. 31) * These buttons are not available during Easy Handycam operation. 40 • Aim the Remote Commander towards the remote sensor to the time code display, and the zero set memory) 1 During playback... tape counter. Searching quickly for a desired scene (Zero set memory display disappears. 4 Press PLAY 4. The tape counter returns to operate your camcorder (p. 35). • To change the battery, see page 121. Insulation sheet 6 1 7 q; 2 8 3 4 5 9 A PHOTO (p. 30) The on . Playback starts...
..., 34) I DISPLAY (p. 21) J Memory control buttons (Index*, -/+, Memory playback) (p. 31) * These buttons are not available during Easy Handycam operation. 40 • Aim the Remote Commander towards the remote sensor to the time code display, and the zero set memory) 1 During playback... tape counter. Searching quickly for a desired scene (Zero set memory display disappears. 4 Press PLAY 4. The tape counter returns to operate your camcorder (p. 35). • To change the battery, see page 121. Insulation sheet 6 1 7 q; 2 8 3 4 5 9 A PHOTO (p. 30) The on . Playback starts...
Operating Guide
Page 53
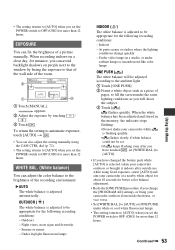
... 3 Touch [ ]. Under video lamps in the memory, the indicator stops flashing. •Do not shake your camcorder outdoors or brought it indoors after outside use while using the CAM CTRL dial (p. 72). • The setting ...BAL. (White balance) You can also adjust the setting manually using fixed exposure, select [AUTO] and aim your camcorder outdoors from inside the house, or vice versa. • Set [WHITE BAL.] to [AUTO] or [ONE PUSH...[WHITE BAL.] to [AUTO]. • If you have changed the battery pack while [AUTO] is selected, taken your camcorder while is adjusted automatically.
... 3 Touch [ ]. Under video lamps in the memory, the indicator stops flashing. •Do not shake your camcorder outdoors or brought it indoors after outside use while using the CAM CTRL dial (p. 72). • The setting ...BAL. (White balance) You can also adjust the setting manually using fixed exposure, select [AUTO] and aim your camcorder outdoors from inside the house, or vice versa. • Set [WHITE BAL.] to [AUTO] or [ONE PUSH...[WHITE BAL.] to [AUTO]. • If you have changed the battery pack while [AUTO] is selected, taken your camcorder while is adjusted automatically.


