
Operating Instructions
Page 6
...Recording an index signal at the beginning of the most recently recorded scenes - Status check 45 Playing the picture on a TV 46 Viewing the picture on a high definition TV 46 Viewing the picture on a 16:9 TV or a 4:3 TV 48 Locating a scene on a tape for playback 49 ...recording 39 Recording in 16:9 wide rec mode 40 Reviewing the most recent recording - PEAKING 33 Customizing the picture quality or sound 34 Customizing the picture quality - PICTURE PROFILE 34 Adjusting the audio recording level - Data code 44 Displaying the video information - END SEARCH 44 Displaying the...
...Recording an index signal at the beginning of the most recently recorded scenes - Status check 45 Playing the picture on a TV 46 Viewing the picture on a high definition TV 46 Viewing the picture on a 16:9 TV or a 4:3 TV 48 Locating a scene on a tape for playback 49 ...recording 39 Recording in 16:9 wide rec mode 40 Reviewing the most recent recording - PEAKING 33 Customizing the picture quality or sound 34 Customizing the picture quality - PICTURE PROFILE 34 Adjusting the audio recording level - Data code 44 Displaying the video information - END SEARCH 44 Displaying the...
Operating Instructions
Page 24
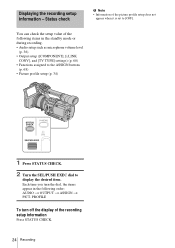
... - Status check b Note • Information of the following items in the following order: AUDIO t OUTPUT t ASSIGN t PICT. You can check the setup value of the picture profile setup does not appear when it is set to display the desired item. Each time you turn off the display of the recording setup information... as microphone volume level (p. 36) • Output setup ([COMPONENT], [i.LINK CONV], and [TV TYPE] settings) (p. 60) • Functions assigned to the ASSIGN buttons (p. 68) • Picture profile setup (p. 34) 1 Press STATUS CHECK. 2 Turn the SEL/PUSH EXEC dial to [OFF].
... - Status check b Note • Information of the following items in the following order: AUDIO t OUTPUT t ASSIGN t PICT. You can check the setup value of the picture profile setup does not appear when it is set to display the desired item. Each time you turn off the display of the recording setup information... as microphone volume level (p. 36) • Output setup ([COMPONENT], [i.LINK CONV], and [TV TYPE] settings) (p. 60) • Functions assigned to the ASSIGN buttons (p. 68) • Picture profile setup (p. 34) 1 Press STATUS CHECK. 2 Turn the SEL/PUSH EXEC dial to [OFF].
Operating Instructions
Page 25
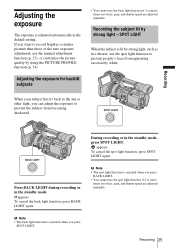
... standby mode, press SPOT LIGHT. To cancel the spot light function, press SPOT LIGHT again. appears. Recording the subject lit by using the PICTURE PROFILE function (p. 34). To cancel the back light function, press BACK LIGHT again. Recording 25 When your subject has its back to the sun... or other light, you can adjust the exposure to record brighter or darker pictures than those of the auto exposure adjustment, use the manual adjustment function (p. 27), or customize the picture quality by strong light - appears. Adjusting the exposure The exposure is canceled when you ...
... standby mode, press SPOT LIGHT. To cancel the spot light function, press SPOT LIGHT again. appears. Recording the subject lit by using the PICTURE PROFILE function (p. 34). To cancel the back light function, press BACK LIGHT again. Recording 25 When your subject has its back to the sun... or other light, you can adjust the exposure to record brighter or darker pictures than those of the auto exposure adjustment, use the manual adjustment function (p. 27), or customize the picture quality by strong light - appears. Adjusting the exposure The exposure is canceled when you ...

Operating Instructions
Page 34
.... At the default setting, [PP1] through [PP6] are registered with picture quality settings for the following recording conditions. Connect your convenience. 1 In the standby mode, press PICTURE PROFILE. 2 Select a picture profile number by adjusting the color intensity, brightness, white balance, etc. PICTURE PROFILE You can change the above default settings at your camcorder to 15 (clearer) 34 Recording
.... At the default setting, [PP1] through [PP6] are registered with picture quality settings for the following recording conditions. Connect your convenience. 1 In the standby mode, press PICTURE PROFILE. 2 Select a picture profile number by adjusting the color intensity, brightness, white balance, etc. PICTURE PROFILE You can change the above default settings at your camcorder to 15 (clearer) 34 Recording
Operating Instructions
Page 35
... adjustment (F11, F6.8, F4). [WB SHIFT] -7 (to make white parts bluish) to +7 (to make wrinkles less noticeable by film recording. [OFF]: normal recording To copy a picture profile setting to other items. 7 Select [ RETURN] by turning the SEL/PUSH EXEC dial, then press the dial. 8 Select [OK] by turning the SEL/ PUSH EXEC...
... adjustment (F11, F6.8, F4). [WB SHIFT] -7 (to make white parts bluish) to +7 (to make wrinkles less noticeable by film recording. [OFF]: normal recording To copy a picture profile setting to other items. 7 Select [ RETURN] by turning the SEL/PUSH EXEC dial, then press the dial. 8 Select [OK] by turning the SEL/ PUSH EXEC...
Operating Instructions
Page 36
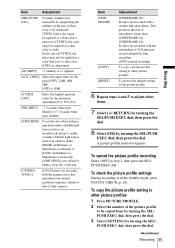
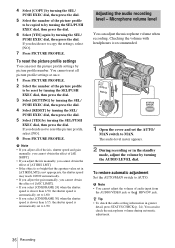
... the dial. 6 Select [YES] again by turning the SEL/ PUSH EXEC dial, then press the dial. You can reset the picture profile settings by picture profile number. If you select [CINEFRAME 30] when the shutter speed is slower than 1/30, the shutter speed is automatically set to ... • If you decide not to be copied to 1/30. If you adjust all picture profile settings at once. 1 Press PICTURE PROFILE. 2 Select the number of the picture profile to copy the settings, select [NO]. 7 Press PICTURE PROFILE. b Note • If you decide not to AUTO. Adjusting the audio recording level ...
... the dial. 6 Select [YES] again by turning the SEL/ PUSH EXEC dial, then press the dial. You can reset the picture profile settings by picture profile number. If you select [CINEFRAME 30] when the shutter speed is slower than 1/30, the shutter speed is automatically set to ... • If you decide not to be copied to 1/30. If you adjust all picture profile settings at once. 1 Press PICTURE PROFILE. 2 Select the number of the picture profile to copy the settings, select [NO]. 7 Press PICTURE PROFILE. b Note • If you decide not to AUTO. Adjusting the audio recording level ...
Operating Instructions
Page 38
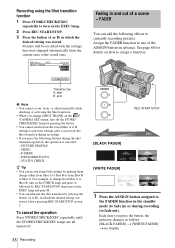
PICTURE PROFILE - FADER You can rehearse the shot transition by REC START/STOP, then turn off... Press the button (A or B) in which the desired setting was stored. Each time you press the following effects to currently recording pictures. MENU - REC START/STOP [BLACK FADER] [WHITE FADER] 1 Press the ASSIGN button assigned to the FADER function in the ... You can add the following buttons during the shot transition operation, the operation is canceled: - Pictures will be recorded with the settings that were changed automatically from Shot B to fade out). EXPANDED FOCUS -
PICTURE PROFILE - FADER You can rehearse the shot transition by REC START/STOP, then turn off... Press the button (A or B) in which the desired setting was stored. Each time you press the following effects to currently recording pictures. MENU - REC START/STOP [BLACK FADER] [WHITE FADER] 1 Press the ASSIGN button assigned to the FADER function in the ... You can add the following buttons during the shot transition operation, the operation is canceled: - Pictures will be recorded with the settings that were changed automatically from Shot B to fade out). EXPANDED FOCUS -

Operating Instructions
Page 83
...and the remote sensor. Troubleshooting Troubleshooting If you press the RESET button, all settings including the clock setting (except the Personal Menu and Picture Profile settings) are dead (p. 105). cDisconnect the AC Adaptor from the wall outlet. • The battery charge is not a malfunction.... problem Overall operations persists, remove the power source and contact your camcorder, use a linear mechanism. See page 88 for a long time. If the functions still do not work, press the RESET button using your Sony dealer. This is set to [ON] (p. 64). Cause and...
...and the remote sensor. Troubleshooting Troubleshooting If you press the RESET button, all settings including the clock setting (except the Personal Menu and Picture Profile settings) are dead (p. 105). cDisconnect the AC Adaptor from the wall outlet. • The battery charge is not a malfunction.... problem Overall operations persists, remove the power source and contact your camcorder, use a linear mechanism. See page 88 for a long time. If the functions still do not work, press the RESET button using your Sony dealer. This is set to [ON] (p. 64). Cause and...

Operating Instructions
Page 86
... is new and has nothing recorded. Cannot play back. cSet [MULTI-SOUND] to CAMERA. • The cassette was recorded in the PICTURE PROFILE look jagged. cClean the head using the cleaning cassette (p. 96). This is not a malfunction. Oblique stripes appear on the... picture. cCancel the back light function (p. 25). The displayed pictures are playing was recorded without setting the date and time. • A blank section on the tape is not possible...
... is new and has nothing recorded. Cannot play back. cSet [MULTI-SOUND] to CAMERA. • The cassette was recorded in the PICTURE PROFILE look jagged. cClean the head using the cleaning cassette (p. 96). This is not a malfunction. Oblique stripes appear on the... picture. cCancel the back light function (p. 25). The displayed pictures are playing was recorded without setting the date and time. • A blank section on the tape is not possible...

Operating Instructions
Page 102
... the default. A LCD screen (p. 3, 15) B IRIS dial (p. 28) C RESET button If you press RESET, all settings including the clock setting (except the Personal Menu and Picture Profile settings) return to identify the location of the buttons. 102 Quick Reference
... the default. A LCD screen (p. 3, 15) B IRIS dial (p. 28) C RESET button If you press RESET, all settings including the clock setting (except the Personal Menu and Picture Profile settings) return to identify the location of the buttons. 102 Quick Reference

Operating Instructions
Page 104
B Lens hood (p. 20) C OPEN/EJECT lever (p. 17) D Cassette compartment lid (p. 17) E Viewfinder lens adjustment lever (p. 15) F PICTURE PROFILE button (p. 34) G MENU button (p. 51) H P-MENU button (p. 65) I STATUS CHECK button (p. 24, 45) J SEL/PUSH EXEC dial (p. 51) To attach the shoe adaptor To remove ... down and push it to the end, and then tighten the screw. When you attach the shoe adaptor, be careful not to those on the camcorder, and turn the lens hood in the direction of the arrow in the opposite direction of the arrow.
B Lens hood (p. 20) C OPEN/EJECT lever (p. 17) D Cassette compartment lid (p. 17) E Viewfinder lens adjustment lever (p. 15) F PICTURE PROFILE button (p. 34) G MENU button (p. 51) H P-MENU button (p. 65) I STATUS CHECK button (p. 24, 45) J SEL/PUSH EXEC dial (p. 51) To attach the shoe adaptor To remove ... down and push it to the end, and then tighten the screw. When you attach the shoe adaptor, be careful not to those on the camcorder, and turn the lens hood in the direction of the arrow in the opposite direction of the arrow.
Operating Instructions
Page 106
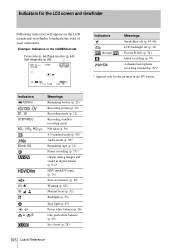
...) LCD backlight off (p. 16) Picture Profile (p. 34) Index recording (p. 39) 4-channel microphone recording standard (p. 87)* * Appears only for the LCD screen and viewfinder Following indicators will appear on the LCD screen and viewfinder to indicate the state of your camcorder. Example: Indicators in the DV ...format. 106 Quick Reference Indicators for the pictures in the CAMERA mode Time code (p. 44)/Tape counter (p. 44)/ Self-diagnosis (p. 88...
...) LCD backlight off (p. 16) Picture Profile (p. 34) Index recording (p. 39) 4-channel microphone recording standard (p. 87)* * Appears only for the LCD screen and viewfinder Following indicators will appear on the LCD screen and viewfinder to indicate the state of your camcorder. Example: Indicators in the DV ...format. 106 Quick Reference Indicators for the pictures in the CAMERA mode Time code (p. 44)/Tape counter (p. 44)/ Self-diagnosis (p. 88...
Operating Instructions
Page 108
NTSC 90 O Operation confirmation beep See BEEP P PAL 90 PEAKING 33 Personal Menu (P-MENU 65 PICTURE PROFILE ......... 34 Picture search 43 Playback Double speed 43 Frame 43 Reverse 43 Slow 43 Playing time 13 R Rec review 41 Recording capacity Display 21 REMAINING 64 Recording ...
NTSC 90 O Operation confirmation beep See BEEP P PAL 90 PEAKING 33 Personal Menu (P-MENU 65 PICTURE PROFILE ......... 34 Picture search 43 Playback Double speed 43 Frame 43 Reverse 43 Slow 43 Playing time 13 R Rec review 41 Recording capacity Display 21 REMAINING 64 Recording ...
