
Operating Instructions
Page 4
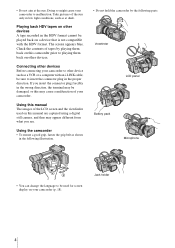
... Battery pack Microphone • You can change the language to be damaged, or this manual are captured using a digital still camera, and thus may appear different from what you insert the connector plug forcibly in the following parts. Connecting other devices Before connecting your camcorder to other devices...is not compatible with the HDV format. Take pictures of tapes by the following illustration. • Do not hold the camcorder by playing them back on this camcorder prior to playing them back on other devices. If you see. Jack holder 4 Check the contents of the sun ...
... Battery pack Microphone • You can change the language to be damaged, or this manual are captured using a digital still camera, and thus may appear different from what you insert the connector plug forcibly in the following parts. Connecting other devices Before connecting your camcorder to other devices...is not compatible with the HDV format. Take pictures of tapes by the following illustration. • Do not hold the camcorder by playing them back on this camcorder prior to playing them back on other devices. If you see. Jack holder 4 Check the contents of the sun ...
Operating Instructions
Page 6
Data code 44 Displaying the video information - Zero set memory 49 Searching for a recording start point - PICTURE PROFILE 34 Adjusting the audio recording level - Microphone volume level 36 Recording a picture using various features 37 Developing scenes smoothly - Shot transition 37 Fading in various modes 43 Various playback functions 44 Searching ...
Data code 44 Displaying the video information - Zero set memory 49 Searching for a recording start point - PICTURE PROFILE 34 Adjusting the audio recording level - Microphone volume level 36 Recording a picture using various features 37 Developing scenes smoothly - Shot transition 37 Fading in various modes 43 Various playback functions 44 Searching ...
Operating Instructions
Page 21
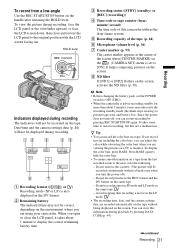
...Recording mode (SP or LP) is set the POWER switch to restart recording, but this not a malfunction. E Recording capacity of the tape (p. 64) F Microphone volume level (p. 36) G Center marker (p. 55) The center marker appears at the center of this information during recording, face the LCD panel or the viewfinder... upward, or face the LCD screen down, then close the LCD panel, it takes about 5 minutes, your camcorder. It helps composing pictures on the screen, activate the ND filter (p. 30). It takes some time to OFF (CHG). • When the...
...Recording mode (SP or LP) is set the POWER switch to restart recording, but this not a malfunction. E Recording capacity of the tape (p. 64) F Microphone volume level (p. 36) G Center marker (p. 55) The center marker appears at the center of this information during recording, face the LCD panel or the viewfinder... upward, or face the LCD screen down, then close the LCD panel, it takes about 5 minutes, your camcorder. It helps composing pictures on the screen, activate the ND filter (p. 30). It takes some time to OFF (CHG). • When the...
Operating Instructions
Page 24
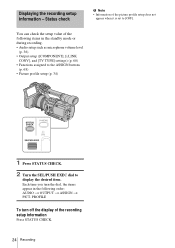
PROFILE To turn the dial, the items appear in the following items in the standby mode or during recording. • Audio setup such as microphone volume level (p. 36) • Output setup ([COMPONENT], [i.LINK CONV], and [TV TYPE] settings) (p. 60) • Functions assigned to the ASSIGN buttons (p. 68) • Picture profile ...
PROFILE To turn the dial, the items appear in the following items in the standby mode or during recording. • Audio setup such as microphone volume level (p. 36) • Output setup ([COMPONENT], [i.LINK CONV], and [TV TYPE] settings) (p. 60) • Functions assigned to the ASSIGN buttons (p. 68) • Picture profile ...
Operating Instructions
Page 36
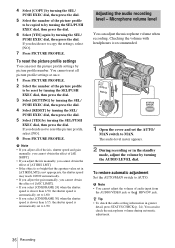
... press STATUS CHECK (p. 24). If you decide not to reset the picture profile, select [NO]. 6 Press PICTURE PROFILE. Microphone volume level You can also check the microphone volume during automatic adjustment. 36 Recording The audio level meter appears. 2 During recording or in the standby mode, adjust the ..., then press the dial. 6 Select [YES] again by turning the SEL/ PUSH EXEC dial, then press the dial. You can adjust the microphone volume when recording. You cannot reset all of the iris, shutter speed and gain manually, you cannot obtain the effect of [AE SHIFT]. •...
... press STATUS CHECK (p. 24). If you decide not to reset the picture profile, select [NO]. 6 Press PICTURE PROFILE. Microphone volume level You can also check the microphone volume during automatic adjustment. 36 Recording The audio level meter appears. 2 During recording or in the standby mode, adjust the ..., then press the dial. 6 Select [YES] again by turning the SEL/ PUSH EXEC dial, then press the dial. You can adjust the microphone volume when recording. You cannot reset all of the iris, shutter speed and gain manually, you cannot obtain the effect of [AE SHIFT]. •...

Operating Instructions
Page 57
Select to input an audio signal when an audio device is without reducing the noise caused by wind. Using the Menu Using the Menu 57 Select when you want to record the sound as it is connected to the MIC/LINE jack. Select to input an audio signal when a microphone is connected to the MIC/LINE jack. WIND GON OFF MIC/LINE IN GEXT MIC LINE Standard setting.
Select to input an audio signal when an audio device is without reducing the noise caused by wind. Using the Menu Using the Menu 57 Select when you want to record the sound as it is connected to the MIC/LINE jack. Select to input an audio signal when a microphone is connected to the MIC/LINE jack. WIND GON OFF MIC/LINE IN GEXT MIC LINE Standard setting.
Operating Instructions
Page 78
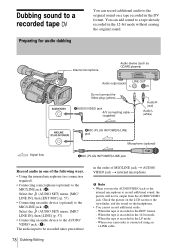
...microphone Audio device (such as CD/MD players) Audio output jacks Do not connect the Video plug (yellow). Check the picture on the LCD screen or the viewfinder, and the sound on a tape recorded in the DV format. When the tape is connected using an i.LINK cable. When your camcorder...• You cannot record additional audio: - When the tape is recorded in the order of the following ways. • Using the internal microphone (no connection required). • Connecting a microphone (optional) to the MIC/LINE jack. (A) Select the (AUDIO SET) menu, [MIC/ LINE IN], then [EXT MIC] (p. 57)....
...microphone Audio device (such as CD/MD players) Audio output jacks Do not connect the Video plug (yellow). Check the picture on the LCD screen or the viewfinder, and the sound on a tape recorded in the DV format. When the tape is connected using an i.LINK cable. When your camcorder...• You cannot record additional audio: - When the tape is recorded in the order of the following ways. • Using the internal microphone (no connection required). • Connecting a microphone (optional) to the MIC/LINE jack. (A) Select the (AUDIO SET) menu, [MIC/ LINE IN], then [EXT MIC] (p. 57)....
Operating Instructions
Page 79
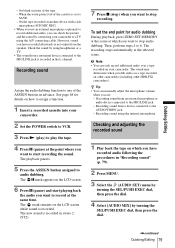
... sound from the speaker. The new sound is not output from an external microphone or audio device connected to 6. b Note • You can manually adjust the microphone volume when you dub audio on a tape recorded on other camcorders (including other HDR-FX1 camcorders). See page 68 for audio dubbing During playback, press ZERO SET MEMORY at...
... sound from the speaker. The new sound is not output from an external microphone or audio device connected to 6. b Note • You can manually adjust the microphone volume when you dub audio on a tape recorded on other camcorders (including other HDR-FX1 camcorders). See page 68 for audio dubbing During playback, press ZERO SET MEMORY at...

Operating Instructions
Page 87
... Actions cSet [COMPONENT] on the (IN/OUT REC) menu according to the requirements of your camcorder. cBefore recording, set [TV TYPE] on the LCD screen. This camcorder does not comply with the component video cable. New sound added to the expanded size. Cause and...when you press EXPANDED FOCUS during dubbing. cIn the (AUDIO SET) menu, adjust [AUDIO MIX] from connected devices are using a 4-channel microphone. The picture appears distorted on the monitor screen during recording in a TV color system other recording devices using the component video cable, make sure...
... Actions cSet [COMPONENT] on the (IN/OUT REC) menu according to the requirements of your camcorder. cBefore recording, set [TV TYPE] on the LCD screen. This camcorder does not comply with the component video cable. New sound added to the expanded size. Cause and...when you press EXPANDED FOCUS during dubbing. cIn the (AUDIO SET) menu, adjust [AUDIO MIX] from connected devices are using a 4-channel microphone. The picture appears distorted on the monitor screen during recording in a TV color system other recording devices using the component video cable, make sure...
Operating Instructions
Page 103
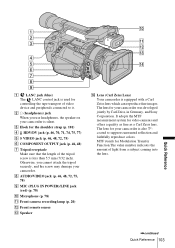
... IN POWER)/LINE jack (red) (p. 78) J Microphone (p. 78) K Front camera recording lamp (p. 20) L Front remote sensor M Speaker N Lens (Carl Zeiss Lens) Your camcorder is also T*coated to it. B i (headphones)... screw may damage your camcorder is equipped with a Carl Zeiss lens which can reproduce fine images. The lens for your camcorder. It adopts the MTF...Tripod receptacle Make sure that the length of the tripod screw is used for your camcorder is silent. The lens for controlling the tape transport of light from a subject...camcorder was developed jointly by Carl Zeiss, in Germany, and...
... IN POWER)/LINE jack (red) (p. 78) J Microphone (p. 78) K Front camera recording lamp (p. 20) L Front remote sensor M Speaker N Lens (Carl Zeiss Lens) Your camcorder is also T*coated to it. B i (headphones)... screw may damage your camcorder is equipped with a Carl Zeiss lens which can reproduce fine images. The lens for your camcorder. It adopts the MTF...Tripod receptacle Make sure that the length of the tripod screw is used for your camcorder is silent. The lens for controlling the tape transport of light from a subject...camcorder was developed jointly by Carl Zeiss, in Germany, and...
Operating Instructions
Page 106
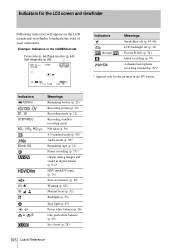
...-push white balance (p. 26) Iris closed (p. 28) Indicators through Meanings SteadyShot off (p. 54, 68) LCD backlight off (p. 16) Picture Profile (p. 34) Index recording (p. 39) 4-channel microphone recording standard (p. 87)* * Appears only for the LCD screen and viewfinder Following indicators will appear on the LCD screen and viewfinder to indicate the state...
...-push white balance (p. 26) Iris closed (p. 28) Indicators through Meanings SteadyShot off (p. 54, 68) LCD backlight off (p. 16) Picture Profile (p. 34) Index recording (p. 39) 4-channel microphone recording standard (p. 87)* * Appears only for the LCD screen and viewfinder Following indicators will appear on the LCD screen and viewfinder to indicate the state...
Operating Instructions
Page 107
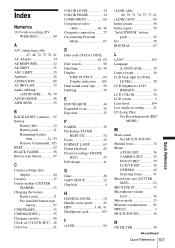
... SET........... 52 IN/OUT REC 59 LCD/VF SET 58 OTHERS 62 Selecting items 51 Menu letter size (LETTER SIZE 63 MIC/LINE IN 57 Microphone volume level 36 Mirror mode 23 Moisture condensation ...... 95 MPEG2 3 MULTI-SOUND 56 N ND FILTER 30 ,continued Quick Reference 107 Quick Reference
... SET........... 52 IN/OUT REC 59 LCD/VF SET 58 OTHERS 62 Selecting items 51 Menu letter size (LETTER SIZE 63 MIC/LINE IN 57 Microphone volume level 36 Mirror mode 23 Moisture condensation ...... 95 MPEG2 3 MULTI-SOUND 56 N ND FILTER 30 ,continued Quick Reference 107 Quick Reference


