Operating Guide (Large File - 11.29 MB)
Page 16
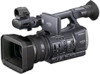
... lens cover Turn the lens hood in the illustration while pressing the PUSH (lens hood release) button. To open or close the lens cover. 16 z Tips • If you attach or remove a 72mm (2 7/8 in the direction of the lens hood with lens cover Move the lens cover lever to OPEN to... locked. Step 2: Attaching the lens hood with lens cover PUSH (lens hood release) button Align the marks on the lens hood to those on the camcorder, and turn the lens hood in .) PL filter or MC protector, remove the lens hood with lens cover.
... lens cover Turn the lens hood in the illustration while pressing the PUSH (lens hood release) button. To open or close the lens cover. 16 z Tips • If you attach or remove a 72mm (2 7/8 in the direction of the lens hood with lens cover Move the lens cover lever to OPEN to... locked. Step 2: Attaching the lens hood with lens cover PUSH (lens hood release) button Align the marks on the lens hood to those on the camcorder, and turn the lens hood in .) PL filter or MC protector, remove the lens hood with lens cover.
Operating Guide (Large File - 11.29 MB)
Page 18
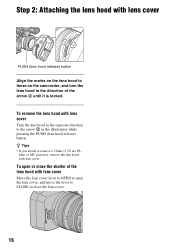
...the AC Adaptor from the DC IN jack. To remove the battery pack Slide the POWER switch to OFF (CHG). • The CHG lamp flashes during charging, or the Battery Info (p. 50) will not be correctly displayed under the following conditions. - On the battery pack • Before ... 50). 18 BATT RELEASE (battery release) button To store the battery pack If the battery pack is damaged. - z Tips • You can check the remaining battery life with your camcorder. Step 3: Charging the battery pack (Continued) 5 Set the POWER switch to OFF (CHG). Charging time Approximate time (min...
...the AC Adaptor from the DC IN jack. To remove the battery pack Slide the POWER switch to OFF (CHG). • The CHG lamp flashes during charging, or the Battery Info (p. 50) will not be correctly displayed under the following conditions. - On the battery pack • Before ... 50). 18 BATT RELEASE (battery release) button To store the battery pack If the battery pack is damaged. - z Tips • You can check the remaining battery life with your camcorder. Step 3: Charging the battery pack (Continued) 5 Set the POWER switch to OFF (CHG). Charging time Approximate time (min...
Operating Guide (Large File - 11.29 MB)
Page 20
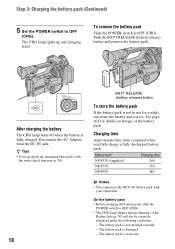
... the LCD backlight, press and hold the DISPLAY button for a few seconds until disappears. Step 4: Turning the power on and holding your camcorder in bright conditions or when you can adjust the brightness of the LCD screen from [LCD BRIGHT] (p. 78). b Notes • If...for a few seconds until appears. This setting is practical when you use your camcorder properly (Continued) 2 Hold the camcorder properly. 3 Ensure a good grip, then fasten the grip belt. Also, you want to OFF (CHG). z Tips • You can turn off the power Slide the POWER switch to save...
... the LCD backlight, press and hold the DISPLAY button for a few seconds until disappears. Step 4: Turning the power on and holding your camcorder in bright conditions or when you can adjust the brightness of the LCD screen from [LCD BRIGHT] (p. 78). b Notes • If...for a few seconds until appears. This setting is practical when you use your camcorder properly (Continued) 2 Hold the camcorder properly. 3 Ensure a good grip, then fasten the grip belt. Also, you want to OFF (CHG). z Tips • You can turn off the power Slide the POWER switch to save...
Operating Guide (Large File - 11.29 MB)
Page 21
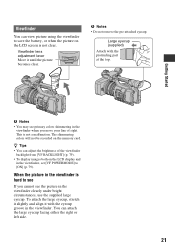
... the viewfinder is not a malfunction. Large eyecup (supplied) Attach with the eyecup groove in the viewfinder clearly under bright circumstances, use the supplied large eyecup. z Tips • You can adjust the brightness of sight. This is hard to see If you cannot see primary colors shimmering in the viewfinder when you...
... the viewfinder is not a malfunction. Large eyecup (supplied) Attach with the eyecup groove in the viewfinder clearly under bright circumstances, use the supplied large eyecup. z Tips • You can adjust the brightness of sight. This is hard to see If you cannot see primary colors shimmering in the viewfinder when you...
Operating Guide (Large File - 11.29 MB)
Page 22
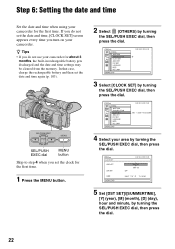
...4 when you set the date and time, [CLOCK SET] screen appears every time you do not use your camcorder. Step 6: Setting the date and time Set the date and time when using your camcorder for about 3 months, the built-in rechargeable battery gets discharged and the date and time settings may be... cleared from the memory. z Tips • If you turn on your camcorder for the first time. If you do not set the clock for the first time. 1 Press the MENU button. 4 Select your area by...
...4 when you set the date and time, [CLOCK SET] screen appears every time you do not use your camcorder. Step 6: Setting the date and time Set the date and time when using your camcorder for about 3 months, the built-in rechargeable battery gets discharged and the date and time settings may be... cleared from the memory. z Tips • If you turn on your camcorder for the first time. If you do not set the clock for the first time. 1 Press the MENU button. 4 Select your area by...

Operating Guide (Large File - 11.29 MB)
Page 23
... the slot in the wrong direction, the memory card, the memory card slot, or image data may be displayed during playback (DATA CODE button, p. 49). z Tips • The date and time are automatically recorded on -screen displays to 12:00 AM. b Notes • If you insert a memory card into the memory...
... the slot in the wrong direction, the memory card, the memory card slot, or image data may be displayed during playback (DATA CODE button, p. 49). z Tips • The date and time are automatically recorded on -screen displays to 12:00 AM. b Notes • If you insert a memory card into the memory...
Operating Guide (Large File - 11.29 MB)
Page 24
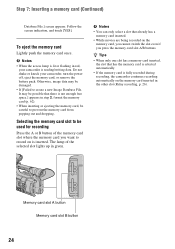
...the memory card Lightly push the memory card once. b Notes • When the access lamp is lit or flashing in the other slot (Relay recording, p. 26). Do not shake or knock your camcorder is inserted. b Notes • You can only select a slot that already has a memory card inserted. ...the memory card from popping out and dropping. z Tips • When only one slot has a memory card inserted, the slot that there is fully recorded during recording, the camcorder continues recording automatically on the memory card inserted in red, your camcorder, turn the power off, eject the memory card...
...the memory card Lightly push the memory card once. b Notes • When the access lamp is lit or flashing in the other slot (Relay recording, p. 26). Do not shake or knock your camcorder is inserted. b Notes • You can only select a slot that already has a memory card inserted. ...the memory card from popping out and dropping. z Tips • When only one slot has a memory card inserted, the slot that there is fully recorded during recording, the camcorder continues recording automatically on the memory card inserted in red, your camcorder, turn the power off, eject the memory card...

Operating Guide (Large File - 11.29 MB)
Page 26
...] t [REC] The recording lamp lights up during the low angle recording. • You can be helpful if you recorded (p. 59). z Tips • When recording in both slots A and B, so the camcorder switches memory card A (or B) just before space on the next memory card automatically. 26 Recording (Continued) 2 Slide the POWER switch to...
...] t [REC] The recording lamp lights up during the low angle recording. • You can be helpful if you recorded (p. 59). z Tips • When recording in both slots A and B, so the camcorder switches memory card A (or B) just before space on the next memory card automatically. 26 Recording (Continued) 2 Slide the POWER switch to...
Operating Guide (Large File - 11.29 MB)
Page 29
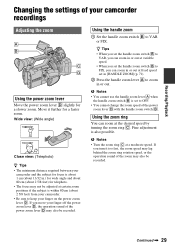
... at variable speed. • When you can zoom in .) for wide angle and about 80 cm (about 2 5/8 feet) from your camcorder. • Be sure to VAR or FIX. z Tips • When you set the handle zoom switch B to VAR, you set to FIX, you turn it further for a slower zoom.... You cannot change the zoom speed of the zoom may not be recorded. Wide view: (Wide angle) Close view: (Telephoto) z Tips • The minimum distance required between your camcorder and the subject for telephoto. • The focus may also be adjusted at the desired speed by turning the zoom ring C. Using...
... at variable speed. • When you can zoom in .) for wide angle and about 80 cm (about 2 5/8 feet) from your camcorder. • Be sure to VAR or FIX. z Tips • When you set the handle zoom switch B to VAR, you set to FIX, you turn it further for a slower zoom.... You cannot change the zoom speed of the zoom may not be recorded. Wide view: (Wide angle) Close view: (Telephoto) z Tips • The minimum distance required between your camcorder and the subject for telephoto. • The focus may also be adjusted at the desired speed by turning the zoom ring C. Using...
Operating Guide (Large File - 11.29 MB)
Page 30
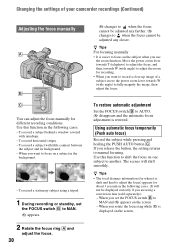
... subject while pressing and holding the PUSH AUTO button C. z Tips • The focal distance information (for when it is displayed on the subject when you want to record a close-up image of your camcorder recordings (Continued) Adjusting the focus manually 9 changes to when ...to focus on the screen. To record a subject with raindrops. - To record a stationary subject using a conversion lens (sold separately)). - z Tips For focusing manually • It is restored. You can adjust the focus manually for about 3 seconds in the following cases. (It will shift ...
... subject while pressing and holding the PUSH AUTO button C. z Tips • The focal distance information (for when it is displayed on the subject when you want to record a close-up image of your camcorder recordings (Continued) Adjusting the focus manually 9 changes to when ...to focus on the screen. To record a subject with raindrops. - To record a stationary subject using a conversion lens (sold separately)). - z Tips For focusing manually • It is restored. You can adjust the focus manually for about 3 seconds in the following cases. (It will shift ...
Operating Guide (Large File - 11.29 MB)
Page 31
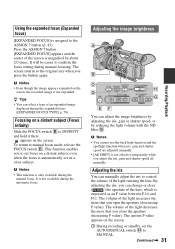
... to INFINITY and hold it there. appears on a distant subject (Focus infinity) Slide the FOCUS switch B to confirm the focus setting during the manual focus. z Tips • You can change or close the aperture (increasing F value). To return to MANUAL. Adjusting the iris You can adjust the image brightness by adjusting...
... to INFINITY and hold it there. appears on a distant subject (Focus infinity) Slide the FOCUS switch B to confirm the focus setting during the manual focus. z Tips • You can change or close the aperture (increasing F value). To return to MANUAL. Adjusting the iris You can adjust the image brightness by adjusting...
Operating Guide (Large File - 11.29 MB)
Page 32
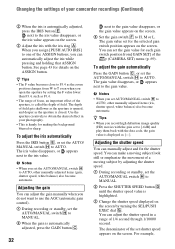
... range of a moving subject look still or emphasize the movement of 1/4 second through 1/10000 second. You can adjust the shutter speed in your camcorder recordings (Continued) 2 When the iris is highlighted. 3 Change the shutter speed displayed on the screen by turning the SEL/PUSH EXEC dial G....ring A. b Notes • When you assign [PUSH AUTO IRIS] to the iris value disappears, or the iris value appears on the screen. z Tips • When you open the aperture by adjusting the shutter speed. 1 During recording or standby, set the AUTO/MANUAL switch H to MANUAL. 2 ...
... range of a moving subject look still or emphasize the movement of 1/4 second through 1/10000 second. You can adjust the shutter speed in your camcorder recordings (Continued) 2 When the iris is highlighted. 3 Change the shutter speed displayed on the screen by turning the SEL/PUSH EXEC dial G....ring A. b Notes • When you assign [PUSH AUTO IRIS] to the iris value disappears, or the iris value appears on the screen. z Tips • When you open the aperture by adjusting the shutter speed. 1 During recording or standby, set the AUTO/MANUAL switch H to MANUAL. 2 ...
Operating Guide (Large File - 11.29 MB)
Page 33
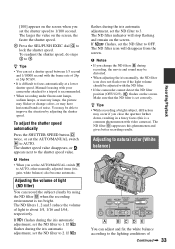
... to lock the shutter speed. If flashes, set the ND filter to 1/100 second. b Notes • If you set the AUTO/MANUAL switch H to 2. z Tips • While recording a bright subject, diffraction may occur if you set the shutter speed to 3. z Tips • You can set the ND...filters B during the iris automatic adjustment, set a shutter speed between 1/3 second and 1/10000 second with your camcorder attached to a tripod is too bright. The ND filter icon will stop flashing and remain on the screen. The larger the value on the screen, the faster the shutter speed. 4...
... to lock the shutter speed. If flashes, set the ND filter to 1/100 second. b Notes • If you set the AUTO/MANUAL switch H to 2. z Tips • While recording a bright subject, diffraction may occur if you set the shutter speed to 3. z Tips • You can set the ND...filters B during the iris automatic adjustment, set a shutter speed between 1/3 second and 1/10000 second with your camcorder attached to a tripod is too bright. The ND filter icon will stop flashing and remain on the screen. The larger the value on the screen, the faster the shutter speed. 4...

Operating Guide (Large File - 11.29 MB)
Page 40
... that supports the +48V power source to the INPUT1 or INPUT2 jack, set the INPUT1/INPUT2 switches to MIC prior to connecting the device. z Tips • See page 39 on the screen. 2 Turn the AUDIO LEVEL dial F to adjust the volume during recording to prevent noise from an...microphone or a microphone connected to the INPUT1/INPUT2 jacks. MIC+48V:For inputting sound from a device that microphone. Changing the settings of your camcorder recordings (Continued) When the CH1 switch is set to INT MIC CH2 switch position Input channel and source INT MIC Internal microphone CH1 (L) ...
... that supports the +48V power source to the INPUT1 or INPUT2 jack, set the INPUT1/INPUT2 switches to MIC prior to connecting the device. z Tips • See page 39 on the screen. 2 Turn the AUDIO LEVEL dial F to adjust the volume during recording to prevent noise from an...microphone or a microphone connected to the INPUT1/INPUT2 jacks. MIC+48V:For inputting sound from a device that microphone. Changing the settings of your camcorder recordings (Continued) When the CH1 switch is set to INT MIC CH2 switch position Input channel and source INT MIC Internal microphone CH1 (L) ...
Operating Guide (Large File - 11.29 MB)
Page 41
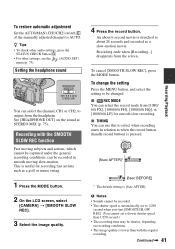
... a golf or tennis swing. 1 Press the MODE button. 2 On the LCD screen, select [CAMERA] t [SMOOTH SLOW REC]. 3 Select the image quality. 4 Press the record button. z Tips • To check other audio settings, press the STATUS CHECK button G. • For other settings, see the (AUDIO SET) menu (p. 75).
... a golf or tennis swing. 1 Press the MODE button. 2 On the LCD screen, select [CAMERA] t [SMOOTH SLOW REC]. 3 Select the image quality. 4 Press the record button. z Tips • To check other audio settings, press the STATUS CHECK button G. • For other settings, see the (AUDIO SET) menu (p. 75).
Operating Guide (Large File - 11.29 MB)
Page 47
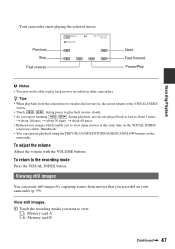
... playing the selected movie. To return to play back movies recorded on your camcorder (p. 59). View still images. 1 Touch the recording media you to view many movies at the same time on the VISUAL INDEX screen are played back as fast as about 5 times t about ... selected movie reaches the last movie, the screen returns to view. : Memory card A : Memory card B Continued , 47 z Tips • When playback from movies that you recorded on other camcorders. To adjust the volume Adjust the volume with the VOLUME buttons. Recording/Playback Previous Stop Fast reverse Next Fast forward...
... playing the selected movie. To return to play back movies recorded on your camcorder (p. 59). View still images. 1 Touch the recording media you to view many movies at the same time on the VISUAL INDEX screen are played back as fast as about 5 times t about ... selected movie reaches the last movie, the screen returns to view. : Memory card A : Memory card B Continued , 47 z Tips • When playback from movies that you recorded on other camcorders. To adjust the volume Adjust the volume with the VOLUME buttons. Recording/Playback Previous Stop Fast reverse Next Fast forward...
Operating Guide (Large File - 11.29 MB)
Page 49
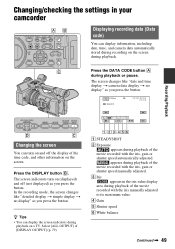
...button. Select [ALL OUTPUT] of [DISPLAY OUTPUT] (p. 79). A STEADYSHOT B Exposure appears during playback or pause. C Iris appears in your camcorder Displaying recording data (Data code) You can display information, including date, time, and camera data automatically stored during recording on (displayed) and off... the display of the time code, and other information on a TV. Press the DISPLAY button B. z Tips • You can turn on the screen during playback. Recording/Playback Changing the screen You can display the screen indicators during playback...
...button. Select [ALL OUTPUT] of [DISPLAY OUTPUT] (p. 79). A STEADYSHOT B Exposure appears during playback or pause. C Iris appears in your camcorder Displaying recording data (Data code) You can display information, including date, time, and camera data automatically stored during recording on (displayed) and off... the display of the time code, and other information on a TV. Press the DISPLAY button B. z Tips • You can turn on the screen during playback. Recording/Playback Changing the screen You can display the screen indicators during playback...
Operating Guide (Large File - 11.29 MB)
Page 54
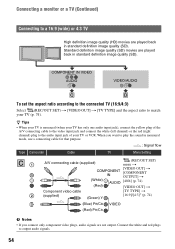
... your TV or VCR. Standard definition image quality (SD) movies are played back in monaural mode, use a connecting cable for that purpose. : Signal flow Type Camcorder Cable TV Menu Setting A/V connecting cable (supplied) (REC/OUT SET) menu t COMPONENT IN [VIDEO OUT] t [COMPONENT OUTPUT] t (White) AUDIO [480i] (p. 74)... want to play the sound in standard definition image quality (SD). Connect the white and red plugs to output audio signals. 54 z Tips • When your TV is monaural (when your TV has only one audio input jack), connect the yellow plug of the A/V connecting...
... your TV or VCR. Standard definition image quality (SD) movies are played back in monaural mode, use a connecting cable for that purpose. : Signal flow Type Camcorder Cable TV Menu Setting A/V connecting cable (supplied) (REC/OUT SET) menu t COMPONENT IN [VIDEO OUT] t [COMPONENT OUTPUT] t (White) AUDIO [480i] (p. 74)... want to play the sound in standard definition image quality (SD). Connect the white and red plugs to output audio signals. 54 z Tips • When your TV is monaural (when your TV has only one audio input jack), connect the yellow plug of the A/V connecting...
Operating Guide (Large File - 11.29 MB)
Page 55
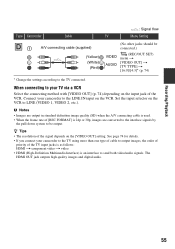
...1, VIDEO 2, etc.). The HDMI OUT jack outputs high quality images and digital audio. 55 Connect your camcorder to the LINE IN input on the VCR to the TV connected. Set the input selector on the VCR. z Tips • The resolution of [REC FORMAT] is 24p or 30p, images are output in standard... t video. • HDMI (High-Definition Multimedia Interface) is an interface to output images, the order of priority of the VCR. When connecting to your camcorder to the TV using more than one type of cable to send both video/audio signals. See page 74 for details. • If you connect...
...1, VIDEO 2, etc.). The HDMI OUT jack outputs high quality images and digital audio. 55 Connect your camcorder to the LINE IN input on the VCR to the TV connected. Set the input selector on the VCR. z Tips • The resolution of [REC FORMAT] is 24p or 30p, images are output in standard... t video. • HDMI (High-Definition Multimedia Interface) is an interface to output images, the order of priority of the VCR. When connecting to your camcorder to the TV using more than one type of cable to send both video/audio signals. See page 74 for details. • If you connect...
Operating Guide (Large File - 11.29 MB)
Page 57
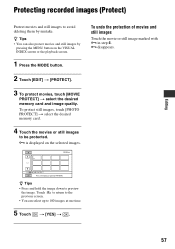
To protect still images, touch [PHOTO PROTECT] t select the desired memory card. 4 Touch the movies or still images to preview the image. Editing z Tips • Press and hold the image down to be protected. - in step 4. - Protecting recorded images (Protect) Protect movies and still images to avoid deleting them ... the desired memory card and image quality. Touch to return to the previous screen. • You can also protect movies and still images by mistake. z Tips • You can select up to 100 images at one time. 5 Touch t [YES] t . 57
To protect still images, touch [PHOTO PROTECT] t select the desired memory card. 4 Touch the movies or still images to preview the image. Editing z Tips • Press and hold the image down to be protected. - in step 4. - Protecting recorded images (Protect) Protect movies and still images to avoid deleting them ... the desired memory card and image quality. Touch to return to the previous screen. • You can also protect movies and still images by mistake. z Tips • You can select up to 100 images at one time. 5 Touch t [YES] t . 57