
Operating Instructions
Page 1
Refer to them whenever you call upon your Sony dealer regarding this product. Record the serial number in the space provided below. 4-246-667-12(1) Micro Hi-Fi Component System Operating Instructions Owner's Record The model and serial numbers are located on the rear of the unit. Model No Serial No CMT-HP7 ©2003 Sony Corporation
Refer to them whenever you call upon your Sony dealer regarding this product. Record the serial number in the space provided below. 4-246-667-12(1) Micro Hi-Fi Component System Operating Instructions Owner's Record The model and serial numbers are located on the rear of the unit. Model No Serial No CMT-HP7 ©2003 Sony Corporation
Operating Instructions
Page 2
...changes or modifications not expressly approved in accordance with news papers, table-cloths, curtains, etc. As an ENERGY STAR® partner, Sony Corporation has determined that provides guidelines for European model ENERGY STAR® is intended to alert the user to Article 820-40 of.... This symbol is a U.S. WARNING This equipment has been tested and found to comply with general house waste, dispose of the apparatus with the instructions, may be connected to the grounding system of the building, as a CLASS 1 LASER product. Reorient or relocate the receiving antenna. - This ...
...changes or modifications not expressly approved in accordance with news papers, table-cloths, curtains, etc. As an ENERGY STAR® partner, Sony Corporation has determined that provides guidelines for European model ENERGY STAR® is intended to alert the user to Article 820-40 of.... This symbol is a U.S. WARNING This equipment has been tested and found to comply with general house waste, dispose of the apparatus with the instructions, may be connected to the grounding system of the building, as a CLASS 1 LASER product. Reorient or relocate the receiving antenna. - This ...
Operating Instructions
Page 25
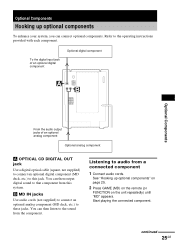
... (not supplied) to connect an optional analog component (MD deck, etc.) to the operating instructions provided with each component. continued 25GB Start playing the connected component. See "Hooking up optional components To enhance your system, you can then listen to the sound from the component. You can connect optional components. Refer to these jacks. You can then...
... (not supplied) to connect an optional analog component (MD deck, etc.) to the operating instructions provided with each component. continued 25GB Start playing the connected component. See "Hooking up optional components To enhance your system, you can then listen to the sound from the component. You can connect optional components. Refer to these jacks. You can then...
Operating Instructions
Page 26
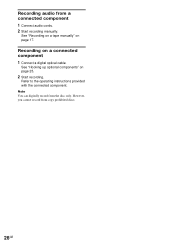
Recording on page 17. See "Recording on a tape manually" on a connected component 1 Connect a digital optical cable. Note You can digitally record from copy prohibited discs. 26GB Refer to the operating instructions provided with the connected component. However, you cannot record from the disc only. See "Hooking up optional components" on page 25. 2 Start recording. Recording audio from a connected component 1 Connect audio cords. 2 Start recording manually.
Recording on page 17. See "Recording on a tape manually" on a connected component 1 Connect a digital optical cable. Note You can digitally record from copy prohibited discs. 26GB Refer to the operating instructions provided with the connected component. However, you cannot record from the disc only. See "Hooking up optional components" on page 25. 2 Start recording. Recording audio from a connected component 1 Connect audio cords. 2 Start recording manually.
Operating Instructions
Page 29
...the preset stations, clock, and timer. if the cord plugs are firmly inserted all the way. • Turn on the connected component. • Refer to the operating instructions supplied with adhesive tape (page 32). • The tape has wound to the end. The sound is loaded. Demagnetise them (page... 32). Cover the broken tab with the connected component and start playing. • Press GAME (MD) on the remote (or FUNCTION on ...
...the preset stations, clock, and timer. if the cord plugs are firmly inserted all the way. • Turn on the connected component. • Refer to the operating instructions supplied with adhesive tape (page 32). • The tape has wound to the end. The sound is loaded. Demagnetise them (page... 32). Cover the broken tab with the connected component and start playing. • Press GAME (MD) on the remote (or FUNCTION on ...
Operating Instructions
Page 32
...play, stop, and fast-winding frequently. Do not change the tape operations such as thinner, benzene or alcohol. For details, refer to the instructions of the demagnetising cassette. Break off the cassette tab from 120 - 10,000 Hz: rated 60 watts per channel minimum RMS power, with a...a separately sold demagnetising cassette. Cleaning the tape heads Clean the tape heads after playing an old tape. For details, refer to the instructions of the cleaning cassette. Demagnetising the tape heads Demagnetise the tape heads and the metal parts that have contact with the tape after every ...
...play, stop, and fast-winding frequently. Do not change the tape operations such as thinner, benzene or alcohol. For details, refer to the instructions of the demagnetising cassette. Break off the cassette tab from 120 - 10,000 Hz: rated 60 watts per channel minimum RMS power, with a...a separately sold demagnetising cassette. Cleaning the tape heads Clean the tape heads after playing an old tape. For details, refer to the instructions of the cleaning cassette. Demagnetising the tape heads Demagnetise the tape heads and the metal parts that have contact with the tape after every ...


