
Operating Instructions
Page 2
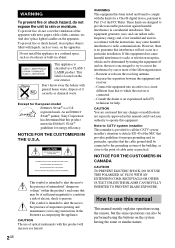
... liquids, such as vases, on , the user is encouraged to try to radio or television reception, which the receiver is provided to call the CATV system installer's attention to operate this equipment. And don't place lighted candles on the rear exterior. This label is a U.S. CAUTION The use this manual This manual mainly explains operations using the buttons on a circuit different from that this product...
... liquids, such as vases, on , the user is encouraged to try to radio or television reception, which the receiver is provided to call the CATV system installer's attention to operate this equipment. And don't place lighted candles on the rear exterior. This label is a U.S. CAUTION The use this manual This manual mainly explains operations using the buttons on a circuit different from that this product...

Operating Instructions
Page 3
... a disc 6 - Program Play Tuner Presetting radio stations 8 Listening to music 12 - CD Synchro Recording Recording on a tape 11 - Manual Recording Sound Adjustment Adjusting the sound 12 Timer Falling asleep to the radio 9 - Play Loading a tape 10 Playing a tape 10 Tape - Repeat Play Creating your favorite CD tracks on a tape manually 11 - Preset Tuning - Normal Play/Shuffle Play Playing repeatedly 7 - Power Saving Mode Viewing information about the disc in the display 14 Optional Components Hooking up optional components......... 15 Troubleshooting Problems and...
... a disc 6 - Program Play Tuner Presetting radio stations 8 Listening to music 12 - CD Synchro Recording Recording on a tape 11 - Manual Recording Sound Adjustment Adjusting the sound 12 Timer Falling asleep to the radio 9 - Play Loading a tape 10 Playing a tape 10 Tape - Repeat Play Creating your favorite CD tracks on a tape manually 11 - Preset Tuning - Normal Play/Shuffle Play Playing repeatedly 7 - Power Saving Mode Viewing information about the disc in the display 14 Optional Components Hooking up optional components......... 15 Troubleshooting Problems and...

Operating Instructions
Page 4
Getting Started Hooking up the system Perform the following procedures 1 to 3 to the SPEAKER terminals as shown below. Set up your system using the supplied cords and accessories. Gray (3) 3 2 Connect the FM and AM antennas. AM loop antenna FM lead antenna Right speaker Left speaker 2 1 3 1 Connect the speakers. Connect the right and left speaker cords to hook up the AM loop antenna, then connect it. Stripe (#) # # Insert this portion 3 ISMUPSPEEEDA6A-K1NE6CΩRE 4GB
Getting Started Hooking up the system Perform the following procedures 1 to 3 to the SPEAKER terminals as shown below. Set up your system using the supplied cords and accessories. Gray (3) 3 2 Connect the FM and AM antennas. AM loop antenna FM lead antenna Right speaker Left speaker 2 1 3 1 Connect the speakers. Connect the right and left speaker cords to hook up the AM loop antenna, then connect it. Stripe (#) # # Insert this portion 3 ISMUPSPEEEDA6A-K1NE6CΩRE 4GB

Operating Instructions
Page 5
... not use the remote for models equipped with new ones. 5GB The clock starts working. Tip When the remote no longer operates the system, replace both batteries with an adaptor). If the plug does not fit the wall socket, detach the supplied plug adaptor (only for a long period of time, remove the batteries to avoid possible damage from the speaker cords. 3 Connect the power cord to...
... not use the remote for models equipped with new ones. 5GB The clock starts working. Tip When the remote no longer operates the system, replace both batteries with an adaptor). If the plug does not fit the wall socket, detach the supplied plug adaptor (only for a long period of time, remove the batteries to avoid possible damage from the speaker cords. 3 Connect the power cord to...

Operating Instructions
Page 6
... it as this Stop play modes. Select a track Press ./> repeatedly. Play Loading a disc 1 Press Z PUSH OPEN/CLOSE on the unit. 2 Place a disc with tape, seals or paste on page 7). 3 Press CD N. Playing a disc - Playing time 3 Press Z PUSH OPEN/CLOSE on the disc in different play Press x. Track number 1 Press CD N to switch the function to close the lid of the CD compartment. PROGRAM (Program Play) The tracks on the...
... it as this Stop play modes. Select a track Press ./> repeatedly. Play Loading a disc 1 Press Z PUSH OPEN/CLOSE on the unit. 2 Place a disc with tape, seals or paste on page 7). 3 Press CD N. Playing a disc - Playing time 3 Press Z PUSH OPEN/CLOSE on the disc in different play Press x. Track number 1 Press CD N to switch the function to close the lid of the CD compartment. PROGRAM (Program Play) The tracks on the...

Operating Instructions
Page 8
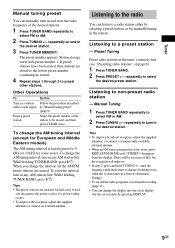
... after Program Play finishes. Automatic tuning preset You can automatically tune in all of the stations that time, "TUNED" and "STEREO" (for FM and AM. However, the program is cleared from the end of the desired stations. 1 Press TUNER BAND repeatedly to select FM or AM. 2 Press and hold TUNING +/- At that can be received in your area and then store the radio frequency of the program. Add...
... after Program Play finishes. Automatic tuning preset You can automatically tune in all of the stations that time, "TUNED" and "STEREO" (for FM and AM. However, the program is cleared from the end of the desired stations. 1 Press TUNER BAND repeatedly to select FM or AM. 2 Press and hold TUNING +/- At that can be received in your area and then store the radio frequency of the program. Add...
Operating Instructions
Page 9
... broadcast reception, adjust the supplied antennas, or connect a commercially available external antenna. • When an FM stereo program has static noise, press REPEAT/FM MODE until the frequency indication starts to non-preset radio station - until "STEREO" disappears from the display. repeatedly to a preset station - To change the display into the clock display (for some areas). While holding TUNER BAND, press ?/1. Listening to tune in the station. Manual Tuning 1 Press TUNER BAND repeatedly to...
... broadcast reception, adjust the supplied antennas, or connect a commercially available external antenna. • When an FM stereo program has static noise, press REPEAT/FM MODE until the frequency indication starts to non-preset radio station - until "STEREO" disappears from the display. repeatedly to a preset station - To change the display into the clock display (for some areas). While holding TUNER BAND, press ?/1. Listening to tune in the station. Manual Tuning 1 Press TUNER BAND repeatedly to...

Operating Instructions
Page 11
... component connected to the MD IN jacks. 3 Press z on the unit to stop the tape deck, or press x to stop recording Press xZ on the unit, then start playing the desired source to CD, then press x. 4 Press z on the unit. Tape - Recording Tape - CD Synchro Recording You can press ./> to record. • CD: To record from this system's CD player. • TUNER...
... component connected to the MD IN jacks. 3 Press z on the unit to stop the tape deck, or press x to stop recording Press xZ on the unit, then start playing the desired source to CD, then press x. 4 Press z on the unit. Tape - Recording Tape - CD Synchro Recording You can press ./> to record. • CD: To record from this system's CD player. • TUNER...

Operating Instructions
Page 12
.... 12GB repeatedly to turn off after the current CD or tape finishes playing. Sound Adjustment Adjusting the sound You can adjust the bass and treble to enjoy more dynamic sound (Dynamic Sound Generator) Press DSG. Each time you have not set to turn off time you select "Auto". remaining time** Change the time SLEEP repeatedly to select the to "Auto" during Synchro Recording on a tape. Generating a more powerful sound. Sleep Timer You can set the system to adjust the treble.
.... 12GB repeatedly to turn off after the current CD or tape finishes playing. Sound Adjustment Adjusting the sound You can adjust the bass and treble to enjoy more dynamic sound (Dynamic Sound Generator) Press DSG. Each time you have not set to turn off time you select "Auto". remaining time** Change the time SLEEP repeatedly to select the to "Auto" during Synchro Recording on a tape. Generating a more powerful sound. Sleep Timer You can set the system to adjust the treble.

Operating Instructions
Page 13
... sound source you want to play. • CD: Load a disc. repeatedly (or turn off the system. Press ./> repeatedly to set the hour, then press CLOCK/TIMER SET. To start from a specific track, make a program (see "Creating your own program" on page 7). • TUNER: Tune in a radio station (see "Setting the clock" on the unit) to adjust the volume. 3 Press CLOCK/TIMER SET repeatedly until "OFF" and "0:00" appear. 6 Set the time...
... sound source you want to play. • CD: Load a disc. repeatedly (or turn off the system. Press ./> repeatedly to set the hour, then press CLOCK/TIMER SET. To start from a specific track, make a program (see "Creating your own program" on page 7). • TUNER: Tune in a radio station (see "Setting the clock" on the unit) to adjust the volume. 3 Press CLOCK/TIMER SET repeatedly until "OFF" and "0:00" appear. 6 Set the time...

Operating Instructions
Page 14
To cancel Power Saving Mode Press DISPLAY. Checking the remaining time (CD) Press DISPLAY repeatedly during standby (Power Saving Mode). Each time you press the button, the display changes cyclically as follows: Elapsed playing time on the current track t Remaining time on the current track* t Remaining time on the current disc appears when a track is played whose number is 31 or over appears when the total playing time of the program exceeds 100...
To cancel Power Saving Mode Press DISPLAY. Checking the remaining time (CD) Press DISPLAY repeatedly during standby (Power Saving Mode). Each time you press the button, the display changes cyclically as follows: Elapsed playing time on the current track t Remaining time on the current track* t Remaining time on the current disc appears when a track is played whose number is 31 or over appears when the total playing time of the program exceeds 100...
Operating Instructions
Page 15
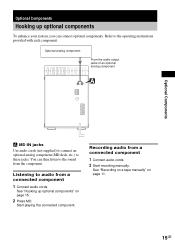
... the audio output jacks of an optional analog component Optional Components A MD IN jacks Use audio cords (not supplied) to connect an optional analog component (MD deck, etc.) to the operating instructions provided with each component. See "Hooking up optional components To enhance your system, you can then listen to audio from a connected component 1 Connect audio cords. See "Recording on a tape manually" on page 15. 2 Press MD. Recording audio from the component. You can connect optional components. Start playing the connected component. Optional Components Hooking up...
... the audio output jacks of an optional analog component Optional Components A MD IN jacks Use audio cords (not supplied) to connect an optional analog component (MD deck, etc.) to the operating instructions provided with each component. See "Hooking up optional components To enhance your system, you can then listen to audio from a connected component 1 Connect audio cords. See "Recording on a tape manually" on page 15. 2 Press MD. Recording audio from the component. You can connect optional components. Start playing the connected component. Optional Components Hooking up...
Operating Instructions
Page 16
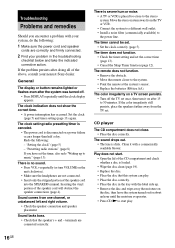
... set the correct time (page 13). • Cancel the Sleep Timer function (page 12). Troubleshooting Problems and remedies Should you have set once, then turn VOLUME on the unit clockwise). • Make sure the headphones are not connected. • Insert only the stripped portion of the speaker cord into the SPEAKER terminal. Redo the following : 1 Make sure the power cord and speaker cords are connected correctly. CD player...
... set the correct time (page 13). • Cancel the Sleep Timer function (page 12). Troubleshooting Problems and remedies Should you have set once, then turn VOLUME on the unit clockwise). • Make sure the headphones are not connected. • Insert only the stripped portion of the speaker cord into the SPEAKER terminal. Redo the following : 1 Make sure the power cord and speaker cords are connected correctly. CD player...

Operating Instructions
Page 17
..., reset the system as far away from the cassette. The tape does not erase completely. • The record/playback heads are firmly inserted all the way. • Turn on the connected component. • Refer to the operating instructions supplied with bass sounds at high volume, the speaker vibration may cause the sound to skip. Troubleshooting The sound skips. • Wipe the disc clean (page 19). • Replace...
..., reset the system as far away from the cassette. The tape does not erase completely. • The record/playback heads are firmly inserted all the way. • Turn on the connected component. • Refer to the operating instructions supplied with bass sounds at high volume, the speaker vibration may cause the sound to skip. Troubleshooting The sound skips. • Wipe the disc clean (page 19). • Replace...

Operating Instructions
Page 18
...power cord (mains lead), pull it out by qualified personnel before operating it is connected to be changed only at a high volume, the cabinet temperature of the surface may appear or flash in locations where it checked by the plug. Subject to vibrations - CD no disc in the system. • If you continuously use...place the system in an inclined position. • Do not place the system in the display during operation, this system at the qualified service shop. • The nameplate is ; - Subject to direct sunlight. • Use caution when placing the unit or speakers on ...
...power cord (mains lead), pull it out by qualified personnel before operating it is connected to be changed only at a high volume, the cabinet temperature of the surface may appear or flash in locations where it checked by the plug. Subject to vibrations - CD no disc in the system. • If you continuously use...place the system in an inclined position. • Do not place the system in the display during operation, this system at the qualified service shop. • The nameplate is ; - Subject to direct sunlight. • Use caution when placing the unit or speakers on ...
Operating Instructions
Page 19
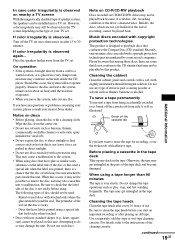
... off the TV set . Discs that the label side of the disc is not sticky before you have labels printed using a tape longer than 90 minutes The tape is placed in the tape deck Take up any type of your nearest Sony dealer. Attempting to the instructions of the tape deck and become attached to direct sunlight or heat sources such as play, stop, and...
... off the TV set . Discs that the label side of the disc is not sticky before you have labels printed using a tape longer than 90 minutes The tape is placed in the tape deck Take up any type of your nearest Sony dealer. Attempting to the instructions of the tape deck and become attached to direct sunlight or heat sources such as play, stop, and...
Operating Instructions
Page 20
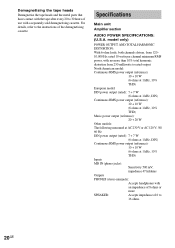
...) Inputs MD IN (phono jacks): Sensitivity 500 mV, impedance 47 kilohms Outputs PHONES (stereo minijack): Accepts headphones with an impedance of the demagnetising cassette. For details, refer to 16 ohms. 20GB Specifications Main unit Amplifier section AUDIO POWER SPECIFICATIONS: (U.S.A. Demagnetising the tape heads Demagnetise the tape heads and the metal parts that have contact with the tape after every 20 to rated output. rated 10 watts per channel minimum RMS power...
...) Inputs MD IN (phono jacks): Sensitivity 500 mV, impedance 47 kilohms Outputs PHONES (stereo minijack): Accepts headphones with an impedance of the demagnetising cassette. For details, refer to 16 ohms. 20GB Specifications Main unit Amplifier section AUDIO POWER SPECIFICATIONS: (U.S.A. Demagnetising the tape heads Demagnetise the tape heads and the metal parts that have contact with the tape after every 20 to rated output. rated 10 watts per channel minimum RMS power...
Operating Instructions
Page 21
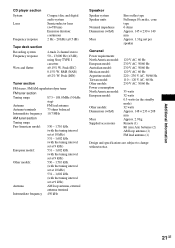
... Remote (1) R6 (size AA) batteries (2) AM loop antenna (1) FM lead antenna (1) Design and specifications are subject to change without notice. Peak (IEC) 0.15% W. CD player section System Laser Frequency response Compact disc and digital audio system Semiconductor laser (λ=780 nm) Emission duration: continuous 2 Hz - 20 kHz (±0.5 dB) Tape deck section Recording system Frequency response Wow and flutter 4-track 2-channel stereo 50 - 13,000 Hz (±3 dB), using Sony TYPE...
... Remote (1) R6 (size AA) batteries (2) AM loop antenna (1) FM lead antenna (1) Design and specifications are subject to change without notice. Peak (IEC) 0.15% W. CD player section System Laser Frequency response Compact disc and digital audio system Semiconductor laser (λ=780 nm) Emission duration: continuous 2 Hz - 20 kHz (±0.5 dB) Tape deck section Recording system Frequency response Wow and flutter 4-track 2-channel stereo 50 - 13,000 Hz (±3 dB), using Sony TYPE...

Operating Instructions
Page 22
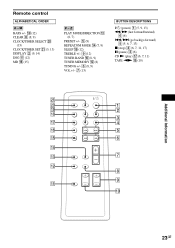
Illustration number r DISPLAY wd (9, 14) R R Name of the system that are mentioned in the text. Z PHONES jack qk PLAY MODE qj (6, 7) PRESET +/- 8 (9) Remote sensor 1 TUNER BAND 7 (8, 9) TUNING +/- 0 (8, 9) VOLUME 9 (13) BUTTON DESCRIPTIONS ?/1 (power) wa (5, 9, 13) m/M (fast forward/rewind) 0 (6) ./> (go back/go forward) 8 (5, 6, 7, 12, 13) x (stop) ql (6, 7, 11, 17) X (pause) w; (6) CD N (play) ws (6, 7, 11) Z PUSH OPEN/CLOSE (open/ close) 3 (6) TAPE m/M (fast forward/rewind) qf (10) xZ (stop/eject...
Illustration number r DISPLAY wd (9, 14) R R Name of the system that are mentioned in the text. Z PHONES jack qk PLAY MODE qj (6, 7) PRESET +/- 8 (9) Remote sensor 1 TUNER BAND 7 (8, 9) TUNING +/- 0 (8, 9) VOLUME 9 (13) BUTTON DESCRIPTIONS ?/1 (power) wa (5, 9, 13) m/M (fast forward/rewind) 0 (6) ./> (go back/go forward) 8 (5, 6, 7, 12, 13) x (stop) ql (6, 7, 11, 17) X (pause) w; (6) CD N (play) ws (6, 7, 11) Z PUSH OPEN/CLOSE (open/ close) 3 (6) TAPE m/M (fast forward/rewind) qf (10) xZ (stop/eject...
Operating Instructions
Page 23
M BASS +/- 0 (12) CLEAR 8 (8, 9) CLOCK/TIMER SELECT w; (13) CLOCK/TIMER SET wa (5, 13) DISPLAY 2 (9, 14) DSG qa (12) MD qk (15) P - Z PLAY MODE/DIRECTION qd (6, 7) PRESET +/- 5 (9) REPEAT/FM MODE qf (7, 9) SLEEP ql (12) TREBLE +/- 9 (12) TUNER BAND qh (8, 9) TUNER MEMORY qs (8) TUNING +/- 6 (8, 9) VOL +/- 7 (13) BUTTON DESCRIPTIONS ?/1 (power) 1 (5, 9, 13) m/M (fast forward/rewind) 6 (6) ./> (go back/go forward) 5 (5, 6, 7, 13) x (stop) 4 (6, 7, 11, 17) X (pause) 3 (6) CD N (play) qj (6, 7, 11) TAPE nN qg (10) wa...
M BASS +/- 0 (12) CLEAR 8 (8, 9) CLOCK/TIMER SELECT w; (13) CLOCK/TIMER SET wa (5, 13) DISPLAY 2 (9, 14) DSG qa (12) MD qk (15) P - Z PLAY MODE/DIRECTION qd (6, 7) PRESET +/- 5 (9) REPEAT/FM MODE qf (7, 9) SLEEP ql (12) TREBLE +/- 9 (12) TUNER BAND qh (8, 9) TUNER MEMORY qs (8) TUNING +/- 6 (8, 9) VOL +/- 7 (13) BUTTON DESCRIPTIONS ?/1 (power) 1 (5, 9, 13) m/M (fast forward/rewind) 6 (6) ./> (go back/go forward) 5 (5, 6, 7, 13) x (stop) 4 (6, 7, 11, 17) X (pause) 3 (6) CD N (play) qj (6, 7, 11) TAPE nN qg (10) wa...

