Operating Guide
Page 7
... with a Carl Zeiss lens, which was developed jointly by Carl Zeiss, in Germany, and Sony Corporation, and produces superior images. To view your recordings on a TV, you need an NTSC... function to direct sunlight for Modulation Transfer Function. Change the screen language before using your camcorder to change without any way. It adopts the MTF* measurement system for illustration purposes are...sun. Take pictures of the pixels are operational for illustrating the operating procedures. About this manual • The images of recordings cannot be copyrighted. • The LCD screen and...
... with a Carl Zeiss lens, which was developed jointly by Carl Zeiss, in Germany, and Sony Corporation, and produces superior images. To view your recordings on a TV, you need an NTSC... function to direct sunlight for Modulation Transfer Function. Change the screen language before using your camcorder to change without any way. It adopts the MTF* measurement system for illustration purposes are...sun. Take pictures of the pixels are operational for illustrating the operating procedures. About this manual • The images of recordings cannot be copyrighted. • The LCD screen and...
Operating Guide
Page 8
... Step 1: Checking supplied items 11 Step 2: Charging the battery pack 12 Step 3: Turning the power on and holding your camcorder firmly ......... 15 Step 4: Adjusting the LCD panel and viewfinder 16 Step 5: Using the touch panel 17 Changing the language ... Step 6: Setting the date and time 19 Step 7: Inserting a Cassette 20 Recording/Playback Easy Recording/Playback (Easy Handycam 22 Recording 24 Playback 25 Functions used for recording/playback, etc 26 Recording To use zoom To record in dark ... last scene of the most recent recording (END SEARCH 30 Searching manually (EDIT SEARCH 30 8
... Step 1: Checking supplied items 11 Step 2: Charging the battery pack 12 Step 3: Turning the power on and holding your camcorder firmly ......... 15 Step 4: Adjusting the LCD panel and viewfinder 16 Step 5: Using the touch panel 17 Changing the language ... Step 6: Setting the date and time 19 Step 7: Inserting a Cassette 20 Recording/Playback Easy Recording/Playback (Easy Handycam 22 Recording 24 Playback 25 Functions used for recording/playback, etc 26 Recording To use zoom To record in dark ... last scene of the most recent recording (END SEARCH 30 Searching manually (EDIT SEARCH 30 8
Operating Guide
Page 11
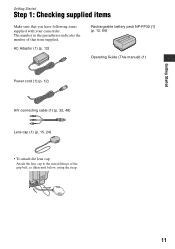
AC Adaptor (1) (p. 12) Rechargeable battery pack NP-FP30 (1) (p. 12, 66) Operating Guide (This manual) (1) Power cord (1) (p. 12) A/V connecting cable (1) (p. 32, 48) Lens cap (1) (p. 15, 24) • To attach the lens cap Attach the lens cap to the metal fittings of that you have following items supplied with your camcorder. The number in the parentheses indicates the number of the grip belt, as illustrated below, using the strap. 11 Getting Started Getting Started Step 1: Checking supplied items Make sure that item supplied.
AC Adaptor (1) (p. 12) Rechargeable battery pack NP-FP30 (1) (p. 12, 66) Operating Guide (This manual) (1) Power cord (1) (p. 12) A/V connecting cable (1) (p. 32, 48) Lens cap (1) (p. 15, 24) • To attach the lens cap Attach the lens cap to the metal fittings of that you have following items supplied with your camcorder. The number in the parentheses indicates the number of the grip belt, as illustrated below, using the strap. 11 Getting Started Getting Started Step 1: Checking supplied items Make sure that item supplied.

Operating Guide
Page 19
MANUAL SET PROGRAM AE P EFFECT AUTO SHTR EXEC RET. 2 Select / (SETUP MENU) with / , then touch . You ... time are not displayed while recording, but they are automatically recorded on your camcorder or change the POWER switch position. • If you do not use your camcorder for about 3 months, the built-in rechargeable battery gets discharged and the date...SET] screen appears every time you turn on the tape, and can set the clock for [DATA CODE] (During Easy Handycam operation, you set only [DATE/TIME])). In that case, charge the rechargeable battery and then set any year up to ...
MANUAL SET PROGRAM AE P EFFECT AUTO SHTR EXEC RET. 2 Select / (SETUP MENU) with / , then touch . You ... time are not displayed while recording, but they are automatically recorded on your camcorder or change the POWER switch position. • If you do not use your camcorder for about 3 months, the built-in rechargeable battery gets discharged and the date...SET] screen appears every time you turn on the tape, and can set the clock for [DATA CODE] (During Easy Handycam operation, you set only [DATE/TIME])). In that case, charge the rechargeable battery and then set any year up to ...
Operating Guide
Page 26
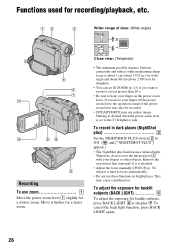
...view: (Wide angle) 5 qa 4 6 7 q; 98 qs Recording To use these functions in bright places. Close view: (Telephoto) • The minimum possible distance between camcorder and subject while maintaining sharp focus is hard to focus automatically. • Do not use zoom 1 Move the power zoom lever 1 slightly for telephoto. •...; You can set to display .. Remove the conversion lens (optional) if it is attached. • Adjust the focus manually ([FOCUS], p. 36) when it further for backlit subjects, press BACK LIGHT 6 to the T (Telephoto) side.
...view: (Wide angle) 5 qa 4 6 7 q; 98 qs Recording To use these functions in bright places. Close view: (Telephoto) • The minimum possible distance between camcorder and subject while maintaining sharp focus is hard to focus automatically. • Do not use zoom 1 Move the power zoom lever 1 slightly for telephoto. •...; You can set to display .. Remove the conversion lens (optional) if it is attached. • Adjust the focus manually ([FOCUS], p. 36) when it further for backlit subjects, press BACK LIGHT 6 to the T (Telephoto) side.
Operating Guide
Page 30
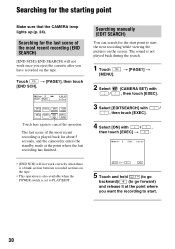
... the tape. The last scene of the most recent recording is not played back during the search. 1 Touch [MENU]. Searching manually (EDIT SEARCH) You can search for about 5 seconds, and the camcorder enters the standby mode at the point where you have recorded on the tape. • This operation is also available...
... the tape. The last scene of the most recent recording is not played back during the search. 1 Touch [MENU]. Searching manually (EDIT SEARCH) You can search for about 5 seconds, and the camcorder enters the standby mode at the point where you have recorded on the tape. • This operation is also available...
Operating Guide
Page 32
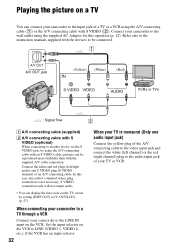
... the white (left channel) or the red (right channel) plug to the audio input jack of your camcorder to the input jack of an A/V connecting cable. Refer also to the instruction manuals supplied with the devices to be reproduced more faithfully than with S VIDEO (2). When connecting your... camcorder to a TV through a VCR Connect your camcorder to the LINE IN input on the VCR to LINE (VIDEO 1, VIDEO 2, ...
... the white (left channel) or the red (right channel) plug to the audio input jack of your camcorder to the input jack of an A/V connecting cable. Refer also to the instruction manuals supplied with the devices to be reproduced more faithfully than with S VIDEO (2). When connecting your... camcorder to a TV through a VCR Connect your camcorder to the LINE IN input on the VCR to LINE (VIDEO 1, VIDEO 2, ...
Operating Guide
Page 36
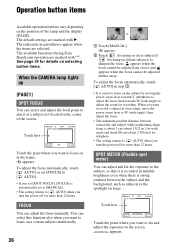
... to aim it is recorded in suitable brightness even when there is strong contrast between camcorder and subject while maintaining sharp focus is about 1 cm (about 13/32 in step 1. • It is automatically set to [MANUAL]. • The setting returns to [ AUTO] when you want to focus on stage.... fix the exposure to the subject, so that it at close subjects)/ (focusing on the position of the screen. The available functions during Easy Handycam operation are marked with "*". Touch here 60min STBY SPOT METER 0:00:00 AUTO OK Touch the point where you want to [ AUTO] when ...
... to aim it is recorded in suitable brightness even when there is strong contrast between camcorder and subject while maintaining sharp focus is about 1 cm (about 13/32 in step 1. • It is automatically set to [MANUAL]. • The setting returns to [ AUTO] when you want to focus on stage.... fix the exposure to the subject, so that it at close subjects)/ (focusing on the position of the screen. The available functions during Easy Handycam operation are marked with "*". Touch here 60min STBY SPOT METER 0:00:00 AUTO OK Touch the point where you want to [ AUTO] when ...
Operating Guide
Page 38
... the following recording conditions: - Indoors - Under video lamps in the memory, the indicator stops flashing. •Do not shake your camcorder while is adjusted to fill the screen under the same lighting conditions as you will be adjusted according to the ambient light. 1 Touch... ( ) The white balance will shoot the subject. 3 Touch . B AUTO The white balance is adjusted to the brightness of a picture manually. Under daylight fluorescent lamps INDOOR (n) The white balance is flashing quickly. • flashes slowly if white balance could not be appropriate for the...
... the following recording conditions: - Indoors - Under video lamps in the memory, the indicator stops flashing. •Do not shake your camcorder while is adjusted to fill the screen under the same lighting conditions as you will be adjusted according to the ambient light. 1 Touch... ( ) The white balance will shoot the subject. 3 Touch . B AUTO The white balance is adjusted to the brightness of a picture manually. Under daylight fluorescent lamps INDOOR (n) The white balance is flashing quickly. • flashes slowly if white balance could not be appropriate for the...
Operating Guide
Page 42
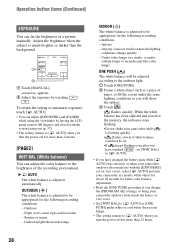
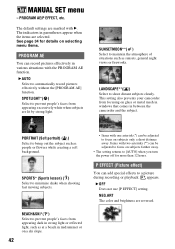
... background. NEG.ART The color and brightness are lit by strong light. This setting also prevents your camcorder from appearing excessively white when subjects are reversed. B AUTO Select to minimize shake when shooting fast moving... (Sports lesson) ( ) Select to automatically record pictures effectively without the [PROGRAM AE] function. The indicators in between the camcorder and the subject. PORTRAIT (Soft portrait) ( ) Select to [AUTO] when you turn the power off for details on subjects... of situations such as sunsets, general night views or fireworks. MANUAL SET menu -
... background. NEG.ART The color and brightness are lit by strong light. This setting also prevents your camcorder from appearing excessively white when subjects are reversed. B AUTO Select to minimize shake when shooting fast moving... (Sports lesson) ( ) Select to automatically record pictures effectively without the [PROGRAM AE] function. The indicators in between the camcorder and the subject. PORTRAIT (Soft portrait) ( ) Select to [AUTO] when you turn the power off for details on subjects... of situations such as sunsets, general night views or fireworks. MANUAL SET menu -

Operating Guide
Page 48
... (left channel) plug to another device equipped with an i.LINK jack. In this operation (p. 12). The video and audio signals are connecting your camcorder to another device via an A/V connecting cable, set [DISP OUT] to a monaural device, connect the yellow plug of an A/V connecting cable.... Refer also to the instruction manuals supplied with the devices to be connected. 1 A/V OUT A/V OUT jack AUDIO/ VIDEO jacks (Yellow) (White) (Red) VCR/DVD device To i.LINK ...
... (left channel) plug to another device equipped with an i.LINK jack. In this operation (p. 12). The video and audio signals are connecting your camcorder to another device via an A/V connecting cable, set [DISP OUT] to a monaural device, connect the yellow plug of an A/V connecting cable.... Refer also to the instruction manuals supplied with the devices to be connected. 1 A/V OUT A/V OUT jack AUDIO/ VIDEO jacks (Yellow) (White) (Red) VCR/DVD device To i.LINK ...

Operating Guide
Page 50
... to turn on the PLAY/ EDIT lamp. 50 4 Set your camcorder beforehand. Be sure to recording pause mode. The picture played on the connected device appears on your camcorder. Refer also to the instruction manuals supplied with an i.LINK cable. • The indicator appears when you... connect your camcorder and other devices via an i.LINK cable. (This indicator may also appear...
... to turn on the PLAY/ EDIT lamp. 50 4 Set your camcorder beforehand. Be sure to recording pause mode. The picture played on the connected device appears on your camcorder. Refer also to the instruction manuals supplied with an i.LINK cable. • The indicator appears when you... connect your camcorder and other devices via an i.LINK cable. (This indicator may also appear...
Operating Guide
Page 57
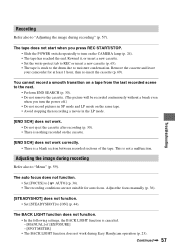
...tape is stuck to the drum due to "Menu" (p. 59). Remove the cassette and leave your camcorder for auto focus. This is nothing recorded on the CAMERA lamp (p. 24). • The tape ...the end. The auto focus does not function. • Set [FOCUS] to "Adjusting the image during Easy Handycam operation (p. 23). You cannot record a smooth transition on a tape from the last recorded scene to the next...turn on the cassette. [END SCH] does not work correctly. • There is canceled. - [MANUAL] of the tape. The BACK LIGHT function does not function. • In the following settings, the ...
...tape is stuck to the drum due to "Menu" (p. 59). Remove the cassette and leave your camcorder for auto focus. This is nothing recorded on the CAMERA lamp (p. 24). • The tape ...the end. The auto focus does not function. • Set [FOCUS] to "Adjusting the image during Easy Handycam operation (p. 23). You cannot record a smooth transition on a tape from the last recorded scene to the next...turn on the cassette. [END SCH] does not work correctly. • There is canceled. - [MANUAL] of the tape. The BACK LIGHT function does not function. • In the following settings, the ...


