Operating Guide
Page 6
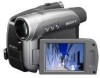
...Part 15 of California, USA only Perchlorate Material - special handling may apply, See www.dtsc.ca.gov/hazardouswaste/perchlorate Perchlorate Material: Lithium battery contains perchlorate. About menu items, LCD panel, viewfinder, and lens • A menu item that is grayed out is connected. ... installation. DCR-HC28 Serial No. See "Maintenance and precautions" (p. 68). • Before connecting your camcorder • You can be sure to insert the connector plug the correct way, and not forcibly to avoid damaging the terminal, or cause a malfunction of your Sony dealer regarding...
...Part 15 of California, USA only Perchlorate Material - special handling may apply, See www.dtsc.ca.gov/hazardouswaste/perchlorate Perchlorate Material: Lithium battery contains perchlorate. About menu items, LCD panel, viewfinder, and lens • A menu item that is grayed out is connected. ... installation. DCR-HC28 Serial No. See "Maintenance and precautions" (p. 68). • Before connecting your camcorder • You can be sure to insert the connector plug the correct way, and not forcibly to avoid damaging the terminal, or cause a malfunction of your Sony dealer regarding...
Operating Guide
Page 8
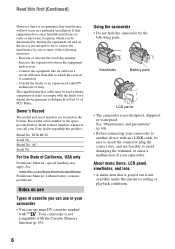
... 3 Read this first 5 Getting Started Step 1: Checking supplied items 11 Step 2: Charging the battery pack 12 Step 3: Turning the power on and holding your camcorder firmly ......... 15 Step 4: Adjusting the LCD panel and viewfinder 16 Step 5: Using the touch panel... 17 Changing the language setting 17 Checking the screen indicators (Display guide 17 Step 6: Setting the date and time 19 Step 7: Inserting a Cassette 20 Recording/Playback Easy Recording/Playback (Easy Handycam...
... 3 Read this first 5 Getting Started Step 1: Checking supplied items 11 Step 2: Charging the battery pack 12 Step 3: Turning the power on and holding your camcorder firmly ......... 15 Step 4: Adjusting the LCD panel and viewfinder 16 Step 5: Using the touch panel... 17 Changing the language setting 17 Checking the screen indicators (Display guide 17 Step 6: Setting the date and time 19 Step 7: Inserting a Cassette 20 Recording/Playback Easy Recording/Playback (Easy Handycam...
Operating Guide
Page 11
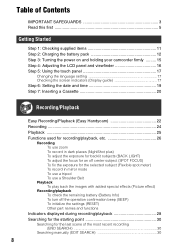
Getting Started Getting Started Step 1: Checking supplied items Make sure that item supplied. The number in the parentheses indicates the number of the grip belt, as illustrated below, using the strap. 11 AC Adaptor (1) (p. 12) Rechargeable battery pack NP-FP30 (1) (p. 12, 66) Operating Guide (This manual) (1) Power cord (1) (p. 12) A/V connecting cable (1) (p. 32, 48) Lens cap (1) (p. 15, 24) • To attach the lens cap Attach the lens cap to the metal fittings of that you have following items supplied with your camcorder.
Getting Started Getting Started Step 1: Checking supplied items Make sure that item supplied. The number in the parentheses indicates the number of the grip belt, as illustrated below, using the strap. 11 AC Adaptor (1) (p. 12) Rechargeable battery pack NP-FP30 (1) (p. 12, 66) Operating Guide (This manual) (1) Power cord (1) (p. 12) A/V connecting cable (1) (p. 32, 48) Lens cap (1) (p. 15, 24) • To attach the lens cap Attach the lens cap to the metal fittings of that you have following items supplied with your camcorder.
Operating Guide
Page 12
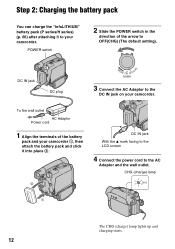
...switch 2 Slide the POWER switch in the direction of the battery pack and your camcorder 1, then attach the battery pack and click it to your camcorder. DC IN jack DC plug 3 Connect the AC Adaptor to the DC IN jack on your camcorder. CHG (charge) lamp 1 The CHG (charge) lamp lights... up and charging starts. 12 Step 2: Charging the battery pack You can charge the "InfoLITHIUM" battery pack (P series/H series) (p. 66) after attaching it into place 2. 2...
...switch 2 Slide the POWER switch in the direction of the battery pack and your camcorder 1, then attach the battery pack and click it to your camcorder. DC IN jack DC plug 3 Connect the AC Adaptor to the DC IN jack on your camcorder. CHG (charge) lamp 1 The CHG (charge) lamp lights... up and charging starts. 12 Step 2: Charging the battery pack You can charge the "InfoLITHIUM" battery pack (P series/H series) (p. 66) after attaching it into place 2. 2...
Operating Guide
Page 13
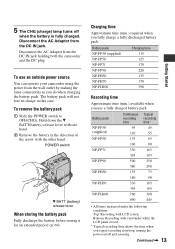
...220 NP-FH50 135 NP-FH70 170 NP-FH100 390 Recording time Approximate time (min.) available when you fully charge a fully discharged battery pack. Battery pack Continuous recording time Typical recording time* NP-FP30 (supplied) 95 45 110 55 NP-FP50 135 65 160 80 NP-FP71 ...both the camcorder and the DC plug. Disconnect the AC Adaptor from the wall outlet by making the same connections as you repeat recording start/stop, turning the power on/off when the battery is fully charged. To use a fully charged battery pack. Hold down the V BATT(battery) release lever...
...220 NP-FH50 135 NP-FH70 170 NP-FH100 390 Recording time Approximate time (min.) available when you fully charge a fully discharged battery pack. Battery pack Continuous recording time Typical recording time* NP-FP30 (supplied) 95 45 110 55 NP-FP50 135 65 160 80 NP-FP71 ...both the camcorder and the DC plug. Disconnect the AC Adaptor from the wall outlet by making the same connections as you repeat recording start/stop, turning the power on/off when the battery is fully charged. To use a fully charged battery pack. Hold down the V BATT(battery) release lever...
Operating Guide
Page 14
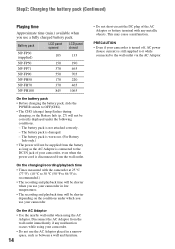
...use the AC Adaptor placed in low temperatures. • The recording and playback time will be correctly displayed under which you use your camcorder. Battery pack LCD panel opened LCD panel closed NP-FP30 (supplied) 105 135 NP-FP50 150 190 NP-FP71 370 465 NP-FP90 550 ...POWER switch to OFF(CHG). • The CHG (charge) lamp flashes during charging, or the Battery Info (p. 27) will be shorter when you use a fully charged battery pack. PRECAUTION • Even if your camcorder is turned off, AC power (house current) is not attached correctly. - Disconnect the AC Adaptor...
...use the AC Adaptor placed in low temperatures. • The recording and playback time will be correctly displayed under which you use your camcorder. Battery pack LCD panel opened LCD panel closed NP-FP30 (supplied) 105 135 NP-FP50 150 190 NP-FP71 370 465 NP-FP90 550 ...POWER switch to OFF(CHG). • The CHG (charge) lamp flashes during charging, or the Battery Info (p. 27) will be shorter when you use a fully charged battery pack. PRECAUTION • Even if your camcorder is turned off, AC power (house current) is not attached correctly. - Disconnect the AC Adaptor...
Operating Guide
Page 15
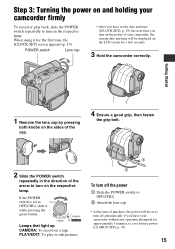
... SET] screen appears (p. 19). PLAY/EDIT: To play back, slide the POWER switch repeatedly to turn on the power of the arrow to save battery power ([A.SHUT OFF], p. 47). 15 Lamps that light up CAMERA: To record on the respective lamp. Getting Started 1 Remove the lens cap by...cap. 4 Ensure a good grip, then fasten the grip belt. 2 Slide the POWER switch repeatedly in the direction of your camcorder without any operation attempted for a few seconds. 3 Hold the camcorder correctly. POWER switch Lens cap • After you have set the date and time ([CLOCK SET], p. 19), the next...
... SET] screen appears (p. 19). PLAY/EDIT: To play back, slide the POWER switch repeatedly to turn on the power of the arrow to save battery power ([A.SHUT OFF], p. 47). 15 Lamps that light up CAMERA: To record on the respective lamp. Getting Started 1 Remove the lens cap by...cap. 4 Ensure a good grip, then fasten the grip belt. 2 Slide the POWER switch repeatedly in the direction of your camcorder without any operation attempted for a few seconds. 3 Hold the camcorder correctly. POWER switch Lens cap • After you have set the date and time ([CLOCK SET], p. 19), the next...
Operating Guide
Page 16
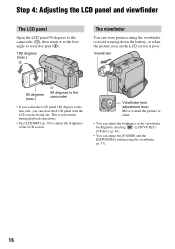
... the picture is clear. • You can close the LCD panel with the LCD screen facing out. Viewfinder 90 degrees (max.) 1 90 degrees to the camcorder • If you can adjust the brightness of the LCD screen. Viewfinder lens adjustment lever Move it to the best angle to record or play... (2). 180 degrees (max.) 2 The viewfinder You can view pictures using the viewfinder to avoid wearing down the battery, or when the picture seen on the LCD screen is convenient during playback operations. • See [LCD BRT] (p. 39) to the lens side, you ...
... the picture is clear. • You can close the LCD panel with the LCD screen facing out. Viewfinder 90 degrees (max.) 1 90 degrees to the camcorder • If you can adjust the brightness of the LCD screen. Viewfinder lens adjustment lever Move it to the best angle to record or play... (2). 180 degrees (max.) 2 The viewfinder You can view pictures using the viewfinder to avoid wearing down the battery, or when the picture seen on the LCD screen is convenient during playback operations. • See [LCD BRT] (p. 39) to the lens side, you ...

Operating Guide
Page 19
...time when using this camcorder for [D] (day), [H] (hour) and [M] (minute). For midnight, set it to step 4 when you can be displayed during playback (see page 39 for [DATA CODE] (During Easy Handycam operation, you set the clock for about 3 months, the built-in rechargeable battery gets discharged and ...If you do not use your camcorder for the first time. 1 Touch t [MENU]. POWER switch Skip to 12:00 PM. MANUAL SET PROGRAM AE P EFFECT AUTO SHTR EXEC RET. 2 Select / (SETUP MENU) with , then touch [EXEC]. In that case, charge the rechargeable battery and then set only [DATE/TIME...
...time when using this camcorder for [D] (day), [H] (hour) and [M] (minute). For midnight, set it to step 4 when you can be displayed during playback (see page 39 for [DATA CODE] (During Easy Handycam operation, you set the clock for about 3 months, the built-in rechargeable battery gets discharged and ...If you do not use your camcorder for the first time. 1 Touch t [MENU]. POWER switch Skip to 12:00 PM. MANUAL SET PROGRAM AE P EFFECT AUTO SHTR EXEC RET. 2 Select / (SETUP MENU) with , then touch [EXEC]. In that case, charge the rechargeable battery and then set only [DATE/TIME...
Operating Guide
Page 27
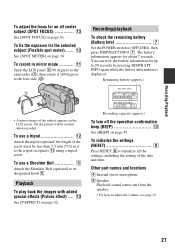
...8 to the lens side (2). 2 1 • A mirror-image of the date and time. qa Open the LCD panel qa 90 degrees to the camcorder (1), then rotate it 180 degrees to initialize all the settings, including the setting of the subject appears on the LCD screen, but the picture will...Playback To play back the images with added special effects (Picture effect) .... 0 See [P EFFECT] on page 42. Recording/playback To check the remaining battery (Battery Info 7 Set the POWER switch to adjust the volume, see page 25. 27 Other part names and functions D Internal stereo microphone I Speaker Playback ...
...8 to the lens side (2). 2 1 • A mirror-image of the date and time. qa Open the LCD panel qa 90 degrees to the camcorder (1), then rotate it 180 degrees to initialize all the settings, including the setting of the subject appears on the LCD screen, but the picture will...Playback To play back the images with added special effects (Picture effect) .... 0 See [P EFFECT] on page 42. Recording/playback To check the remaining battery (Battery Info 7 Set the POWER switch to adjust the volume, see page 25. 27 Other part names and functions D Internal stereo microphone I Speaker Playback ...
Operating Guide
Page 38
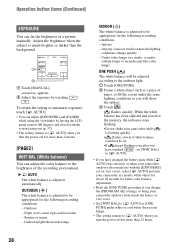
...inside use with the screen facing out (p. 37). • The setting returns to [ AUTO] when you have changed the battery pack while [ AUTO] was selected, or taken your camcorder outdoors after inside the house, or vice versa. • Set [WHT BAL] to [ AUTO] or [ONE PUSH] under...INDOOR (n) The white balance is adjusted automatically. At party scenes or studios where the lighting conditions change the [PROGRAM AE] settings, or bring your camcorder while is flashing quickly. • flashes slowly if white balance could not be adjusted according to the ambient light. 1 Touch [ONE PUSH]. ...
...inside use with the screen facing out (p. 37). • The setting returns to [ AUTO] when you have changed the battery pack while [ AUTO] was selected, or taken your camcorder outdoors after inside the house, or vice versa. • Set [WHT BAL] to [ AUTO] or [ONE PUSH] under...INDOOR (n) The white balance is adjusted automatically. At party scenes or studios where the lighting conditions change the [PROGRAM AE] settings, or bring your camcorder while is flashing quickly. • flashes slowly if white balance could not be adjusted according to the ambient light. 1 Touch [ONE PUSH]. ...
Operating Guide
Page 45
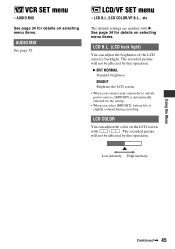
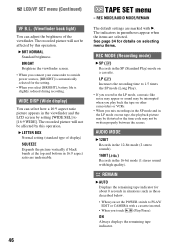
... by this operation. B BRT NORMAL Standard brightness. BRIGHT Brightens the LCD screen. • When you connect your camcorder to outside power sources, [BRIGHT] is automatically selected for the setting. • When you select [BRIGHT], battery life is slightly reduced during recording. LCD B.L./LCD COLOR/VF B.L., etc The default settings are marked with...
... by this operation. B BRT NORMAL Standard brightness. BRIGHT Brightens the LCD screen. • When you connect your camcorder to outside power sources, [BRIGHT] is automatically selected for the setting. • When you select [BRIGHT], battery life is slightly reduced during recording. LCD B.L./LCD COLOR/VF B.L., etc The default settings are marked with...
Operating Guide
Page 46
...details on one tape, the playback picture may be distorted or the time code may be interrupted when you play back the tape on other camcorders or VCRs. • When you set the POWER switch to PLAY/ EDIT or CAMERA with B. REMAIN B AUTO Displays the remaining tape..., [BRIGHT] is slightly reduced during recording. BRIGHT Brightens the viewfinder screen. • When you connect your camcorder to 1.5 times the SP mode (Long Play). • If you select [BRIGHT], battery life is automatically selected for about 8 seconds in situations such as those described below. • When you ...
...details on one tape, the playback picture may be distorted or the time code may be interrupted when you play back the tape on other camcorders or VCRs. • When you set the POWER switch to PLAY/ EDIT or CAMERA with B. REMAIN B AUTO Displays the remaining tape..., [BRIGHT] is slightly reduced during recording. BRIGHT Brightens the viewfinder screen. • When you connect your camcorder to 1.5 times the SP mode (Long Play). • If you select [BRIGHT], battery life is automatically selected for about 8 seconds in situations such as those described below. • When you ...
Operating Guide
Page 54
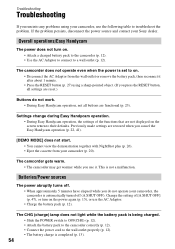
... • Disconnect the AC Adaptor from your Sony dealer. Settings change during Easy Handycam operation. • During Easy Handycam operation, the settings of [A.SHUT OFF] (p. 47), or turn on the screen return to a wall outlet (p. 12). Batteries/Power sources The power abruptly turns off. &#...When approximately 5 minutes have elapsed while you do not work. • During Easy Handycam operation, not all buttons are not displayed on . • Attach a charged battery pack to the camcorder (p. 12). • Use the AC Adaptor to connect to their defaults. Troubleshooting Troubleshooting...
... • Disconnect the AC Adaptor from your Sony dealer. Settings change during Easy Handycam operation. • During Easy Handycam operation, the settings of [A.SHUT OFF] (p. 47), or turn on the screen return to a wall outlet (p. 12). Batteries/Power sources The power abruptly turns off. &#...When approximately 5 minutes have elapsed while you do not work. • During Easy Handycam operation, not all buttons are not displayed on . • Attach a charged battery pack to the camcorder (p. 12). • Use the AC Adaptor to connect to their defaults. Troubleshooting Troubleshooting...
Operating Guide
Page 55
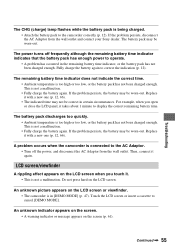
..., when you touch it. • This is being charged. • Attach the battery pack to display the correct remaining battery time. A problem occurs when the camcorder is too high or too low, or the battery pack has not been charged enough. Touch the LCD screen or insert a cassette to ...power, and disconnect the AC Adaptor from the wall outlet and contact your Sony dealer. An unknown indicator appears on the screen. • A warning indicator or message appears on the LCD screen. Fully charge the battery again to cancel [DEMO MODE]. This is in certain circumstances. If ...
..., when you touch it. • This is being charged. • Attach the battery pack to display the correct remaining battery time. A problem occurs when the camcorder is too high or too low, or the battery pack has not been charged enough. Touch the LCD screen or insert a cassette to ...power, and disconnect the AC Adaptor from the wall outlet and contact your Sony dealer. An unknown indicator appears on the screen. • A warning indicator or message appears on the LCD screen. Fully charge the battery again to cancel [DEMO MODE]. This is in certain circumstances. If ...
Operating Guide
Page 56
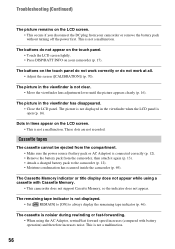
... noisier during rewinding or fast-forwarding. • When using a cassette with battery operation) and therefore increases noise. Troubleshooting (Continued) The picture remains on your camcorder or remove the battery pack without turning off the power first. The picture in the viewfinder when the...adjustment lever until the picture appears clearly (p. 16). Cassette tapes The cassette cannot be ejected from the camcorder, then attach it again (p. 13). • Attach a charged battery pack to always display the remaining tape indicator (p. 46). The buttons on the LCD screen. •...
... noisier during rewinding or fast-forwarding. • When using a cassette with battery operation) and therefore increases noise. Troubleshooting (Continued) The picture remains on your camcorder or remove the battery pack without turning off the power first. The picture in the viewfinder when the...adjustment lever until the picture appears clearly (p. 16). Cassette tapes The cassette cannot be ejected from the camcorder, then attach it again (p. 13). • Attach a charged battery pack to always display the remaining tape indicator (p. 46). The buttons on the LCD screen. •...
Operating Guide
Page 61
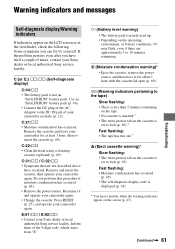
...Do not perform this procedure if moisture condensation has occurred (p. 69). • Remove the power source. Inform them of your camcorder securely (p. 12). E (Battery level warning) • The battery pack is nearly used up. • Depending on the cassette is displayed (p. 61). * You hear a melody when the... even after you can fix by yourself. Press RESET (p. 27), and operate your Sony dealer or local authorized Sony service facility. C:(or E:) ss:ss (Self-diagnosis display) C:04:ss • The battery pack is set to the tape) Slow flashing: • There is less than ...
...Do not perform this procedure if moisture condensation has occurred (p. 69). • Remove the power source. Inform them of your camcorder securely (p. 12). E (Battery level warning) • The battery pack is nearly used up. • Depending on the cassette is displayed (p. 61). * You hear a melody when the... even after you can fix by yourself. Press RESET (p. 27), and operate your Sony dealer or local authorized Sony service facility. C:(or E:) ss:ss (Self-diagnosis display) C:04:ss • The battery pack is set to the tape) Slow flashing: • There is less than ...
Operating Guide
Page 66
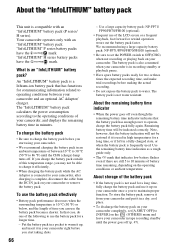
... dry, cool place. • To discharge the battery pack on your camcorder completely, set the POWER switch to the operating conditions of between your camcorder in recording standby or playback pause. • Have spare battery packs ready for communicating information related to operating conditions ... lithium-ion battery pack that indicates low battery flashes even if there are still 5 to operate, charge the battery pack fully again. To store the battery pack, remove it from the DC IN jack on your camcorder is an "InfoLITHIUM" battery pack? Remaining battery time will ...
... dry, cool place. • To discharge the battery pack on your camcorder completely, set the POWER switch to the operating conditions of between your camcorder in recording standby or playback pause. • Have spare battery packs ready for communicating information related to operating conditions ... lithium-ion battery pack that indicates low battery flashes even if there are still 5 to operate, charge the battery pack fully again. To store the battery pack, remove it from the DC IN jack on your camcorder is an "InfoLITHIUM" battery pack? Remaining battery time will ...
Operating Guide
Page 68
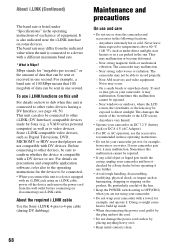
... parked in these operating instructions. • Do not let your camcorder on DC 7.2 V (battery pack) or DC 8.4 V (AC Adaptor). • For DC or AC operation, use the accessories recommended in the sun. To use or store the camcorder and accessories in the operating instructions of each piece of equipment. ... (Continued) The baud rate is listed under direct sunlight, near the i.LINK interface on some devices. About the required i.LINK cable Use the Sony i.LINK 4-pin-to-4-pin cable (during DV dubbing). 68 Maintenance and precautions On use and care • Do not use i.LINK functions on...
... parked in these operating instructions. • Do not let your camcorder on DC 7.2 V (battery pack) or DC 8.4 V (AC Adaptor). • For DC or AC operation, use the accessories recommended in the sun. To use or store the camcorder and accessories in the operating instructions of each piece of equipment. ... (Continued) The baud rate is listed under direct sunlight, near the i.LINK interface on some devices. About the required i.LINK cable Use the Sony i.LINK 4-pin-to-4-pin cable (during DV dubbing). 68 Maintenance and precautions On use and care • Do not use i.LINK functions on...
Operating Guide
Page 69
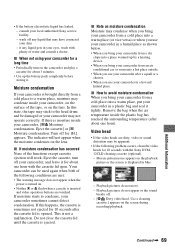
...for about one hour with plenty of the following problem occurs, clean the video heads for about 3 minutes. • Use up the battery pack completely before storing it. x If moisture condensation has occurred None of the tape, or on the surface of the functions except ...cassette ejection will not appear when the moisture condenses on the camcorder and play a cassette for 10 seconds with the Sony DVM12CLD cleaning cassette (optional). - x Note on . • Neither % or Z flash when a cassette is sometimes not ejected ...
...for about one hour with plenty of the following problem occurs, clean the video heads for about 3 minutes. • Use up the battery pack completely before storing it. x If moisture condensation has occurred None of the tape, or on the surface of the functions except ...cassette ejection will not appear when the moisture condenses on the camcorder and play a cassette for 10 seconds with the Sony DVM12CLD cleaning cassette (optional). - x Note on . • Neither % or Z flash when a cassette is sometimes not ejected ...

