
Operating Instructions
Page 48
...The socket-outlet should be installed near the equipment and be used in accordance with Part 15 of Conformity Trade Name: SONY Model: FWD-50PX3 Responsible Party: Sony Electronics Inc. The Authorized Representative for EMC and product safety is no guarantee that may fall. For any interference received, ... LOCAL RULES. This apparatus shall not be easily accessible. On transportation When you call ; If you fail to do so, the speakers may come out of this product is subject to radio communications. If you may cause harmful interference to the following measures: •...
...The socket-outlet should be installed near the equipment and be used in accordance with Part 15 of Conformity Trade Name: SONY Model: FWD-50PX3 Responsible Party: Sony Electronics Inc. The Authorized Representative for EMC and product safety is no guarantee that may fall. For any interference received, ... LOCAL RULES. This apparatus shall not be easily accessible. On transportation When you call ; If you fail to do so, the speakers may come out of this product is subject to radio communications. If you may cause harmful interference to the following measures: •...
Operating Instructions
Page 49
Table of Contents Introduction Precautions ...4 Recommendations on Installation 6 Location and Function of Parts and Controls Front Panel...7 Side Panel...8 Optional Adaptors ...10 Rear Panel ...11 Remote Control ...12 Button Description...12 Special Buttons on the Remote Control 14 GB Using the Wide Mode...14 ...Using the PAP Setting 15 Using the ID MODE button 16 Connections Connecting the Speakers...17 Connecting the AC Power Cord 17 Cable ...
Table of Contents Introduction Precautions ...4 Recommendations on Installation 6 Location and Function of Parts and Controls Front Panel...7 Side Panel...8 Optional Adaptors ...10 Rear Panel ...11 Remote Control ...12 Button Description...12 Special Buttons on the Remote Control 14 GB Using the Wide Mode...14 ...Using the PAP Setting 15 Using the ID MODE button 16 Connections Connecting the Speakers...17 Connecting the AC Power Cord 17 Cable ...

Operating Instructions
Page 52
... When moving or installing the display when it has entered standby mode. Actual installation is attached to the stand (not supplied), do so with qualified Sony personnel for installation. • While the display is powered on , a certain amount of heat builds up to the authorized local dealers. Avoid touching the top...; The ambient temperature must be 0 °C to 35 °C (32 °F to 95 °F). • When using the stand, make sure you cannot use the speakers SS-SP50FW (not supplied). • Be sure to use only the UL listed wall mount bracket to mount the display.
... When moving or installing the display when it has entered standby mode. Actual installation is attached to the stand (not supplied), do so with qualified Sony personnel for installation. • While the display is powered on , a certain amount of heat builds up to the authorized local dealers. Avoid touching the top...; The ambient temperature must be 0 °C to 35 °C (32 °F to 95 °F). • When using the stand, make sure you cannot use the speakers SS-SP50FW (not supplied). • Be sure to use only the UL listed wall mount bracket to mount the display.
Operating Instructions
Page 53
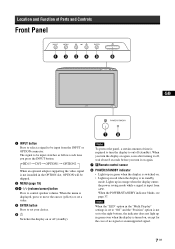
...the power saving mode while a signal is input from the INPUT or OPTION connector. The signal to control speaker volume. Note When the "LED" option in the "Multi Display" settings is set to "Off" ... light up in red when the display is turned on, except for the case of Parts and Controls Front Panel GB 1 INPUT button Press to select a signal to turn it off, wait about 8 seconds before you... the display is in green when the display is switched on /off (standby). Note To protect the panel, a certain amount of time is required to be input switches as follows each time you turn the ...
...the power saving mode while a signal is input from the INPUT or OPTION connector. The signal to control speaker volume. Note When the "LED" option in the "Multi Display" settings is set to "Off" ... light up in red when the display is turned on, except for the case of Parts and Controls Front Panel GB 1 INPUT button Press to select a signal to turn it off, wait about 8 seconds before you... the display is in green when the display is switched on /off (standby). Note To protect the panel, a certain amount of time is required to be input switches as follows each time you turn the ...

Operating Instructions
Page 57
...came with a greater sense of presence. Please be sure to install the display stand SU-50FW (not supplied). 11 GB Rear Panel GB Parts 1 AC IN socket 2 SPEAKER socket 3 Stand installation hooks Description Connect the supplied AC power cord to this socket, you connect the AC power cord, the...indicator lights up in red and the display goes into the standby mode. For details on connecting the speakers, see page 18. Use these hooks to connect the speakers correctly. By connecting the speakers SS-SP50FW (not supplied) to this socket and to a wall outlet. Once you can output ...
...came with a greater sense of presence. Please be sure to install the display stand SU-50FW (not supplied). 11 GB Rear Panel GB Parts 1 AC IN socket 2 SPEAKER socket 3 Stand installation hooks Description Connect the supplied AC power cord to this socket, you connect the AC power cord, the...indicator lights up in red and the display goes into the standby mode. For details on connecting the speakers, see page 18. Use these hooks to connect the speakers correctly. By connecting the speakers SS-SP50FW (not supplied) to this socket and to a wall outlet. Once you can output ...
Operating Instructions
Page 63
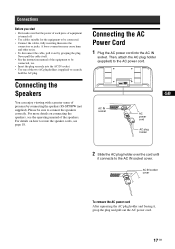
... piece of equipment is turned off. • Use cables suitable for the equipment to the AC power cord. Connecting the Speakers You can enjoy viewing with a greater sense of the speakers. AC IN socket cover To remove the AC power cord After squeezing the AC plug holder and freeing it connects to... route the speaker cords, see the operating manual of presence by grasping the plug. For details on connecting the speakers, see page 18. AC IN socket GB AC power cord AC plug holder 2 Slide the AC plug...
... piece of equipment is turned off. • Use cables suitable for the equipment to the AC power cord. Connecting the Speakers You can enjoy viewing with a greater sense of the speakers. AC IN socket cover To remove the AC power cord After squeezing the AC plug holder and freeing it connects to... route the speaker cords, see the operating manual of presence by grasping the plug. For details on connecting the speakers, see page 18. AC IN socket GB AC power cord AC plug holder 2 Slide the AC plug...
Operating Instructions
Page 66
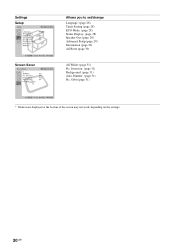
Orbit (page 31) * Menu icons displayed at the bottom of the screen may not work, depending on the settings. 20 GB Inversion: (page 31) Background: (page 31) Auto Dimmer: (page 31) Pic. Settings Setup Screen Saver Allows you to set/change Language: (page 28) Timer Setting (page 28) ECO Mode: (page 28) Status Display: (page 28) Speaker Out: (page 28) Advanced Setup (page 29) Information (page 30) All Reset (page 30) All White: (page 31) Pic.
Orbit (page 31) * Menu icons displayed at the bottom of the screen may not work, depending on the settings. 20 GB Inversion: (page 31) Background: (page 31) Auto Dimmer: (page 31) Pic. Settings Setup Screen Saver Allows you to set/change Language: (page 28) Timer Setting (page 28) ECO Mode: (page 28) Status Display: (page 28) Speaker Out: (page 28) Advanced Setup (page 29) Information (page 30) All Reset (page 30) All White: (page 31) Pic.
Operating Instructions
Page 68
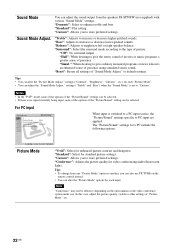
..."Brightness", "Chroma ", etc.) for each input. "Standard": Select for video conferencing under use. "Dynamic": Select to emphasize left or right speaker balance. "Surround": Select the surround mode according to give ordinary monaural programs or news telecasts an enhanced sense of presence. "Hall": When desiring... you can also use PICTURE on the environment or the video conference system under fluorescent lights. Tips • To change from the speakers SS-SP50FW (not supplied) with various "Sound Mode" settings. Tips • You can alter the "Picture Mode Adjust." Sound ...
..."Brightness", "Chroma ", etc.) for each input. "Standard": Select for video conferencing under use. "Dynamic": Select to emphasize left or right speaker balance. "Surround": Select the surround mode according to give ordinary monaural programs or news telecasts an enhanced sense of presence. "Hall": When desiring... you can also use PICTURE on the environment or the video conference system under fluorescent lights. Tips • To change from the speakers SS-SP50FW (not supplied) with various "Sound Mode" settings. Tips • You can alter the "Picture Mode Adjust." Sound ...
Operating Instructions
Page 69
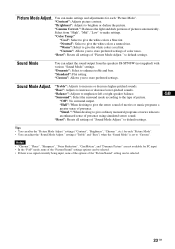
"Contrast": Adjusts picture contrast. "Brightness": Adjusts to enhance treble and bass. Select from the speakers SS-SP50FW (not supplied) with various "Sound Mode" settings. "Color Temp." "Dynamic": Select to brighten or darken the picture. "Bass": Adjusts to...color tones. "Custom": Allows you to give the stereo sound of movies or music programs a greater sense of pictures automatically. to emphasize left or right speaker balance. "Balance": Adjusts to default settings. Picture Mode Adjust. You can make settings. "Cool": Select to the type of "Picture Mode Adjust." ...
"Contrast": Adjusts picture contrast. "Brightness": Adjusts to enhance treble and bass. Select from the speakers SS-SP50FW (not supplied) with various "Sound Mode" settings. "Color Temp." "Dynamic": Select to brighten or darken the picture. "Bass": Adjusts to...color tones. "Custom": Allows you to give the stereo sound of movies or music programs a greater sense of pictures automatically. to emphasize left or right speaker balance. "Balance": Adjusts to default settings. Picture Mode Adjust. You can make settings. "Cool": Select to the type of "Picture Mode Adjust." ...
Operating Instructions
Page 74
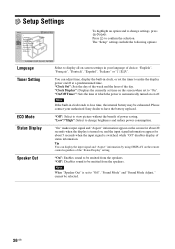
...-in clock tends to lose time, the internal battery may be selected. 28 GB Tip You can adjust time, display the built-in your authorized Sony dealer to display all on-screen settings in clock, or set the timer to make the display power on/off at which the power is... for about 20 seconds when the display is automatically turned on the screen when set to "Off", "Sound Mode" and "Sound Mode Adjust." Note When "Speaker Out" is switched, while "Off" disables display of the day. Setup Settings To highlight an option and to change brightness and reduce power consumption. You...
...-in clock tends to lose time, the internal battery may be selected. 28 GB Tip You can adjust time, display the built-in your authorized Sony dealer to display all on-screen settings in clock, or set the timer to make the display power on/off at which the power is... for about 20 seconds when the display is automatically turned on the screen when set to "Off", "Sound Mode" and "Sound Mode Adjust." Note When "Speaker Out" is switched, while "Off" disables display of the day. Setup Settings To highlight an option and to change brightness and reduce power consumption. You...

Operating Instructions
Page 83
..."Picture Mode" (page 12). • Adjust the "Picture Mode" options in the table below. 2 If the problem still persists, have your dealer or Sony service center of how the indicator flashes (the number of flashes and the duration of the display, or the remote control (page 7, 12). No color... 31). • Check the condition of the display. • Keep the remote control sensor area clear from the screen (page 13). • Check "Speaker Out" settings (page 28). No picture. When it is flashing The self-diagnosis function is flashing red. try turning off the fluorescent lamps.
..."Picture Mode" (page 12). • Adjust the "Picture Mode" options in the table below. 2 If the problem still persists, have your dealer or Sony service center of how the indicator flashes (the number of flashes and the duration of the display, or the remote control (page 7, 12). No color... 31). • Check the condition of the display. • Keep the remote control sensor area clear from the screen (page 13). • Check "Speaker Out" settings (page 28). No picture. When it is flashing The self-diagnosis function is flashing red. try turning off the fluorescent lamps.
Operating Instructions
Page 89
..., 24 Setup screen 35 Setup Settings 20, 28 Sharpness 21 SNMP 36 Sound Mode Adjust. 19, 22, 23 Sound Mode 19, 22, 23 Speaker Out 20, 28 SPEAKER socket 11 Speed Setup 30 Stand installation hooks 11 Standard 21, 22, 23 STANDBY button 13 Status Display 20, 28 Status Report 35 Surround...
..., 24 Setup screen 35 Setup Settings 20, 28 Sharpness 21 SNMP 36 Sound Mode Adjust. 19, 22, 23 Sound Mode 19, 22, 23 Speaker Out 20, 28 SPEAKER socket 11 Speed Setup 30 Stand installation hooks 11 Standard 21, 22, 23 STANDBY button 13 Status Display 20, 28 Status Report 35 Surround...

Operating Instructions
Page 284
设定 Setup Screen Saver Language 28 页) Timer Setting 28 页) ECO Mode 28 页) Status Display 28 页) Speaker Out 28 页) Advanced Setup 29 页) Information 30 页) All Reset 30 页) All White 31 页) Pic. Orbit 31 页) 20 CS Inversion 31 页) Background 31 页) Auto Dimmer 31 页) Pic.
设定 Setup Screen Saver Language 28 页) Timer Setting 28 页) ECO Mode 28 页) Status Display 28 页) Speaker Out 28 页) Advanced Setup 29 页) Information 30 页) All Reset 30 页) All White 31 页) Pic. Orbit 31 页) 20 CS Inversion 31 页) Background 31 页) Auto Dimmer 31 页) Pic.
Operating Instructions
Page 292
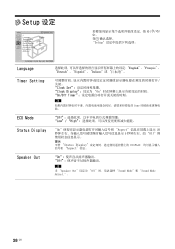
Setup 设定 F/f/G/ g。 Setup Language Timer Setting ECO Mode Status Display Speaker Out English"、"Français"、 "Deutsch"、"Español"、"Italiano"或 " "。 Clock Set Clock Display On On/Off Timer 注 Sony "Off Low"/ "High "On Aspect 20 5 Off Status Display DISPLAY Aspect"信息。 "On Off 注 当 "Speaker Out"设定为 "Off Sound Mode"和 "Sound Mode Adjust."。 28 CS
Setup 设定 F/f/G/ g。 Setup Language Timer Setting ECO Mode Status Display Speaker Out English"、"Français"、 "Deutsch"、"Español"、"Italiano"或 " "。 Clock Set Clock Display On On/Off Timer 注 Sony "Off Low"/ "High "On Aspect 20 5 Off Status Display DISPLAY Aspect"信息。 "On Off 注 当 "Speaker Out"设定为 "Off Sound Mode"和 "Sound Mode Adjust."。 28 CS

Operating Instructions
Page 301
...;障排除 检查 POWER/STANDBY 闪烁时 1 检查 POWER/STANDBY 2 3 2 次。 2 1 Sony 1 2 问题 Control Setting"(第 29 页)。 HD15 Signal 30 INPUT 7、12 页)。 •...12290; 35°C。 + 使 Muting (第 13 页)。 • 检查 "Speaker Out 28 页)。 Control Setting"(第 29 CONTROL S IN CONTROL S 37 CS
...;障排除 检查 POWER/STANDBY 闪烁时 1 检查 POWER/STANDBY 2 3 2 次。 2 1 Sony 1 2 问题 Control Setting"(第 29 页)。 HD15 Signal 30 INPUT 7、12 页)。 •...12290; 35°C。 + 使 Muting (第 13 页)。 • 检查 "Speaker Out 28 页)。 Control Setting"(第 29 CONTROL S IN CONTROL S 37 CS

Operating Instructions
Page 307
...; 20, 28 Setup 35 Sharpness 21 39 SNMP 36 Sound Mode Adjust 调整) 19, 22, 23 Sound Mode 19, 21, 23 SPEAKER 插座 11 Speaker Out 20, 28 Speed Setup 30 Standard 21, 22, 23 STANDBY 键 13 Status Display 20, 28 Status Report 35 Surround 22, 23 Swap...
...; 20, 28 Setup 35 Sharpness 21 39 SNMP 36 Sound Mode Adjust 调整) 19, 22, 23 Sound Mode 19, 21, 23 SPEAKER 插座 11 Speaker Out 20, 28 Speed Setup 30 Standard 21, 22, 23 STANDBY 键 13 Status Display 20, 28 Status Report 35 Surround 22, 23 Swap...

