Operating Instructions
Page 2
...energy and, if not installed and used in this manual could void your Sony dealer regarding this product, you may cause undesired operation. If you carry the display unit, hold the unit itself, not the speakers. Address: 16450 W. Bernardo Dr, San Diego, CA 92127 U.S.A. This ...het einde van de levensduur in Canada This class B digital apparatus complies with Part 15 of Conformity Trade Name: SONY Model: FWD-40LX1/32LX1R Responsible Party: Sony Electronics Inc. NL The socket-outlet should be installed near the equipment and be determined by turning the equipment off ...
...energy and, if not installed and used in this manual could void your Sony dealer regarding this product, you may cause undesired operation. If you carry the display unit, hold the unit itself, not the speakers. Address: 16450 W. Bernardo Dr, San Diego, CA 92127 U.S.A. This ...het einde van de levensduur in Canada This class B digital apparatus complies with Part 15 of Conformity Trade Name: SONY Model: FWD-40LX1/32LX1R Responsible Party: Sony Electronics Inc. NL The socket-outlet should be installed near the equipment and be determined by turning the equipment off ...
Operating Instructions
Page 3
... 7 (GB) Front / Rear / Side 7 (GB) Indicator Section 8 (GB) Control Button Section (Top 8 (GB) Connector Panel 9 (GB) Remote Commander RM-980 11 (GB) Caution 13 (GB) Connections 14 (GB) Connecting the Speakers 14 (GB) Connecting the AC Power Cord 14 (GB) Cable management 15 (GB) Using On-screen Menus 16... (GB) Operating Through Menus 16 (GB) Menu Guide 16 (GB) GB Watching the Picture 21 (GB) Switching the Input Signal 21 (GB) Input Signal, Picture Mode and Display Status...
... 7 (GB) Front / Rear / Side 7 (GB) Indicator Section 8 (GB) Control Button Section (Top 8 (GB) Connector Panel 9 (GB) Remote Commander RM-980 11 (GB) Caution 13 (GB) Connections 14 (GB) Connecting the Speakers 14 (GB) Connecting the AC Power Cord 14 (GB) Cable management 15 (GB) Using On-screen Menus 16... (GB) Operating Through Menus 16 (GB) Menu Guide 16 (GB) GB Watching the Picture 21 (GB) Switching the Input Signal 21 (GB) Input Signal, Picture Mode and Display Status...
Operating Instructions
Page 7
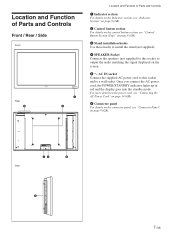
...). 6 Connector panel For details on the connector panel, see "Control Button Section (Top)" on page 8 (GB). 3 Stand installation hooks Use these hooks to install the stand (not supplied). 4 SPEAKER Socket Connects the speakers (not supplied) to this socket and to output the audio matching the signal displayed on page 9... Indicator section, see "Indicator Section" on page 8 (GB). 2 Control button section For details on the control button section, see "Connector Panel" on the screen. 5 - AC IN socket Connect the supplied AC power cord to this socket to a wall outlet. Once you connect ...
...). 6 Connector panel For details on the connector panel, see "Control Button Section (Top)" on page 8 (GB). 3 Stand installation hooks Use these hooks to install the stand (not supplied). 4 SPEAKER Socket Connects the speakers (not supplied) to this socket and to output the audio matching the signal displayed on page 9... Indicator section, see "Indicator Section" on page 8 (GB). 2 Control button section For details on the control button section, see "Connector Panel" on the screen. 5 - AC IN socket Connect the supplied AC power cord to this socket to a wall outlet. Once you connect ...
Operating Instructions
Page 8
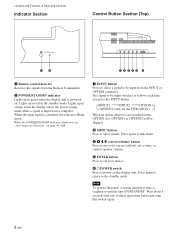
... ON/STANDBY. Note To protect the panel, a certain amount of time is switched, the indicator blinks green. Lights up in orange when the display enters the power saving mode while a...speaker volume. 5 ENTER button Press to set your choice. 6 1POWER switch Press to power on page 41 (GB). 1 INPUT button Press to select a signal to the standby mode. INPUT1 INPUT2 OPTION1 OPTION2 (only for the FWD-40LX1...) When an option adaptor is powered on. When the POWER/STANDBY indicator blinks red, see "Self-diagnosis Function" on the display unit. Location and ...
... ON/STANDBY. Note To protect the panel, a certain amount of time is switched, the indicator blinks green. Lights up in orange when the display enters the power saving mode while a...speaker volume. 5 ENTER button Press to set your choice. 6 1POWER switch Press to power on page 41 (GB). 1 INPUT button Press to select a signal to the standby mode. INPUT1 INPUT2 OPTION1 OPTION2 (only for the FWD-40LX1...) When an option adaptor is powered on. When the POWER/STANDBY indicator blinks red, see "Self-diagnosis Function" on the display unit. Location and ...

Operating Instructions
Page 13
.... This will allow for installation. • While the unit is on or just after it is more space around the display • When you cannot use the display stand SU-42FW/32FW (not supplied) as a stand. • Regarding the installation of hardware such as brackets, screws...there is powered on , a certain amount of heat builds up to 95 °F). • When installing the display horizontally, use the speakers SS-SP40FW/32FW (not supplied). 13 (GB) Consult with qualified Sony personnel for proper ventilation. • The ambient temperature must be 0 °C to +35 °C (32...
.... This will allow for installation. • While the unit is on or just after it is more space around the display • When you cannot use the display stand SU-42FW/32FW (not supplied) as a stand. • Regarding the installation of hardware such as brackets, screws...there is powered on , a certain amount of heat builds up to 95 °F). • When installing the display horizontally, use the speakers SS-SP40FW/32FW (not supplied). 13 (GB) Consult with qualified Sony personnel for proper ventilation. • The ambient temperature must be 0 °C to +35 °C (32...
Operating Instructions
Page 14
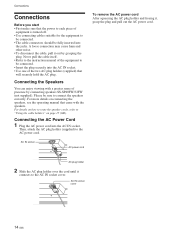
... make sure that the power to each piece of presence by grasping the plug. AC IN socket cover 14 (GB) Connecting the Speakers You can enjoy viewing with the speakers. Connecting the AC Power Cord 1 Plug the AC power cord into the jacks. Then, attach the AC plug holder (supplied) to the... (GB). AC IN socket AC power cord To remove the AC power cord After squeezing the AC plug holder and freeing it out by connecting speakers SS-SP40FW/32FW (not supplied). AC plug holder 2 Slide the AC plug holder over the cord until it connects to the AC power cord...
... make sure that the power to each piece of presence by grasping the plug. AC IN socket cover 14 (GB) Connecting the Speakers You can enjoy viewing with the speakers. Connecting the AC Power Cord 1 Plug the AC power cord into the jacks. Then, attach the AC plug holder (supplied) to the... (GB). AC IN socket AC power cord To remove the AC power cord After squeezing the AC plug holder and freeing it out by connecting speakers SS-SP40FW/32FW (not supplied). AC plug holder 2 Slide the AC plug holder over the cord until it connects to the AC power cord...
Operating Instructions
Page 15
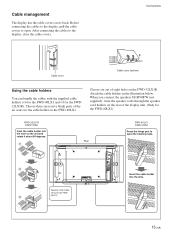
...;6 for the FWD-40LX1 and ×4 for the cable holder on the FWD-40LX1. After connecting the cables to open the hooking nails. 2 Speaker cord holder (Only for the FWD-40LX1) FWD-32LX1R Cable holder Inset the cable holder into the hole on the rear of the air vents for the FWD32LX1R). Cable management The display has the cable...
...;6 for the FWD-40LX1 and ×4 for the cable holder on the FWD-40LX1. After connecting the cables to open the hooking nails. 2 Speaker cord holder (Only for the FWD-40LX1) FWD-32LX1R Cable holder Inset the cable holder into the hole on the rear of the air vents for the FWD32LX1R). Cable management The display has the cable...
Operating Instructions
Page 18
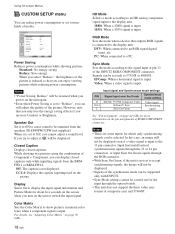
... you power on the unit again. • Even when Power Saving is set only to 575/50I or 480/60I. Speaker Out Set it is connected to the display unit. Notes • There are some inputs for about five seconds on the screen when you can enjoy viewing pictures while... reducing power consumption. CUSTOM SETUP Power Saving: Speaker Out: Closed Caption: Display: Color Matrix HD Mode: RGB Mode Sync Mode: Illumination: Remote Standard Off Off Off 1080i H/Comp High Select Set ENTER Exit MENU...
... you power on the unit again. • Even when Power Saving is set only to 575/50I or 480/60I. Speaker Out Set it is connected to the display unit. Notes • There are some inputs for about five seconds on the screen when you can enjoy viewing pictures while... reducing power consumption. CUSTOM SETUP Power Saving: Speaker Out: Closed Caption: Display: Color Matrix HD Mode: RGB Mode Sync Mode: Illumination: Remote Standard Off Off Off 1080i H/Comp High Select Set ENTER Exit MENU...
Operating Instructions
Page 22
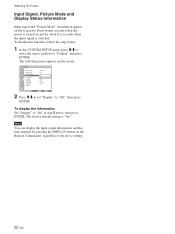
...Speaker Out: Closed Caption: Display: Color Matrix: HD Mode: RGB Mode: Sync Mode: Illumination: Remote Standard Off Off Off YO/nPB/PR 1080i DTV H/Comp High Select Set ENTER Exit MENU 2 Press M/m to set "Display" to "Display" and press ENTER. Watching the Picture Input Signal, Picture Mode and Display... SETUP menu, press M/m to move the cursor (yellow) to "Off," then press ENTER. The factory default setting is switched. To display the information Set "Display" to "On" in step 2 above setting. 22 (GB) The following menu appears on and for about five seconds when the input...
...Speaker Out: Closed Caption: Display: Color Matrix: HD Mode: RGB Mode: Sync Mode: Illumination: Remote Standard Off Off Off YO/nPB/PR 1080i DTV H/Comp High Select Set ENTER Exit MENU 2 Press M/m to set "Display" to "Display" and press ENTER. Watching the Picture Input Signal, Picture Mode and Display... SETUP menu, press M/m to move the cursor (yellow) to "Off," then press ENTER. The factory default setting is switched. To display the information Set "Display" to "On" in step 2 above setting. 22 (GB) The following menu appears on and for about five seconds when the input...

Operating Instructions
Page 35
Adjusting the Treble, Bass, and Balance, etc. Adjust the treble with M/m and press ENTER. Set the "Picture Mode" to show the main menu and adjust "Treble," "Bass," "Balance," or "Surround" from the Adjust Sound menu. Treble Select "Treble" with M/m/ Press MENU to any of the speaker (left and right) volume. Adjusting the Sound Quality When a speaker SS-SP40FW/32FW (not supplied) installed, you can also be set. The surround mode can adjust sound treble level, bass level, or balance of "User1" - "User3."
Adjusting the Treble, Bass, and Balance, etc. Adjust the treble with M/m and press ENTER. Set the "Picture Mode" to show the main menu and adjust "Treble," "Bass," "Balance," or "Surround" from the Adjust Sound menu. Treble Select "Treble" with M/m/ Press MENU to any of the speaker (left and right) volume. Adjusting the Sound Quality When a speaker SS-SP40FW/32FW (not supplied) installed, you can also be set. The surround mode can adjust sound treble level, bass level, or balance of "User1" - "User3."
Operating Instructions
Page 36
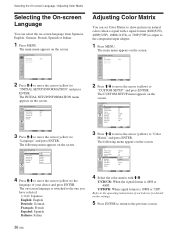
... appears on the settings. 5 Press ENTER to return to show pictures in natural colors when a signal with M/m. CUSTOM SETUP Power Saving: Speaker Out: Closed Caption: Display: Color Matrix: HD Mode: RGB Mode: Sync Mode: Illumination: Remote Standard Off Off Off Y/PCB/PCR 1Y0/P8B0i/PR DTV H/Comp... Select Set ENTER Exit MENU 4 Press M/m to move the cursor (yellow) to "Language" and press ENTER. CUSTOM SETUP Power Saving: Speaker Out: Closed Caption: Display: Color Matrix: HD Mode: RGB Mode: Sync Mode: Illumination: Remote Standard Off Off Off Y/PB/PR 1080i DTV H/Comp High Select ...
... appears on the settings. 5 Press ENTER to return to show pictures in natural colors when a signal with M/m. CUSTOM SETUP Power Saving: Speaker Out: Closed Caption: Display: Color Matrix: HD Mode: RGB Mode: Sync Mode: Illumination: Remote Standard Off Off Off Y/PCB/PCR 1Y0/P8B0i/PR DTV H/Comp... Select Set ENTER Exit MENU 4 Press M/m to move the cursor (yellow) to "Language" and press ENTER. CUSTOM SETUP Power Saving: Speaker Out: Closed Caption: Display: Color Matrix: HD Mode: RGB Mode: Sync Mode: Illumination: Remote Standard Off Off Off Y/PB/PR 1080i DTV H/Comp High Select ...
Operating Instructions
Page 42
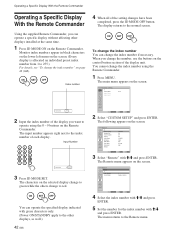
...at the same time. 1 Press ID MODE ON on the Remote Commander. The following appears on the screen. CUSTOM SETUP Power Saving: Speaker Out: Closed Caption: Display: Color Matrix: HD Mode: RGB Mode: Sync Mode: Illumination: Remote Standard Off Off Off Y/PB/PR 1080i DTV H/Comp High Select...screen. Monitor index numbers appear in black characters on the lower left menu on page 42 (GB). CUSTOM SETUP Remote Index Number: Control Mode: 1 Display + Remote Select Set ENTER Exit MENU 4 Select the index number with M/m and press ENTER. 5 Set the number for the index number with ...
...at the same time. 1 Press ID MODE ON on the Remote Commander. The following appears on the screen. CUSTOM SETUP Power Saving: Speaker Out: Closed Caption: Display: Color Matrix: HD Mode: RGB Mode: Sync Mode: Illumination: Remote Standard Off Off Off Y/PB/PR 1080i DTV H/Comp High Select...screen. Monitor index numbers appear in black characters on the lower left menu on page 42 (GB). CUSTOM SETUP Remote Index Number: Control Mode: 1 Display + Remote Select Set ENTER Exit MENU 4 Select the index number with M/m and press ENTER. 5 Set the number for the index number with ...
Operating Instructions
Page 43
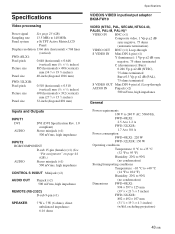
...LCD Panel Display resolution 1366 dots (horizontal) × 768 lines (vertical) FWD-40LX1: Pixel pitch 0.648 (horizontal) × 0.648 (vertical) mm (1⁄32 × 1⁄32 inches) Picture size 885 (horizontal) × 498 (vertical) mm (34 7⁄8 × 19 5⁄8 inches) Panel size 40-inch (diagonal 1016 mm) FWD-32LX1R: Pixel pitch Picture size Panel...215;2) AUDIO OUT Pinjack (×2) 500 mVrms, high impedance REMOTE (RS-232C) D-sub 9-pin (×1) SPEAKER 7 W + 7 W (6 ohms), direct unbalanced impedance: 6-16 ohms Specifications VIDEO/S VIDEO input/output adaptor...
...LCD Panel Display resolution 1366 dots (horizontal) × 768 lines (vertical) FWD-40LX1: Pixel pitch 0.648 (horizontal) × 0.648 (vertical) mm (1⁄32 × 1⁄32 inches) Picture size 885 (horizontal) × 498 (vertical) mm (34 7⁄8 × 19 5⁄8 inches) Panel size 40-inch (diagonal 1016 mm) FWD-32LX1R: Pixel pitch Picture size Panel...215;2) AUDIO OUT Pinjack (×2) 500 mVrms, high impedance REMOTE (RS-232C) D-sub 9-pin (×1) SPEAKER 7 W + 7 W (6 ohms), direct unbalanced impedance: 6-16 ohms Specifications VIDEO/S VIDEO input/output adaptor...
Operating Instructions
Page 44
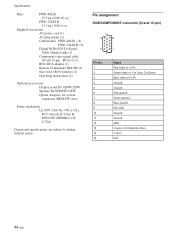
... Composite Video V sync SCL 44 (GB) Specifications Mass FWD-40LX1: 27.5 kg (60 lb 10 oz) FWD-32LX1R: 17.5 kg (38 lb 9 oz) Supplied accessories AC power cord (1) AC plug holder (2) Cable holder FWD-40LX1: (4) FWD-32LX1R: (6) Digital RGB (DVI-D) Signal Cable (Single ...Link) (1) Component video signal cable (D-sub 15-pin - RCA×3) (1) BNC-RCA adaptor (1) Remote Commander RM-980 (1) Size AAA (R03) batteries (2) Operating instructions (1) Optional accessories Display stand SU-42FW/32FW Speaker ...
... Composite Video V sync SCL 44 (GB) Specifications Mass FWD-40LX1: 27.5 kg (60 lb 10 oz) FWD-32LX1R: 17.5 kg (38 lb 9 oz) Supplied accessories AC power cord (1) AC plug holder (2) Cable holder FWD-40LX1: (4) FWD-32LX1R: (6) Digital RGB (DVI-D) Signal Cable (Single ...Link) (1) Component video signal cable (D-sub 15-pin - RCA×3) (1) BNC-RCA adaptor (1) Remote Commander RM-980 (1) Size AAA (R03) batteries (2) Operating instructions (1) Optional accessories Display stand SU-42FW/32FW Speaker ...


